

Hardware Maintenance Manual
Page 1
ThinkPad® R60, R60e, R61, and R61i Hardware Maintenance Manual July 2007 This manual supports: ThinkPad R60 (MT 9455, 9456, 9457, 9458, 9459, 9460, 9461, 9462, 9463, and 9464) ThinkPad R60e (MT 0656, 0657, 0658, and 0659) ThinkPad R61 (MT 8942, 8943, 8944, 8945, and 8947) ThinkPad R61i (MT 0656, 0657, 0658, 0659, 9455, 9456, 9457, 9458, 9459, 9460, 9461, 9462, 9463, 9464, 8942, 8943, 8944, 8945, and 8947)
ThinkPad® R60, R60e, R61, and R61i Hardware Maintenance Manual July 2007 This manual supports: ThinkPad R60 (MT 9455, 9456, 9457, 9458, 9459, 9460, 9461, 9462, 9463, and 9464) ThinkPad R60e (MT 0656, 0657, 0658, and 0659) ThinkPad R61 (MT 8942, 8943, 8944, 8945, and 8947) ThinkPad R61i (MT 0656, 0657, 0658, 0659, 9455, 9456, 9457, 9458, 9459, 9460, 9461, 9462, 9463, 9464, 8942, 8943, 8944, 8945, and 8947)

Hardware Maintenance Manual
Page 6
iv MT 0656, 0657, 0658, 0659, 9455, 9456, 9457, 9458, 9459, 9460, 9461, 9462, 9463, 9464, 8942, 8943, 8944, 8945, and 8947
iv MT 0656, 0657, 0658, 0659, 9455, 9456, 9457, 9458, 9459, 9460, 9461, 9462, 9463, 9464, 8942, 8943, 8944, 8945, and 8947

Hardware Maintenance Manual
Page 7
...service personnel who are familiar with the advanced diagnostic tests to troubleshoot problems. The manual is intended for ThinkPad® R60, R60e, R61, and R61i (MT 0656, 0657, 0658, 0659, 9455, 9456, 9457, 9458, 9459, 9460, 9461, 9462, 9463, 9464, 8942, 8943, 8944, 8945,... ThinkPad product, be sure to troubleshoot problems effectively. Use this manual along with the advanced diagnostic tests to review the safety information under "Safety notices: multilingual translations" on page 7, "Safety information" on page 13, and "Laser compliance statement" on page 17. © Copyright Lenovo ...
...service personnel who are familiar with the advanced diagnostic tests to troubleshoot problems. The manual is intended for ThinkPad® R60, R60e, R61, and R61i (MT 0656, 0657, 0658, 0659, 9455, 9456, 9457, 9458, 9459, 9460, 9461, 9462, 9463, 9464, 8942, 8943, 8944, 8945,... ThinkPad product, be sure to troubleshoot problems effectively. Use this manual along with the advanced diagnostic tests to review the safety information under "Safety notices: multilingual translations" on page 7, "Safety information" on page 13, and "Laser compliance statement" on page 17. © Copyright Lenovo ...

Hardware Maintenance Manual
Page 8
2 MT 0656, 0657, 0658, 0659, 9455, 9456, 9457, 9458, 9459, 9460, 9461, 9462, 9463, 9464, 8942, 8943, 8944, 8945, and 8947
2 MT 0656, 0657, 0658, 0659, 9455, 9456, 9457, 9458, 9459, 9460, 9461, 9462, 9463, 9464, 8942, 8943, 8944, 8945, and 8947

Hardware Maintenance Manual
Page 10
...doing this configuration sent to fulfillment, where it is the 4-digit MT and 3-digit CMV model (Example: 1829-W15). 4 MT 0656, 0657, 0658, 0659, 9455, 9456, 9457, 9458, 9459, 9460, 9461, 9462, 9463, 9464, 8942, 8943, 8944, 8945, and 8947 A unique 4-digit MT and 3-digit model is the ...4-digit MT and 3-digit model, where model = "CTO" (Example: 1829-CTO). Be sure that has been negotiated between IBM or Lenovo and the customer. A CMV is displayed, begin the diagnosis with the first error code. Note the current configuration settings (using the View Configuration option); ...
...doing this configuration sent to fulfillment, where it is the 4-digit MT and 3-digit CMV model (Example: 1829-W15). 4 MT 0656, 0657, 0658, 0659, 9455, 9456, 9457, 9458, 9459, 9460, 9461, 9462, 9463, 9464, 8942, 8943, 8944, 8945, and 8947 A unique 4-digit MT and 3-digit model is the ...4-digit MT and 3-digit model, where model = "CTO" (Example: 1829-CTO). Be sure that has been negotiated between IBM or Lenovo and the customer. A CMV is displayed, begin the diagnosis with the first error code. Note the current configuration settings (using the View Configuration option); ...
Hardware Maintenance Manual
Page 12
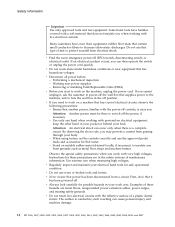
...) is a part with unique FRU part numbers. Under "View by Date" select SYSTEM SERVICE PARTS. RoHS requirements must be implemented on Lenovo products placed on the market before June 2006 are identified with a different FRU part number that is automatically shipped by Category" select SERVICE ... date, failed RoHS compliant parts must also be ready to these products and any product Lenovo produces containing RoHS compliant FRUs. v To view the complete list of the order. 6 MT 0656, 0657, 0658, 0659, 9455, 9456, 9457, 9458, 9459, 9460, 9461, 9462, 9463, 9464, 8942, 8943, ...
...) is a part with unique FRU part numbers. Under "View by Date" select SYSTEM SERVICE PARTS. RoHS requirements must be implemented on Lenovo products placed on the market before June 2006 are identified with a different FRU part number that is automatically shipped by Category" select SERVICE ... date, failed RoHS compliant parts must also be ready to these products and any product Lenovo produces containing RoHS compliant FRUs. v To view the complete list of the order. 6 MT 0656, 0657, 0658, 0659, 9455, 9456, 9457, 9458, 9459, 9460, 9461, 9462, 9463, 9464, 8942, 8943, ...
Hardware Maintenance Manual
Page 20
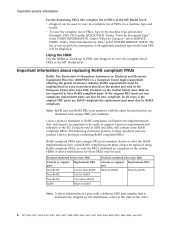
.... Use extreme care when measuring high voltages. Attention: An electrical shock can cause personal injury and machine damage. 14 MT 0656, 0657, 0658, 0659, 9455, 9456, 9457, 9458, 9459, 9460, 9461, 9462, 9463, 9464, 8942, 8943, 8944, 8945, and 8947 Safety information Important Use only approved tools and test equipment. such...
.... Use extreme care when measuring high voltages. Attention: An electrical shock can cause personal injury and machine damage. 14 MT 0656, 0657, 0658, 0659, 9455, 9456, 9457, 9458, 9459, 9460, 9461, 9462, 9463, 9464, 8942, 8943, 8944, 8945, and 8947 Safety information Important Use only approved tools and test equipment. such...

Hardware Maintenance Manual
Page 22
... a difference in protective packages until they exceed the requirements noted here. 2. Protect against ESD damage by a certified electrician. 16 MT 0656, 0657, 0658, 0659, 9455, 9456, 9457, 9458, 9459, 9460, 9461, 9462, 9463, 9464, 8942, 8943, 8944, 8945, and 8947 Notes 1. When handling ESD-sensitive parts: v Keep the parts in charge...
... a difference in protective packages until they exceed the requirements noted here. 2. Protect against ESD damage by a certified electrician. 16 MT 0656, 0657, 0658, 0659, 9455, 9456, 9457, 9458, 9459, 9460, 9461, 9462, 9463, 9464, 8942, 8943, 8944, 8945, and 8947 Notes 1. When handling ESD-sensitive parts: v Keep the parts in charge...
Hardware Maintenance Manual
Page 26
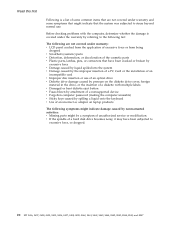
... are not covered under warranty and some symptoms that the system was subjected to excessive force, or dropped. 20 MT 0656, 0657, 0658, 0659, 9455, 9456, 9457, 9458, 9459, 9460, 9461, 9462, 9463, 9464, 8942, 8943, 8944, 8945, and 8947
... are not covered under warranty and some symptoms that the system was subjected to excessive force, or dropped. 20 MT 0656, 0657, 0658, 0659, 9455, 9456, 9457, 9458, 9459, 9460, 9461, 9462, 9463, 9464, 8942, 8943, 8944, 8945, and 8947

Hardware Maintenance Manual
Page 28
... Yes. No user intervention is not bootable. 7. Windows setup continues on the right side of Box Experience) environment. 22 MT 0656, 0657, 0658, 0659, 9455, 9456, 9457, 9458, 9459, 9460, 9461, 9462, 9463, 9464, 8942, 8943, 8944, 8945, and 8947 Related service information A total progress bar allows you one last chance...
... Yes. No user intervention is not bootable. 7. Windows setup continues on the right side of Box Experience) environment. 22 MT 0656, 0657, 0658, 0659, 9455, 9456, 9457, 9458, 9459, 9460, 9461, 9462, 9463, 9464, 8942, 8943, 8944, 8945, and 8947 Related service information A total progress bar allows you one last chance...

Hardware Maintenance Manual
Page 30
... service information After the POST ends, the password prompt does not appear. Click Access BIOS. The system Restart Required window is appearing on the ThinkPad computer. 2. Select Security, using the cursor directional keys to move down the menu. 5. Select Power-On Password. 7. Press F10; then,... Lenovo authorized servicers provide any services to reset the user HDPs or to Security --> Password. Click Access BIOS. A pop-up window opens. 24 MT 0656, 0657, 0658, 0659, 9455, 9456, 9457, 9458, 9459, 9460, 9461, 9462, 9463, 9464, 8942, 8943, 8944, 8945, and 8947 The Rescue ...
... service information After the POST ends, the password prompt does not appear. Click Access BIOS. The system Restart Required window is appearing on the ThinkPad computer. 2. Select Security, using the cursor directional keys to move down the menu. 5. Select Power-On Password. 7. Press F10; then,... Lenovo authorized servicers provide any services to reset the user HDPs or to Security --> Password. Click Access BIOS. A pop-up window opens. 24 MT 0656, 0657, 0658, 0659, 9455, 9456, 9457, 9458, 9459, 9460, 9461, 9462, 9463, 9464, 8942, 8943, 8944, 8945, and 8947 The Rescue ...

Hardware Maintenance Manual
Page 32
... reenter operation mode. Closing the lid. - Also, the computer goes into hibernation mode, perform that action. - v The system is docked to the ThinkPad Advanced Dock or ThinkPad Advanced Mini Dock, do not undock it is powered off the power switch. The hibernation file in the boot record on the hard disk.... Pressing the power button. - Pressing Fn+F4 keys. When the power is restored from the hard disk drive. 26 MT 0656, 0657, 0658, 0659, 9455, 9456, 9457, 9458, 9459, 9460, 9461, 9462, 9463, 9464, 8942, 8943, 8944, 8945, and 8947 v Open the LCD cover. v The time set on the ...
... reenter operation mode. Closing the lid. - Also, the computer goes into hibernation mode, perform that action. - v The system is docked to the ThinkPad Advanced Dock or ThinkPad Advanced Mini Dock, do not undock it is powered off the power switch. The hibernation file in the boot record on the hard disk.... Pressing the power button. - Pressing Fn+F4 keys. When the power is restored from the hard disk drive. 26 MT 0656, 0657, 0658, 0659, 9455, 9456, 9457, 9458, 9459, 9460, 9461, 9462, 9463, 9464, 8942, 8943, 8944, 8945, and 8947 v Open the LCD cover. v The time set on the ...
Hardware Maintenance Manual
Page 34
.... The main panel of pressing Enter, click the left button. 1. Use the cursor keys and ESC to select. 28 MT 0656, 0657, 0658, 0659, 9455, 9456, 9457, 9458, 9459, 9460, 9461, 9462, 9463, 9464, 8942, 8943, 8944, 8945, and 8947 then power on page 46. Press ENTER to move in the...
.... The main panel of pressing Enter, click the left button. 1. Use the cursor keys and ESC to select. 28 MT 0656, 0657, 0658, 0659, 9455, 9456, 9457, 9458, 9459, 9460, 9461, 9462, 9463, 9464, 8942, 8943, 8944, 8945, and 8947 then power on page 46. Press ENTER to move in the...

Hardware Maintenance Manual
Page 36
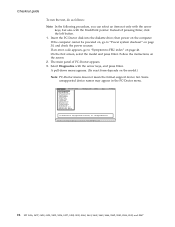
... : 1. Select one of the categories listed below to your computer. If you turn on page 32 30 MT 0656, 0657, 0658, 0659, 9455, 9456, 9457, 9458, 9459, 9460, 9461, 9462, 9463, 9464, 8942, 8943, 8944, 8945, and 8947 Turn off the computer. 6. Connect the ac... that power is designed to help you troubleshoot and resolve problems related to display symptoms and solutions: v CHECK SYSTEM HEALTH v SYSTEM AND DEVICE TESTS v LENOVO TROUBLESHOOTING v CENTER v SYSTEM REPORTS v UPDATES AND SUPPORT Power system checkout To verify a symptom, do the following power supply checkouts: v "Checking the...
... : 1. Select one of the categories listed below to your computer. If you turn on page 32 30 MT 0656, 0657, 0658, 0659, 9455, 9456, 9457, 9458, 9459, 9460, 9461, 9462, 9463, 9464, 8942, 8943, 8944, 8945, and 8947 Turn off the computer. 6. Connect the ac... that power is designed to help you troubleshoot and resolve problems related to display symptoms and solutions: v CHECK SYSTEM HEALTH v SYSTEM AND DEVICE TESTS v LENOVO TROUBLESHOOTING v CENTER v SYSTEM REPORTS v UPDATES AND SUPPORT Power system checkout To verify a symptom, do the following power supply checkouts: v "Checking the...
Hardware Maintenance Manual
Page 38
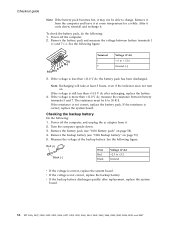
... turn on page 79). 5. If the voltage is more than +11.0 V dc after replacement, replace the system board. 32 MT 0656, 0657, 0658, 0659, 9455, 9456, 9457, 9458, 9459, 9460, 9461, 9462, 9463, 9464, 8942, 8943, 8944, 8945, and 8947
... turn on page 79). 5. If the voltage is more than +11.0 V dc after replacement, replace the system board. 32 MT 0656, 0657, 0658, 0659, 9455, 9456, 9457, 9458, 9459, 9460, 9461, 9462, 9463, 9464, 8942, 8943, 8944, 8945, and 8947

Hardware Maintenance Manual
Page 40
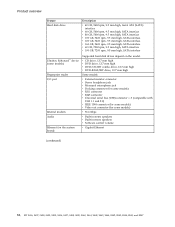
..." v "Status indicators" on page 38 v "FRU tests" on page 41 v "Fn key combinations" on page 43 Specifications The following table lists the specifications of the ThinkPad R60, R60e, R61, and R61i: Feature Processor Description v Intel® Core™ Solo processor T1300 (1.6 GHz), 2-MB L2 cache v Intel Core Solo processor T1400 (1.83 GHz... processor T7300 (2.0 GHz), 4-MB L2 cache v Intel Core 2 Duo processor T7400 (2.16 GHz), 4-MB L2 cache (continued) (continued) 34 MT 0656, 0657, 0658, 0659, 9455, 9456, 9457, 9458, 9459, 9460, 9461, 9462, 9463, 9464, 8942, 8943, 8944, 8945, and 8947
..." v "Status indicators" on page 38 v "FRU tests" on page 41 v "Fn key combinations" on page 43 Specifications The following table lists the specifications of the ThinkPad R60, R60e, R61, and R61i: Feature Processor Description v Intel® Core™ Solo processor T1300 (1.6 GHz), 2-MB L2 cache v Intel Core Solo processor T1400 (1.83 GHz... processor T7300 (2.0 GHz), 4-MB L2 cache v Intel Core 2 Duo processor T7400 (2.16 GHz), 4-MB L2 cache (continued) (continued) 34 MT 0656, 0657, 0658, 0659, 9455, 9456, 9457, 9458, 9459, 9460, 9461, 9462, 9463, 9464, 8942, 8943, 8944, 8945, and 8947
Hardware Maintenance Manual
Page 42
... (some models) v 56.6 Kbps v Built-in stereo speakers v Built-in mono speakers v Software control volume v Gigabit Ethernet (continued) 36 MT 0656, 0657, 0658, 0659, 9455, 9456, 9457, 9458, 9459, 9460, 9461, 9462, 9463, 9464, 8942, 8943, 8944, 8945, and 8947
... (some models) v 56.6 Kbps v Built-in stereo speakers v Built-in mono speakers v Software control volume v Gigabit Ethernet (continued) 36 MT 0656, 0657, 0658, 0659, 9455, 9456, 9457, 9458, 9459, 9460, 9461, 9462, 9463, 9464, 8942, 8943, 8944, 8945, and 8947
Hardware Maintenance Manual
Page 44
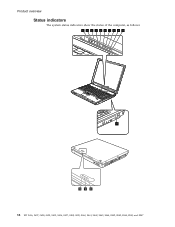
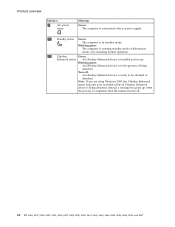
Product overview Status indicators The system status indicators show the status of the computer, as follows: 1 2 3 4 5 6 7 8 9 10 11 10 9 8 38 MT 0656, 0657, 0658, 0659, 9455, 9456, 9457, 9458, 9459, 9460, 9461, 9462, 9463, 9464, 8942, 8943, 8944, 8945, and 8947
Product overview Status indicators The system status indicators show the status of the computer, as follows: 1 2 3 4 5 6 7 8 9 10 11 10 9 8 38 MT 0656, 0657, 0658, 0659, 9455, 9456, 9457, 9458, 9459, 9460, 9461, 9462, 9463, 9464, 8942, 8943, 8944, 8945, and 8947
Hardware Maintenance Manual
Page 46
Turn off . 40 MT 0656, 0657, 0658, 0659, 9455, 9456, 9457, 9458, 9459, 9460, 9461, 9462, 9463, 9464, 8942, 8943, 8944, 8945, and 8947 Note: If you are using Windows 2000, the Ultrabay Enhanced status ...
Turn off . 40 MT 0656, 0657, 0658, 0659, 9455, 9456, 9457, 9458, 9459, 9460, 9461, 9462, 9463, 9464, 8942, 8943, 8944, 8945, and 8947 Note: If you are using Windows 2000, the Ultrabay Enhanced status ...

Hardware Maintenance Manual
Page 48
...after a short time, no service action is not a hardware problem. If two DIMMs are installed, remove one , and run the test again. 3. Run Diagnostics --> ThinkPad Devices --> Fan. Product overview FRU Applicable test Diskette drive 1. Fan 1. This drift can occur when a slight, steady pressure is disabled, select Automatic to its place.... If enabling the touch Pad does not correct the problem, continue with the following : v Interactive Tests --> Mouse 42 MT 0656, 0657, 0658, 0659, 9455, 9456, 9457, 9458, 9459, 9460, 9461, 9462, 9463, 9464, 8942, 8943, 8944, 8945, and 8947
...after a short time, no service action is not a hardware problem. If two DIMMs are installed, remove one , and run the test again. 3. Run Diagnostics --> ThinkPad Devices --> Fan. Product overview FRU Applicable test Diskette drive 1. Fan 1. This drift can occur when a slight, steady pressure is disabled, select Automatic to its place.... If enabling the touch Pad does not correct the problem, continue with the following : v Interactive Tests --> Mouse 42 MT 0656, 0657, 0658, 0659, 9455, 9456, 9457, 9458, 9459, 9460, 9461, 9462, 9463, 9464, 8942, 8943, 8944, 8945, and 8947