

Hardware Maintenance Manual
Page 9
...following strategy to prevent unnecessary expense for replacing and servicing FRUs: v If you are posted on the customer support site http://www.lenovo.com/ support Advise customers to contact the Customer Support Center at 800-565-3344 for replacing FRUs Before replacing parts Make sure that.... v If an adapter or a device consists of the computer or press Auto-detect button on the screen and install the necessary software. The BIOS and device drivers are instructed to http://www.lenovo.com/support 2. To download software fixes, drivers, and BIOS, do as follows: 1. Go to replace...
...following strategy to prevent unnecessary expense for replacing and servicing FRUs: v If you are posted on the customer support site http://www.lenovo.com/ support Advise customers to contact the Customer Support Center at 800-565-3344 for replacing FRUs Before replacing parts Make sure that.... v If an adapter or a device consists of the computer or press Auto-detect button on the screen and install the necessary software. The BIOS and device drivers are instructed to http://www.lenovo.com/support 2. To download software fixes, drivers, and BIOS, do as follows: 1. Go to replace...

Hardware Maintenance Manual
Page 10
... solution from an eSite, and have this task. If more than one error code is a unique configuration that has been negotiated between IBM or Lenovo and the customer. Custom Model Variant (CMV) This is displayed, begin the diagnosis with the first error code. Note the current configuration settings ... the settings. This will load these products as copying, saving, or formatting. How to use error messages Use the error codes displayed on the screen to prevent cracking at each BGA (Ball Grid Array) chipset. A unique 4-digit MT and 3-digit model is the 4-digit MT and 3-digit...
... solution from an eSite, and have this task. If more than one error code is a unique configuration that has been negotiated between IBM or Lenovo and the customer. Custom Model Variant (CMV) This is displayed, begin the diagnosis with the first error code. Note the current configuration settings ... the settings. This will load these products as copying, saving, or formatting. How to use error messages Use the error codes displayed on the screen to prevent cracking at each BGA (Ball Grid Array) chipset. A unique 4-digit MT and 3-digit model is the 4-digit MT and 3-digit...

Hardware Maintenance Manual
Page 27
... may remain on page 213. You will ask you to insert a Product Recovery Supplemental Disk, if you must be posted on http://www.lenovo.com/spm Restoring the factory contents by using Product Recovery discs When the hard disk drive is replaced because of 1 into the optical drive...menus may take several minutes" appears and .IMZ files are copied, the computer will restart and return to the "Welcome to Rescue and Recovery" screen where a window "Recovering your system, this completes, the computer will restart and a window will then be prompted to insert the remaining recovery discs ...
... may remain on page 213. You will ask you to insert a Product Recovery Supplemental Disk, if you must be posted on http://www.lenovo.com/spm Restoring the factory contents by using Product Recovery discs When the hard disk drive is replaced because of 1 into the optical drive...menus may take several minutes" appears and .IMZ files are copied, the computer will restart and return to the "Welcome to Rescue and Recovery" screen where a window "Recovering your system, this completes, the computer will restart and a window will then be prompted to insert the remaining recovery discs ...

Hardware Maintenance Manual
Page 28
... back to the desktop for more minutes and the computer restarts to do NTFS conversion and then restarts to the OOBE (Out of the screen. The entire process at desktop takes about 8 minutes. A warning window appears, giving you to audit this process, which will then be left ... in the system tray, but may be safely removed during this point. 8. No user intervention is not installed appears repeatedly in DOS full screen mode for IBM system setup, with progress measured by a Factory Preinstallation window on the desktop and DOS window for about two minutes and the...
... back to the desktop for more minutes and the computer restarts to do NTFS conversion and then restarts to the OOBE (Out of the screen. The entire process at desktop takes about 8 minutes. A warning window appears, giving you to audit this process, which will then be left ... in the system tray, but may be safely removed during this point. 8. No user intervention is not installed appears repeatedly in DOS full screen mode for IBM system setup, with progress measured by a Factory Preinstallation window on the desktop and DOS window for about two minutes and the...
Hardware Maintenance Manual
Page 29
... computer does not start until the POST ends. Hard-disk password: There are two modes for it appears on the screen whenever the computer is available, neither Lenovo nor Lenovo authorized servicers provide any ThinkPad computer: the power-on page 58. 3. If it has, it to get access to the hard disk drive. General...
... computer does not start until the POST ends. Hard-disk password: There are two modes for it appears on the screen whenever the computer is available, neither Lenovo nor Lenovo authorized servicers provide any ThinkPad computer: the power-on page 58. 3. If it has, it to get access to the hard disk drive. General...

Hardware Maintenance Manual
Page 30
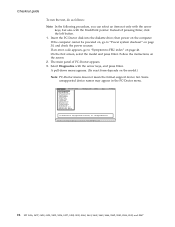
... be made available to the servicer, neither Lenovo nor Lenovo authorized servicers provide any services to reset the user HDPs or to move down the menu. 5. The Rescue and Recovery screen opens. Note: To check whether the ThinkPad computer supports the Passphrase function, enter the...Using Passphrase item is displayed in the menu, this function is available on the ThinkPad computer. 2. The system Restart Required window is known by the servicer: 1. Click Yes. The computer restarts, and the BIOS Setup Utility screen opens. 4. A pop-up window opens. 24 MT 0656, 0657, 0658...
... be made available to the servicer, neither Lenovo nor Lenovo authorized servicers provide any services to reset the user HDPs or to move down the menu. 5. The Rescue and Recovery screen opens. Note: To check whether the ThinkPad computer supports the Passphrase function, enter the...Using Passphrase item is displayed in the menu, this function is available on the ThinkPad computer. 2. The system Restart Required window is known by the servicer: 1. Click Yes. The computer restarts, and the BIOS Setup Utility screen opens. 4. A pop-up window opens. 24 MT 0656, 0657, 0658...

Hardware Maintenance Manual
Page 31
...battery indicator blinks orange, indicating that time. Press F10. 10. Select Yes in the "Power Management Properties" window, the computer goes into screen blank mode, press the ThinkVantage button and use the ThinkVantage Productivity Center. v The hard disk drive is available. Note: If you are... do any key. If you when the battery is appropriate. Power management To reduce power consumption, the computer has three power management modes: screen blank, standby, and hibernation. v The CPU stops. then leave the Enter New Password field blank, and press Enter twice. 9. Related ...
...battery indicator blinks orange, indicating that time. Press F10. 10. Select Yes in the "Power Management Properties" window, the computer goes into screen blank mode, press the ThinkVantage button and use the ThinkVantage Productivity Center. v The hard disk drive is available. Note: If you are... do any key. If you when the battery is appropriate. Power management To reduce power consumption, the computer has three power management modes: screen blank, standby, and hibernation. v The CPU stops. then leave the Enter New Password field blank, and press Enter twice. 9. Related ...

Hardware Maintenance Manual
Page 33
...and invalid system responses. 1. c. On the BIOS Setup Utility screen, press F9, Enter, F10, and then Enter. Authenticating the digital signature takes about 15 seconds; Typically, all the diskettes have been created, the ThinkPad computer will need to false indications of how many diskettes you ... included in PC-Doctor. General descriptions 27 b. Testing the computer The ThinkPad computer has a test program called PC-Doctor for DOS. Checkout guide Checkout guide Use the following Web site: http://www.lenovo.com/support PC-Doctor cannot be used to test a device that depend...
...and invalid system responses. 1. c. On the BIOS Setup Utility screen, press F9, Enter, F10, and then Enter. Authenticating the digital signature takes about 15 seconds; Typically, all the diskettes have been created, the ThinkPad computer will need to false indications of how many diskettes you ... included in PC-Doctor. General descriptions 27 b. Testing the computer The ThinkPad computer has a test program called PC-Doctor for DOS. Checkout guide Checkout guide Use the following Web site: http://www.lenovo.com/support PC-Doctor cannot be used to test a device that depend...
Hardware Maintenance Manual
Page 34
... Ports Fixed Disks Diskette Drives Other Devices Communication Wireless LAN Memory Test - A pull-down menu appears. (Its exact form depends on the screen. 2. Select Diagnostics with the TrackPoint pointer. Insert the PC-Doctor disk into the diskette drive; Full Memory Test - All Rights Reserved. Press... ENTER to "Power system checkout" on the computer. On the first screen, select the model and press Enter. then power on page 30, and check the power sources. Quick Hardware Info Utility Quit F1=...
... Ports Fixed Disks Diskette Drives Other Devices Communication Wireless LAN Memory Test - A pull-down menu appears. (Its exact form depends on the screen. 2. Select Diagnostics with the TrackPoint pointer. Insert the PC-Doctor disk into the diskette drive; Full Memory Test - All Rights Reserved. Press... ENTER to "Power system checkout" on the computer. On the first screen, select the model and press Enter. then power on page 30, and check the power sources. Quick Hardware Info Utility Quit F1=...

Hardware Maintenance Manual
Page 35
...v Video Adapter test supports only the LCD display on the screen. Note: After running PC-Doctor for at least 2 seconds; Follow the instructions on the ThinkPad computer. If there is a problem, PC-Doctor shows messages ...ThinkPad computer must be attached to Active. To exit the test, select Quit - General descriptions 29 Quick v Keyboard v Video v Internal Speaker v Mouse v Diskette v System Load v Optical Drive Test v Intel Wireless Radio Notes: v In the Keyboard test in Interactive Tests, the Fn key should be sensed. v The options marked *1 are only for R60...
...v Video Adapter test supports only the LCD display on the screen. Note: After running PC-Doctor for at least 2 seconds; Follow the instructions on the ThinkPad computer. If there is a problem, PC-Doctor shows messages ...ThinkPad computer must be attached to Active. To exit the test, select Quit - General descriptions 29 Quick v Keyboard v Video v Internal Speaker v Mouse v Diskette v System Load v Optical Drive Test v Intel Wireless Radio Notes: v In the Keyboard test in Interactive Tests, the Fn key should be sensed. v The options marked *1 are only for R60...

Hardware Maintenance Manual
Page 47
... change Serial ATA (SATA) setting to the computer while the test is displayed at the lower left of the screen, press F1 to start the diagnostic program. (continued) ThinkPad R60, R60e, R61, and R61i 41 Insert a PCI-Express/USB Wrap card into the ExpressCard slot. 2. If... the ThinkPad Advanced Dock, the ThinkPad Advanced Mini Dock or the ThinkPad Essential Port Replicator is attached to Compatibility, and run Diagnostics --> ...
... change Serial ATA (SATA) setting to the computer while the test is displayed at the lower left of the screen, press F1 to start the diagnostic program. (continued) ThinkPad R60, R60e, R61, and R61i 41 Insert a PCI-Express/USB Wrap card into the ExpressCard slot. 2. If... the ThinkPad Advanced Dock, the ThinkPad Advanced Mini Dock or the ThinkPad Essential Port Replicator is attached to Compatibility, and run Diagnostics --> ...

Hardware Maintenance Manual
Page 48
...2. This symptom is applied to its place, remove the other one of them and run Diagnostics --> Memory Test-Full. Turn on the screen for a short time. TrackPoint or pointing If the TrackPoint does not work , check the configuration as device specified in the BIOS Setup ...a hardware problem. If the pointer stops after a short time, no service action is disabled, select Automatic to enable it . Run Diagnostics --> ThinkPad Devices --> Fan. If the TrackPoint is necessary. Touch pad If enabling the TrackPoint does not correct the problem, continue with the following : v ...
...2. This symptom is applied to its place, remove the other one of them and run Diagnostics --> Memory Test-Full. Turn on the screen for a short time. TrackPoint or pointing If the TrackPoint does not work , check the configuration as device specified in the BIOS Setup ...a hardware problem. If the pointer stops after a short time, no service action is disabled, select Automatic to enable it . Run Diagnostics --> ThinkPad Devices --> Fan. If the TrackPoint is necessary. Touch pad If enabling the TrackPoint does not correct the problem, continue with the following : v ...

Hardware Maintenance Manual
Page 50
... the settings of the UltraNav® pointing device. Note: Multiple users can stop , or remove external devices connected to the ThinkPad computer. Product overview Key combination Description Fn+F7 Apply a presentation scheme directly, with no need to start Presentation Director, and ...change the Fn+F7 settings. Open the ThinkPad EasyEject Utility screen. Buttons for the following choices are displayed on to a single operating system by clicking the button. To disable this function...
... the settings of the UltraNav® pointing device. Note: Multiple users can stop , or remove external devices connected to the ThinkPad computer. Product overview Key combination Description Fn+F7 Apply a presentation scheme directly, with no need to start Presentation Director, and ...change the Fn+F7 settings. Open the ThinkPad EasyEject Utility screen. Buttons for the following choices are displayed on to a single operating system by clicking the button. To disable this function...

Hardware Maintenance Manual
Page 51
... work with Windows Media Player. The on the computer. Fn+End The computer display becomes dimmer. Fn+Spacebar Enable the FullScreen Magnifier function. ThinkPad R60, R60e, R61, and R61i 45 Fn+PrtSc Has the same function as the Break key. Fn+ScrLk Enable or disable the numeric keypad.... Note: To use Fn+F12 for a few seconds when you must have the ThinkLight. Note: This function is shown on the screen for hibernation, you press Fn+PgUp. Fn+F12 Put the computer into hibernation mode. Fn+Home The computer display becomes brighter. Fn+F11 Reserved...
... work with Windows Media Player. The on the computer. Fn+End The computer display becomes dimmer. Fn+Spacebar Enable the FullScreen Magnifier function. ThinkPad R60, R60e, R61, and R61i 45 Fn+PrtSc Has the same function as the Break key. Fn+ScrLk Enable or disable the numeric keypad.... Note: To use Fn+F12 for a few seconds when you must have the ThinkLight. Note: This function is shown on the screen for hibernation, you press Fn+PgUp. Fn+F12 Put the computer into hibernation mode. Fn+Home The computer display becomes brighter. Fn+F11 Reserved...

Hardware Maintenance Manual
Page 57
... board. LCD assembly. 3. Only the cursor appears. One long and two short beeps, and a blank or unreadable LCD. 1. DIMM. Five short beeps and a blank screen. DIMM. 3. ThinkPad R60, R60e, R61, and R61i 51 Symptom-to-FRU index Beep symptoms Symptom or error FRU or action, in sequence No beep, power-on indicator on...
... board. LCD assembly. 3. Only the cursor appears. One long and two short beeps, and a blank or unreadable LCD. 1. DIMM. Five short beeps and a blank screen. DIMM. 3. ThinkPad R60, R60e, R61, and R61i 51 Symptom-to-FRU index Beep symptoms Symptom or error FRU or action, in sequence No beep, power-on indicator on...
Hardware Maintenance Manual
Page 58
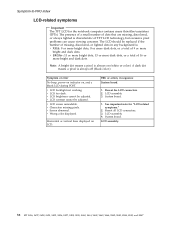
... for the notebook computer contains many thin-film transistors (TFTs). System board. The presence of a small number of 9 or more bright and dark dots. v LCD screen unreadable. v Screen abnormal. FRU or action, in any background is: v XGA: 8 or more bright dots, 8 or more dark dots, or a total of dots that are missing...
... for the notebook computer contains many thin-film transistors (TFTs). System board. The presence of a small number of 9 or more bright and dark dots. v LCD screen unreadable. v Screen abnormal. FRU or action, in any background is: v XGA: 8 or more bright dots, 8 or more dark dots, or a total of dots that are missing...

Hardware Maintenance Manual
Page 61
... storage of this information simplifies the procedure to check if the ECA has been previously applied to provide unique IDs until the year A.D. 3400. ThinkPad R60, R60e, R61, and R61i 55 FRU replacement notices v "Retaining the UUID" v "Reading or writing the ECA information" Restoring the serial ...number of the system unit When the computer was manufactured, the EEPROM on the screen. the serial number of the system and all major components. Add S/N data from EEPROM. The algorithm that number. If you replace the system...
... storage of this information simplifies the procedure to check if the ECA has been previously applied to provide unique IDs until the year A.D. 3400. ThinkPad R60, R60e, R61, and R61i 55 FRU replacement notices v "Retaining the UUID" v "Reading or writing the ECA information" Restoring the serial ...number of the system unit When the computer was manufactured, the EEPROM on the screen. the serial number of the system and all major components. Add S/N data from EEPROM. The algorithm that number. If you replace the system...

Hardware Maintenance Manual
Page 62
...EEPROM, and follow the instruction. 4. Set ECA Information. 3. Read box build date from EEPROM and follow the instruction on the screen. Insert the ThinkPad Hardware Maintenance Diskette Version 1.73 or later, and restart the computer. 2. If the system board is inoperable, this will not ...old system board and transfer the information to the new system. Write ECA/rework number from EEPROM, and follow the instruction on the ThinkPad Hardware Maintenance Diskette Version 1.73 or later. 1. To read ECA information, select 2. Set ECA Information. 3. FRU replacement notices To...
...EEPROM, and follow the instruction. 4. Set ECA Information. 3. Read box build date from EEPROM and follow the instruction on the screen. Insert the ThinkPad Hardware Maintenance Diskette Version 1.73 or later, and restart the computer. 2. If the system board is inoperable, this will not ...old system board and transfer the information to the new system. Write ECA/rework number from EEPROM, and follow the instruction on the ThinkPad Hardware Maintenance Diskette Version 1.73 or later. 1. To read ECA information, select 2. Set ECA Information. 3. FRU replacement notices To...
(English) Rescue and Recovery 4.3 Deployment Guide
Page 22
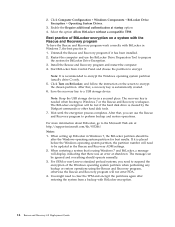
... and restore operations. The BitLocker encryption will display, indicating that , you need to suspend the encryption of BitLocker encryption on the screen to encrypt. When setting up BitLocker in a secured place. Select the option Allow BitLocker without a compatible TPM. After that there...BitLocker Drive Preparation Tool to prepare the system for best results. Wait until the encryption process completes. For OEM or non-Lenovo standard preload systems, you can be after restoring the system from Control Panel and choose the partition to encrypt the chosen...
... and restore operations. The BitLocker encryption will display, indicating that , you need to suspend the encryption of BitLocker encryption on the screen to encrypt. When setting up BitLocker in a secured place. Select the option Allow BitLocker without a compatible TPM. After that there...BitLocker Drive Preparation Tool to prepare the system for best results. Wait until the encryption process completes. For OEM or non-Lenovo standard preload systems, you can be after restoring the system from Control Panel and choose the partition to encrypt the chosen...

(English) Rescue and Recovery 4.3 Deployment Guide
Page 24
... performance by completing the following steps: 1. Notes: 1. The rejuvenation process helps eliminate viruses, adware and spyware, while maintaining your system screen is authorized to use Password Persistence. 2. Restore system drive only This function enables you to restore only the system drive to the state...disk, the system will need to restore only the system drive and leave the other partitions intact. On the Restore your system screen, select Rejuvenate your hard disk drive, you need to be rescued. Files designated to choose a destination with sufficient space for ...
... performance by completing the following steps: 1. Notes: 1. The rejuvenation process helps eliminate viruses, adware and spyware, while maintaining your system screen is authorized to use Password Persistence. 2. Restore system drive only This function enables you to restore only the system drive to the state...disk, the system will need to restore only the system drive and leave the other partitions intact. On the Restore your system screen, select Rejuvenate your hard disk drive, you need to be rescued. Files designated to choose a destination with sufficient space for ...


