
Hardware Maintenance Manual
Page 5
...the computer 31 Detecting system information with PC-Doctor . . 33 Power system checkout 34 ThinkPad T60 and T60p (14.1-inch and 15.0-inch 37 Product overview 38 Specifications 38 Status ...beep symptoms 54 LCD-related symptoms 55 Intermittent problems 56 Undetermined problems 56 © Copyright Lenovo 2006, 2008 FRU replacement notices 57 Screw notices 57 Retaining serial numbers 57 Removing and ... drive rubber rails 65 1040 Palm rest or palm rest with fingerprint reader 67 1050 DIMM 74 1060 Keyboard 75 1070 Modem daughter card (MDC-1.5) . . . . 77 1080 PCI Express Mini Card for...
...the computer 31 Detecting system information with PC-Doctor . . 33 Power system checkout 34 ThinkPad T60 and T60p (14.1-inch and 15.0-inch 37 Product overview 38 Specifications 38 Status ...beep symptoms 54 LCD-related symptoms 55 Intermittent problems 56 Undetermined problems 56 © Copyright Lenovo 2006, 2008 FRU replacement notices 57 Screw notices 57 Retaining serial numbers 57 Removing and ... drive rubber rails 65 1040 Palm rest or palm rest with fingerprint reader 67 1050 DIMM 74 1060 Keyboard 75 1070 Modem daughter card (MDC-1.5) . . . . 77 1080 PCI Express Mini Card for...
Hardware Maintenance Manual
Page 30
... first Following is covered under the warranty by referring to the following list: The following symptoms might indicate damage caused by spilling a liquid onto the keyboard v Use of an incorrect ac adapter on laptop products The following are not covered under warranty: v LCD panel cracked from the application of excessive force...
... first Following is covered under the warranty by referring to the following list: The following symptoms might indicate damage caused by spilling a liquid onto the keyboard v Use of an incorrect ac adapter on laptop products The following are not covered under warranty: v LCD panel cracked from the application of excessive force...
Hardware Maintenance Manual
Page 35
..., the charge indicator notifies you can change the action of the operating system; v The system is docked to the ThinkPad Advanced Dock or ThinkPad Advanced Mini Dock, do any ® operation with the keyboard, the TrackPoint , the hard disk, the parallel connector, or the diskette drive within that the battery power is signaled...
..., the charge indicator notifies you can change the action of the operating system; v The system is docked to the ThinkPad Advanced Dock or ThinkPad Advanced Mini Dock, do any ® operation with the keyboard, the TrackPoint , the hard disk, the parallel connector, or the diskette drive within that the battery power is signaled...
Hardware Maintenance Manual
Page 36
... either of the following conditions: v If a "hibernation time" has been set on the timer, and if the user does not do any operation with the keyboard, the TrackPoint, the hard disk drive, the parallel connector, or the diskette drive within that action. - When the power is turned on the hard disk...
... either of the following conditions: v If a "hibernation time" has been set on the timer, and if the user does not do any operation with the keyboard, the TrackPoint, the hard disk drive, the parallel connector, or the diskette drive within that action. - When the power is turned on the hard disk...
Hardware Maintenance Manual
Page 39
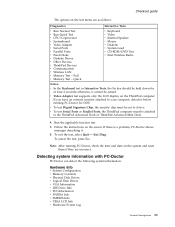
...Test v Intel Wireless Radio Notes: v In the Keyboard test in Interactive Tests, the Fn key should be sensed. v To test Serial Ports or Parallel Ports, the ThinkPad computer must be attached to the ThinkPad Advanced Dock or ThinkPad Advanced Mini Dock. 4. Run the applicable function test... v Run Quick Test v CPU/Coprocessor v Systemboard v Video Adapter v Serial Ports v Parallel Ports v Fixed Disks v Diskette Drives v Other Devices v ThinkPad Devices v Communication v Wireless LAN v Memory Test - v Video Adapter test supports only the LCD display on the screen. To cancel the test, press...
...Test v Intel Wireless Radio Notes: v In the Keyboard test in Interactive Tests, the Fn key should be sensed. v To test Serial Ports or Parallel Ports, the ThinkPad computer must be attached to the ThinkPad Advanced Dock or ThinkPad Advanced Mini Dock. 4. Run the applicable function test... v Run Quick Test v CPU/Coprocessor v Systemboard v Video Adapter v Serial Ports v Parallel Ports v Fixed Disks v Diskette Drives v Other Devices v ThinkPad Devices v Communication v Wireless LAN v Memory Test - v Video Adapter test supports only the LCD display on the screen. To cancel the test, press...
Hardware Maintenance Manual
Page 43
...215 Common parts list 215 Tools 215 Power cords 216 Notices 217 Trademarks 218 © Copyright Lenovo 2006, 2008 37 SXGA+ IPS TFT 193 15.0-in . XGA TFT 188 15.0-in . XGA TFT 172 14.1-in . ThinkPad T60 and T60p (14.1-inch and 15.0-inch) Product overview 38 Specifications 38 Status indicators... cover, hard disk drive, and hard disk drive rubber rails 65 1040 Palm rest or palm rest with fingerprint reader 67 1050 DIMM 74 1060 Keyboard 75 1070 Modem daughter card (MDC-1.5) . . . . 77 1080 PCI Express Mini Card for 802.11 a/b/g wireless LAN 79 1090 PCI Express Mini Card for...
...215 Common parts list 215 Tools 215 Power cords 216 Notices 217 Trademarks 218 © Copyright Lenovo 2006, 2008 37 SXGA+ IPS TFT 193 15.0-in . XGA TFT 188 15.0-in . XGA TFT 172 14.1-in . ThinkPad T60 and T60p (14.1-inch and 15.0-inch) Product overview 38 Specifications 38 Status indicators... cover, hard disk drive, and hard disk drive rubber rails 65 1040 Palm rest or palm rest with fingerprint reader 67 1050 DIMM 74 1060 Keyboard 75 1070 Modem daughter card (MDC-1.5) . . . . 77 1080 PCI Express Mini Card for 802.11 a/b/g wireless LAN 79 1090 PCI Express Mini Card for...
Hardware Maintenance Manual
Page 48
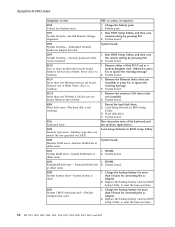
To enable or disable Caps Lock mode, press the Caps Lock key. When this indicator is enabled. Green: The numeric keypad on the keyboard is on, do not put the computer into standby mode or turn off the computer. Green: Data is being transmitted. Blinking green: Data is being ...
To enable or disable Caps Lock mode, press the Caps Lock key. When this indicator is enabled. Green: The numeric keypad on the keyboard is on, do not put the computer into standby mode or turn off the computer. Green: Data is being transmitted. Blinking green: Data is being ...
Hardware Maintenance Manual
Page 50
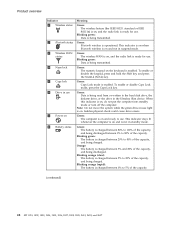
...Devices HDA CODEC Test Speaker Interactive Tests --> Internal Speaker PC Card slot Diagnostics --> Systemboard --> PCMCIA ExpressCard slot 1. Keyboard 1. Diagnostics --> Systemboard --> Keyboard 2. Using cursor keys, select HDD diagnostic program. Press Enter to enter the BIOS Setup Utility. 4. FRU Applicable ...test System board 1. Diagnostics --> Systemboard 3. Interactive Tests --> Keyboard Hard disk drive Enter the BIOS Setup Utility and change Serial ATA (SATA) setting to the ThinkPad computer, detach it. Using cursor keys, select Main hard disk ...
...Devices HDA CODEC Test Speaker Interactive Tests --> Internal Speaker PC Card slot Diagnostics --> Systemboard --> PCMCIA ExpressCard slot 1. Keyboard 1. Diagnostics --> Systemboard --> Keyboard 2. Using cursor keys, select HDD diagnostic program. Press Enter to enter the BIOS Setup Utility. 4. FRU Applicable ...test System board 1. Diagnostics --> Systemboard 3. Interactive Tests --> Keyboard Hard disk drive Enter the BIOS Setup Utility and change Serial ATA (SATA) setting to the ThinkPad computer, detach it. Using cursor keys, select Main hard disk ...
Hardware Maintenance Manual
Page 56
... System board. 01CA More than one specified in BIOS Setup Utility. 0230 Shadow RAM error-Shadow RAM fails at offset nnnn. 1. System board. 021x Keyboard error. at offset nnnn. 0250 System battery error-System battery is not working. 1. or press Esc to -FRU index Symptom or error FRU or ...action, in BIOS Setup Utility. 3. Remove one of the keyboard and the auxiliary input device. 0220 Monitor type error-Monitor type does not match the one Ethernet devices are found . Remove the Ethernet device that...
... System board. 01CA More than one specified in BIOS Setup Utility. 0230 Shadow RAM error-Shadow RAM fails at offset nnnn. 1. System board. 021x Keyboard error. at offset nnnn. 0250 System battery error-System battery is not working. 1. or press Esc to -FRU index Symptom or error FRU or ...action, in BIOS Setup Utility. 3. Remove one of the keyboard and the auxiliary input device. 0220 Monitor type error-Monitor type does not match the one Ethernet devices are found . Remove the Ethernet device that...

Hardware Maintenance Manual
Page 67
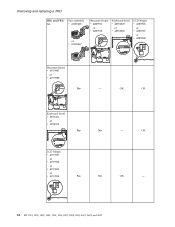
...proper replacement FRU. OK or v 42W2226 LCD hinges v 42R9906 or v 42R9907 OK OK OK - OK OK OK v 41V9932 (continued) ThinkPad T60 and T60p (14.1-inch and 15.0-inch) 61 or v 42R9908 Fan assembly v 41V9931 or - v 41W6406 or v 41W0467 Structure frame v ...42R9911 or v 42R9912 Keyboard bezel v 42W2225 or v 42W2226 LCD hinges v 42R9906 or v 42R9907 or v 42R9908 Fan assembly v 41W6406 - OK OK or v 42R9912 Keyboard bezel v 42W2225 OK OK - or v 41W0467 OK OK OK Structure frame v 42R9911 OK ...
...proper replacement FRU. OK or v 42W2226 LCD hinges v 42R9906 or v 42R9907 OK OK OK - OK OK OK v 41V9932 (continued) ThinkPad T60 and T60p (14.1-inch and 15.0-inch) 61 or v 42R9908 Fan assembly v 41V9931 or - v 41W6406 or v 41W0467 Structure frame v ...42R9911 or v 42R9912 Keyboard bezel v 42W2225 or v 42W2226 LCD hinges v 42R9906 or v 42R9907 or v 42R9908 Fan assembly v 41W6406 - OK OK or v 42R9912 Keyboard bezel v 42W2225 OK OK - or v 41W0467 OK OK OK Structure frame v 42R9911 OK ...
Hardware Maintenance Manual
Page 68
OK OK Keyboard bezel v 39T7461 or v 39T4762 No No - Removing and replacing a FRU FRU and FRU Fan assembly no. v 41W6406 or v 41W0467 Structure frame v 42R9911 or v 42R9912 Keyboard bezel v 42W2225 or v 42W2226 LCD hinges v 42R9906 or v 42R9907 or v 42R9908 Structure frame v 41V9987 or v 41V9988 No - OK LCD hinges v 41V9901 or v 41V9902 or v 41V9903 or v 41V9904 No No OK - 62 MT 1951, 1952, 1953, 1954, 1955, 1956, 2007, 2008, 2009, 2613, 2623, and 2637
OK OK Keyboard bezel v 39T7461 or v 39T4762 No No - Removing and replacing a FRU FRU and FRU Fan assembly no. v 41W6406 or v 41W0467 Structure frame v 42R9911 or v 42R9912 Keyboard bezel v 42W2225 or v 42W2226 LCD hinges v 42R9906 or v 42R9907 or v 42R9908 Structure frame v 41V9987 or v 41V9988 No - OK LCD hinges v 41V9901 or v 41V9902 or v 41V9903 or v 41V9904 No No OK - 62 MT 1951, 1952, 1953, 1954, 1955, 1956, 2007, 2008, 2009, 2613, 2623, and 2637
Hardware Maintenance Manual
Page 77
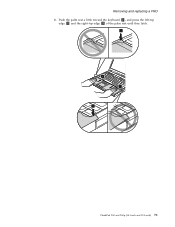
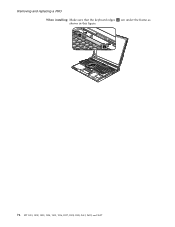
Push the palm rest a little toward the keyboard 1 , and press the left-top edge 2 and the right-top edge 3 of the palm rest until they latch. 2 1 1 3 ThinkPad T60 and T60p (14.1-inch and 15.0-inch) 71 Removing and replacing a FRU b.
Push the palm rest a little toward the keyboard 1 , and press the left-top edge 2 and the right-top edge 3 of the palm rest until they latch. 2 1 1 3 ThinkPad T60 and T60p (14.1-inch and 15.0-inch) 71 Removing and replacing a FRU b.
Hardware Maintenance Manual
Page 81
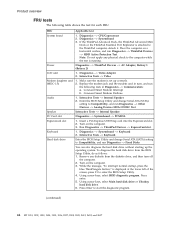
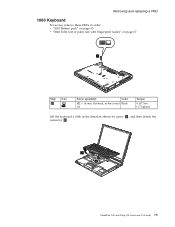
Removing and replacing a FRU 1060 Keyboard For access, remove these FRUs in order: v "1010 Battery pack" on page 63 v "1040 Palm rest or palm rest with fingerprint reader" on page 67 1 Step 1 Icon Screw (quantity) Color M2 × 14 mm, flat-head, nylon-coated Black (1) Torque 0.167 Nm (1.7 kgfcm) Lift the keyboard a little in the direction shown by arrow 2 , and then detach the connector 3 . 2 3 ThinkPad T60 and T60p (14.1-inch and 15.0-inch) 75
Removing and replacing a FRU 1060 Keyboard For access, remove these FRUs in order: v "1010 Battery pack" on page 63 v "1040 Palm rest or palm rest with fingerprint reader" on page 67 1 Step 1 Icon Screw (quantity) Color M2 × 14 mm, flat-head, nylon-coated Black (1) Torque 0.167 Nm (1.7 kgfcm) Lift the keyboard a little in the direction shown by arrow 2 , and then detach the connector 3 . 2 3 ThinkPad T60 and T60p (14.1-inch and 15.0-inch) 75
Hardware Maintenance Manual
Page 82
Removing and replacing a FRU When installing: Make sure that the keyboard edges a are under the frame as shown in this figure. a aa 76 MT 1951, 1952, 1953, 1954, 1955, 1956, 2007, 2008, 2009, 2613, 2623, and 2637
Removing and replacing a FRU When installing: Make sure that the keyboard edges a are under the frame as shown in this figure. a aa 76 MT 1951, 1952, 1953, 1954, 1955, 1956, 2007, 2008, 2009, 2613, 2623, and 2637
Hardware Maintenance Manual
Page 83
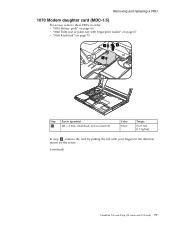
Removing and replacing a FRU 1070 Modem daughter card (MDC-1.5) For access, remove these FRUs in order: v "1010 Battery pack" on page 63 v "1040 Palm rest or palm rest with fingerprint reader" on page 67 v "1060 Keyboard" on page 75 1 2 1 Step 1 Screw (quantity) M2 × 3 mm, small-head, nylon-coated (2) Color Silver Torque 0.167 Nm (1.7 kgfcm) In step 2 , remove the card by pulling the tab with your fingers in the direction shown by the arrow. (continued) ThinkPad T60 and T60p (14.1-inch and 15.0-inch) 77
Removing and replacing a FRU 1070 Modem daughter card (MDC-1.5) For access, remove these FRUs in order: v "1010 Battery pack" on page 63 v "1040 Palm rest or palm rest with fingerprint reader" on page 67 v "1060 Keyboard" on page 75 1 2 1 Step 1 Screw (quantity) M2 × 3 mm, small-head, nylon-coated (2) Color Silver Torque 0.167 Nm (1.7 kgfcm) In step 2 , remove the card by pulling the tab with your fingers in the direction shown by the arrow. (continued) ThinkPad T60 and T60p (14.1-inch and 15.0-inch) 77
Hardware Maintenance Manual
Page 85
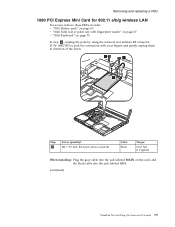
... access, remove these FRUs in order: v "1010 Battery pack" on page 63 v "1040 Palm rest or palm rest with fingerprint reader" on page 67 v "1060 Keyboard" on page 75 In step 1 , unplug the jacks by using the removal tool antenna RF connector (P/N: 08K7159) or pick the connectors with your fingers and... (1.7 kgfcm) When installing: Plug the gray cable into the jack labeled MAIN on the card, and the black cable into the jack labeled AUX. (continued) ThinkPad T60 and T60p (14.1-inch and 15.0-inch) 79
... access, remove these FRUs in order: v "1010 Battery pack" on page 63 v "1040 Palm rest or palm rest with fingerprint reader" on page 67 v "1060 Keyboard" on page 75 In step 1 , unplug the jacks by using the removal tool antenna RF connector (P/N: 08K7159) or pick the connectors with your fingers and... (1.7 kgfcm) When installing: Plug the gray cable into the jack labeled MAIN on the card, and the black cable into the jack labeled AUX. (continued) ThinkPad T60 and T60p (14.1-inch and 15.0-inch) 79
Hardware Maintenance Manual
Page 87
... access, remove these FRUs in order: v "1010 Battery pack" on page 63 v "1040 Palm rest or palm rest with fingerprint reader" on page 67 v "1060 Keyboard" on page 75 In step 1 , unplug the jacks by using the removal tool antenna RF connector (P/N: 08K7159) or pick the connectors with your fingers and... the jack labeled TR1, the white cable (3rd) into jack labeled R0, and the black cable (AUX) into jack labeled TR2 on the card. (continued) ThinkPad T60 and T60p (14.1-inch and 15.0-inch) 81
... access, remove these FRUs in order: v "1010 Battery pack" on page 63 v "1040 Palm rest or palm rest with fingerprint reader" on page 67 v "1060 Keyboard" on page 75 In step 1 , unplug the jacks by using the removal tool antenna RF connector (P/N: 08K7159) or pick the connectors with your fingers and... the jack labeled TR1, the white cable (3rd) into jack labeled R0, and the black cable (AUX) into jack labeled TR2 on the card. (continued) ThinkPad T60 and T60p (14.1-inch and 15.0-inch) 81
Hardware Maintenance Manual
Page 89
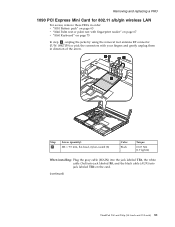
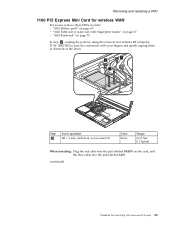
... access, remove these FRUs in order: v "1010 Battery pack" on page 63 v "1040 Palm rest or palm rest with fingerprint reader" on page 67 v "1060 Keyboard" on page 75 In step 1 , unplug the jacks by using the removal tool antenna RF connector (P/N: 08K7159) or pick the connectors with your fingers and... (1.7 kgfcm) When installing: Plug the red cable into the jack labeled MAIN on the card, and the blue cable into the jack labeled AUX. (continued) ThinkPad T60 and T60p (14.1-inch and 15.0-inch) 83
... access, remove these FRUs in order: v "1010 Battery pack" on page 63 v "1040 Palm rest or palm rest with fingerprint reader" on page 67 v "1060 Keyboard" on page 75 In step 1 , unplug the jacks by using the removal tool antenna RF connector (P/N: 08K7159) or pick the connectors with your fingers and... (1.7 kgfcm) When installing: Plug the red cable into the jack labeled MAIN on the card, and the blue cable into the jack labeled AUX. (continued) ThinkPad T60 and T60p (14.1-inch and 15.0-inch) 83
Hardware Maintenance Manual
Page 91
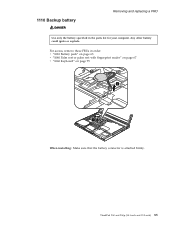
For access, remove these FRUs in the parts list for your computer. ThinkPad T60 and T60p (14.1-inch and 15.0-inch) 85 Any other battery could ignite or explode. 1110 Backup battery DANGER Removing and replacing a FRU Use only the battery specified in order: v "1010 Battery pack" on page 63 v "1040 Palm rest or palm rest with fingerprint reader" on page 67 v "1060 Keyboard" on page 75 2 1 When installing: Make sure that the battery connector is attached firmly.
For access, remove these FRUs in the parts list for your computer. ThinkPad T60 and T60p (14.1-inch and 15.0-inch) 85 Any other battery could ignite or explode. 1110 Backup battery DANGER Removing and replacing a FRU Use only the battery specified in order: v "1010 Battery pack" on page 63 v "1040 Palm rest or palm rest with fingerprint reader" on page 67 v "1060 Keyboard" on page 75 2 1 When installing: Make sure that the battery connector is attached firmly.
Hardware Maintenance Manual
Page 92
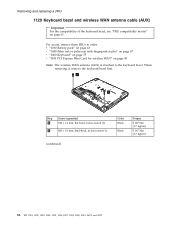
..., 1953, 1954, 1955, 1956, 2007, 2008, 2009, 2613, 2623, and 2637 Removing and replacing a FRU 1120 Keyboard bezel and wireless WAN antenna cable (AUX) Important For the compatibility of the keyboard bezel, see "FRU compatibility matrix" on page 83 Note: The wireless WAN antenna (AUX) is attached to the... keyboard bezel. For access, remove these FRUs in order: v "1010 Battery pack" on page 63 v "1040 Palm ...
..., 1953, 1954, 1955, 1956, 2007, 2008, 2009, 2613, 2623, and 2637 Removing and replacing a FRU 1120 Keyboard bezel and wireless WAN antenna cable (AUX) Important For the compatibility of the keyboard bezel, see "FRU compatibility matrix" on page 83 Note: The wireless WAN antenna (AUX) is attached to the... keyboard bezel. For access, remove these FRUs in order: v "1010 Battery pack" on page 63 v "1040 Palm ...


