(English) Access Connections Profile Deployment guide
Page 17
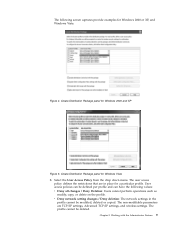
... that are TCP/IP settings, Advanced TCP/IP settings, and wireless settings. User access policies can be defined per profile and can have the following screen captures provide examples for Windows Vista 3. Create Distribution Package panel for a particular profile. The profile cannot be modified, deleted or copied. Chapter 3. Working with the...
... that are TCP/IP settings, Advanced TCP/IP settings, and wireless settings. User access policies can be defined per profile and can have the following screen captures provide examples for Windows Vista 3. Create Distribution Package panel for a particular profile. The profile cannot be modified, deleted or copied. Chapter 3. Working with the...
(English) Access Connections Profile Deployment guide
Page 20
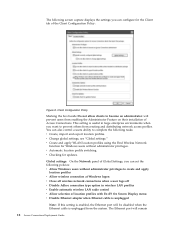
...following policies: v Allow Windows users without administrator privileges. Global settings: On the Network panel of location profiles with Fn+F5 On Screen Display menu v Disable Ethernet adapter when Ethernet cable is unplugged Note: If this setting is enabled, the Ethernet port will be... the following tasks: v Create, import and export location profiles. v Checking for the Client tab of Access Connections. The following screen capture displays the settings you want to prevent others from creating and distributing network access profiles. The Ethernet port will prevent users from...
...following policies: v Allow Windows users without administrator privileges. Global settings: On the Network panel of location profiles with Fn+F5 On Screen Display menu v Disable Ethernet adapter when Ethernet cable is unplugged Note: If this setting is enabled, the Ethernet port will be... the following tasks: v Create, import and export location profiles. v Checking for the Client tab of Access Connections. The following screen capture displays the settings you want to prevent others from creating and distributing network access profiles. The Ethernet port will prevent users from...
(English) Access Connections Profile Deployment guide
Page 22
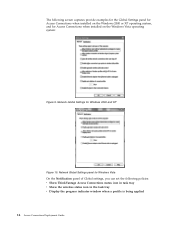
... applied 14 Access Connections Deployment Guide Network Global Settings panel for Windows Vista On the Notification panel of Global settings, you can set the following screen captures provide examples for the Global Settings panel for Access Connections when installed on the Windows Vista operating system: Figure 9.
... applied 14 Access Connections Deployment Guide Network Global Settings panel for Windows Vista On the Notification panel of Global settings, you can set the following screen captures provide examples for the Global Settings panel for Access Connections when installed on the Windows Vista operating system: Figure 9.
(English) Access Connections Profile Deployment guide
Page 33
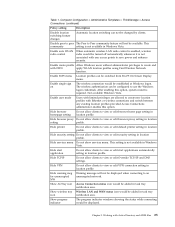
... not be displayed. Enable auto WLAN radio control When automatic wireless LAN radio control is enabled, wireless radio would be switched from Fn+F5 On Screen Display menu. Show ACTray icon Access Connection status icon would be available. Show progress indicator The progress indicator windows showing the status while connecting would...
... not be displayed. Enable auto WLAN radio control When automatic wireless LAN radio control is enabled, wireless radio would be switched from Fn+F5 On Screen Display menu. Show ACTray icon Access Connection status icon would be available. Show progress indicator The progress indicator windows showing the status while connecting would...

(English) Access Connections Profile Deployment guide
Page 40
... IBMPM for Access Connections. such as WLANCX2, WLLANATH, or WLLANINT. 4. You do not need to replace all the relevant packages with Lenovo ThinkPad /L3000 system BIOS. To install interactively, type: \setup.exe b. v WLANCX2 is the folder that contains the Intel® Pro/...silently, all the relevant packages with no restart. To install silently, all the relevant packages with prompt for the Hotkey utilities package and On screen display. v WLLANINT is extracted, the following subdirectory under ACCONWLD containing each of installation type: \setup.exe /S /H /R c. The following...
... IBMPM for Access Connections. such as WLANCX2, WLLANATH, or WLLANINT. 4. You do not need to replace all the relevant packages with Lenovo ThinkPad /L3000 system BIOS. To install interactively, type: \setup.exe b. v WLANCX2 is the folder that contains the Intel® Pro/...silently, all the relevant packages with no restart. To install silently, all the relevant packages with prompt for the Hotkey utilities package and On screen display. v WLLANINT is extracted, the following subdirectory under ACCONWLD containing each of installation type: \setup.exe /S /H /R c. The following...

(English) Power Manager Deployment Guide
Page 10
... Guide Follow the instructions on your computer, match the Power Manager version with your operating system. Make sure that you install Power Manager on the screen to complete installation and restart the computer. Power Manager designed specifically for Windows Vista and Windows 7 operating systems. When you have selected the Install ThinkVantage...
... Guide Follow the instructions on your computer, match the Power Manager version with your operating system. Make sure that you install Power Manager on the screen to complete installation and restart the computer. Power Manager designed specifically for Windows Vista and Windows 7 operating systems. When you have selected the Install ThinkVantage...
(English) Power Manager Deployment Guide
Page 37
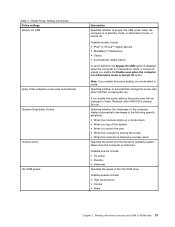
...: • When the computer starts up or shuts down • When you switch the user • When the computer is locking the screen • When the computer is displaying a screen saver Specifies the action that the Windows operating system takes when the computer is playing Blu-ray. Note: If you must select...
...: • When the computer starts up or shuts down • When you switch the user • When the computer is locking the screen • When the computer is displaying a screen saver Specifies the action that the Windows operating system takes when the computer is playing Blu-ray. Note: If you must select...
Hardware Maintenance Manual
Page 3
...password 41 How to remove the power-on password . . . 41 How to remove the hard-disk password . . . 41 Power management 42 Screen blank mode 42 Sleep (standby) mode 42 Hibernation mode 43 Symptom-to electrostatic discharge 3 Grounding requirements 4 Safety notices (multilingual translations 4 Laser compliance ... 73 1120 Palm rest assembly with cables 75 1130 PCI Express Mini Card for DOS diagnostics program 30 System supporting the Lenovo diagnostics programs 34 Power system checkout 36 Checking the ac power adapter 36 Checking operational charging 37 Checking the battery pack...
...password 41 How to remove the power-on password . . . 41 How to remove the hard-disk password . . . 41 Power management 42 Screen blank mode 42 Sleep (standby) mode 42 Hibernation mode 43 Symptom-to electrostatic discharge 3 Grounding requirements 4 Safety notices (multilingual translations 4 Laser compliance ... 73 1120 Palm rest assembly with cables 75 1130 PCI Express Mini Card for DOS diagnostics program 30 System supporting the Lenovo diagnostics programs 34 Power system checkout 36 Checking the ac power adapter 36 Checking operational charging 37 Checking the battery pack...
Hardware Maintenance Manual
Page 31
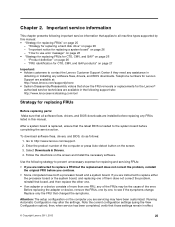
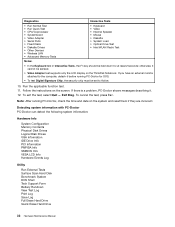
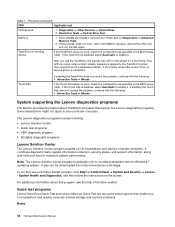
...device consists of more than one FRU, any of the FRUs may be the cause of the computer or press Auto-detect button on the screen. 3. Note the current configuration settings (using the View Configuration option); Chapter 2. "Product definition" on page 26 - "FRU identification for ...8226; System Disassembly/Reassembly videos that show the FRU removals or replacements for replacing FRUs Before replacing parts: Make sure that applies to http://www.lenovo.com/support. 2. To download software fixes, drivers, and BIOS, do as follows: 1. Select Downloads & Drivers. 4. then, when service ...
...device consists of more than one FRU, any of the FRUs may be the cause of the computer or press Auto-detect button on the screen. 3. Note the current configuration settings (using the View Configuration option); Chapter 2. "Product definition" on page 26 - "FRU identification for ...8226; System Disassembly/Reassembly videos that show the FRU removals or replacements for replacing FRUs Before replacing parts: Make sure that applies to http://www.lenovo.com/support. 2. To download software fixes, drivers, and BIOS, do as follows: 1. Select Downloads & Drivers. 4. then, when service ...
Hardware Maintenance Manual
Page 32
... the customer. If you select an incorrect drive, data or programs can cause damage to diagnose failures. The Lenovo preloaded software is installed on the screen to those components, and may cause a system malfunction. Custom Model Variant (CMV) This is shipped with the first error code. Be extremely ...; Do not drop a system board or apply any kind. • Avoid bending a system board and hard pushing to configure an IBM® or a Lenovo solution from an eSite, and have been changed. How to place orders (Example: 1829-W15). If more than one error code is installed in the...
... the customer. If you select an incorrect drive, data or programs can cause damage to diagnose failures. The Lenovo preloaded software is installed on the screen to those components, and may cause a system malfunction. Custom Model Variant (CMV) This is shipped with the first error code. Be extremely ...; Do not drop a system board or apply any kind. • Avoid bending a system board and hard pushing to configure an IBM® or a Lenovo solution from an eSite, and have been changed. How to place orders (Example: 1829-W15). If more than one error code is installed in the...
Hardware Maintenance Manual
Page 33
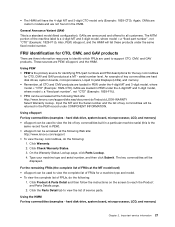
... model = a "fixed part number", not "CTO" (Example: 1829-F1U). • PEW can be accessed at the following Web site: http://www.lenovo.com/support • To view the key commodities, do ?lndocid=LOOK-WARNTY Select Warranty lookup. hard disk drive, system board, microprocessor, LCD, and memory...27 Click Check Warranty Status. 3. Click Product & Parts Detail and then follow the instructions on the screen to view the list of FRUs, do the following Web site: http://www.lenovo.com/support/site.wss/document.do the following: 1. Using the HMM For key commodities (examples - General...
... model = a "fixed part number", not "CTO" (Example: 1829-F1U). • PEW can be accessed at the following Web site: http://www.lenovo.com/support • To view the key commodities, do ?lndocid=LOOK-WARNTY Select Warranty lookup. hard disk drive, system board, microprocessor, LCD, and memory...27 Click Check Warranty Status. 3. Click Product & Parts Detail and then follow the instructions on the screen to view the list of FRUs, do the following Web site: http://www.lenovo.com/support/site.wss/document.do the following: 1. Using the HMM For key commodities (examples - General...
Hardware Maintenance Manual
Page 37
...the Boot Menu. 5. Note: You can be started from a USB attached optical drive. To run the test, do as follows: Chapter 3. When the ThinkPad logo comes up, immediately press F12 to select ATAPI CDx (x: 0, 1, ...) and then press Enter. 7. Select Diagnostics with the TrackPoint® pointer. ...computer. 2. If an error code appears, go to -FRU index" on the screen. 8. Follow the instructions on page 43. 4. Note: When you are as follows: 1. Turn on the following Web site: http://www.lenovo.com/support PC-Doctor cannot be powered on, go to "Symptom-to "Power ...
...the Boot Menu. 5. Note: You can be started from a USB attached optical drive. To run the test, do as follows: Chapter 3. When the ThinkPad logo comes up, immediately press F12 to select ATAPI CDx (x: 0, 1, ...) and then press Enter. 7. Select Diagnostics with the TrackPoint® pointer. ...computer. 2. If an error code appears, go to -FRU index" on the screen. 8. Follow the instructions on page 43. 4. Note: When you are as follows: 1. Turn on the following Web site: http://www.lenovo.com/support PC-Doctor cannot be powered on, go to "Symptom-to "Power ...
Hardware Maintenance Manual
Page 38
...12. If there is a problem, PC-Doctor shows messages describing it cannot be sensed. • Video Adapter test supports only the LCD display on the ThinkPad Notebook. Note: After running PC-Doctor for DOS. • To test Digital Signature Chip, the security chip must be held down for at least 2 ... Interactive Tests, the Fn key should be set to the computer, detach it before running PC-Doctor, check the time and date on the screen. Follow the instructions on the system and reset them if they are incorrect. Exit Diag. Detecting system information with PC-Doctor PC-Doctor can...
...12. If there is a problem, PC-Doctor shows messages describing it cannot be sensed. • Video Adapter test supports only the LCD display on the ThinkPad Notebook. Note: After running PC-Doctor for DOS. • To test Digital Signature Chip, the security chip must be held down for at least 2 ... Interactive Tests, the Fn key should be set to the computer, detach it before running PC-Doctor, check the time and date on the screen. Follow the instructions on the system and reset them if they are incorrect. Exit Diag. Detecting system information with PC-Doctor PC-Doctor can...
Hardware Maintenance Manual
Page 39
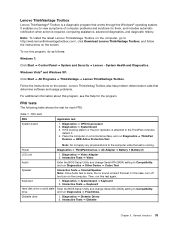
...Diskette Chapter 3. Windows Vista® and Windows XP: Click Start ➙ All Programs ➙ ThinkVantage ➙ Lenovo ThinkVantage Toolbox. Power Diagnostics ➙ ThinkPad Devices ➙ AC Adapter ➙ Battery 1 (Battery 2) LCD unit 1. In this test. Note: Do ...not apply any physical shock to the ThinkPad computer, detach it. 4. Keyboard 1. Diagnostics ➙ CPU/Coprocessor 2. Diagnostics ➙ Systemboard ➙ Keyboard 2. Place the computer on the screen. Diagnostics ➙ Video Adapter 2. General checkout 33 If...
...Diskette Chapter 3. Windows Vista® and Windows XP: Click Start ➙ All Programs ➙ ThinkVantage ➙ Lenovo ThinkVantage Toolbox. Power Diagnostics ➙ ThinkPad Devices ➙ AC Adapter ➙ Battery 1 (Battery 2) LCD unit 1. In this test. Note: Do ...not apply any physical shock to the ThinkPad computer, detach it. 4. Keyboard 1. Diagnostics ➙ CPU/Coprocessor 2. Diagnostics ➙ Systemboard ➙ Keyboard 2. Place the computer on the screen. Diagnostics ➙ Video Adapter 2. General checkout 33 If...
Hardware Maintenance Manual
Page 40
...necessary. If enabling the Touch Pad does not correct the problem, continue with the Windows 7 operating system. Note: The Lenovo Solution Center program is disabled, select Automatic to troubleshoot and resolve computer internal storage and memory problems. Notes: 34 Hardware... Maintenance Manual System Health and Diagnostics, and then follow the instructions on the screen for maximum system performance. For additional information about ThinkPad computers that enable you to enable it . FRU tests (continued) FRU Applicable test Optical drive 1. ...
...necessary. If enabling the Touch Pad does not correct the problem, continue with the Windows 7 operating system. Note: The Lenovo Solution Center program is disabled, select Automatic to troubleshoot and resolve computer internal storage and memory problems. Notes: 34 Hardware... Maintenance Manual System Health and Diagnostics, and then follow the instructions on the screen for maximum system performance. For additional information about ThinkPad computers that enable you to enable it . FRU tests (continued) FRU Applicable test Optical drive 1. ...
Hardware Maintenance Manual
Page 41
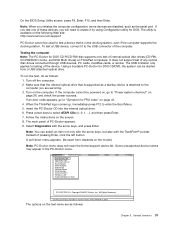
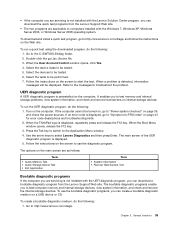
...recover bad sectors on the Web site. When the Boot Menu window opens, release the F12 key. 3. Follow the instructions on the screen to http://www.lenovo.com/diags, and follow the instructions on internal storage devices. To run the UEFI diagnostic program, do the following : 1. Chapter ...is displayed, go to use the bootable diagnostic programs, you are applicable to http://www.lenovo.com/diags. When the ThinkPad logo is preinstalled on a USB device or CD. The options on the main screen are as follows: Tests • Quick Memory Test • Quick Storage Device Test ...
...recover bad sectors on the Web site. When the Boot Menu window opens, release the F12 key. 3. Follow the instructions on the screen to http://www.lenovo.com/diags, and follow the instructions on internal storage devices. To run the UEFI diagnostic program, do the following : 1. Chapter ...is displayed, go to use the bootable diagnostic programs, you are applicable to http://www.lenovo.com/diags. When the ThinkPad logo is preinstalled on a USB device or CD. The options on the main screen are as follows: Tests • Quick Memory Test • Quick Storage Device Test ...
Hardware Maintenance Manual
Page 42
...: 1. When the Boot Menu window opens, release the F12 key. 4. Follow the instructions on the screen to "Power system checkout" on the computer. Power system checkout To verify a symptom, do the following..., replace the docking station or the port replicator. 36 Hardware Maintenance Manual Click Lenovo Bootable Diagnostics. 3. To use the diagnostic program. Attach the USB device to... turn on the computer. 5. The diagnostic program will be launched automatically. 5. When the ThinkPad logo is displayed, repeatedly press and release the F12 key. When the Boot Menu window ...
...: 1. When the Boot Menu window opens, release the F12 key. 4. Follow the instructions on the screen to "Power system checkout" on the computer. Power system checkout To verify a symptom, do the following..., replace the docking station or the port replicator. 36 Hardware Maintenance Manual Click Lenovo Bootable Diagnostics. 3. To use the diagnostic program. Attach the USB device to... turn on the computer. 5. The diagnostic program will be launched automatically. 5. When the ThinkPad logo is displayed, repeatedly press and release the F12 key. When the Boot Menu window ...
Hardware Maintenance Manual
Page 45
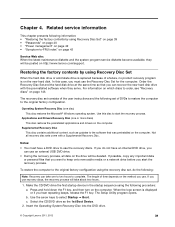
...beeps, release the F1 key. The Setup Utility program opens. c. Insert the Operating System Recovery Disc into the DVD drive. © Copyright Lenovo 2011, 2012 39 Chapter 4. Restoring the factory contents by using Recovery Disc Set When the hard disk drive or solid state drive is replaced ...on the new hard disk. The recovery disc set consists of DVDs to restore the computer to start the recovery process. When the logo screen is on the method you must have an internal DVD drive, you start the recovery process. Related service information This chapter presents following :...
...beeps, release the F1 key. The Setup Utility program opens. c. Insert the Operating System Recovery Disc into the DVD drive. © Copyright Lenovo 2011, 2012 39 Chapter 4. Restoring the factory contents by using Recovery Disc Set When the hard disk drive or solid state drive is replaced ...on the new hard disk. The recovery disc set consists of DVDs to restore the computer to start the recovery process. When the logo screen is on the method you must have an internal DVD drive, you start the recovery process. Related service information This chapter presents following :...
Hardware Maintenance Manual
Page 46
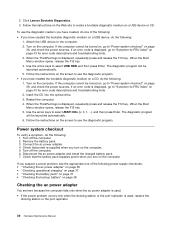
Press F10 to restore the default settings. Follow the instructions on the screen to begin the recovery process. 4. Start the Setup Utility program and then press F9 to save and exit the Setup Utility. If any ThinkPad Notebook: the power-on password (POP), the hard-disk password (HDP),.... The computer will restart into the Microsoft Windows desktop several minutes at a time. When the recovery process is complete, the Set Up Windows screen is entered. After you have a Supplemental Recovery Disc, insert it when prompted and click Yes. Press F10 to remove the power-on password...
Press F10 to restore the default settings. Follow the instructions on the screen to begin the recovery process. 4. Start the Setup Utility program and then press F9 to save and exit the Setup Utility. If any ThinkPad Notebook: the power-on password (POP), the hard-disk password (HDP),.... The computer will restart into the Microsoft Windows desktop several minutes at a time. When the recovery process is complete, the Set Up Windows screen is entered. After you have a Supplemental Recovery Disc, insert it when prompted and click Yes. Press F10 to remove the power-on password...

Hardware Maintenance Manual
Page 47
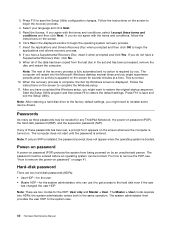
If no master HDP is available, neither Lenovo nor Lenovo authorized service technicians provide any services to reset the user HDPs or to remove the backup battery, see "1140 Backup battery" on the ThinkPad Notebook. 3. The system board must enter the SVP in order to get access to move ...Password. The hard disk drive can be replaced for a scheduled fee. For how to remove the POP, see "1010 Battery pack" on the screen; Supervisor password A supervisor password (SVP) protects the system information stored in the Enter Current Password field. The user must be used for a ...
If no master HDP is available, neither Lenovo nor Lenovo authorized service technicians provide any services to reset the user HDPs or to remove the backup battery, see "1140 Backup battery" on the ThinkPad Notebook. 3. The system board must enter the SVP in order to get access to move ...Password. The hard disk drive can be replaced for a scheduled fee. For how to remove the POP, see "1010 Battery pack" on the screen; Supervisor password A supervisor password (SVP) protects the system information stored in the Enter Current Password field. The user must be used for a ...


