
(English) Access Connections Profile Deployment guide
Page 9
... indicator window shows the state of networks. Features Access Connections has features that are available to a network from the list and connect to support automatic location switching between location profiles as effective alternatives for wireless networks that enable you to change location profiles. When you create location profiles that are not sure about what, if any wireless networks that define the settings required to connect to find wireless and network connections quickly and effortlessly. If the connection fails, a button...
... indicator window shows the state of networks. Features Access Connections has features that are available to a network from the list and connect to support automatic location switching between location profiles as effective alternatives for wireless networks that enable you to change location profiles. When you create location profiles that are not sure about what, if any wireless networks that define the settings required to connect to find wireless and network connections quickly and effortlessly. If the connection fails, a button...
(English) Access Connections Profile Deployment guide
Page 33
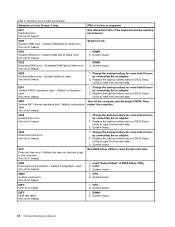
... setting Description Disable location switching feature changes Automatic location switching can be changed by clients. Enable FnF5 menu Location profiles can be turned off automatically whenever it is enabled, wireless radio would be switched from Fn+F5 On Screen Display menu. Show progress indicator The progress indicator windows showing the status while connecting would be displayed. Hide security setting Do not allow clients to use the Windows logon credentials. Working with any existing location profiles provided Access Connections administrator enables this option...
... setting Description Disable location switching feature changes Automatic location switching can be changed by clients. Enable FnF5 menu Location profiles can be turned off automatically whenever it is enabled, wireless radio would be switched from Fn+F5 On Screen Display menu. Show progress indicator The progress indicator windows showing the status while connecting would be displayed. Hide security setting Do not allow clients to use the Windows logon credentials. Working with any existing location profiles provided Access Connections administrator enables this option...
(English) Access Connections Profile Deployment guide
Page 39
... the challenging deadlines of Access Connections and relevant drivers and setup utility files needed to create the integrated package installation. Portions © IBM Corp. 2005. 31 For this integrated package installation, obtain Access Connections version 3.82. Download the following Lenovo Web site for the Wireless LAN driver required for Access Connections that requires no user interaction. The default directory where modules are extracted is required for Access Connections to the wireless driver table on how...
... the challenging deadlines of Access Connections and relevant drivers and setup utility files needed to create the integrated package installation. Portions © IBM Corp. 2005. 31 For this integrated package installation, obtain Access Connections version 3.82. Download the following Lenovo Web site for the Wireless LAN driver required for Access Connections that requires no user interaction. The default directory where modules are extracted is required for Access Connections to the wireless driver table on how...

(English) Power Manager Deployment Guide
Page 7
... (CPU) speed and the brightness of the computer display. Moving the slider to help users quickly and easily set as default when users open Power Manager for Windows Vista and Windows 7 operating systems. In the Windows Vista and Windows 7 version, the term "power plan" is used . You can view specific settings in the predefined Maximum Performance power plan are applied. • View, create, delete, and switch power plans A power plan is a collection of hardware and system settings that manages how...
... (CPU) speed and the brightness of the computer display. Moving the slider to help users quickly and easily set as default when users open Power Manager for Windows Vista and Windows 7 operating systems. In the Windows Vista and Windows 7 version, the term "power plan" is used . You can view specific settings in the predefined Maximum Performance power plan are applied. • View, create, delete, and switch power plans A power plan is a collection of hardware and system settings that manages how...
(English) Power Manager Deployment Guide
Page 45
... Windows Vista or Windows 7 client computers (ADM file) Under User Configuration, click Administrative Templates ➙ Classic Administrative Templates ➙ Lenovo ThinkVantage Components ➙ Power Manager for Vista/7 ➙ Power Agenda Deployments ➙ Power Agenda*. • For Windows Vista or Windows 7 client computers (ADMX file) Under User Configuration, click Administrative Templates ➙ Lenovo ThinkVantage Components ➙ Power Manager for this power agenda is selected, and this policy setting, the check box for Vista...
... Windows Vista or Windows 7 client computers (ADM file) Under User Configuration, click Administrative Templates ➙ Classic Administrative Templates ➙ Lenovo ThinkVantage Components ➙ Power Manager for Vista/7 ➙ Power Agenda Deployments ➙ Power Agenda*. • For Windows Vista or Windows 7 client computers (ADMX file) Under User Configuration, click Administrative Templates ➙ Lenovo ThinkVantage Components ➙ Power Manager for this power agenda is selected, and this policy setting, the check box for Vista...
(English) Service and Troubleshooting Guide
Page 16
... not covered: • Replacement or use of parts not manufactured for technical assistance, please have downloaded the most current drivers and system updates, run diagnostics, and recorded information before you make your machine is not listed, contact your Customer Support Center location are subject to device drivers • Installation and maintenance of network operating systems (NOS) • Installation and maintenance of operation, visit the Support Web site at http://www.lenovo.com/support...
... not covered: • Replacement or use of parts not manufactured for technical assistance, please have downloaded the most current drivers and system updates, run diagnostics, and recorded information before you make your machine is not listed, contact your Customer Support Center location are subject to device drivers • Installation and maintenance of network operating systems (NOS) • Installation and maintenance of operation, visit the Support Web site at http://www.lenovo.com/support...
Hardware Maintenance Manual
Page 3
... 39 Restoring the factory contents by using PC-Doctor for DOS. . . . 28 Lenovo ThinkVantage Toolbox (Lenovo System Toolbox 31 PC-Doctor for replacing a system board 24 How to do first 27 Checkout guide 28 Diagnostics using Recovery Disc Set 39 Passwords 40 Power-on password 40 Hard-disk password 40 Supervisor password 41 © Copyright Lenovo 2010, 2012 How to remove the power-on password . . . 41 How to remove the hard-disk password . . . 41 Power management 42 Screen blank mode 42 Sleep mode...
... 39 Restoring the factory contents by using PC-Doctor for DOS. . . . 28 Lenovo ThinkVantage Toolbox (Lenovo System Toolbox 31 PC-Doctor for replacing a system board 24 How to do first 27 Checkout guide 28 Diagnostics using Recovery Disc Set 39 Passwords 40 Power-on password 40 Hard-disk password 40 Supervisor password 41 © Copyright Lenovo 2010, 2012 How to remove the power-on password . . . 41 How to remove the hard-disk password . . . 41 Power management 42 Screen blank mode 42 Sleep mode...

Hardware Maintenance Manual
Page 8
... then operate the switch or unplug the power cord quickly. • Do not work alone under hazardous conditions or near their normal operating places in a machine: - Use only one hand when working with live electrical circuits with the reflective surface of these precautions are in the off position. • If you work area. By observing the above 2 Hardware Maintenance Manual Instructions for safe operational condition...
... then operate the switch or unplug the power cord quickly. • Do not work alone under hazardous conditions or near their normal operating places in a machine: - Use only one hand when working with live electrical circuits with the reflective surface of these precautions are in the off position. • If you work area. By observing the above 2 Hardware Maintenance Manual Instructions for safe operational condition...
Hardware Maintenance Manual
Page 29
... replacing a hard disk drive" on page 24 - Replace only the FRU that applies to all software fixes, drivers, and BIOS downloads are instructed to replace either the processor board or the system board, and replacing one of them does not correct the problem, reinstall that board, and then replace the other one. • If an adapter or a device consists of more than one , to see if the symptoms change. "Strategy for replacing...
... replacing a hard disk drive" on page 24 - Replace only the FRU that applies to all software fixes, drivers, and BIOS downloads are instructed to replace either the processor board or the system board, and replacing one of them does not correct the problem, reinstall that board, and then replace the other one. • If an adapter or a device consists of more than one , to see if the symptoms change. "Strategy for replacing...
Hardware Maintenance Manual
Page 33
... to your particular computer. What to it: 1. Failing FRU name and part number 8. Machine type, model number, and serial number 9. "Lenovo ThinkVantage Toolbox (Lenovo System Toolbox)" on page 28 - When you replace a FRU, make sure that a FRU is defective, clear the error log and run the test again. Consider replacing a FRU only when a problem recurs. If you attach to do first When you do first...
... to your particular computer. What to it: 1. Failing FRU name and part number 8. Machine type, model number, and serial number 9. "Lenovo ThinkVantage Toolbox (Lenovo System Toolbox)" on page 28 - When you replace a FRU, make sure that a FRU is defective, clear the error log and run the test again. Consider replacing a FRU only when a problem recurs. If you attach to do first When you do first...

Hardware Maintenance Manual
Page 35
... can start BIOS Setup Utility by using Configuration utility for DOS. Turn off the computer. 2. If the computer cannot be started from a USB attached optical drive. Note: You can be powered on, go to "Symptom-to "Power system checkout" on the model.) Note: PC-Doctor menu does not mean the formal support device list. The USB limitation only applies to testing of pressing Enter, click the left button. Turn on ThinkPad computers. The utility...
... can start BIOS Setup Utility by using Configuration utility for DOS. Turn off the computer. 2. If the computer cannot be started from a USB attached optical drive. Note: You can be powered on, go to "Symptom-to "Power system checkout" on the model.) Note: PC-Doctor menu does not mean the formal support device list. The USB limitation only applies to testing of pressing Enter, click the left button. Turn on ThinkPad computers. The utility...
Hardware Maintenance Manual
Page 36
... the system and reset them if they are incorrect. Exit Diag. The options on the test menu are as follows: Diagnostics Interactive Tests • Run Normal Test • Run Quick Test • CPU/Coprocessor • System board • Video Adapter • Serial Ports • Fixed Disks • Diskette Drives • Other Devices • Wireless LAN • Advanced Memory Tests • Keyboard • Video • Internal Speaker • Mouse • Diskette •...
... the system and reset them if they are incorrect. Exit Diag. The options on the test menu are as follows: Diagnostics Interactive Tests • Run Normal Test • Run Quick Test • CPU/Coprocessor • System board • Video Adapter • Serial Ports • Fixed Disks • Diskette Drives • Other Devices • Wireless LAN • Advanced Memory Tests • Keyboard • Video • Internal Speaker • Mouse • Diskette •...
Hardware Maintenance Manual
Page 38
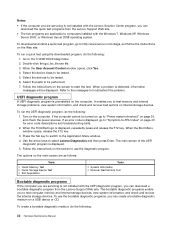
....exe file. 3. When the User Account Control window opens, click Yes. 4. Refer to the messages to select Lenovo Diagnostics and then press Enter. Use the arrow keys to troubleshoot the problem. Follow the instructions on internal storage devices. Go to the Application Menu window. 4. To use the diagnostic program. To run a quick test using the downloaded program, do the following: 32 Hardware Maintenance Manual Press the Tab key to switch to the C:\SWTOOLS\ldiag...
....exe file. 3. When the User Account Control window opens, click Yes. 4. Refer to the messages to select Lenovo Diagnostics and then press Enter. Use the arrow keys to troubleshoot the problem. Follow the instructions on internal storage devices. Go to the Application Menu window. 4. To use the diagnostic program. To run a quick test using the downloaded program, do the following: 32 Hardware Maintenance Manual Press the Tab key to switch to the C:\SWTOOLS\ldiag...
Hardware Maintenance Manual
Page 40
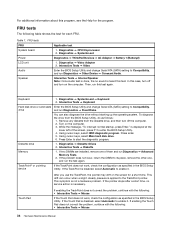
... Touch Pad is disabled, select Automatic to the TrackPoint pointer. Diagnostics ➙ Systemboard ➙ Keyboard 2. Diagnostics ➙ Diskette Drives 2. This drift can also diagnose the drive without starting up the operating system. FRU tests FRU System board Power LCD unit Audio Speaker Applicable test 1. Using cursor keys, select Main hard disk drive. 6. TrackPoint® or pointing device If the TrackPoint does not work , check the configuration as specified in the BIOS Setup Utility...
... Touch Pad is disabled, select Automatic to the TrackPoint pointer. Diagnostics ➙ Systemboard ➙ Keyboard 2. Diagnostics ➙ Diskette Drives 2. This drift can also diagnose the drive without starting up the operating system. FRU tests FRU System board Power LCD unit Audio Speaker Applicable test 1. Using cursor keys, select Main hard disk drive. 6. TrackPoint® or pointing device If the TrackPoint does not work , check the configuration as specified in the BIOS Setup Utility...
Hardware Maintenance Manual
Page 45
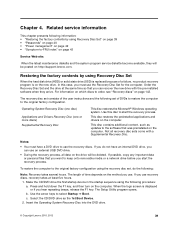
... the F1 key, and then turn on the computer. Use the arrow keys to start the recovery process. For information on which discs to the software that was preinstalled on http://support.lenovo.com. To restore the computer to the original factory configuration using the following set , do not have an internal DVD drive, you must have a DVD drive to the original factory configuration. The Setup Utility program opens. b. In this disc to select Startup ➙ Boot. If...
... the F1 key, and then turn on the computer. Use the arrow keys to start the recovery process. For information on which discs to the software that was preinstalled on http://support.lenovo.com. To restore the computer to the original factory configuration using the following set , do not have an internal DVD drive, you must have a DVD drive to the original factory configuration. The Setup Utility program opens. b. In this disc to select Startup ➙ Boot. If...
Hardware Maintenance Manual
Page 47
... set and is available on the ThinkPad Notebook. 3. The hard disk drive can be replaced for access to enter BIOS Setup Utility.For models supporting the Passphrase function, press F1 while the POP icon is available, neither Lenovo nor Lenovo authorized service technicians provide any services to reset the user HDPs or to the BIOS Setup Utility and change the system configuration. The user must be replaced for a scheduled fee. Remove the backup battery. If the Using Passphrase item is displayed in the BIOS Setup Utility...
... set and is available on the ThinkPad Notebook. 3. The hard disk drive can be replaced for access to enter BIOS Setup Utility.For models supporting the Passphrase function, press F1 while the POP icon is available, neither Lenovo nor Lenovo authorized service technicians provide any services to reset the user HDPs or to the BIOS Setup Utility and change the system configuration. The user must be replaced for a scheduled fee. Remove the backup battery. If the Using Passphrase item is displayed in the BIOS Setup Utility...

Hardware Maintenance Manual
Page 48
... Using Passphrase item is displayed in the menu, this mode, you enter hibernation, all open applications, folders, and files are servicing supports the Passphrase function, enter the BIOS Setup Utility and go to enter BIOS Setup Utility.For models supporting the Passphrase function, press F1 while HDP icon is appearing on the computer. 2. then leave the Enter New Password field blank, and press Enter twice. 8. Both user HDP and master HDP will have been removed. Power management To...
... Using Passphrase item is displayed in the menu, this mode, you enter hibernation, all open applications, folders, and files are servicing supports the Passphrase function, enter the BIOS Setup Utility and go to enter BIOS Setup Utility.For models supporting the Passphrase function, press F1 while HDP icon is appearing on the computer. 2. then leave the Enter New Password field blank, and press Enter twice. 8. Both user HDP and master HDP will have been removed. Power management To...
Hardware Maintenance Manual
Page 50
... connecting the ac adapter. 2. DIMM. 3. Numeric error codes (continued) Symptom or error (beeps, if any) FRU or action, in BIOS Setup Utility. 2. Charge the backup battery for more than 8 hours by connecting the ac adapter. 2. Replace the backup battery and run BIOS Setup Utility to reset the time and date. 0280 Previous boot incomplete- Replace the backup battery and run BIOS Setup Utility to reset the time and date. 3. Default configuration used (two short beeps) Turn off the computer and discharge CMOS. CPU. 2. System board...
... connecting the ac adapter. 2. DIMM. 3. Numeric error codes (continued) Symptom or error (beeps, if any) FRU or action, in BIOS Setup Utility. 2. Charge the backup battery for more than 8 hours by connecting the ac adapter. 2. Replace the backup battery and run BIOS Setup Utility to reset the time and date. 0280 Previous boot incomplete- Replace the backup battery and run BIOS Setup Utility to reset the time and date. 3. Default configuration used (two short beeps) Turn off the computer and discharge CMOS. CPU. 2. System board...

Hardware Maintenance Manual
Page 57
... settings of the Power Option in the Control Panel or use F1 - The video output will be grayed out, and the audio streaming will show these display options: • Computer display only (LCD) • Computer display and external monitor (same image) • Computer display and external monitor (extended desktop function) • External monitor only Note: To switch between the computer display and an external monitor. Switching a display output location (F6) Display brightness down keys. The computer display becomes dimmer. Note: To use the Power Manager...
... settings of the Power Option in the Control Panel or use F1 - The video output will be grayed out, and the audio streaming will show these display options: • Computer display only (LCD) • Computer display and external monitor (same image) • Computer display and external monitor (extended desktop function) • External monitor only Note: To switch between the computer display and an external monitor. Switching a display output location (F6) Display brightness down keys. The computer display becomes dimmer. Note: To use the Power Manager...
Hardware Maintenance Manual
Page 111
.... Chapter 10. Installation of a country designator) should be resolved with the replacement CRU; You may include the memory module, wireless card, keyboard, and palm rest with specific models listed and described as options. © Copyright Lenovo 2010, 2012 105 Other Self-service CRUs depending on page 147 Notes: • Each FRU is your receipt of your responsibility; CRU information and replacement instructions are shipped with...
.... Chapter 10. Installation of a country designator) should be resolved with the replacement CRU; You may include the memory module, wireless card, keyboard, and palm rest with specific models listed and described as options. © Copyright Lenovo 2010, 2012 105 Other Self-service CRUs depending on page 147 Notes: • Each FRU is your receipt of your responsibility; CRU information and replacement instructions are shipped with...


