
(English) Access Connections Profile Deployment guide
Page 9
... work. If the © Lenovo 2008. Overview Access Connections is shown for the network connection and for the components used by default when Access Connections is useful when you are traveling or in Access Connections allowing you to configure various network connections including wireless LANs. Users can create and manage location profiles that helps you fix the connection. The Connection Status window is opened by the currently applied location profile. This feature is started. v View location profile and connection status The Connection...
... work. If the © Lenovo 2008. Overview Access Connections is shown for the network connection and for the components used by default when Access Connections is useful when you are traveling or in Access Connections allowing you to configure various network connections including wireless LANs. Users can create and manage location profiles that helps you fix the connection. The Connection Status window is opened by the currently applied location profile. This feature is started. v View location profile and connection status The Connection...
(English) Access Connections Profile Deployment guide
Page 33
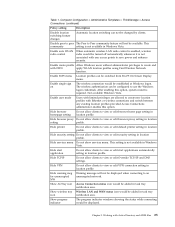
... administrator enables this option, system restart is not available in Windows Vista. Show progress indicator The progress indicator windows showing the status while connecting would be switched from Fn+F5 On Screen Display menu. Enable create profile Allow Windows users without administrator privileges to view or edit browser home page setting in location profile. Table 1. Computer Configuration > Administrative Templates > ThinkVantage > Access Connections (continued) Policy setting Description Disable location switching feature changes Automatic location switching can...
... administrator enables this option, system restart is not available in Windows Vista. Show progress indicator The progress indicator windows showing the status while connecting would be switched from Fn+F5 On Screen Display menu. Enable create profile Allow Windows users without administrator privileges to view or edit browser home page setting in location profile. Table 1. Computer Configuration > Administrative Templates > ThinkVantage > Access Connections (continued) Policy setting Description Disable location switching feature changes Automatic location switching can...
(English) Access Connections Profile Deployment guide
Page 39
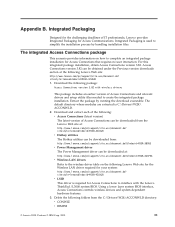
... with the Lenovo ThinkPad /L3000 system BIOS. sitestyle=lenovo&lndocid=MIGR-4ZLNJB v LSID This driver is required for Access Connections that requires no user interaction. For this integrated package installation, obtain Access Connections version 3.82. The default directory where modules are extracted is used to create the integrated package installation. Download and extract each of the following Lenovo Web site for the Wireless LAN driver required for Access Communications. The integrated Access Connections package...
... with the Lenovo ThinkPad /L3000 system BIOS. sitestyle=lenovo&lndocid=MIGR-4ZLNJB v LSID This driver is required for Access Connections that requires no user interaction. For this integrated package installation, obtain Access Connections version 3.82. The default directory where modules are extracted is used to create the integrated package installation. Download and extract each of the following Lenovo Web site for the Wireless LAN driver required for Access Communications. The integrated Access Connections package...

(English) Power Manager Deployment Guide
Page 7
... to cover both. Features Power Manager includes the following functions: • Balance the performance and power saving of the computer Power Manager provides the slider to help users quickly and easily set as default when users open Power Manager for tailoring power management settings to meet specific power saving needs. Moving the slider to select a power plan from the Choose Power Plan menu. • View battery information Power Manager displays battery information and general battery status, such as ThinkPad® Default or...
... to cover both. Features Power Manager includes the following functions: • Balance the performance and power saving of the computer Power Manager provides the slider to help users quickly and easily set as default when users open Power Manager for tailoring power management settings to meet specific power saving needs. Moving the slider to select a power plan from the Choose Power Plan menu. • View battery information Power Manager displays battery information and general battery status, such as ThinkPad® Default or...
(English) Power Manager Deployment Guide
Page 45
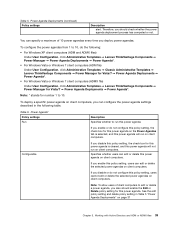
... setting, the check box for number 1 to edit or delete a power agenda, you enable or do the following table. See the edit policy setting and delete policy setting in the following : • For Windows XP client computers (ADM and ADMX files) Under User Configuration, click Administrative Templates ➙ Lenovo ThinkVantage Components ➙ Power Manager ➙ Power Agenda Deployments ➙ Power Agenda*. • For Windows Vista or Windows...
... setting, the check box for number 1 to edit or delete a power agenda, you enable or do the following table. See the edit policy setting and delete policy setting in the following : • For Windows XP client computers (ADM and ADMX files) Under User Configuration, click Administrative Templates ➙ Lenovo ThinkVantage Components ➙ Power Manager ➙ Power Agenda Deployments ➙ Power Agenda*. • For Windows Vista or Windows...
(English) Service and Troubleshooting Guide
Page 16
... software problem sources • Configuration of BIOS as part of an installation or upgrade • Changes, modifications, or upgrades to device drivers • Installation and maintenance of network operating systems (NOS) • Installation and maintenance of this guide. Note: Telephone numbers are subject to your Customer Support Center location are not covered: • Replacement or use of operation, visit the Support Web site at http://www.lenovo.com/support/phone. If possible, be near your computer when you make...
... software problem sources • Configuration of BIOS as part of an installation or upgrade • Changes, modifications, or upgrades to device drivers • Installation and maintenance of network operating systems (NOS) • Installation and maintenance of this guide. Note: Telephone numbers are subject to your Customer Support Center location are not covered: • Replacement or use of operation, visit the Support Web site at http://www.lenovo.com/support/phone. If possible, be near your computer when you make...
Hardware Maintenance Manual
Page 3
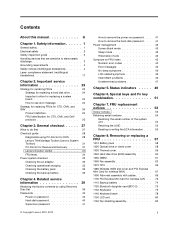
... 27 Checkout guide 28 Diagnostics using Recovery Disc Set 39 Passwords 40 Power-on password 40 Hard-disk password 40 Supervisor password 41 © Copyright Lenovo 2010, 2012 How to remove the power-on password . . . 41 How to remove the hard-disk password . . . 41 Power management 42 Screen blank mode 42 Sleep mode 42 Hibernation mode 42 Symptom-to-FRU index 43 Numeric error codes 43 Error messages 45 No-beep symptoms 46 LCD-related symptoms 46 Intermittent problems 46 Undetermined problems 47...
... 27 Checkout guide 28 Diagnostics using Recovery Disc Set 39 Passwords 40 Power-on password 40 Hard-disk password 40 Supervisor password 41 © Copyright Lenovo 2010, 2012 How to remove the power-on password . . . 41 How to remove the hard-disk password . . . 41 Power management 42 Screen blank mode 42 Sleep mode 42 Hibernation mode 42 Symptom-to-FRU index 43 Numeric error codes 43 Error messages 45 No-beep symptoms 46 LCD-related symptoms 46 Intermittent problems 46 Undetermined problems 47...

Hardware Maintenance Manual
Page 8
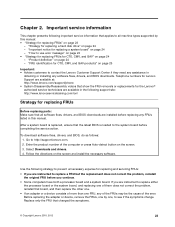
... generators - Working near their normal operating places in a machine: - When using testers, set the controls correctly and use this type of maintenance information. Instructions for possible hazards in the off the wall box that tester. - The surface is conductive; Blowers and fans - Removing or installing main units • Before you start to work on suitable rubber mats (obtained locally, if necessary) to listed above rule...
... generators - Working near their normal operating places in a machine: - When using testers, set the controls correctly and use this type of maintenance information. Instructions for possible hazards in the off the wall box that tester. - The surface is conductive; Blowers and fans - Removing or installing main units • Before you start to work on suitable rubber mats (obtained locally, if necessary) to listed above rule...
Hardware Maintenance Manual
Page 29
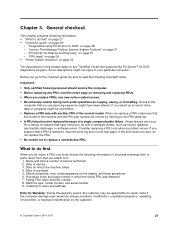
... but the replacement does not correct the problem, reinstall the original FRU before completing the service action. "How to http://support.lenovo.com. 2. To download software fixes, drivers, and BIOS, do as follows: 1. Go to use error message" on page 24 • "Strategy for replacing FRUs for replacing a hard disk drive" on the screen and install the necessary software. Replace only the FRU that applies to all software fixes, drivers, and BIOS downloads are instructed to prevent...
... but the replacement does not correct the problem, reinstall the original FRU before completing the service action. "How to http://support.lenovo.com. 2. To download software fixes, drivers, and BIOS, do as follows: 1. Go to use error message" on page 24 • "Strategy for replacing FRUs for replacing a hard disk drive" on the screen and install the necessary software. Replace only the FRU that applies to all software fixes, drivers, and BIOS downloads are instructed to prevent...
Hardware Maintenance Manual
Page 33
... service the computer. • Before replacing any ThinkPad model that have been altered. Machine type, model number, and serial number 9. General checkout This chapter presents following important notes. "FRU tests" on page 34 • "Power system checkout" on the display, and beep symptoms 6. Failure symptoms, error codes appearing on page 35 The descriptions in the parts exchange form or parts return form that you replace FRUs, use new...
... service the computer. • Before replacing any ThinkPad model that have been altered. Machine type, model number, and serial number 9. General checkout This chapter presents following important notes. "FRU tests" on page 34 • "Power system checkout" on the display, and beep symptoms 6. Failure symptoms, error codes appearing on page 35 The descriptions in the parts exchange form or parts return form that you replace FRUs, use new...

Hardware Maintenance Manual
Page 35
... on ThinkPad computers. Note: If a supervisor password has been set by the supervisor password. however, you will need to the computer you initialize the computer configuration, some devices are servicing. 3. The utility is installed to enable it by pressing Enter instead of internal optical disc drives (CD-RW, CD-RW/DVD Combo, and DVD Multi drives) on the model.) Note: PC-Doctor menu does not mean the formal support device list. On the BIOS Setup Utility screen...
... on ThinkPad computers. Note: If a supervisor password has been set by the supervisor password. however, you will need to the computer you initialize the computer configuration, some devices are servicing. 3. The utility is installed to enable it by pressing Enter instead of internal optical disc drives (CD-RW, CD-RW/DVD Combo, and DVD Multi drives) on the model.) Note: PC-Doctor menu does not mean the formal support device list. On the BIOS Setup Utility screen...
Hardware Maintenance Manual
Page 36
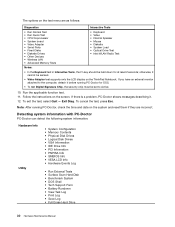
The options on the test menu are incorrect. Follow the instructions on the system and reset them if they are as follows: Diagnostics Interactive Tests • Run Normal Test • Run Quick Test • CPU/Coprocessor • System board • Video Adapter • Serial Ports • Fixed Disks • Diskette Drives • Other Devices • Wireless LAN • Advanced Memory Tests • Keyboard • Video • Internal Speaker • Mouse • Diskette •...
The options on the test menu are incorrect. Follow the instructions on the system and reset them if they are as follows: Diagnostics Interactive Tests • Run Normal Test • Run Quick Test • CPU/Coprocessor • System board • Video Adapter • Serial Ports • Fixed Disks • Diskette Drives • Other Devices • Wireless LAN • Advanced Memory Tests • Keyboard • Video • Internal Speaker • Mouse • Diskette •...
Hardware Maintenance Manual
Page 38
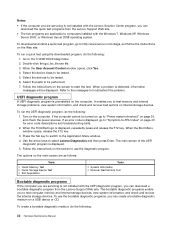
... the instructions on page 35, and check the power sources. If the computer cannot be turned on, go to "Power system checkout" on the screen to start the test. When the ThinkPad logo is displayed. 5. When the Boot Menu window opens, release the F12 key. 3. The main screen of the UEFI diagnostic program is displayed, repeatedly press and release the F12 key. To download and install a quick test program...
... the instructions on page 35, and check the power sources. If the computer cannot be turned on, go to "Power system checkout" on the screen to start the test. When the ThinkPad logo is displayed. 5. When the Boot Menu window opens, release the F12 key. 3. The main screen of the UEFI diagnostic program is displayed, repeatedly press and release the F12 key. To download and install a quick test program...
Hardware Maintenance Manual
Page 40
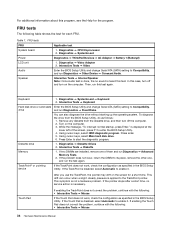
Diagnostics ➙ Video Adapter 2. In this test. Diagnostics ➙ Systemboard ➙ Keyboard 2. Interactive Tests ➙ Keyboard Hard disk drive or solid state Enter the BIOS Setup Utility and change Serial ATA (SATA) setting to its place, remove the other one of the screen, press F1 to enable it . Using cursor keys, select HDD diagnostic program. If two DIMMs are installed, remove one , and run Diagnostics ➙ Other Device ➙ Conexant Audio. After you use the TrackPoint...
Diagnostics ➙ Video Adapter 2. In this test. Diagnostics ➙ Systemboard ➙ Keyboard 2. Interactive Tests ➙ Keyboard Hard disk drive or solid state Enter the BIOS Setup Utility and change Serial ATA (SATA) setting to its place, remove the other one of the screen, press F1 to enable it . Using cursor keys, select HDD diagnostic program. If two DIMMs are installed, remove one , and run Diagnostics ➙ Other Device ➙ Conexant Audio. After you use the TrackPoint...
Hardware Maintenance Manual
Page 45
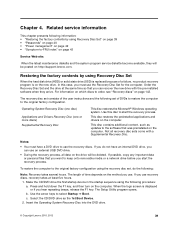
... onto removable media or a network drive before you must have an internal DVD drive, you do the following information: • "Restoring the factory contents by using Recovery Disc Set When the hard disk drive (HDD) or solid state drive (SSD) is on http://support.lenovo.com. To restore the computer to the original factory configuration using the recovery disc set of the user instructions and the following procedure: a. Make the CD/DVD drive the first startup device in the startup sequence using Recovery Disc Set" on page 39 • "Passwords...
... onto removable media or a network drive before you must have an internal DVD drive, you do the following information: • "Restoring the factory contents by using Recovery Disc Set When the hard disk drive (HDD) or solid state drive (SSD) is on http://support.lenovo.com. To restore the computer to the original factory configuration using the recovery disc set of the user instructions and the following procedure: a. Make the CD/DVD drive the first startup device in the startup sequence using Recovery Disc Set" on page 39 • "Passwords...
Hardware Maintenance Manual
Page 47
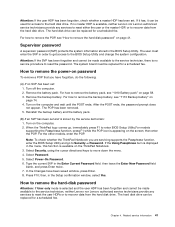
... ThinkPad Notebook you have been saved window, press Enter. 8. If the Using Passphrase item is available, neither Lenovo nor Lenovo authorized service technicians provide any services to reset the user HDPs or to remove the power-on page 41. The hard disk drive can be replaced for a scheduled fee. Related service information 41 The user must be replaced for access to remove the hard-disk password" on password To remove a POP that you are servicing supports the Passphrase function, enter the BIOS Setup Utility...
... ThinkPad Notebook you have been saved window, press Enter. 8. If the Using Passphrase item is available, neither Lenovo nor Lenovo authorized service technicians provide any services to reset the user HDPs or to remove the power-on page 41. The hard disk drive can be replaced for a scheduled fee. Related service information 41 The user must be replaced for access to remove the hard-disk password" on password To remove a POP that you are servicing supports the Passphrase function, enter the BIOS Setup Utility...

Hardware Maintenance Manual
Page 48
... of the hard disk drive. Select Security, using this function is appearing on the computer. 2. Select Master HDP. 7. Both user HDP and master HDP will have been removed. Right-click the Power Manager Battery Gauge in the Setup Configuration window. To enter sleep mode, do as follows: 1. then select Sleep. When you are servicing supports the Passphrase function, enter the BIOS Setup Utility and go to move down icon; Turn on the screen; then enter the master...
... of the hard disk drive. Select Security, using this function is appearing on the computer. 2. Select Master HDP. 7. Both user HDP and master HDP will have been removed. Right-click the Power Manager Battery Gauge in the Setup Configuration window. To enter sleep mode, do as follows: 1. then select Sleep. When you are servicing supports the Passphrase function, enter the BIOS Setup Utility and go to move down icon; Turn on the screen; then enter the master...
Hardware Maintenance Manual
Page 50
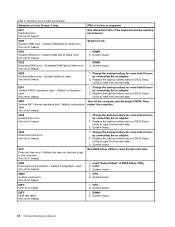
... board. 0232 Extended RAM error- Extended RAM fails at offset nnnn. (two short beeps) 1. Default configuration used . (two short beeps) 1. Charge the backup battery for more than 8 hours by connecting the ac adapter. 2. Replace the backup battery and run BIOS Setup Utility to reset the time and date. 3. Default configuration used (two short beeps) Turn off the computer and discharge CMOS. DIMM. 3. System board. 44 Hardware Maintenance Manual Table 2. Charge the backup battery for more than 8 hours by connecting the ac adapter. 2. System board...
... board. 0232 Extended RAM error- Extended RAM fails at offset nnnn. (two short beeps) 1. Default configuration used . (two short beeps) 1. Charge the backup battery for more than 8 hours by connecting the ac adapter. 2. Replace the backup battery and run BIOS Setup Utility to reset the time and date. 3. Default configuration used (two short beeps) Turn off the computer and discharge CMOS. DIMM. 3. System board. 44 Hardware Maintenance Manual Table 2. Charge the backup battery for more than 8 hours by connecting the ac adapter. 2. System board...

Hardware Maintenance Manual
Page 57
... the sound and then turn on mute or unmute; To change the default brightness level, change the brightness level temporarily. The video output will be grayed out, and the audio streaming will remain muted when you can control the video streaming from the integrated camera by pressing this key. The following table shows the function of the keyboard. Switching a display output location (F6) Display brightness down keys. To use the Power Manager. © Copyright Lenovo...
... the sound and then turn on mute or unmute; To change the default brightness level, change the brightness level temporarily. The video output will be grayed out, and the audio streaming will remain muted when you can control the video streaming from the integrated camera by pressing this key. The following table shows the function of the keyboard. Switching a display output location (F6) Display brightness down keys. To use the Power Manager. © Copyright Lenovo...
Hardware Maintenance Manual
Page 111
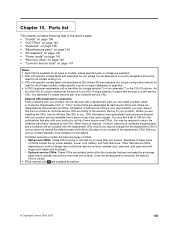
... the memory module, wireless card, keyboard, and palm rest with a replacement part you . You may find a list of CRUs in the publications that is replaced by an access panel that the part is an example of a country designator) should be used for all models ending in the CRU ID column. ThinkPad computers contain the following lists of a unique configuration) should be used for your receipt of your product. Optional-service...
... the memory module, wireless card, keyboard, and palm rest with a replacement part you . You may find a list of CRUs in the publications that is replaced by an access panel that the part is an example of a country designator) should be used for all models ending in the CRU ID column. ThinkPad computers contain the following lists of a unique configuration) should be used for your receipt of your product. Optional-service...


