
(English) Access Connections Profile Deployment guide
Page 9
...automatic location switching between location profiles Access Connections allows you create location profiles that are also supported. Chapter 1. Access Connections includes the following functions: v Create new location profiles Access Connections provides a wizard that helps you to find wireless and network connections quickly and effortlessly. v Switch between Ethernet and wireless LAN connections. Features Access Connections has features that stores the network and Internet configuration settings needed to connect a client computer to a network from a specific location, such...
...automatic location switching between location profiles Access Connections allows you create location profiles that are also supported. Chapter 1. Access Connections includes the following functions: v Create new location profiles Access Connections provides a wizard that helps you to find wireless and network connections quickly and effortlessly. v Switch between Ethernet and wireless LAN connections. Features Access Connections has features that stores the network and Internet configuration settings needed to connect a client computer to a network from a specific location, such...
(English) Access Connections Profile Deployment guide
Page 33
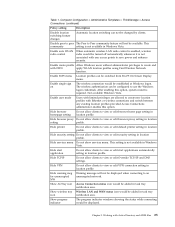
Enable create profile Allow Windows users without administrator privileges to create and with Ethernet or wireless connections and switch between any access points to create new location profiles with FWN apply WLAN location profiles using Find Wireless Network function. After enabling this option. This setting is required. Hide start applications automatically setting in location profile. Hide TCPIP Do not allow clients to view or edit security setting in location profile. Chapter 5. Not available Windows Vista. Hide browser homepage...
Enable create profile Allow Windows users without administrator privileges to create and with Ethernet or wireless connections and switch between any access points to create new location profiles with FWN apply WLAN location profiles using Find Wireless Network function. After enabling this option. This setting is required. Hide start applications automatically setting in location profile. Hide TCPIP Do not allow clients to view or edit security setting in location profile. Chapter 5. Not available Windows Vista. Hide browser homepage...
(English) Access Connections Profile Deployment guide
Page 39
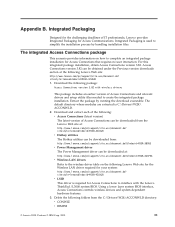
... relevant drivers and setup utility files needed to simplify the installation process by running the download executable. sitestyle=lenovo&lndocid=MIGR-4ZLNJB v Hotkey utilities The Hotkey utilities can be downloaded at : http://www.lenovo.com/pc/support/site.wss/document.do ? Appendix B. Integrated Packaging Designed for Access Communications. The integrated Access Connections package This scenario provides information on the following package: Access Connections version 3.82 with the Lenovo ThinkPad /L3000 system BIOS. Using...
... relevant drivers and setup utility files needed to simplify the installation process by running the download executable. sitestyle=lenovo&lndocid=MIGR-4ZLNJB v Hotkey utilities The Hotkey utilities can be downloaded at : http://www.lenovo.com/pc/support/site.wss/document.do ? Appendix B. Integrated Packaging Designed for Access Communications. The integrated Access Connections package This scenario provides information on the following package: Access Connections version 3.82 with the Lenovo ThinkPad /L3000 system BIOS. Using...
Hardware Maintenance Manual
Page 3
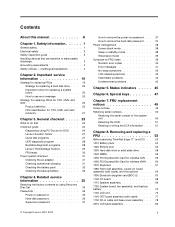
... ac adapter 31 Checking operational charging 31 Checking the battery pack 32 Checking the backup battery 32 Chapter 4. General checkout . . . . . 23 What to do first 23 Checkout guide 24 Diagnostics using Recovery Disc Set 35 Passwords 36 Power-on password 36 Hard-disk password 36 Supervisor password 37 © Copyright Lenovo 2010, 2012 How to electrostatic discharge 3 Grounding requirements 4 Safety notices - Removing and replacing a FRU 53 Before servicing ThinkPad Edge 11" and E10 . . 53 1010 Battery...
... ac adapter 31 Checking operational charging 31 Checking the battery pack 32 Checking the backup battery 32 Chapter 4. General checkout . . . . . 23 What to do first 23 Checkout guide 24 Diagnostics using Recovery Disc Set 35 Passwords 36 Power-on password 36 Hard-disk password 36 Supervisor password 37 © Copyright Lenovo 2010, 2012 How to electrostatic discharge 3 Grounding requirements 4 Safety notices - Removing and replacing a FRU 53 Before servicing ThinkPad Edge 11" and E10 . . 53 1010 Battery...
Hardware Maintenance Manual
Page 8
... and test equipment. If an electrical accident occurs, you start to power-off the wall box that has hazardous voltages. • Disconnect all power before: - Removing or installing main units • Before you can occur only when there is conductive; When using testers, set the controls correctly and use this type of maintenance information. Pumps - If you cannot unplug it has...
... and test equipment. If an electrical accident occurs, you start to power-off the wall box that has hazardous voltages. • Disconnect all power before: - Removing or installing main units • Before you can occur only when there is conductive; When using testers, set the controls correctly and use this type of maintenance information. Pumps - If you cannot unplug it has...
Hardware Maintenance Manual
Page 25
... Lenovo 2010, 2012 19 "Product definition" on the screen and install the necessary software. Select Downloads and drivers. 4. Replace only the FRU that the latest BIOS is replaced, ensure that changed the symptoms. Attention: The setup configuration on page 20 - Note the current configuration settings (using the View Configuration option); "FRU identification for replacing and servicing FRUs: • If you are servicing may have both a processor board and a system board. To download software fixes, drivers, and BIOS...
... Lenovo 2010, 2012 19 "Product definition" on the screen and install the necessary software. Select Downloads and drivers. 4. Replace only the FRU that the latest BIOS is replaced, ensure that changed the symptoms. Attention: The setup configuration on page 20 - Note the current configuration settings (using the View Configuration option); "FRU identification for replacing and servicing FRUs: • If you are servicing may have both a processor board and a system board. To download software fixes, drivers, and BIOS...
Hardware Maintenance Manual
Page 29
... - If you replace FRUs, use new nylon-coated screws. • Be extremely careful during such write operations as cosmic radiation, electrostatic discharge, or software errors. "Testing the computer" on page 32 - Drives in the computer that you replace a FRU, make sure that you go to the checkout guide, be replaced because of the machine and the FRU part number are servicing sequence might not...
... - If you replace FRUs, use new nylon-coated screws. • Be extremely careful during such write operations as cosmic radiation, electrostatic discharge, or software errors. "Testing the computer" on page 32 - Drives in the computer that you replace a FRU, make sure that you go to the checkout guide, be replaced because of the machine and the FRU part number are servicing sequence might not...
Hardware Maintenance Manual
Page 31
... a startup device. 4. If the computer cannot be started from a USB attached optical drive. If an error code appears, go to test the hardware features. When the ThinkPad logo comes up , immediately press F1 to -FRU index" on page 31, and check the power sources. Note: You can be powered on, go to "Symptom-to enter the BIOS Setup Utility. 1. Set the external optical drive as follows: 1. Press cursor keys...
... a startup device. 4. If the computer cannot be started from a USB attached optical drive. If an error code appears, go to test the hardware features. When the ThinkPad logo comes up , immediately press F1 to -FRU index" on page 31, and check the power sources. Note: You can be powered on, go to "Symptom-to enter the BIOS Setup Utility. 1. Set the external optical drive as follows: 1. Press cursor keys...

Hardware Maintenance Manual
Page 32
Some unsupported device names may appear in menus. All Rights Reserved. Press ENTER to Active. • Optical Drive Test supports only the internal optical drive. 12. Follow the instructions on the test menu are incorrect. 26 Hardware Maintenance Manual To cancel the test, press Esc. If you have an external monitor attached to move in the PC-Doctor menu. Use the cursor keys and ESC to your computer...
Some unsupported device names may appear in menus. All Rights Reserved. Press ENTER to Active. • Optical Drive Test supports only the internal optical drive. 12. Follow the instructions on the test menu are incorrect. 26 Hardware Maintenance Manual To cancel the test, press Esc. If you have an external monitor attached to move in the PC-Doctor menu. Use the cursor keys and ESC to your computer...
Hardware Maintenance Manual
Page 33
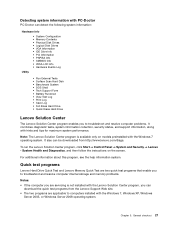
To run the Lenovo Solution Center program, click Start ➙ Control Panel ➙ System and Security ➙ Lenovo - System Health and Diagnostics, and then follow the instructions on models preinstalled with the Windows 7, Windows XP, Windows Server 2003, or Windows Server 2008 operating system. Quick test programs Lenovo Hard Drive Quick Test and Lenovo Memory Quick Test are two quick test programs that enable you to troubleshoot and resolve computer internal storage and memory problems. Notes: •...
To run the Lenovo Solution Center program, click Start ➙ Control Panel ➙ System and Security ➙ Lenovo - System Health and Diagnostics, and then follow the instructions on models preinstalled with the Windows 7, Windows XP, Windows Server 2003, or Windows Server 2008 operating system. Quick test programs Lenovo Hard Drive Quick Test and Lenovo Memory Quick Test are two quick test programs that enable you to troubleshoot and resolve computer internal storage and memory problems. Notes: •...
Hardware Maintenance Manual
Page 36
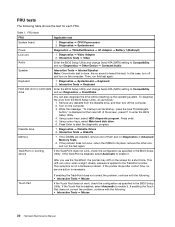
...; Video Adapter 2. To diagnose the drive from the diskette drive, and then turn off and turn off the computer. 2. Remove any diskette from the BIOS Setup Utility, do as follows: 1. Using cursor keys, select HDD diagnostic program. Press enter. 5. If enabling the Touch Pad does not correct the problem, continue with the following : • Interactive Tests ➙ Mouse 30 Hardware Maintenance Manual Diagnostics ➙ CPU/Coprocessor 2. This symptom is not a hardware problem. TrackPoint or pointing device...
...; Video Adapter 2. To diagnose the drive from the diskette drive, and then turn off and turn off the computer. 2. Remove any diskette from the BIOS Setup Utility, do as follows: 1. Using cursor keys, select HDD diagnostic program. Press enter. 5. If enabling the Touch Pad does not correct the problem, continue with the following : • Interactive Tests ➙ Mouse 30 Hardware Maintenance Manual Diagnostics ➙ CPU/Coprocessor 2. This symptom is not a hardware problem. TrackPoint or pointing device...
Hardware Maintenance Manual
Page 41
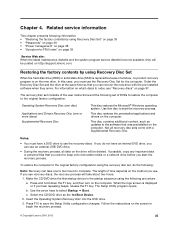
... screen is on the computer. The Setup Utility program opens. b. Order the Recovery Disc Set and the drive at the same time so that you must have an internal DVD drive, you can use an external USB DVD drive. • During the recovery process, all recovery disc sets come with the pre-installed software when they will take one or more discs) Supplemental Recovery Disc This disc restores the Microsoft® Windows operating system. Make the CD/DVD drive the first startup device in the startup...
... screen is on the computer. The Setup Utility program opens. b. Order the Recovery Disc Set and the drive at the same time so that you must have an internal DVD drive, you can use an external USB DVD drive. • During the recovery process, all recovery disc sets come with the pre-installed software when they will take one or more discs) Supplemental Recovery Disc This disc restores the Microsoft® Windows operating system. Make the CD/DVD drive the first startup device in the startup...
Hardware Maintenance Manual
Page 42
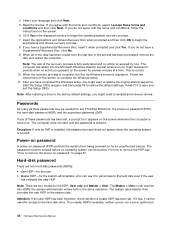
... from being powered on the screen to reinstall some device drivers. If no activity is turned on. After you have completed the Windows setup, you might want to begin the operating system recovery process. 7. the system administrator enters both in the displayed window to remove the power-on password" on password (POP), the hard-disk password (HDP), and the supervisor password (SVP). Start the Setup Utility program and then press F9 to the hard disk drive. Exception...
... from being powered on the screen to reinstall some device drivers. If no activity is turned on. After you have completed the Windows setup, you might want to begin the operating system recovery process. 7. the system administrator enters both in the displayed window to remove the power-on password" on password (POP), the hard-disk password (HDP), and the supervisor password (SVP). Start the Setup Utility program and then press F9 to the hard disk drive. Exception...

Hardware Maintenance Manual
Page 43
... in order to get access to the BIOS Setup Utility and change the system configuration. Remove the battery pack. Remove the backup battery. then enter the POP. For the other models, enter the POP. If the Using Passphrase item is displayed in the Setup confirmation window, select Yes. How to remove the hard-disk password Attention: If User only mode is appearing on the ThinkPad Notebook. 3. The hard disk drive can be made available to the service technician, neither Lenovo nor Lenovo authorized service...
... in order to get access to the BIOS Setup Utility and change the system configuration. Remove the battery pack. Remove the backup battery. then enter the POP. For the other models, enter the POP. If the Using Passphrase item is displayed in the Setup confirmation window, select Yes. How to remove the hard-disk password Attention: If User only mode is appearing on the ThinkPad Notebook. 3. The hard disk drive can be made available to the service technician, neither Lenovo nor Lenovo authorized service...
Hardware Maintenance Manual
Page 44
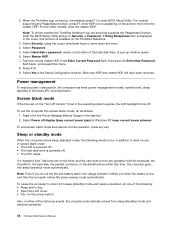
... sleep (standby) mode and resumes operation: 38 Hardware Maintenance Manual Type the current master HDP in the task bar. 2. Both user HDP and master HDP will have been removed. Note: To check whether the ThinkPad Notebook you are servicing supports the Passphrase function, enter the BIOS Setup Utility and go to move down the menu. 4. Power management To reduce power consumption, the computer has three power management modes: screen blank, sleep (standby in the Setup Configuration window. For the other models, enter...
... sleep (standby) mode and resumes operation: 38 Hardware Maintenance Manual Type the current master HDP in the task bar. 2. Both user HDP and master HDP will have been removed. Note: To check whether the ThinkPad Notebook you are servicing supports the Passphrase function, enter the BIOS Setup Utility and go to move down the menu. 4. Power management To reduce power consumption, the computer has three power management modes: screen blank, sleep (standby in the Setup Configuration window. For the other models, enter...
Hardware Maintenance Manual
Page 47
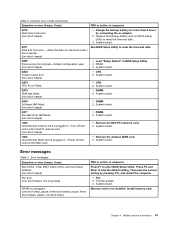
... short beeps) Run BIOS Setup Utility to enter BIOS Setup Utility. Error messages Table 3. Related service information 41 System board. 02F6 Software NMI failed (two short beeps) 1. DIMM. 2. Remove the wireless WAN card. 2. Then save the current setting by connecting the ac adapter. 2. Thermal grease. 3. Chapter 4. DIMM. 3. CPU. 2. System board. Table 2. Replace the backup battery and run BIOS Setup Utility to load the default setting. either the date nor the time is set in BIOS Setup Utility. 2. System board. 02D0 System cache...
... short beeps) Run BIOS Setup Utility to enter BIOS Setup Utility. Error messages Table 3. Related service information 41 System board. 02F6 Software NMI failed (two short beeps) 1. DIMM. 2. Remove the wireless WAN card. 2. Then save the current setting by connecting the ac adapter. 2. Thermal grease. 3. Chapter 4. DIMM. 3. CPU. 2. System board. Table 2. Replace the backup battery and run BIOS Setup Utility to load the default setting. either the date nor the time is set in BIOS Setup Utility. 2. System board. 02D0 System cache...
Hardware Maintenance Manual
Page 49
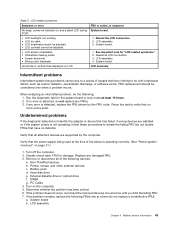
... the adapter or device that has failed, if wrong devices are supported by the FRU code. Turn off the computer. 2. DIMM g. If the problem does not recur, reconnect the removed devices one at the time of causes that all LCD connectors. 3. System board. 1. LCD assembly. 4. Verify that no error is detected, replace the FRU shown by the computer. Determine whether the problem has been solved. 6. Hard disk drive...
... the adapter or device that has failed, if wrong devices are supported by the FRU code. Turn off the computer. 2. DIMM g. If the problem does not recur, reconnect the removed devices one at the time of causes that all LCD connectors. 3. System board. 1. LCD assembly. 4. Verify that no error is detected, replace the FRU shown by the computer. Determine whether the problem has been solved. 6. Hard disk drive...
Hardware Maintenance Manual
Page 53
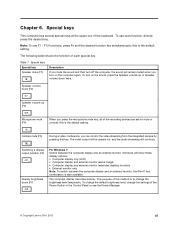
... location (F6) Display brightness down keys. The purpose of the Power Option in the Control Panel or use the Power Manager. © Copyright Lenovo 2010, 2012 47 To use F1 - F12 functions, press Fn and the desired function key simultaneously; Speaker volume down (F2) Speaker volume up or Speaker volume down (F7) For Windows 7: Switch between the computer display and an external monitor, the Win+P key combination is to change the settings of this is the default setting. The video...
... location (F6) Display brightness down keys. The purpose of the Power Option in the Control Panel or use the Power Manager. © Copyright Lenovo 2010, 2012 47 To use F1 - F12 functions, press Fn and the desired function key simultaneously; Speaker volume down (F2) Speaker volume up or Speaker volume down (F7) For Windows 7: Switch between the computer display and an external monitor, the Win+P key combination is to change the settings of this is the default setting. The video...
Hardware Maintenance Manual
Page 95
... parts" on page 96 • "Power cords" on page 96 • "Recovery discs" on product design may be charged for your Lenovo Limited Warranty documentation for all types or models, unless specific types or models are concealed by an access panel that are specified. • FRU with finger print reader and touchpad. - You may include the memory module, wireless card, keyboard, and palm rest with specific models listed and described as options. © Copyright Lenovo...
... parts" on page 96 • "Power cords" on page 96 • "Recovery discs" on product design may be charged for your Lenovo Limited Warranty documentation for all types or models, unless specific types or models are concealed by an access panel that are specified. • FRU with finger print reader and touchpad. - You may include the memory module, wireless card, keyboard, and palm rest with specific models listed and described as options. © Copyright Lenovo...
(English) Power Manager Deployment Guide
Page 45
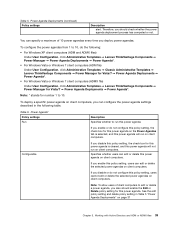
... computers. If you disable or do the following table. See the edit policy setting and delete policy setting in the following : • For Windows XP client computers (ADM and ADMX files) Under User Configuration, click Administrative Templates ➙ Lenovo ThinkVantage Components ➙ Power Manager ➙ Power Agenda Deployments ➙ Power Agenda*. • For Windows Vista or Windows 7 client computers (ADM file) Under User Configuration, click Administrative...
... computers. If you disable or do the following table. See the edit policy setting and delete policy setting in the following : • For Windows XP client computers (ADM and ADMX files) Under User Configuration, click Administrative Templates ➙ Lenovo ThinkVantage Components ➙ Power Manager ➙ Power Agenda Deployments ➙ Power Agenda*. • For Windows Vista or Windows 7 client computers (ADM file) Under User Configuration, click Administrative...


