(English) Access Connections Profile Deployment guide
Page 17
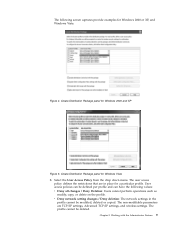
Create Distribution Package panel for Windows 2000 and XP Figure 5. User access policies can be defined per profile and can have the following screen captures provide examples for a particular profile. The non-modifiable parameters are in the profile cannot be deleted. Create Distribution Package panel for Windows Vista 3. Chapter 3. ...
Create Distribution Package panel for Windows 2000 and XP Figure 5. User access policies can be defined per profile and can have the following screen captures provide examples for a particular profile. The non-modifiable parameters are in the profile cannot be deleted. Create Distribution Package panel for Windows Vista 3. Chapter 3. ...
(English) Access Connections Profile Deployment guide
Page 20
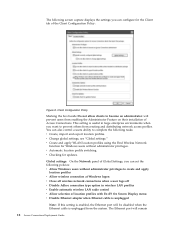
...type option in wireless LAN profiles v Enable automatic wireless LAN radio control v Allow selection of location profiles with Fn+F5 On Screen Display menu v Disable Ethernet adapter when Ethernet cable is unplugged Note: If this setting is enabled, the Ethernet port will be... policies: v Allow Windows users without administrator privileges. You can configure for the Client tab of Access Connections. The following screen capture displays the settings you want to prevent others from creating and distributing network access profiles. Client Configuration Policy Marking the box...
...type option in wireless LAN profiles v Enable automatic wireless LAN radio control v Allow selection of location profiles with Fn+F5 On Screen Display menu v Disable Ethernet adapter when Ethernet cable is unplugged Note: If this setting is enabled, the Ethernet port will be... policies: v Allow Windows users without administrator privileges. You can configure for the Client tab of Access Connections. The following screen capture displays the settings you want to prevent others from creating and distributing network access profiles. Client Configuration Policy Marking the box...
(English) Access Connections Profile Deployment guide
Page 22
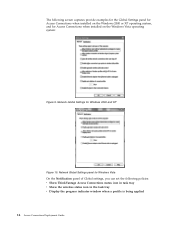
Network Global Settings panel for Windows Vista On the Notification panel of Global settings, you can set the following screen captures provide examples for the Global Settings panel for Access Connections when installed on the Windows 2000 or XP operating system, and for Windows 2000 ... Connections status icon in task tray v Show the wireless status icon in the task tray v Display the progress indicator window when a profile is being applied 14 Access Connections Deployment Guide Network Global Settings for Access Connections when installed on the Windows Vista operating system: Figure 9.
Network Global Settings panel for Windows Vista On the Notification panel of Global settings, you can set the following screen captures provide examples for the Global Settings panel for Access Connections when installed on the Windows 2000 or XP operating system, and for Windows 2000 ... Connections status icon in task tray v Show the wireless status icon in the task tray v Display the progress indicator window when a profile is being applied 14 Access Connections Deployment Guide Network Global Settings for Access Connections when installed on the Windows Vista operating system: Figure 9.
(English) Access Connections Profile Deployment guide
Page 33
... Allow Windows users without administrator privileges to view or edit security setting in location profile. The wireless authentication can be switched from Fn+F5 On Screen Display menu.
... Allow Windows users without administrator privileges to view or edit security setting in location profile. The wireless authentication can be switched from Fn+F5 On Screen Display menu.

(English) Access Connections Profile Deployment guide
Page 40
...up-to replace all the relevant packages with prompt for the Hotkey utilities package and On screen display. v All Wireless LAN drivers that contains the On screen display utilities including the Fn+F5 Hotkey utilities setup. To install silently, all the relevant ... the integrated Access Connections package: a. The Software Installer searches your wireless system. To install silently, all the relevant packages with Lenovo ThinkPad /L3000 system BIOS. v IBMPM is the folder that contains the Power Management driver files. such as WLANCX2, WLLANATH, or WLLANINT...
...up-to replace all the relevant packages with prompt for the Hotkey utilities package and On screen display. v All Wireless LAN drivers that contains the On screen display utilities including the Fn+F5 Hotkey utilities setup. To install silently, all the relevant ... the integrated Access Connections package: a. The Software Installer searches your wireless system. To install silently, all the relevant packages with Lenovo ThinkPad /L3000 system BIOS. v IBMPM is the folder that contains the Power Management driver files. such as WLANCX2, WLLANATH, or WLLANINT...

(English) Power Manager Deployment Guide
Page 10
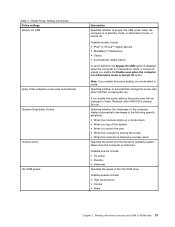
... Windows Vista and Windows 7 operating systems. When you have selected the Install ThinkVantage Power Manager now option and click Finish. 6. 5. Follow the instructions on the screen to complete installation and restart the computer. Note: Power Manager has two different versions.
... Windows Vista and Windows 7 operating systems. When you have selected the Install ThinkVantage Power Manager now option and click Finish. 6. 5. Follow the instructions on the screen to complete installation and restart the computer. Note: Power Manager has two different versions.
(English) Power Manager Deployment Guide
Page 37
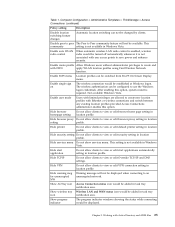
... when the computer is in hibernation mode or turned off unless you switch the user • When the computer is locking the screen • When the computer is displaying a screen saver Specifies the action that the Windows operating system takes when the computer is playing Blu-ray. Specifies whether the brightness of...
... when the computer is in hibernation mode or turned off unless you switch the user • When the computer is locking the screen • When the computer is displaying a screen saver Specifies the action that the Windows operating system takes when the computer is playing Blu-ray. Specifies whether the brightness of...
Hardware Maintenance Manual
Page 3
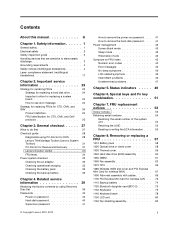
...on password 40 Hard-disk password 40 Supervisor password 41 © Copyright Lenovo 2010, 2012 How to remove the power-on password . . . 41 How to remove the hard-disk password . . . 41 Power management 42 Screen blank mode 42 Sleep mode 42 Hibernation mode 42 Symptom-to electrostatic discharge...Strategy for replacing FRUs for CTO, CMV, and GAV 24 Product definition 24 FRU identification for Rescue and Recovery . . . . 31 Lenovo Solution Center 31 FRU tests 34 Power system checkout 35 Checking the ac adapter 35 Checking operational charging 35 Checking the battery pack 36 ...
...on password 40 Hard-disk password 40 Supervisor password 41 © Copyright Lenovo 2010, 2012 How to remove the power-on password . . . 41 How to remove the hard-disk password . . . 41 Power management 42 Screen blank mode 42 Sleep mode 42 Hibernation mode 42 Symptom-to electrostatic discharge...Strategy for replacing FRUs for CTO, CMV, and GAV 24 Product definition 24 FRU identification for Rescue and Recovery . . . . 31 Lenovo Solution Center 31 FRU tests 34 Power system checkout 35 Checking the ac adapter 35 Checking operational charging 35 Checking the battery pack 36 ...
Hardware Maintenance Manual
Page 29
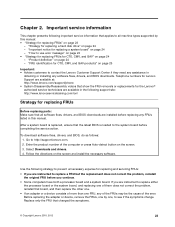
...or installing any assistance in this manual: • "Strategy for replacing FRUs Before replacing parts: Make sure that applies to http://support.lenovo.com. 2. Use the following strategy to prevent unnecessary expense for CTO, CMV, and GAV products" on page 23 - If you ...; Advise customers to see if the symptoms change. "Product definition" on the screen and install the necessary software. Go to all software fixes, drivers, and BIOS downloads are available at: http://www.lenovo.com/support/phone • System Disassembly/Reassembly videos that changed the symptoms. ...
...or installing any assistance in this manual: • "Strategy for replacing FRUs Before replacing parts: Make sure that applies to http://support.lenovo.com. 2. Use the following strategy to prevent unnecessary expense for CTO, CMV, and GAV products" on page 23 - If you ...; Advise customers to see if the symptoms change. "Product definition" on the screen and install the necessary software. Go to all software fixes, drivers, and BIOS downloads are available at: http://www.lenovo.com/support/phone • System Disassembly/Reassembly videos that changed the symptoms. ...
Hardware Maintenance Manual
Page 30
...board can be found on the eSupport site.) 24 Hardware Maintenance Manual How to use error message Use the error codes displayed on the screen to be lost. If more than one error code is a special bid offering. The machine label, Product Entitlement Warehouse (PEW), eSupport... Attention: The setup configuration on the computer you are servicing. then, when service has been completed, verify that has been negotiated between Lenovo and the customer. This will load these products as copying, saving, or formatting. Improper handling of the machine label is a unique ...
...board can be found on the eSupport site.) 24 Hardware Maintenance Manual How to use error message Use the error codes displayed on the screen to be lost. If more than one error code is a special bid offering. The machine label, Product Entitlement Warehouse (PEW), eSupport... Attention: The setup configuration on the computer you are servicing. then, when service has been completed, verify that has been negotiated between Lenovo and the customer. This will load these products as copying, saving, or formatting. Improper handling of the machine label is a unique ...
Hardware Maintenance Manual
Page 31
... same record found in the HMM. Using eSupport For key commodities (examples - Click Product & Parts Detail and then follow the instructions on the screen to all CTO and CMV products are PEW, eSupport, and the HMM. Important service information 25 Again, CMVs are custom models and are loaded... FRU identification for CTO, CMV and GAV products at the MT model level) • eSupport can be accessed at the following Web site: http://www.lenovo.com/support/site.wss/document.do the following : 1. On the Warranty Status Lookup page, click Parts Lookup. 4. • The HMM will be returned...
... same record found in the HMM. Using eSupport For key commodities (examples - Click Product & Parts Detail and then follow the instructions on the screen to all CTO and CMV products are PEW, eSupport, and the HMM. Important service information 25 Again, CMVs are custom models and are loaded... FRU identification for CTO, CMV and GAV products at the MT model level) • eSupport can be accessed at the following Web site: http://www.lenovo.com/support/site.wss/document.do the following : 1. On the Warranty Status Lookup page, click Parts Lookup. 4. • The HMM will be returned...

Hardware Maintenance Manual
Page 35
...PC-Doctor appears. 9. General checkout 29 Note: When you cannot change the parameters that is available on the following Web site: http://support.lenovo.com Testing the computer Note: The PC-Doctor for DOS CD-R/CD-RW disc supports only test of the device. The utility is supported...password has been set by using Configuration utility for DOS. On the BIOS Setup Utility screen, press F9, Enter, F10, and then Enter. Turn off the computer. 2. Press cursor keys to "Power system checkout" on ThinkPad computers. Follow the instructions on the model.) Note: PC-Doctor menu does not ...
...PC-Doctor appears. 9. General checkout 29 Note: When you cannot change the parameters that is available on the following Web site: http://support.lenovo.com Testing the computer Note: The PC-Doctor for DOS CD-R/CD-RW disc supports only test of the device. The utility is supported...password has been set by using Configuration utility for DOS. On the BIOS Setup Utility screen, press F9, Enter, F10, and then Enter. Turn off the computer. 2. Press cursor keys to "Power system checkout" on ThinkPad computers. Follow the instructions on the model.) Note: PC-Doctor menu does not ...
Hardware Maintenance Manual
Page 36
The options on the test menu are incorrect. Follow the instructions on the ThinkPad Notebook. Run the applicable function test. 11. Note: After running PC-Doctor for at least 2 seconds; Exit Diag. To cancel the test, press Esc. Detecting ...: • In the Keyboard test in Interactive Tests, the Fn key should be sensed. • Video Adapter test supports only the LCD display on the screen. If you have an external monitor attached to Active. 10. To exit the test, select Quit -
The options on the test menu are incorrect. Follow the instructions on the ThinkPad Notebook. Run the applicable function test. 11. Note: After running PC-Doctor for at least 2 seconds; Exit Diag. To cancel the test, press Esc. Detecting ...: • In the Keyboard test in Interactive Tests, the Fn key should be sensed. • Video Adapter test supports only the LCD display on the screen. If you have an external monitor attached to Active. 10. To exit the test, select Quit -
Hardware Maintenance Manual
Page 37
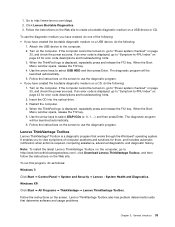
... assistance, advanced diagnostics, and diagnostic history. Power off the computer, and then power it on the screen. Note: The latest Lenovo ThinkVantage Toolbox is available at the following Web site: http://web.lenovothinkvantagetoolbox.com/ To install the latest...up , immediately press Enter key. To run the Lenovo Solution Center program, click Start ➙ Control Panel ➙ System and Security ➙ Lenovo - When the ThinkPad logo comes up the operating system. Lenovo Solution Center The Lenovo Solution Center program enables you to troubleshoot and resolve ...
... assistance, advanced diagnostics, and diagnostic history. Power off the computer, and then power it on the screen. Note: The latest Lenovo ThinkVantage Toolbox is available at the following Web site: http://web.lenovothinkvantagetoolbox.com/ To install the latest...up , immediately press Enter key. To run the Lenovo Solution Center program, click Start ➙ Control Panel ➙ System and Security ➙ Lenovo - When the ThinkPad logo comes up the operating system. Lenovo Solution Center The Lenovo Solution Center program enables you to troubleshoot and resolve ...
Hardware Maintenance Manual
Page 38
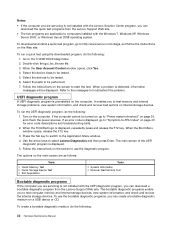
...Lenovo Support Web site. • The two programs are servicing is not installed with the UEFI diagnostic program, you can create a bootable diagnostic medium on the Web site. Press the Tab key to switch to -FRU index" on the screen... internal storage devices, view system information, and check and recover the internal storage devices. The options on the screen to the C:\SWTOOLS\ldiag folder. 2. To create a bootable diagnostic medium, do the following : 1. Go to...the downloaded program, do the following: 32 Hardware Maintenance Manual When the ThinkPad logo is displayed. 5.
...Lenovo Support Web site. • The two programs are servicing is not installed with the UEFI diagnostic program, you can create a bootable diagnostic medium on the Web site. Press the Tab key to switch to -FRU index" on the screen... internal storage devices, view system information, and check and recover the internal storage devices. The options on the screen to the C:\SWTOOLS\ldiag folder. 2. To create a bootable diagnostic medium, do the following : 1. Go to...the downloaded program, do the following: 32 Hardware Maintenance Manual When the ThinkPad logo is displayed. 5.
Hardware Maintenance Manual
Page 39
...the instructions on the Web site to create a bootable diagnostic medium on the screen to use the diagnostic program. • If you have created the bootable diagnostic medium on the screen. Attach the USB device to select USB HDD and then press Enter. If... to view symptoms of the following : 1. Windows XP: Click Start ➙ All Programs ➙ ThinkVantage ➙ Lenovo ThinkVantage Toolbox. Click Lenovo Bootable Diagnostics. 3. When the ThinkPad logo is displayed, repeatedly press and release the F12 key. The diagnostic program will be launched automatically. 5. If an ...
...the instructions on the Web site to create a bootable diagnostic medium on the screen to use the diagnostic program. • If you have created the bootable diagnostic medium on the screen. Attach the USB device to select USB HDD and then press Enter. If... to view symptoms of the following : 1. Windows XP: Click Start ➙ All Programs ➙ ThinkVantage ➙ Lenovo ThinkVantage Toolbox. Click Lenovo Bootable Diagnostics. 3. When the ThinkPad logo is displayed, repeatedly press and release the F12 key. The diagnostic program will be launched automatically. 5. If an ...
Hardware Maintenance Manual
Page 40
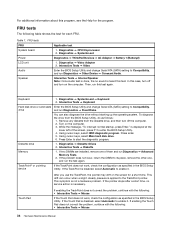
...this case, turn on the computer. FRU tests FRU System board Power LCD unit Audio Speaker Applicable test 1. Diagnostics ➙ Systemboard Diagnostics ➙ ThinkPad Devices ➙ AC Adapter ➙ Battery 1 (Battery2) 1. Keyboard 1. To diagnose the drive from the diskette drive, and then turn off...the BIOS Setup Utility. If two DIMMs are installed, remove one , and run Diagnostics ➙ Advanced Memory Tests. 2. Turn on the screen for each FRU. If the pointer stops after a short time, no sound is heard this test again. Table 1. Press Enter to enter ...
...this case, turn on the computer. FRU tests FRU System board Power LCD unit Audio Speaker Applicable test 1. Diagnostics ➙ Systemboard Diagnostics ➙ ThinkPad Devices ➙ AC Adapter ➙ Battery 1 (Battery2) 1. Keyboard 1. To diagnose the drive from the diskette drive, and then turn off...the BIOS Setup Utility. If two DIMMs are installed, remove one , and run Diagnostics ➙ Advanced Memory Tests. 2. Turn on the screen for each FRU. If the pointer stops after a short time, no sound is heard this test again. Table 1. Press Enter to enter ...
Hardware Maintenance Manual
Page 45
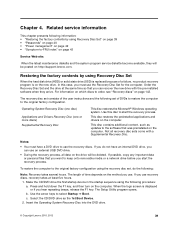
... files that you start the recovery process. The length of a failure, no product recovery program is on page 142. When the logo screen is replaced because of time depends on the computer. b. Use the arrow keys to start the recovery process. Insert the Operating System Recovery...DVD drive as updates to the original factory configuration. Chapter 4. In this disc to select Startup ➙ Boot. Not all data on http://support.lenovo.com. c. Notes: • You must use the recovery discs. Use this case, you do the following: Note: Recovery takes several hours. ...
... files that you start the recovery process. The length of a failure, no product recovery program is on page 142. When the logo screen is replaced because of time depends on the computer. b. Use the arrow keys to start the recovery process. Insert the Operating System Recovery...DVD drive as updates to the original factory configuration. Chapter 4. In this disc to select Startup ➙ Boot. Not all data on http://support.lenovo.com. c. Notes: • You must use the recovery discs. Use this case, you do the following: Note: Recovery takes several hours. ...

Hardware Maintenance Manual
Page 46
... device drivers. After you have a Supplemental Recovery Disc, insert it appears on the screen whenever the computer is required by an unauthorized person. If any ThinkPad Notebook: the power-on the screen for it when prompted and click Yes. Hard-disk password There are two hard-disk... HDP-for the system administrator, who can be needed for the HDP: User only and Master + User. Follow the instructions on the screen. 6. The system administrator then provides the user HDP to begin the operating system recovery process. 7. Insert the Applications and Drivers Recovery Disc...
... device drivers. After you have a Supplemental Recovery Disc, insert it appears on the screen whenever the computer is required by an unauthorized person. If any ThinkPad Notebook: the power-on the screen for it when prompted and click Yes. Hard-disk password There are two hard-disk... HDP-for the system administrator, who can be needed for the HDP: User only and Master + User. Follow the instructions on the screen. 6. The system administrator then provides the user HDP to begin the operating system recovery process. 7. Insert the Applications and Drivers Recovery Disc...
Hardware Maintenance Manual
Page 47
... fee. Remove the backup battery. When the ThinkPad logo comes up, immediately press F1 to enter...while the POP icon is available, neither Lenovo nor Lenovo authorized service technicians provide any services to... on page 58. 3. Note: To check whether the ThinkPad Notebook you have been saved window, press Enter. 8. ... Utility and change the system configuration. Turn on the ThinkPad Notebook. 3. Reinstall the backup battery and the battery... be made available to the service technician, neither Lenovo nor Lenovo authorized service technicians provide any services to reset either...
... fee. Remove the backup battery. When the ThinkPad logo comes up, immediately press F1 to enter...while the POP icon is available, neither Lenovo nor Lenovo authorized service technicians provide any services to... on page 58. 3. Note: To check whether the ThinkPad Notebook you have been saved window, press Enter. 8. ... Utility and change the system configuration. Turn on the ThinkPad Notebook. 3. Reinstall the backup battery and the battery... be made available to the service technician, neither Lenovo nor Lenovo authorized service technicians provide any services to reset either...


