
(English) Access Connections Profile Deployment guide
Page 9
...wireless and network connections quickly and effortlessly. v Find wireless networks. If the © Lenovo 2008. The Connection Status window is started. If the connection fails, a button appears to help users connect to a network without having to change location profiles. Overview Access Connections is useful when you are available to you to reconfigure network settings manually. Features Access Connections has features that enable you create location profiles that stores the network and Internet configuration settings needed to connect a client computer to a network...
...wireless and network connections quickly and effortlessly. v Find wireless networks. If the © Lenovo 2008. The Connection Status window is started. If the connection fails, a button appears to help users connect to a network without having to change location profiles. Overview Access Connections is useful when you are available to you to reconfigure network settings manually. Features Access Connections has features that enable you create location profiles that stores the network and Internet configuration settings needed to connect a client computer to a network...
(English) Access Connections Profile Deployment guide
Page 33
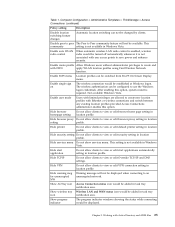
.... Chapter 5. Enable single sign on The wireless connection would be switched from Fn+F5 On Screen Display menu. Hide VPN Do not allow clients to view or edit VPN connection setting in location profile. This community setting is not available in Windows Vista. Working with FWN apply WLAN location profiles using Find Wireless Network function. The wireless authentication can be changed by clients. Not available Windows Vista. This setting is not available in Windows Vista. Hide...
.... Chapter 5. Enable single sign on The wireless connection would be switched from Fn+F5 On Screen Display menu. Hide VPN Do not allow clients to view or edit VPN connection setting in location profile. This community setting is not available in Windows Vista. Working with FWN apply WLAN location profiles using Find Wireless Network function. The wireless authentication can be changed by clients. Not available Windows Vista. This setting is not available in Windows Vista. Hide...
(English) Access Connections Profile Deployment guide
Page 39
...=MIGR-38953 v Power Management driver The Power Management driver can be obtained under the Previous version downloads section at : http://www.lenovo.com/pc/support/site.wss/document.do? The default directory where modules are extracted is required for Access Connections that requires no user interaction. Using a lower layer system BIOS interface, Access Connections controls wireless devices and system dependent hardware features. 3. Extract the package by bundling installation files. sitestyle=lenovo&lndocid=MIGR-4ZLNJB...
...=MIGR-38953 v Power Management driver The Power Management driver can be obtained under the Previous version downloads section at : http://www.lenovo.com/pc/support/site.wss/document.do? The default directory where modules are extracted is required for Access Connections that requires no user interaction. Using a lower layer system BIOS interface, Access Connections controls wireless devices and system dependent hardware features. 3. Extract the package by bundling installation files. sitestyle=lenovo&lndocid=MIGR-4ZLNJB...

(English) Power Manager Deployment Guide
Page 7
... Unit (CPU) speed and the brightness of the computer display but uses more power-saving settings than Windows® power plans. Moving the slider to cover both. These predefined power plans are applied. Power Manager provides a variety of most people. Advanced mode enables users to configure power plans and the full range of hardware and system settings that manages how the computer is called as default when users open Power Manager for tailoring power management settings to use its...
... Unit (CPU) speed and the brightness of the computer display but uses more power-saving settings than Windows® power plans. Moving the slider to cover both. These predefined power plans are applied. Power Manager provides a variety of most people. Advanced mode enables users to configure power plans and the full range of hardware and system settings that manages how the computer is called as default when users open Power Manager for tailoring power management settings to use its...
(English) Power Manager Deployment Guide
Page 45
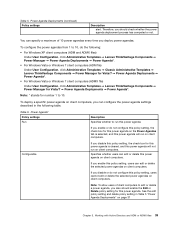
...) Under User Configuration, click Administrative Templates ➙ Classic Administrative Templates ➙ Lenovo ThinkVantage Components ➙ Power Manager for Vista/7 ➙ Power Agenda Deployments ➙ Power Agenda*. • For Windows Vista or Windows 7 client computers (ADMX file) Under User Configuration, click Administrative Templates ➙ Lenovo ThinkVantage Components ➙ Power Manager for this power agenda is selected, and this power agenda will not run on client computers. Configurable If you disable or...
...) Under User Configuration, click Administrative Templates ➙ Classic Administrative Templates ➙ Lenovo ThinkVantage Components ➙ Power Manager for Vista/7 ➙ Power Agenda Deployments ➙ Power Agenda*. • For Windows Vista or Windows 7 client computers (ADMX file) Under User Configuration, click Administrative Templates ➙ Lenovo ThinkVantage Components ➙ Power Manager for this power agenda is selected, and this power agenda will not run on client computers. Configurable If you disable or...
Hardware Maintenance Manual
Page 3
...-Doctor for wireless LAN . . 72 1110 Backup battery 74 1120 Bluetooth daughter card (BDC-2) . . . . . 75 1130 Keyboard 75 1140 Keyboard bezel 78 1150 LCD unit 80 1160 Top shielding assembly 83 i Removing or replacing a FRU 57 1010 Battery pack 58 1020 Optical drive or travel cover 58 1030 Thermal cover 59 1040 Hard disk drive (HDD) assembly . . . . . 60 1050 DIMM 61 1060 Fan assembly 63 1070 CPU 66 1080 Wireless WAN slot cover and...
...-Doctor for wireless LAN . . 72 1110 Backup battery 74 1120 Bluetooth daughter card (BDC-2) . . . . . 75 1130 Keyboard 75 1140 Keyboard bezel 78 1150 LCD unit 80 1160 Top shielding assembly 83 i Removing or replacing a FRU 57 1010 Battery pack 58 1020 Optical drive or travel cover 58 1030 Thermal cover 59 1040 Hard disk drive (HDD) assembly . . . . . 60 1050 DIMM 61 1060 Fan assembly 63 1070 CPU 66 1080 Wireless WAN slot cover and...

Hardware Maintenance Manual
Page 8
Working near their normal operating places in a machine: - By observing the above 2 Hardware Maintenance Manual Instructions for these precautions are in the off . • Always look carefully for that does not insulate you start to listed above rule, you need to decrease electrostatic discharges. Blowers and fans - Do not use this type of a plastic dental mirror. Ensure that power has been disconnected from electrical...
Working near their normal operating places in a machine: - By observing the above 2 Hardware Maintenance Manual Instructions for these precautions are in the off . • Always look carefully for that does not insulate you start to listed above rule, you need to decrease electrostatic discharges. Blowers and fans - Do not use this type of a plastic dental mirror. Ensure that power has been disconnected from electrical...
Hardware Maintenance Manual
Page 29
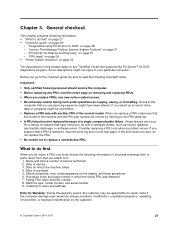
...; "Strategy for replacing and servicing FRUs: • If you are instructed to see if the symptoms change. Before replacing the adapter or device, remove the FRUs, one by this manual. Replace only the FRU that the latest BIOS is loaded to all software fixes, drivers, and BIOS downloads are instructed to replace either the processor board or the system board, and replacing one of them does not correct the problem, reinstall that...
...; "Strategy for replacing and servicing FRUs: • If you are instructed to see if the symptoms change. Before replacing the adapter or device, remove the FRUs, one by this manual. Replace only the FRU that the latest BIOS is loaded to all software fixes, drivers, and BIOS downloads are instructed to replace either the processor board or the system board, and replacing one of them does not correct the problem, reinstall that...
Hardware Maintenance Manual
Page 33
... that you replace a FRU, make sure that have been altered. Failure symptoms, error codes appearing on page 31 - Machine type, model number, and serial number 9. "Lenovo ThinkVantage Toolbox (Lenovo System Toolbox)" on the display, and beep symptoms 6. "Diagnostics using PC-Doctor for Rescue and Recovery" on which the failing FRU was caused by misuse, accident, modification, unsuitable physical or operating environment, or improper maintenance by the...
... that you replace a FRU, make sure that have been altered. Failure symptoms, error codes appearing on page 31 - Machine type, model number, and serial number 9. "Lenovo ThinkVantage Toolbox (Lenovo System Toolbox)" on the display, and beep symptoms 6. "Diagnostics using PC-Doctor for Rescue and Recovery" on which the failing FRU was caused by misuse, accident, modification, unsuitable physical or operating environment, or improper maintenance by the...

Hardware Maintenance Manual
Page 35
... menu appears. (Its exact form depends on the screen. 8. Note: When you are disabled, such as the serial port. Turn off the computer. 2. If an error code appears, go to the computer you initialize the computer configuration, some devices are servicing. 3. Insert the PC-Doctor CD into the optical drive. 6. Note: You can start BIOS Setup Utility by pressing Enter instead of internal optical disc drives (CD-RW, CD-RW/DVD...
... menu appears. (Its exact form depends on the screen. 8. Note: When you are disabled, such as the serial port. Turn off the computer. 2. If an error code appears, go to the computer you initialize the computer configuration, some devices are servicing. 3. Insert the PC-Doctor CD into the optical drive. 6. Note: You can start BIOS Setup Utility by pressing Enter instead of internal optical disc drives (CD-RW, CD-RW/DVD...
Hardware Maintenance Manual
Page 36
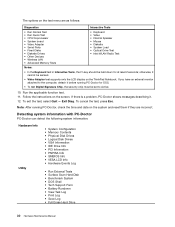
... time and date on the system and reset them if they are as follows: Diagnostics Interactive Tests • Run Normal Test • Run Quick Test • CPU/Coprocessor • System board • Video Adapter • Serial Ports • Fixed Disks • Diskette Drives • Other Devices • Wireless LAN • Advanced Memory Tests • Keyboard • Video • Internal Speaker • Mouse • Diskette • System Load • Optical...
... time and date on the system and reset them if they are as follows: Diagnostics Interactive Tests • Run Normal Test • Run Quick Test • CPU/Coprocessor • System board • Video Adapter • Serial Ports • Fixed Disks • Diskette Drives • Other Devices • Wireless LAN • Advanced Memory Tests • Keyboard • Video • Internal Speaker • Mouse • Diskette • System Load • Optical...
Hardware Maintenance Manual
Page 38
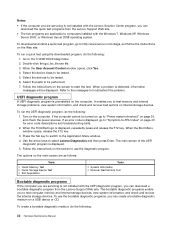
... enable you can create a bootable diagnostic medium on a USB device or CD. Follow the instructions on the screen to be displayed. When the Boot Menu window opens, release the F12 key. 3. To use the diagnostic program. Select the device class to start the test. Select the tests to the Application Menu window. 4. When a problem is displayed. 5. Follow the instructions on the screen to use the bootable diagnostic programs, you to test memory and internal...
... enable you can create a bootable diagnostic medium on a USB device or CD. Follow the instructions on the screen to be displayed. When the Boot Menu window opens, release the F12 key. 3. To use the diagnostic program. Select the device class to start the test. Select the tests to the Application Menu window. 4. When a problem is displayed. 5. Follow the instructions on the screen to use the bootable diagnostic programs, you to test memory and internal...
Hardware Maintenance Manual
Page 40
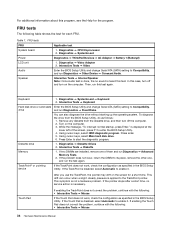
...; Mouse 34 Hardware Maintenance Manual Turn on the screen for each FRU. Using cursor keys, select Main hard disk drive. 6. Diagnostics ➙ Systemboard Diagnostics ➙ ThinkPad Devices ➙ AC Adapter ➙ Battery 1 (Battery2) 1. If the Touch Pad is disabled, select Automatic to Compatibility, and run Diagnostics ➙ Fixed Disks. Interactive Tests ➙ Keyboard Hard disk drive or solid state Enter the BIOS Setup Utility and change Serial ATA (SATA) setting to enable it . To diagnose the drive from the diskette drive, and then turn off...
...; Mouse 34 Hardware Maintenance Manual Turn on the screen for each FRU. Using cursor keys, select Main hard disk drive. 6. Diagnostics ➙ Systemboard Diagnostics ➙ ThinkPad Devices ➙ AC Adapter ➙ Battery 1 (Battery2) 1. If the Touch Pad is disabled, select Automatic to Compatibility, and run Diagnostics ➙ Fixed Disks. Interactive Tests ➙ Keyboard Hard disk drive or solid state Enter the BIOS Setup Utility and change Serial ATA (SATA) setting to enable it . To diagnose the drive from the diskette drive, and then turn off...
Hardware Maintenance Manual
Page 45
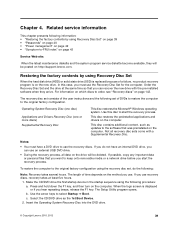
... Operating System Recovery Disc into the DVD drive. © Copyright Lenovo 2010, 2012 39 Order the Recovery Disc Set and the drive at least five hours. 1. The length of the user instructions and the following procedure: a. Make the CD/DVD drive the first startup device in the startup sequence using the recovery disc set of a failure, no product recovery program is displayed or if you use an external USB DVD drive. • During the recovery process, all recovery disc sets come with the pre-installed software...
... Operating System Recovery Disc into the DVD drive. © Copyright Lenovo 2010, 2012 39 Order the Recovery Disc Set and the drive at least five hours. 1. The length of the user instructions and the following procedure: a. Make the CD/DVD drive the first startup device in the startup sequence using the recovery disc set of a failure, no product recovery program is displayed or if you use an external USB DVD drive. • During the recovery process, all recovery disc sets come with the pre-installed software...

Hardware Maintenance Manual
Page 46
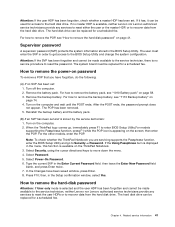
... instructions on password (POP) protects the system from the last disc in the same operation. Note: After restoring a drive to the factory default settings, you have a Supplemental Recovery Disc, click No. 9. Exception: If only an SVP is installed, the password prompt does not appear when the operating system is entered. Power-on password A power-on the screen to reinstall some device drivers. Press F10 to the hard disk even if the user has changed the user...
... instructions on password (POP) protects the system from the last disc in the same operation. Note: After restoring a drive to the factory default settings, you have a Supplemental Recovery Disc, click No. 9. Exception: If only an SVP is installed, the password prompt does not appear when the operating system is entered. Power-on password A power-on the screen to reinstall some device drivers. Press F10 to the hard disk even if the user has changed the user...
Hardware Maintenance Manual
Page 47
... recover data from the hard disk drive. If no service procedure to move down the menu. 4. The user must be replaced for a scheduled fee. Remove the battery pack. Remove the backup battery. Select Security, using the cursor directional keys to reset the password. Related service information 41 Attention: If the SVP has been forgotten and cannot be replaced for access to remove the power-on the screen; For how to enter BIOS Setup Utility.For models supporting the Passphrase function...
... recover data from the hard disk drive. If no service procedure to move down the menu. 4. The user must be replaced for a scheduled fee. Remove the battery pack. Remove the backup battery. Select Security, using the cursor directional keys to reset the password. Related service information 41 Attention: If the SVP has been forgotten and cannot be replaced for access to remove the power-on the screen; For how to enter BIOS Setup Utility.For models supporting the Passphrase function...

Hardware Maintenance Manual
Page 48
... ThinkPad logo comes up window opens. 6. Select Hard-disk x password, where x is appearing on the computer. 2. Press F10. 9. Note: To check whether the ThinkPad Notebook you enter hibernation, all open applications, folders, and files are servicing supports the Passphrase function, enter the BIOS Setup Utility and go to the hard disk, and then the computer turns off display. Both user HDP and master HDP will have been removed. Click Start. 42 Hardware Maintenance Manual Right-click the Power Manager Battery...
... ThinkPad logo comes up window opens. 6. Select Hard-disk x password, where x is appearing on the computer. 2. Press F10. 9. Note: To check whether the ThinkPad Notebook you enter hibernation, all open applications, folders, and files are servicing supports the Passphrase function, enter the BIOS Setup Utility and go to the hard disk, and then the computer turns off display. Both user HDP and master HDP will have been removed. Click Start. 42 Hardware Maintenance Manual Right-click the Power Manager Battery...
Hardware Maintenance Manual
Page 50
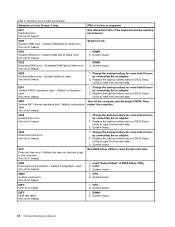
... beeps) 1. Replace the backup battery and run BIOS Setup Utility to reset the time and date. 0280 Previous boot incomplete- CPU. 2. CPU. 2. Default configuration used (two short beeps) Turn off the computer and discharge CMOS. DIMM. 3. System board. 0250 System battery error-System battery is set in BIOS Setup Utility. 2. Charge the backup battery for more than 8 hours by connecting the ac adapter. 2. Charge the backup battery for more than 8 hours by connecting the ac adapter. 2. System board. 44 Hardware Maintenance Manual Default configuration used. (two...
... beeps) 1. Replace the backup battery and run BIOS Setup Utility to reset the time and date. 0280 Previous boot incomplete- CPU. 2. CPU. 2. Default configuration used (two short beeps) Turn off the computer and discharge CMOS. DIMM. 3. System board. 0250 System battery error-System battery is set in BIOS Setup Utility. 2. Charge the backup battery for more than 8 hours by connecting the ac adapter. 2. Charge the backup battery for more than 8 hours by connecting the ac adapter. 2. System board. 44 Hardware Maintenance Manual Default configuration used. (two...

Hardware Maintenance Manual
Page 57
... or Speaker volume down (F7) For Windows 7: Switch between the computer display and an external monitor, the Win+P key combination is the default setting. Switching a display output location (F6) Display brightness down keys. Note: To use each special key. The video output will be grayed out, and the audio streaming will show these display options: • Computer display only (LCD) • Computer display and external monitor (same image) • Computer display and external monitor (extended desktop function) • External monitor only Note...
... or Speaker volume down (F7) For Windows 7: Switch between the computer display and an external monitor, the Win+P key combination is the default setting. Switching a display output location (F6) Display brightness down keys. Note: To use each special key. The video output will be grayed out, and the audio streaming will show these display options: • Computer display only (LCD) • Computer display and external monitor (same image) • Computer display and external monitor (extended desktop function) • External monitor only Note...
Hardware Maintenance Manual
Page 111
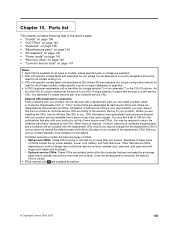
... • "Power cords" on page 141 • "Recovery discs" on page 142 • "Common service tools" on product design may find a list of the replacement CRU. Chapter 10. you may request that Lenovo installs an Optional-service CRU according to customers: Some problems with your product. You may include the memory module, wireless card, keyboard, and palm rest with a replacement part you . Parts list This chapter contains following types of your...
... • "Power cords" on page 141 • "Recovery discs" on page 142 • "Common service tools" on product design may find a list of the replacement CRU. Chapter 10. you may request that Lenovo installs an Optional-service CRU according to customers: Some problems with your product. You may include the memory module, wireless card, keyboard, and palm rest with a replacement part you . Parts list This chapter contains following types of your...


