
User Guide V1.0 - Lenovo G465, G565
Page 3
Getting to the Internet 22 Wired connection 22 Wireless connection 24 Chapter 4. CRU instructions..... 35 Replacing the battery 35 Replacing the hard disk drive..... 36 Replacing memory 40 Removing the optical drive ........ 43 Appendix B. OneKey Rescue ...notices....... 56 Appendix D. Contents Chapter 1. Connecting to know your computer 20 Chapter 3. Lenovo limited warranty 45 Warranty information 51 Appendix C. Learning the basics..... 8 First use 8 Using AC adapter and battery ....10 Using the touchpad 12 Using the keyboard 13 Connecting external devices.......16 Special ...
Getting to the Internet 22 Wired connection 22 Wireless connection 24 Chapter 4. CRU instructions..... 35 Replacing the battery 35 Replacing the hard disk drive..... 36 Replacing memory 40 Removing the optical drive ........ 43 Appendix B. OneKey Rescue ...notices....... 56 Appendix D. Contents Chapter 1. Connecting to know your computer 20 Chapter 3. Lenovo limited warranty 45 Warranty information 51 Appendix C. Learning the basics..... 8 First use 8 Using AC adapter and battery ....10 Using the touchpad 12 Using the keyboard 13 Connecting external devices.......16 Special ...
User Guide V1.0 - Lenovo G465, G565
Page 9
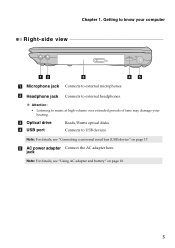
Attention: • Listening to music at high volume over extended periods of time may damage your computer Right-side view ab c de a Microphone jack Connects to know your hearing. Note: For details, see "Using AC adapter and battery" on page 17. Getting to external microphones. Connects to external headphones. Chapter 1. c Optical drive d USB port Reads/Burns optical disks. e AC power adapter Connect the AC adapter here. b Headphone jack Connects to USB devices. jack Note: For details, see "Connecting a universal serial bus (USB) device" on page 10. 5
Attention: • Listening to music at high volume over extended periods of time may damage your computer Right-side view ab c de a Microphone jack Connects to know your hearing. Note: For details, see "Using AC adapter and battery" on page 17. Getting to external microphones. Connects to external headphones. Chapter 1. c Optical drive d USB port Reads/Burns optical disks. e AC power adapter Connect the AC adapter here. b Headphone jack Connects to USB devices. jack Note: For details, see "Connecting a universal serial bus (USB) device" on page 10. 5

User Guide V1.0 - Lenovo G465, G565
Page 11
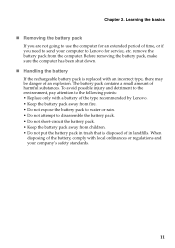
d Hard disk drive (HDD)/Memory/ CPU (Central processing unit)/ Mini PCI Express Card slot compartment 7 c Battery latch spring loaded The spring-loaded battery latch keeps the battery pack secured in place. b Battery pack For details, see "Using AC adapter and battery" on page 10. Getting to know your computer Bottom view a b c d a Battery latch manual The manual battery latch is used to keep the battery pack secured in place. Chapter 1.
d Hard disk drive (HDD)/Memory/ CPU (Central processing unit)/ Mini PCI Express Card slot compartment 7 c Battery latch spring loaded The spring-loaded battery latch keeps the battery pack secured in place. b Battery pack For details, see "Using AC adapter and battery" on page 10. Getting to know your computer Bottom view a b c d a Battery latch manual The manual battery latch is used to keep the battery pack secured in place. Chapter 1.

User Guide V1.0 - Lenovo G465, G565
Page 12
... begin using your computer, insert the battery pack and connect the computer to an electrical outlet. Connecting the computer to an electrical outlet...outlet. „ Turning on the computer Press the power button to the power The supplied battery pack is not fully charged at purchase. Installing the battery pack Refer to the supplied Setup Poster to configure the operating system when it is running ...132; Conncting to turn on AC power. The configuration process may need to install the battery pack. The battery is automatically charged while the computer is first used. Chapter 2.
... begin using your computer, insert the battery pack and connect the computer to an electrical outlet. Connecting the computer to an electrical outlet...outlet. „ Turning on the computer Press the power button to the power The supplied battery pack is not fully charged at purchase. Installing the battery pack Refer to the supplied Setup Poster to configure the operating system when it is running ...132; Conncting to turn on AC power. The configuration process may need to install the battery pack. The battery is automatically charged while the computer is first used. Chapter 2.

User Guide V1.0 - Lenovo G465, G565
Page 14
... a long time Notes: • You are two main factors: • The amount of energy stored in the battery when you commence work. • The way you need to charge the battery or replace it is difficult to prevent small particles from entering the inside of your computer. • To increase... the life of the following situations: • When you purchase a new battery • If the battery status indicator starts blinking • If the battery has not been used for example, how often you access the hard disk drive and how bright you make the...
... a long time Notes: • You are two main factors: • The amount of energy stored in the battery when you commence work. • The way you need to charge the battery or replace it is difficult to prevent small particles from entering the inside of your computer. • To increase... the life of the following situations: • When you purchase a new battery • If the battery status indicator starts blinking • If the battery has not been used for example, how often you access the hard disk drive and how bright you make the...
User Guide V1.0 - Lenovo G465, G565
Page 15
..., make sure the computer has been shut down. „ Handling the battery If the rechargeable battery pack is disposed of the type recommended by Lenovo. • Keep the battery pack away from fire. • Do not expose the battery pack to water or rain. • Do not attempt to send your company's safety standards. 11...
..., make sure the computer has been shut down. „ Handling the battery If the rechargeable battery pack is disposed of the type recommended by Lenovo. • Keep the battery pack away from fire. • Do not expose the battery pack to water or rain. • Do not attempt to send your company's safety standards. 11...

User Guide V1.0 - Lenovo G465, G565
Page 21
... actual maximum range may result. „ Connecting a Bluetooth device (Select models only) If your computer has an integrated Bluetooth adapter card, it off to save battery power. • You need to pair the Bluetooth enabled device with your computer as possible. To get the best possible connection speed, place the device...
... actual maximum range may result. „ Connecting a Bluetooth device (Select models only) If your computer has an integrated Bluetooth adapter card, it off to save battery power. • You need to pair the Bluetooth enabled device with your computer as possible. To get the best possible connection speed, place the device...

User Guide V1.0 - Lenovo G465, G565
Page 22
...Energy Management button (b) (Select models only) Lenovo Energy Management provides you control over the performance and power consumption for each component of your notebook through the collaboration of software and hardware, thus extends battery life and improves battery runtime. 18 Learning the basics Special keys ...and buttons ab „ OneKey Rescue system button (a) • When the computer is powered-off, press this button to enter the OneKey Rescue system if Lenovo OneKey Rescue system...
...Energy Management button (b) (Select models only) Lenovo Energy Management provides you control over the performance and power consumption for each component of your notebook through the collaboration of software and hardware, thus extends battery life and improves battery runtime. 18 Learning the basics Special keys ...and buttons ab „ OneKey Rescue system button (a) • When the computer is powered-off, press this button to enter the OneKey Rescue system if Lenovo OneKey Rescue system...

User Guide V1.0 - Lenovo G465, G565
Page 23
...that the Caps lock function or the numeric keypad has been enabled or disabled. G465 G565 b ab a CapsLK cd ef cd ef a Caps lock indicator G465: G565: b Num lock indicator G465: G565: Notes: • The Caps lock indicator and Num lock indicator are for selected models... only. • For other models, when you of the computer status. Chapter 2. c Power status indicator d Battery status indicator e Wireless communication indicator ...
...that the Caps lock function or the numeric keypad has been enabled or disabled. G465 G565 b ab a CapsLK cd ef cd ef a Caps lock indicator G465: G565: b Num lock indicator G465: G565: Notes: • The Caps lock indicator and Num lock indicator are for selected models... only. • For other models, when you of the computer status. Chapter 2. c Power status indicator d Battery status indicator e Wireless communication indicator ...

User Guide V1.0 - Lenovo G465, G565
Page 30
... hidden partition by creating recovery discs. For more instructions, see the Help file of operating system and preinstalled software). „ Using Lenovo OneKey Recovery (within Windows operating system) In Windows operating system, double click the OneKey Recovery system Icon on the desktop to store...the creation of recovery discs may take some time, connect the AC adapter and battery pack to physically create the recovery discs. OneKey Rescue system OneKey Rescue system „ Introduction The Lenovo OneKey Rescue system is needed to your system partition (C drive) for security ...
... hidden partition by creating recovery discs. For more instructions, see the Help file of operating system and preinstalled software). „ Using Lenovo OneKey Recovery (within Windows operating system) In Windows operating system, double click the OneKey Recovery system Icon on the desktop to store...the creation of recovery discs may take some time, connect the AC adapter and battery pack to physically create the recovery discs. OneKey Rescue system OneKey Rescue system „ Introduction The Lenovo OneKey Rescue system is needed to your system partition (C drive) for security ...
User Guide V1.0 - Lenovo G465, G565
Page 34
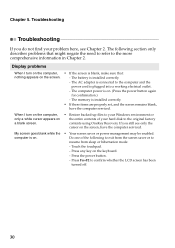
... screen saver or power management may be enabled. Press Fn+F2 to the more comprehensive information in Chapter 2. The computer power is installed correctly. - The battery is on . computer is installed correctly. • If these items are properly set, and the screen remains blank, have the computer serviced. Touch the touchpad...
... screen saver or power management may be enabled. Press Fn+F2 to the more comprehensive information in Chapter 2. The computer power is installed correctly. - The battery is on . computer is installed correctly. • If these items are properly set, and the screen remains blank, have the computer serviced. Touch the touchpad...
User Guide V1.0 - Lenovo G465, G565
Page 35
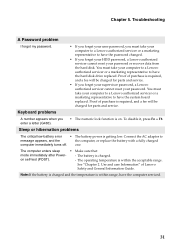
...Keyboard problems A number appears when you forget your supervisor password, a Lenovo authorized servicer cannot reset your password or recover data from the hard disk. Chapter 5. Note:If the battery is charged and the temperature is within range, have the system board... replaced. You must take your computer to a Lenovo authorized servicer or a marketing representative to message appears, and the the computer, or replace the battery with a fully charged computer immediately turns off. Troubleshooting A Password problem I forgot my...
...Keyboard problems A number appears when you forget your supervisor password, a Lenovo authorized servicer cannot reset your password or recover data from the hard disk. Chapter 5. Note:If the battery is charged and the temperature is within range, have the system board... replaced. You must take your computer to a Lenovo authorized servicer or a marketing representative to message appears, and the the computer, or replace the battery with a fully charged computer immediately turns off. Troubleshooting A Password problem I forgot my...
User Guide V1.0 - Lenovo G465, G565
Page 36
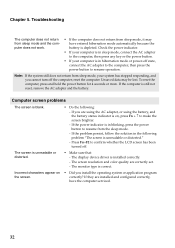
...If the computer is unreadable or distorted. • Make sure that: - The screen is still not reset, remove the AC adapter and the battery. If the problem persist, follow the solution in hibernation mode or power-off the computer; Incorrect characters appear on , press Fn + ↑... button to make the screen brighter. - The screen resolution and color quality are using the AC adapter, or using the battery, and the battery status indicator is unreadable or distorted." - If they are installed and configured correctly, have entered hibernation mode automatically because the...
...If the computer is unreadable or distorted. • Make sure that: - The screen is still not reset, remove the AC adapter and the battery. If the problem persist, follow the solution in hibernation mode or power-off the computer; Incorrect characters appear on , press Fn + ↑... button to make the screen brighter. - The screen resolution and color quality are using the AC adapter, or using the battery, and the battery status indicator is unreadable or distorted." - If they are installed and configured correctly, have entered hibernation mode automatically because the...
User Guide V1.0 - Lenovo G465, G565
Page 37
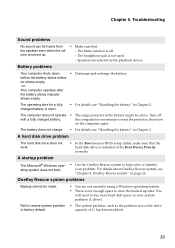
...disk space on your problem. Speakers are not currently using a Windows operating system. • There is off with a fully charged battery. before the battery status indica- The operating time for one minute to help solve or identify your system partition (C drive). The computer does not ...operate • The surge protector in Chapter 2. then turn on page 26. The battery does not charge. • For details, see "Chapter 4. The Microsoft® Windows operating system does not start. • Use the ...
...disk space on your problem. Speakers are not currently using a Windows operating system. • There is off with a fully charged battery. before the battery status indica- The operating time for one minute to help solve or identify your system partition (C drive). The computer does not ...operate • The surge protector in Chapter 2. then turn on page 26. The battery does not charge. • For details, see "Chapter 4. The Microsoft® Windows operating system does not start. • Use the ...
User Guide V1.0 - Lenovo G465, G565
Page 38
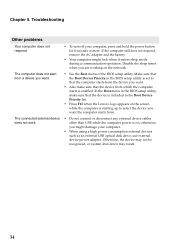
... from the device you want . • Also make sure that the Boot Device Priority in the Boot Device Priority list. • Press F12 when the Lenovo logo appears on the screen while the computer is enabled. If the computer still does not respond, remove the AC adapter and the... battery. • Your computer might damage your computer, press and hold the power button for 4 seconds or more. Disable the sleep timer when you might lock ...
... from the device you want . • Also make sure that the Boot Device Priority in the Boot Device Priority list. • Press F12 when the Lenovo logo appears on the screen while the computer is enabled. If the computer still does not respond, remove the AC adapter and the... battery. • Your computer might damage your computer, press and hold the power button for 4 seconds or more. Disable the sleep timer when you might lock ...
User Guide V1.0 - Lenovo G465, G565
Page 39
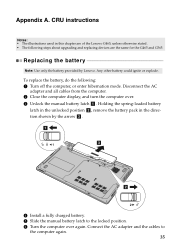
... following steps about upgrading and replacing devices are the same for the G465 and G565. Holding the spring-loaded battery latch in the unlocked position b , remove the battery pack in this chapter are of the Lenovo G465, unless otherwise stated. • The following : 1 Turn off the.... CRU instructions Notes: • The illustrations used in the direction shown by Lenovo. a1 c b 4 Install a fully charged battery. 5 Slide the manual battery latch to the computer again. 35 Appendix A. Any other battery could ignite or explode. Connect the AC adapter and the cables to the locked...
... following steps about upgrading and replacing devices are the same for the G465 and G565. Holding the spring-loaded battery latch in the unlocked position b , remove the battery pack in this chapter are of the Lenovo G465, unless otherwise stated. • The following : 1 Turn off the.... CRU instructions Notes: • The illustrations used in the direction shown by Lenovo. a1 c b 4 Install a fully charged battery. 5 Slide the manual battery latch to the computer again. 35 Appendix A. Any other battery could ignite or explode. Connect the AC adapter and the cables to the locked...

User Guide V1.0 - Lenovo G465, G565
Page 41
a b 37 b.Remove the compartment cover b . a.Loosen the screws that secure the compartment cover a. CRU instructions To replace the hard disk drive, do the following: 1 Turn off the computer; then disconnect the AC adapter and all cables from the computer. 2 Close the computer display, and then turn the computer over. 3 Remove the battery pack. 4 Remove the Hard disk drive (HDD)/Memory/CPU (Central processing unit)/Mini PCI Express Card slot compartment cover. Appendix A.
a b 37 b.Remove the compartment cover b . a.Loosen the screws that secure the compartment cover a. CRU instructions To replace the hard disk drive, do the following: 1 Turn off the computer; then disconnect the AC adapter and all cables from the computer. 2 Close the computer display, and then turn the computer over. 3 Remove the battery pack. 4 Remove the Hard disk drive (HDD)/Memory/CPU (Central processing unit)/Mini PCI Express Card slot compartment cover. Appendix A.

User Guide V1.0 - Lenovo G465, G565
Page 43
... computer over again. CRU instructions 7 Take out the hard disk drive secured in a metal frame e. B Reinstall the compartment cover and tighten the screws. C Reinstall the battery pack.
... computer over again. CRU instructions 7 Take out the hard disk drive secured in a metal frame e. B Reinstall the compartment cover and tighten the screws. C Reinstall the battery pack.
User Guide V1.0 - Lenovo G465, G565
Page 44
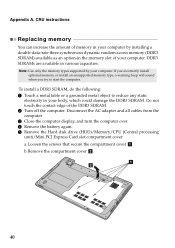
... damage the DDR3 SDRAM. Disconnect the AC adapter and all cables from the computer. 3 Close the computer display, and turn the computer over. 4 Remove the battery again. 5 Remove the Hard disk drive (HDD)/Memory/CPU (Central processing unit)/Mini PCI Express Card slot compartment cover. To install a DDR3 SDRAM, do the...
... damage the DDR3 SDRAM. Disconnect the AC adapter and all cables from the computer. 3 Close the computer display, and turn the computer over. 4 Remove the battery again. 5 Remove the Hard disk drive (HDD)/Memory/CPU (Central processing unit)/Mini PCI Express Card slot compartment cover. To install a DDR3 SDRAM, do the...

User Guide V1.0 - Lenovo G465, G565
Page 45
b a a 7 Align the notch of the socket and gently insert the DDR3 SDRAM into the closed position. B Turn the computer over again. A Reinstall the battery. b a 9 After aligning the attachment clips with the protrusion of the DDR3 SDRAM with their matching gaps, reinstall the compartment cover. 0 Reinstall and tighten the screws. ...
b a a 7 Align the notch of the socket and gently insert the DDR3 SDRAM into the closed position. B Turn the computer over again. A Reinstall the battery. b a 9 After aligning the attachment clips with the protrusion of the DDR3 SDRAM with their matching gaps, reinstall the compartment cover. 0 Reinstall and tighten the screws. ...


