User Guide
Page 7
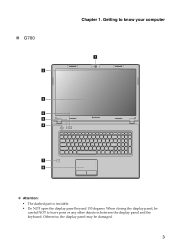
„ G780 2 3 6 5 4 Chapter 1. Otherwise, the display panel may be careful NOT to know your computer 1 7 8 Attention: • The dashed part is invisible. • Do NOT open the display panel beyond 130 degrees. Getting to leave pens or any other objects in between the display panel and the keyboard. When closing the display panel, be damaged. 3
„ G780 2 3 6 5 4 Chapter 1. Otherwise, the display panel may be careful NOT to know your computer 1 7 8 Attention: • The dashed part is invisible. • Do NOT open the display panel beyond 130 degrees. Getting to leave pens or any other objects in between the display panel and the keyboard. When closing the display panel, be damaged. 3
User Guide
Page 8
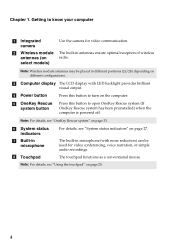
c Computer display The LCD display with noise reduction) can be placed in antennas ensure optimal reception of wireless radio. e OneKey Rescue system button Press this button to open OneKey Rescue ...
c Computer display The LCD display with noise reduction) can be placed in antennas ensure optimal reception of wireless radio. e OneKey Rescue system button Press this button to open OneKey Rescue ...
User Guide
Page 9
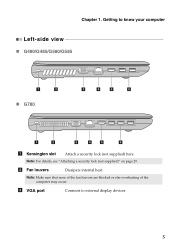
Note: Make sure that none of the fan louvers are blocked or else overheating of the computer may occur. c VGA port Connects to know your computer Left-side view „ G480/G485/G580/G585 1 2 „ G780 3 4 5 6 1 2 3 4 5 6 a Kensington slot Attach a security lock (not supplied) here. Chapter 1. Note: For details, see "Attaching a security lock (not supplied)" on page 29. b Fan louvers Dissipate internal heat. Getting to external display devices. 5
Note: Make sure that none of the fan louvers are blocked or else overheating of the computer may occur. c VGA port Connects to know your computer Left-side view „ G480/G485/G580/G585 1 2 „ G780 3 4 5 6 1 2 3 4 5 6 a Kensington slot Attach a security lock (not supplied) here. Chapter 1. Note: For details, see "Attaching a security lock (not supplied)" on page 29. b Fan louvers Dissipate internal heat. Getting to external display devices. 5
User Guide
Page 10
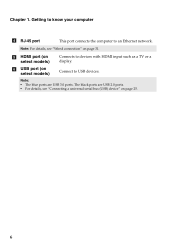
Getting to know your computer d RJ-45 port This port connects the computer to USB devices. Note: • The blue ports are USB 2.0 ports. • For details, see "Wired connection" on page 31. The black ports are USB 3.0 ports. e HDMI port (on select models) f USB port (on page 25. 6 Connect to an Ethernet network. Note: For details, see "Connecting a universal serial bus (USB) device" on select models) Connects to devices with HDMI input such as a TV or a display. Chapter 1.
Getting to know your computer d RJ-45 port This port connects the computer to USB devices. Note: • The blue ports are USB 2.0 ports. • For details, see "Wired connection" on page 31. The black ports are USB 3.0 ports. e HDMI port (on select models) f USB port (on page 25. 6 Connect to an Ethernet network. Note: For details, see "Connecting a universal serial bus (USB) device" on select models) Connects to devices with HDMI input such as a TV or a display. Chapter 1.
User Guide
Page 22
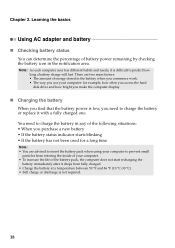
... • If the battery has not been used for example, how often you access the hard disk drive and how bright you make the computer display. „ Charging the battery When you find that the battery power is low, you use your computer: for a long time Note: • You are two...
... • If the battery has not been used for example, how often you access the hard disk drive and how bright you make the computer display. „ Charging the battery When you find that the battery power is low, you use your computer: for a long time Note: • You are two...
User Guide
Page 27
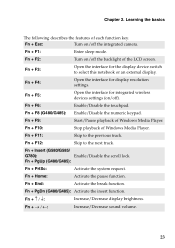
... the touchpad. Fn + F11: Skip to the next track. Fn + PgUp (G480/G485): Fn + PrtSc: Activate the system request. Fn + PgDn (G480/G485): Activate the insert function. Fn + F3: Open the interface for display resolution settings. Fn + F12: Skip to the previous track. Fn + F5: Open ... devices settings (on /off the backlight of each function key. Fn + F8 (G480/G485): Enable/Disable the numeric keypad. Chapter 2. Fn + F2: Turn on/off the integrated camera. Fn Increase/Decrease display brightness. Fn + F1: Enter sleep mode. Fn + F9: Start/Pause playback of ...
... the touchpad. Fn + F11: Skip to the next track. Fn + PgUp (G480/G485): Fn + PrtSc: Activate the system request. Fn + PgDn (G480/G485): Activate the insert function. Fn + F3: Open the interface for display resolution settings. Fn + F12: Skip to the previous track. Fn + F5: Open ... devices settings (on /off the backlight of each function key. Fn + F8 (G480/G485): Enable/Disable the numeric keypad. Chapter 2. Fn + F2: Turn on/off the integrated camera. Fn Increase/Decrease display brightness. Fn + F1: Enter sleep mode. Fn + F9: Start/Pause playback of ...
User Guide
Page 39
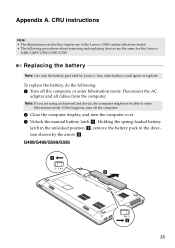
... the direction shown by Lenovo. Replacing the battery Note: Use only the battery provided by the arrow c . If this chapter are of the Lenovo G580, unless otherwise stated. • The following : 1 Turn off the computer. 2 Close the computer display, and turn the computer over. 3 Unlock the manual battery latch a . G480/G485/G580/G585 1 3 2 35...
... the direction shown by Lenovo. Replacing the battery Note: Use only the battery provided by the arrow c . If this chapter are of the Lenovo G580, unless otherwise stated. • The following : 1 Turn off the computer. 2 Close the computer display, and turn the computer over. 3 Unlock the manual battery latch a . G480/G485/G580/G585 1 3 2 35...
User Guide
Page 42
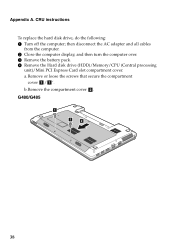
a.Remove or loose the screws that secure the compartment cover a/ a '. b.Remove the compartment cover b. then disconnect the AC adapter and all cables from the computer. 2 Close the computer display, and then turn the computer over. 3 Remove the battery pack. 4 Remove the Hard disk drive (HDD)/Memory/CPU (Central processing unit)/Mini PCI Express Card slot compartment cover. CRU instructions To replace the hard disk drive, do the following: 1 Turn off the computer; Appendix A. G480/G485 1 1 2 38
a.Remove or loose the screws that secure the compartment cover a/ a '. b.Remove the compartment cover b. then disconnect the AC adapter and all cables from the computer. 2 Close the computer display, and then turn the computer over. 3 Remove the battery pack. 4 Remove the Hard disk drive (HDD)/Memory/CPU (Central processing unit)/Mini PCI Express Card slot compartment cover. CRU instructions To replace the hard disk drive, do the following: 1 Turn off the computer; Appendix A. G480/G485 1 1 2 38
User Guide
Page 48
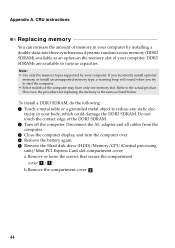
... in your computer by your body, which could damage the DDR3 SDRAM. Disconnect the AC adapter and all cables from the computer. 3 Close the computer display, and turn the computer over. 4 Remove the battery again. 5 Remove the Hard disk drive (HDD)/Memory/CPU (Central processing unit)/Mini PCI Express Card slot...
... in your computer by your body, which could damage the DDR3 SDRAM. Disconnect the AC adapter and all cables from the computer. 3 Close the computer display, and turn the computer over. 4 Remove the battery again. 5 Remove the Hard disk drive (HDD)/Memory/CPU (Central processing unit)/Mini PCI Express Card slot...
User Guide
Page 52
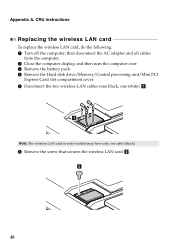
... the wireless LAN card, do the following: 1 Turn off the computer; then disconnect the AC adapter and all cables from the computer. 2 Close the computer display, and then turn the computer over. 3 Remove the battery pack. 4 Remove the Hard disk drive/Memory/Central processing unit/Mini PCI Express Card slot compartment...
... the wireless LAN card, do the following: 1 Turn off the computer; then disconnect the AC adapter and all cables from the computer. 2 Close the computer display, and then turn the computer over. 3 Remove the battery pack. 4 Remove the Hard disk drive/Memory/Central processing unit/Mini PCI Express Card slot compartment...
Hardware Maintenance Manual
Page 26
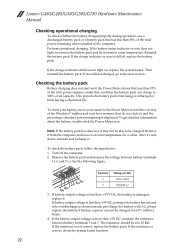
...battery pack becomes hot, it may not be charged. To check the battery pack, follow the steps below: 1. If battery output voltage is displayed. The resistance should be charged over 0% within 2 hours. 4. If the charge indicator or icon is not correct, replace the battery pack. ... If the battery status indicator or icon does not light on , replace the system board. Turn off , replace the battery pack. Lenovo G480/G485/G580/G585/G780 Hardware Maintenance Manual Checking operational charging To check whether the battery charges properly during operation, use a discharged battery pack or...
...battery pack becomes hot, it may not be charged. To check the battery pack, follow the steps below: 1. If battery output voltage is displayed. The resistance should be charged over 0% within 2 hours. 4. If the charge indicator or icon is not correct, replace the battery pack. ... If the battery status indicator or icon does not light on , replace the system board. Turn off , replace the battery pack. Lenovo G480/G485/G580/G585/G780 Hardware Maintenance Manual Checking operational charging To check whether the battery charges properly during operation, use a discharged battery pack or...
Hardware Maintenance Manual
Page 28
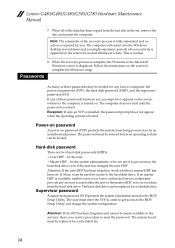
...Attention: If the SVP has been forgotten and cannot be replaced for the system administrator, who can be needed for several times and you . Lenovo G480/G485/G580/G585/G780 Hardware Maintenance Manual 7. Note: The remainder of these passwords has been set, a prompt for access to reset the password.... to the hard disk drive. Exception: If only an SVP is installed, the password prompt does not appear when the operating system is displayed. Supervisor password A supervisor password (SVP) protects the system information stored in order to get access to the hard disk drive even if ...
...Attention: If the SVP has been forgotten and cannot be replaced for the system administrator, who can be needed for several times and you . Lenovo G480/G485/G580/G585/G780 Hardware Maintenance Manual 7. Note: The remainder of these passwords has been set, a prompt for access to reset the password.... to the hard disk drive. Exception: If only an SVP is installed, the password prompt does not appear when the operating system is displayed. Supervisor password A supervisor password (SVP) protects the system information stored in order to get access to the hard disk drive even if ...

Hardware Maintenance Manual
Page 31
... River/AMD Deccan Core Chipset • Intel HM76 (HM75 ready)(G480/G580/G780) Bus architecture • G480/G485/G580/G585: DDR3 1600/1333 MHz (Ivy Bridge), 1333 MHz (Sandy Bridge) PCI Express bus DMI •...Display • 14.0 HD LED Panel, Flat type, 1366x768 pixels, 200 nit (G480/G485) • 15.6 HD LED Panel, Flat type, 1366x768 pixels, 200 nit (G580/G585) • 17.3" HD+ LED Panel, 16:9, 1600x900 pixels, 220nits; Lenovo G480/G485/G580/G585/G780 Lenovo G480/G485... 97 Specifications The following table lists the specifications of the Lenovo G480/G485/G580/ G585/G780: Table 1.
... River/AMD Deccan Core Chipset • Intel HM76 (HM75 ready)(G480/G580/G780) Bus architecture • G480/G485/G580/G585: DDR3 1600/1333 MHz (Ivy Bridge), 1333 MHz (Sandy Bridge) PCI Express bus DMI •...Display • 14.0 HD LED Panel, Flat type, 1366x768 pixels, 200 nit (G480/G485) • 15.6 HD LED Panel, Flat type, 1366x768 pixels, 200 nit (G580/G585) • 17.3" HD+ LED Panel, 16:9, 1600x900 pixels, 220nits; Lenovo G480/G485/G580/G585/G780 Lenovo G480/G485... 97 Specifications The following table lists the specifications of the Lenovo G480/G485/G580/ G585/G780: Table 1.
Hardware Maintenance Manual
Page 35
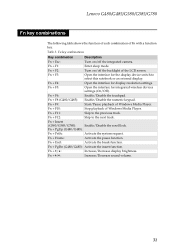
... camera. Fn + F12: Skip to the previous track. Fn + PgUp (G480/G485): Fn + PrtSc: Activate the system request. Fn + Home: Activate the pause function. Table 3. Fn + F4: Open the interface for display resolution settings. Fn + F2: Turn on /off the backlight of Fn with a... function key. Fn + F10: Stop playback of Windows Media Player. Lenovo G480/G485/G580/G585/G780 Fn key combinations The following table shows the ...
... camera. Fn + F12: Skip to the previous track. Fn + PgUp (G480/G485): Fn + PrtSc: Activate the system request. Fn + Home: Activate the pause function. Table 3. Fn + F4: Open the interface for display resolution settings. Fn + F2: Turn on /off the backlight of Fn with a... function key. Fn + F10: Stop playback of Windows Media Player. Lenovo G480/G485/G580/G585/G780 Fn key combinations The following table shows the ...
Hardware Maintenance Manual
Page 96
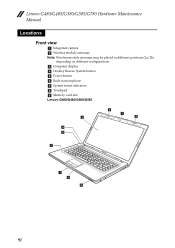
Lenovo G480/G485/G580/G585/G780 Hardware Maintenance Manual Locations Front view a Integrated camera b Wireless module antennas Note: Wireless module antennas may be placed in microphone g System status indicators h Touchpad i Memory card slot Lenovo G480/G485/G580/G585 2 1 3 2 4 5 6 7 8 9 92 c Computer display d OneKey Rescue System button e Power button f Built-in different positions (2a/2b) depending on different configurations.
Lenovo G480/G485/G580/G585/G780 Hardware Maintenance Manual Locations Front view a Integrated camera b Wireless module antennas Note: Wireless module antennas may be placed in microphone g System status indicators h Touchpad i Memory card slot Lenovo G480/G485/G580/G585 2 1 3 2 4 5 6 7 8 9 92 c Computer display d OneKey Rescue System button e Power button f Built-in different positions (2a/2b) depending on different configurations.
Lenovo G480, G485, G580, G585, G780 Lenovo Limited Warranty & Product Specific Notices V1.0 (English)
Page 14
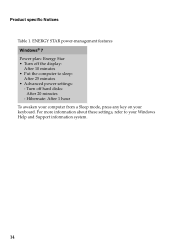
For more information about these settings, refer to sleep: After 25 minutes • Advanced power settings: - Hibernate: After 1 hour To awaken your computer from a Sleep mode, press any key on your Windows Help and Support information system. 14 Product specific Notices Table 1. ENERGY STAR power-management features Windows® 7 Power plan: Energy Star • Turn off hard disks: After 20 minutes - Turn off the display: After 10 minutes • Put the computer to your keyboard.
For more information about these settings, refer to sleep: After 25 minutes • Advanced power settings: - Hibernate: After 1 hour To awaken your computer from a Sleep mode, press any key on your Windows Help and Support information system. 14 Product specific Notices Table 1. ENERGY STAR power-management features Windows® 7 Power plan: Energy Star • Turn off hard disks: After 20 minutes - Turn off the display: After 10 minutes • Put the computer to your keyboard.
Lenovo G480, G485, G580, G585, G780 Lenovo Limited Warranty & Product Specific Notices V1.0 (English)
Page 20
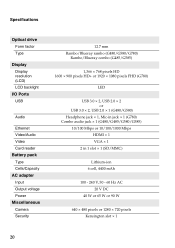
...drive Form factor Type Display Display resolution (LCD) LCD backlight I/O Ports USB Audio Ethernet Video/Audio Video Card reader Battery pack Type Cells/Capacity AC adapter Input Output voltage Power Miscellaneous Camera Security 12.7 mm Rambo/Blueray rambo (G480/G580/G780) Rambo/Blueray combo (G485/G585) 1,366 ... 2.0 × 2 or USB 3.0 × 2, USB 2.0 × 1 (G480/G580) Headphone jack × 1, Mic-in jack × 1 (G780) Combo audio jack × 1 (G480/G485/G580/G585) 10/100 Mbps or 10/100/1000 Mbps HDMI × 1 VGA × 1 2 in 1 slot × 1 (SD/MMC) Lithium-ion 6 cell, 4400 mAh 100...
...drive Form factor Type Display Display resolution (LCD) LCD backlight I/O Ports USB Audio Ethernet Video/Audio Video Card reader Battery pack Type Cells/Capacity AC adapter Input Output voltage Power Miscellaneous Camera Security 12.7 mm Rambo/Blueray rambo (G480/G580/G780) Rambo/Blueray combo (G485/G585) 1,366 ... 2.0 × 2 or USB 3.0 × 2, USB 2.0 × 1 (G480/G580) Headphone jack × 1, Mic-in jack × 1 (G780) Combo audio jack × 1 (G480/G485/G580/G585) 10/100 Mbps or 10/100/1000 Mbps HDMI × 1 VGA × 1 2 in 1 slot × 1 (SD/MMC) Lithium-ion 6 cell, 4400 mAh 100...


