
Lenovo B575 Setup Poster V1.0
Page 1
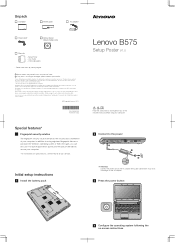
.... By default, you can find all preinstalled software downloads. Please login to using your software. Unpack Computer Battery pack AC adapter Power cord* Optical disk(s) (Select models only) Manuals - P/N:148500091 Printed in China Lenovo B575 Setup Poster V1.0 Read the safety notices and important tips in the United States and/or other countries...
.... By default, you can find all preinstalled software downloads. Please login to using your software. Unpack Computer Battery pack AC adapter Power cord* Optical disk(s) (Select models only) Manuals - P/N:148500091 Printed in China Lenovo B575 Setup Poster V1.0 Read the safety notices and important tips in the United States and/or other countries...
Lenovo B575 Limited Warranty and Product Specific Notices V1.0
Page 5
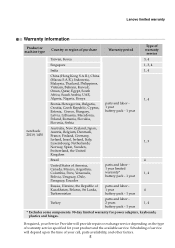
Lenovo limited warranty Warranty information Product or machine type Country or region of purchase Warranty period Type of warranty service Taiwan, Korea 3, 4 Singapore 1, 3, 4 India ...Qatar, Egypt, South Africa, Saudi Arabia, UAE, Algeria, Nigeria, Kenya 1, 4 Bosnia-Herzegovina, Bulgaria, Croatia, Czech Republic, Cyprus, Estonia, Greece, Hungary, parts and labor 1 year battery pack - 1 year Latvia, Lithuania, Macedonia, Poland, Romania, Slovakia, Slovenia, Serbia notebook: 20119, 1450 Australia, New Zealand, Japan, Austria, Belgium, Denmark, France, Finland, Germany, ...
Lenovo limited warranty Warranty information Product or machine type Country or region of purchase Warranty period Type of warranty service Taiwan, Korea 3, 4 Singapore 1, 3, 4 India ...Qatar, Egypt, South Africa, Saudi Arabia, UAE, Algeria, Nigeria, Kenya 1, 4 Bosnia-Herzegovina, Bulgaria, Croatia, Czech Republic, Cyprus, Estonia, Greece, Hungary, parts and labor 1 year battery pack - 1 year Latvia, Lithuania, Macedonia, Poland, Romania, Slovakia, Slovenia, Serbia notebook: 20119, 1450 Australia, New Zealand, Japan, Austria, Belgium, Denmark, France, Finland, Germany, ...
Lenovo B575 Limited Warranty and Product Specific Notices V1.0
Page 13
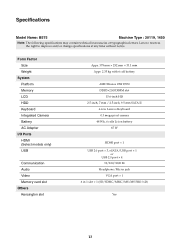
... Brazos 18W E350 DDR3×2 SODIMM slot 15.6-inch HD 2.5-inch, 7 mm / 2.5-inch, 9.5 mm SATA II 6-row Lenovo Keyboard 0.3 mega pixel camera 48 Wh, 6 cells Li-ion battery 65 W HDMI port × 1 USB 2.0 port × 3, eSATA/USB port × 1 or USB 2.0 port × 4 10/100/1000 M Headphone/Mic-in jack ...VGA port × 1 6 in 1 slot × 1 (SD/SDHC/MMC/MS/MS PRO/xD) Yes 13 Specifications Model Name: B575 Machine Type : 20119, 1450 ...
... Brazos 18W E350 DDR3×2 SODIMM slot 15.6-inch HD 2.5-inch, 7 mm / 2.5-inch, 9.5 mm SATA II 6-row Lenovo Keyboard 0.3 mega pixel camera 48 Wh, 6 cells Li-ion battery 65 W HDMI port × 1 USB 2.0 port × 3, eSATA/USB port × 1 or USB 2.0 port × 4 10/100/1000 M Headphone/Mic-in jack ...VGA port × 1 6 in 1 slot × 1 (SD/SDHC/MMC/MS/MS PRO/xD) Yes 13 Specifications Model Name: B575 Machine Type : 20119, 1450 ...
Lenovo B575 User Guide V1.0
Page 3
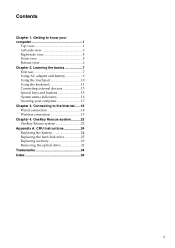
... optical drive 32 Trademarks 34 Index 35 i OneKey Rescue system ..........23 OneKey Rescue system 23 Appendix A. Learning the basics 7 First use 7 Using AC adapter and battery 9 Using the touchpad 10 Using the keyboard 11 Connecting external devices 13 Special keys and buttons 15 System status indicators 16 Securing your computer 1 Top...
... optical drive 32 Trademarks 34 Index 35 i OneKey Rescue system ..........23 OneKey Rescue system 23 Appendix A. Learning the basics 7 First use 7 Using AC adapter and battery 9 Using the touchpad 10 Using the keyboard 11 Connecting external devices 13 Special keys and buttons 15 System status indicators 16 Securing your computer 1 Top...
Lenovo B575 User Guide V1.0
Page 7
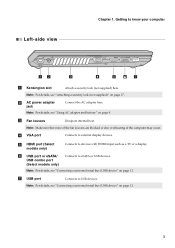
..." on page 13. 3 Chapter 1. g USB port Connects to devices with HDMI input such as a TV or a display. Note: For details, see "Using AC adapter and battery" on page 17. c Fan louvers Dissipate internal heat. Note: For details, see "Attaching a security lock (not supplied)" on page 9. Getting to know your computer Left...
..." on page 13. 3 Chapter 1. g USB port Connects to devices with HDMI input such as a TV or a display. Note: For details, see "Using AC adapter and battery" on page 17. c Fan louvers Dissipate internal heat. Note: For details, see "Attaching a security lock (not supplied)" on page 9. Getting to know your computer Left...

Lenovo B575 User Guide V1.0
Page 10
... is used to know your computer Bottom view $ % & ' ( a Battery latch - e Hard disk drive (HDD) / Memory / Mini PCI Express Card slot compartment 6 b Battery pack For details, see "Using Mobile Broadband (Select models only)" on page 9. Notes: • In order to be able ...SIM card into this slot, you must first disconnect the AC adapter and remove the battery pack. • For details, see "Using AC adapter and battery" on page 20. c Battery latch - Getting to keep the battery pack secured in place. Chapter 1. spring loaded d SIM card slot (Select models only...
... is used to know your computer Bottom view $ % & ' ( a Battery latch - e Hard disk drive (HDD) / Memory / Mini PCI Express Card slot compartment 6 b Battery pack For details, see "Using Mobile Broadband (Select models only)" on page 9. Notes: • In order to be able ...SIM card into this slot, you must first disconnect the AC adapter and remove the battery pack. • For details, see "Using AC adapter and battery" on page 20. c Battery latch - Getting to keep the battery pack secured in place. Chapter 1. spring loaded d SIM card slot (Select models only...
Lenovo B575 User Guide V1.0
Page 11
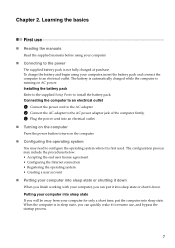
... Configuring the Internet connection • Registering the operating system • Creating a user account „ Putting your computer into sleep state. The battery is automatically charged while the computer is in sleep state, you will be away from your computer for only a short time, put it into ...into sleep state or shutting it down . Putting your computer, you can quickly wake it is not fully charged at purchase. Installing the battery pack Refer to the supplied Setup Poster to an electrical outlet. Learning the basics First use , and bypass the startup process. 7 The...
... Configuring the Internet connection • Registering the operating system • Creating a user account „ Putting your computer into sleep state. The battery is automatically charged while the computer is in sleep state, you will be away from your computer for only a short time, put it into ...into sleep state or shutting it down . Putting your computer, you can quickly wake it is not fully charged at purchase. Installing the battery pack Refer to the supplied Setup Poster to an electrical outlet. Learning the basics First use , and bypass the startup process. 7 The...
Lenovo B575 User Guide V1.0
Page 13
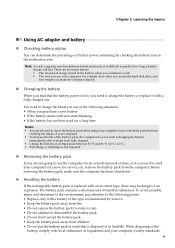
... sure the computer has been shut down. „ Handling the battery If the rechargeable battery pack is disposed of harmful substances. Learning the basics Using AC adapter and battery „ Checking battery status You can determine the percentage of battery power remaining by Lenovo. • Keep the battery pack away from fire. • Do not expose the...
... sure the computer has been shut down. „ Handling the battery If the rechargeable battery pack is disposed of harmful substances. Learning the basics Using AC adapter and battery „ Checking battery status You can determine the percentage of battery power remaining by Lenovo. • Keep the battery pack away from fire. • Do not expose the...
Lenovo B575 User Guide V1.0
Page 18
... data between them. Enabling Bluetooth communications on how to pair the device with your computer has an integrated Bluetooth adapter card, it off to save battery power. • You need to pair the Bluetooth enabled device with your computer 1 Slide the integrated wireless device switch from to . 2 Press Fn + F5 to...
... data between them. Enabling Bluetooth communications on how to pair the device with your computer has an integrated Bluetooth adapter card, it off to save battery power. • You need to pair the Bluetooth enabled device with your computer 1 Slide the integrated wireless device switch from to . 2 Press Fn + F5 to...
Lenovo B575 User Guide V1.0
Page 20
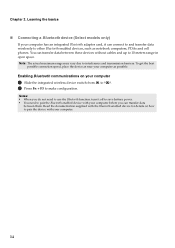
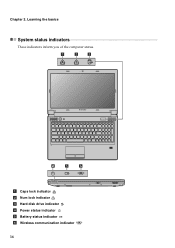
Learning the basics System status indicators These indicators inform you of the computer status. $ % & B575 ' ( ) a Caps lock indicator b Num lock indicator c Hard disk drive indicator d Power status indicator e Battery status indicator f Wireless communication indicator 16 Chapter 2.
Learning the basics System status indicators These indicators inform you of the computer status. $ % & B575 ' ( ) a Caps lock indicator b Num lock indicator c Hard disk drive indicator d Power status indicator e Battery status indicator f Wireless communication indicator 16 Chapter 2.
Lenovo B575 User Guide V1.0
Page 25
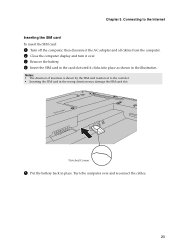
... all cables from the computer. 2 Close the computer display and turn it over and reconnect the cables. 21 Chapter 3. Turn the computer over . 3 Remove the battery. 4 Insert the SIM card in the card slot until it clicks into place as shown in place. Notched Corner 5 Put the...
... all cables from the computer. 2 Close the computer display and turn it over and reconnect the cables. 21 Chapter 3. Turn the computer over . 3 Remove the battery. 4 Insert the SIM card in the card slot until it clicks into place as shown in place. Notched Corner 5 Put the...
Lenovo B575 User Guide V1.0
Page 26
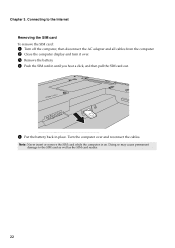
Doing so may cause permanent damage to the Internet Removing the SIM card To remove the SIM card: 1 Turn off the computer, then disconnect the AC adapter and all cables from the computer. 2 Close the computer display and turn it over and reconnect the cables. Chapter 3. Note: Never insert or remove the SIM card while the computer is on. Connecting to the SIM card as well as the SIM card reader. 22 Turn the computer over . 3 Remove the battery. 4 Push the SIM card in until you hear a click, and then pull the SIM card out. 5 Put the battery back in place.
Doing so may cause permanent damage to the Internet Removing the SIM card To remove the SIM card: 1 Turn off the computer, then disconnect the AC adapter and all cables from the computer. 2 Close the computer display and turn it over and reconnect the cables. Chapter 3. Note: Never insert or remove the SIM card while the computer is on. Connecting to the SIM card as well as the SIM card reader. 22 Turn the computer over . 3 Remove the battery. 4 Push the SIM card in until you hear a click, and then pull the SIM card out. 5 Put the battery back in place.
Lenovo B575 User Guide V1.0
Page 27
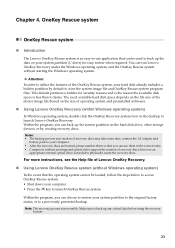
... restore when required. Notes: • The backup process and creation of recovery discs may take some time, connect the AC adapter and battery pack to your computer. • After the recovery discs are burned, please number them in the correct order. • Computers without... an integrated optical drive support the creation of Lenovo OneKey Recovery. „ Using Lenovo OneKey Rescue system (without starting the Windows operating system. Note: The recovery process is an easy-to a previously generated backup...
... restore when required. Notes: • The backup process and creation of recovery discs may take some time, connect the AC adapter and battery pack to your computer. • After the recovery discs are burned, please number them in the correct order. • Computers without... an integrated optical drive support the creation of Lenovo OneKey Recovery. „ Using Lenovo OneKey Rescue system (without starting the Windows operating system. Note: The recovery process is an easy-to a previously generated backup...
Lenovo B575 User Guide V1.0
Page 28
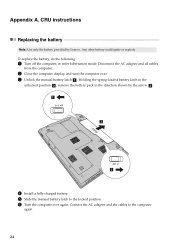
... again. CRU instructions Replacing the battery Note: Use only the battery provided by the arrow c . 4 Install a fully charged battery. 5 Slide the manual battery latch to the computer again. 24 Holding the spring-loaded battery latch in the unlocked position b , remove the battery pack in the direction shown by Lenovo. To replace the battery, do the following: 1 Turn off...
... again. CRU instructions Replacing the battery Note: Use only the battery provided by the arrow c . 4 Install a fully charged battery. 5 Slide the manual battery latch to the computer again. 24 Holding the spring-loaded battery latch in the unlocked position b , remove the battery pack in the direction shown by Lenovo. To replace the battery, do the following: 1 Turn off...
Lenovo B575 User Guide V1.0
Page 30
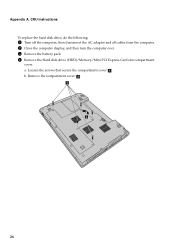
then disconnect the AC adapter and all cables from the computer. 2 Close the computer display, and then turn the computer over. 3 Remove the battery pack. 4 Remove the Hard disk drive (HDD)/Memory/Mini PCI Express Card slot compartment cover. b. Appendix A. a. Remove the compartment cover b . 26 CRU instructions To replace the hard disk drive, do the following: 1 Turn off the computer; Loosen the screws that secure the compartment cover a .
then disconnect the AC adapter and all cables from the computer. 2 Close the computer display, and then turn the computer over. 3 Remove the battery pack. 4 Remove the Hard disk drive (HDD)/Memory/Mini PCI Express Card slot compartment cover. b. Appendix A. a. Remove the compartment cover b . 26 CRU instructions To replace the hard disk drive, do the following: 1 Turn off the computer; Loosen the screws that secure the compartment cover a .

Lenovo B575 User Guide V1.0
Page 32
... again. 28 then push it firmly into the hard disk drive bay with the tab facing upwards and the connectors facing each other; C Reinstall the battery pack. D Turn the computer over again.
... again. 28 then push it firmly into the hard disk drive bay with the tab facing upwards and the connectors facing each other; C Reinstall the battery pack. D Turn the computer over again.
Lenovo B575 User Guide V1.0
Page 33
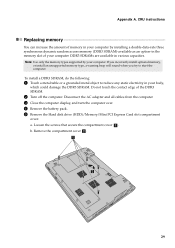
Disconnect the AC adapter and all cables from the computer. 3 Close the computer display, and turn the computer over. 4 Remove the battery pack. 5 Remove the Hard disk drive (HDD)/Memory/Mini PCI Express Card slot compartment cover. To install a DDR3 SDRAM, do the following: 1 Touch a metal table ...
Disconnect the AC adapter and all cables from the computer. 3 Close the computer display, and turn the computer over. 4 Remove the battery pack. 5 Remove the Hard disk drive (HDD)/Memory/Mini PCI Express Card slot compartment cover. To install a DDR3 SDRAM, do the following: 1 Touch a metal table ...

Lenovo B575 User Guide V1.0
Page 34
..., remove one of the socket and gently insert the DDR3 SDRAM into the closed position. 9 Reinstall the compartment cover and tighten the screws. 0 Reinstall the battery pack. A Turn the computer over again. Be sure to the computer again. 30 Appendix A.
..., remove one of the socket and gently insert the DDR3 SDRAM into the closed position. 9 Reinstall the compartment cover and tighten the screws. 0 Reinstall the battery pack. A Turn the computer over again. Be sure to the computer again. 30 Appendix A.
Lenovo B575 User Guide V1.0
Page 36
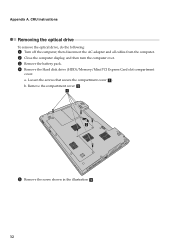
a. CRU instructions Removing the optical drive To remove the optical drive, do the following: 1 Turn off the computer; Remove the compartment cover b . 5 Remove the screw shown in the illustration c . 32 Appendix A. b. then disconnect the AC adapter and all cables from the computer. 2 Close the computer display, and then turn the computer over. 3 Remove the battery pack. 4 Remove the Hard disk drive (HDD)/Memory/Mini PCI Express Card slot compartment cover. Loosen the screws that secure the compartment cover a .
a. CRU instructions Removing the optical drive To remove the optical drive, do the following: 1 Turn off the computer; Remove the compartment cover b . 5 Remove the screw shown in the illustration c . 32 Appendix A. b. then disconnect the AC adapter and all cables from the computer. 2 Close the computer display, and then turn the computer over. 3 Remove the battery pack. 4 Remove the Hard disk drive (HDD)/Memory/Mini PCI Express Card slot compartment cover. Loosen the screws that secure the compartment cover a .
Lenovo B575 User Guide V1.0
Page 37
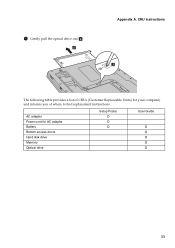
Appendix A. AC adapter Power cord for your computer, and informs you of CRUs (Customer Replaceable Units) for AC adapter Battery Bottom access doors Hard disk drive Memory Optical drive Setup Poster O O O User Guide O O O O O 33 CRU instructions The following table provides a list of where to find replacement instructions. 6 Gently pull the optical drive out d .
Appendix A. AC adapter Power cord for your computer, and informs you of CRUs (Customer Replaceable Units) for AC adapter Battery Bottom access doors Hard disk drive Memory Optical drive Setup Poster O O O User Guide O O O O O 33 CRU instructions The following table provides a list of where to find replacement instructions. 6 Gently pull the optical drive out d .


