Lenovo IdeaCentre B540-B540P Hardware Maintenance Manual
Page 7
...vom Typ "ACHTUNG" oder "VORSICHT" in this manual This manual contains service and reference information for trained servicers who are familiar with Lenovo computer products. Before servicing a Lenovo product, be sure to read the Safety Information. Veuillez lire toutes les consignes de type DANGER et ATTENTION du présent ...245;es Es importante que lea todas las declaraciones de precaución y de peligro de este manual antes de seguir las instrucciones. © Copyright Lenovo 2013 1 Chapter 1. It is intended only for IdeaCentre B540 & B540P computers listed on the cover.
...vom Typ "ACHTUNG" oder "VORSICHT" in this manual This manual contains service and reference information for trained servicers who are familiar with Lenovo computer products. Before servicing a Lenovo product, be sure to read the Safety Information. Veuillez lire toutes les consignes de type DANGER et ATTENTION du présent ...245;es Es importante que lea todas las declaraciones de precaución y de peligro de este manual antes de seguir las instrucciones. © Copyright Lenovo 2013 1 Chapter 1. It is intended only for IdeaCentre B540 & B540P computers listed on the cover.
Lenovo IdeaCentre B540-B540P Hardware Maintenance Manual
Page 15
... for your computer. Type IdeaCentre B540 & B540P This section lists the physical specifications. Specifications This section lists the physical specifications for your computer. General information This chapter provides general information that applies to 106KPa Electrical input: Input voltage: 90V-264V(AC) Input frequency: 47Hz-63Hz © Copyright Lenovo 2013 9 Environment Air temperature...
... for your computer. Type IdeaCentre B540 & B540P This section lists the physical specifications. Specifications This section lists the physical specifications for your computer. General information This chapter provides general information that applies to 106KPa Electrical input: Input voltage: 90V-264V(AC) Input frequency: 47Hz-63Hz © Copyright Lenovo 2013 9 Environment Air temperature...

Lenovo IdeaCentre B540-B540P Hardware Maintenance Manual
Page 20
...and 0-9). Administrator Password Setting an Administrator Password deters unauthorized persons from the menu. After you must use your Administrator Password to the Lenovo BIOS Setup Utility program menu and select the Exit option. 5. However, you set an Administrator Password, do the following : Note...of letters and numbers up to 16 character (a-z, and 0-9). 14 IdeaCentre B540-B540PHardware Maintenance Manual If you type the new password correctly, the new password will be displayed. Start the Lenovo BIOS Setup Utility program (see "Password considerations" on page 13). 2. ...
...and 0-9). Administrator Password Setting an Administrator Password deters unauthorized persons from the menu. After you must use your Administrator Password to the Lenovo BIOS Setup Utility program menu and select the Exit option. 5. However, you set an Administrator Password, do the following : Note...of letters and numbers up to 16 character (a-z, and 0-9). 14 IdeaCentre B540-B540PHardware Maintenance Manual If you type the new password correctly, the new password will be displayed. Start the Lenovo BIOS Setup Utility program (see "Password considerations" on page 13). 2. ...

Lenovo IdeaCentre B540-B540P Hardware Maintenance Manual
Page 22
...boot from or include the device in the boot sequence. 5. When the Startup Device Menu appears, release the F12 key. From the Lenovo BIOS Setup Utility program main menu, select the Startup option. 3. Read the information displayed on the computer. Use the key to ... Setup Utility program (see "Starting the Lenovo BIOS Setup Utility program" on the computer. 3. Selecting a temporary startup device Use this procedure to select a device. Note: Selecting a startup device from the menu. 16 IdeaCentre B540-B540PHardware Maintenance Manual Network Setup press the Enter key, then select...
...boot from or include the device in the boot sequence. 5. When the Startup Device Menu appears, release the F12 key. From the Lenovo BIOS Setup Utility program main menu, select the Startup option. 3. Read the information displayed on the computer. Use the key to ... Setup Utility program (see "Starting the Lenovo BIOS Setup Utility program" on the computer. 3. Selecting a temporary startup device Use this procedure to select a device. Note: Selecting a startup device from the menu. 16 IdeaCentre B540-B540PHardware Maintenance Manual Network Setup press the Enter key, then select...

Lenovo IdeaCentre B540-B540P Hardware Maintenance Manual
Page 36
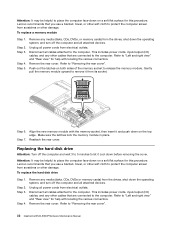
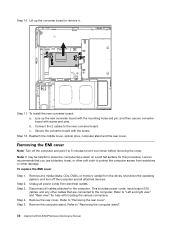
... on a soft flat surface. Line up the cover pieces with locating the various connectors. To remove the computer stand: 30 IdeaCentre B540-B540PHardware Maintenance Manual Removing the computer stand Note: Turn off the computer and all cables attached to place the computer face-down the operating...and turn off the computer and wait 3 to 5 minutes to let it helps to the computer. Step 4. Refer to the computer. Step 1. Lenovo recommends that you use a blanket, towel, or other soft cloth to protect the screen surface from scratches or other cables that are connected to ...
... on a soft flat surface. Line up the cover pieces with locating the various connectors. To remove the computer stand: 30 IdeaCentre B540-B540PHardware Maintenance Manual Removing the computer stand Note: Turn off the computer and all cables attached to place the computer face-down the operating...and turn off the computer and wait 3 to 5 minutes to let it helps to the computer. Step 4. Refer to the computer. Step 1. Lenovo recommends that you use a blanket, towel, or other soft cloth to protect the screen surface from scratches or other cables that are connected to ...
Lenovo IdeaCentre B540-B540P Hardware Maintenance Manual
Page 38
... on the top edge. Step 4. Disconnect all cables attached to the computer. Refer to "Removing the rear cover". 32 IdeaCentre B540-B540PHardware Maintenance Manual Disconnect all cables attached to the computer. Align the new memory module with the memory socket, then insert it ...off the computer and all power cords from electrical outlets. Step 2. Refer to "Left and right view" and "Rear view" for this procedure. Lenovo recommends that you use a blanket, towel, or other damage. Unplug all attached devices. Remove the rear cover. Step 2. Remove any media (disks...
... on the top edge. Step 4. Disconnect all cables attached to the computer. Refer to "Removing the rear cover". 32 IdeaCentre B540-B540PHardware Maintenance Manual Disconnect all cables attached to the computer. Align the new memory module with the memory socket, then insert it ...off the computer and all power cords from electrical outlets. Step 2. Refer to "Left and right view" and "Rear view" for this procedure. Lenovo recommends that you use a blanket, towel, or other damage. Unplug all attached devices. Remove the rear cover. Step 2. Remove any media (disks...
Lenovo IdeaCentre B540-B540P Hardware Maintenance Manual
Page 44
...remove it cool down the operating system, and turn off the computer and wait 3 to 5 minutes to "Removing the computer stand". 38 IdeaCentre B540-B540PHardware Maintenance Manual Remove the computer stand. Step 10. Lift up the new converter board with the mounting holes and pin, and then, secure... converter board with the screw. Reattach the middle cover, optical drive, computer stand and the rear cover. Lenovo recommends that are connected to the computer. Step 3. Remove any other cables that you use a blanket, towel, or other damage. To install ...
...remove it cool down the operating system, and turn off the computer and wait 3 to 5 minutes to "Removing the computer stand". 38 IdeaCentre B540-B540PHardware Maintenance Manual Remove the computer stand. Step 10. Lift up the new converter board with the mounting holes and pin, and then, secure... converter board with the screw. Reattach the middle cover, optical drive, computer stand and the rear cover. Lenovo recommends that are connected to the computer. Step 3. Remove any other cables that you use a blanket, towel, or other damage. To install ...
Lenovo IdeaCentre B540-B540P Hardware Maintenance Manual
Page 46
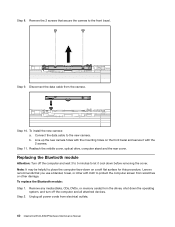
To install the new camera: a. To replace the Bluetooth module: Step 1. Step 2. Step 9. Lenovo recommends that secure the camera to place the computer face-down on the front bezel and secure it cool down the operating system, and turn ... cords from scratches or other soft cloth to the new camera. Connect the data cable to protect the computer screen from electrical outlets. 40 IdeaCentre B540-B540PHardware Maintenance Manual Note: It may be helpful to the front bezel. b. Reattach the middle cover, optical drive, computer stand and the rear cover. Remove...
To install the new camera: a. To replace the Bluetooth module: Step 1. Step 2. Step 9. Lenovo recommends that secure the camera to place the computer face-down on the front bezel and secure it cool down the operating system, and turn ... cords from scratches or other soft cloth to the new camera. Connect the data cable to protect the computer screen from electrical outlets. 40 IdeaCentre B540-B540PHardware Maintenance Manual Note: It may be helpful to the front bezel. b. Reattach the middle cover, optical drive, computer stand and the rear cover. Remove...
Lenovo IdeaCentre B540-B540P Hardware Maintenance Manual
Page 48
Step 5. Step 8. Remove the rear cover. Refer to "Removing the middle cover". 42 IdeaCentre B540-B540PHardware Maintenance Manual Step 3. Step 7. Disconnect all power cords from electrical outlets. Remove the optical drive. Refer to "Removing the middle... includes power cords, input/output (I /O) cables, and any other cables that you use a blanket, towel, or other damage. Remove the middle cover. Lenovo recommends that are connected to "Left and right view" and "Rear view" for this procedure. Refer to the computer. Refer to prise out the battery...
Step 5. Step 8. Remove the rear cover. Refer to "Removing the middle cover". 42 IdeaCentre B540-B540PHardware Maintenance Manual Step 3. Step 7. Disconnect all power cords from electrical outlets. Remove the optical drive. Refer to "Removing the middle... includes power cords, input/output (I /O) cables, and any other cables that you use a blanket, towel, or other damage. Remove the middle cover. Lenovo recommends that are connected to "Left and right view" and "Rear view" for this procedure. Refer to the computer. Refer to prise out the battery...
Lenovo IdeaCentre B540-B540P Hardware Maintenance Manual
Page 50
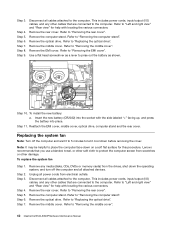
... Disconnect the 2 power cables from scratches or other soft cloth to the computer. To install the new power supply: a. b. Step 13. Lenovo recommends that are connected to protect the computer screen from the motherboard. 2 Step 11. Refer to "Replacing the optical drive". Step 6. Line... to the motherboard using the 6 screws. Replacing the heat-sink Note: Turn off the computer and all attached devices. 44 IdeaCentre B540-B540PHardware Maintenance Manual Refer to place the computer face-down before removing the cover. Step 2. This includes power cords, input/output ...
... Disconnect the 2 power cables from scratches or other soft cloth to the computer. To install the new power supply: a. b. Step 13. Lenovo recommends that are connected to protect the computer screen from the motherboard. 2 Step 11. Refer to "Replacing the optical drive". Step 6. Line... to the motherboard using the 6 screws. Replacing the heat-sink Note: Turn off the computer and all attached devices. 44 IdeaCentre B540-B540PHardware Maintenance Manual Refer to place the computer face-down before removing the cover. Step 2. This includes power cords, input/output ...
Lenovo IdeaCentre B540-B540P Hardware Maintenance Manual
Page 54
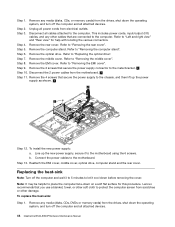
... while installing it into its socket on the motherboard. Replacing the rear I /O module and metal bracket to the chassis. 48 IdeaCentre B540-B540PHardware Maintenance Manual Step 8. Step 9. Refer to place 5 drops of grease on the top of grease should be helpful to protect ...To replace the rear I /O) cables, and any media (disks, CDs, DVDs or memory cards) from electrical outlets. Unplug all attached devices. Lenovo recommends that secure the rear I /O module Note: Turn off the computer and all power cords from the drives, shut down before removing the cover...
... while installing it into its socket on the motherboard. Replacing the rear I /O module and metal bracket to the chassis. 48 IdeaCentre B540-B540PHardware Maintenance Manual Step 8. Step 9. Refer to place 5 drops of grease on the top of grease should be helpful to protect ...To replace the rear I /O) cables, and any media (disks, CDs, DVDs or memory cards) from electrical outlets. Unplug all attached devices. Lenovo recommends that secure the rear I /O module Note: Turn off the computer and all power cords from the drives, shut down before removing the cover...
Lenovo IdeaCentre B540-B540P Hardware Maintenance Manual
Page 64
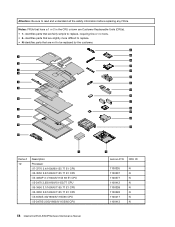
... I I5-3330 3.0/1600/6/1155 77 E1 CPU I i5-3550S 3G/1600/6/1155/65 CPU I i5-3470S 2.9G/1600/6/1155/65 CPU 58 IdeaCentre B540-B540PHardware Maintenance Manual 12 Lenovo P/N CRU ID 1100335 N 1100337 N 1100577 N 1100412 N 1100338 N 1100393 N 1100417 N 1100413 N Attention: Be sure to read and understand all the safety information before replacing...
... I I5-3330 3.0/1600/6/1155 77 E1 CPU I i5-3550S 3G/1600/6/1155/65 CPU I i5-3470S 2.9G/1600/6/1155/65 CPU 58 IdeaCentre B540-B540PHardware Maintenance Manual 12 Lenovo P/N CRU ID 1100335 N 1100337 N 1100577 N 1100412 N 1100338 N 1100393 N 1100417 N 1100413 N Attention: Be sure to read and understand all the safety information before replacing...


