User Manual
Page 3
... information 3-1 Monitor specifications 3-1 Troubleshooting 3-2 Manual image setup 3-3 Manually installing the monitor driver 3-4 Service information 3-6 Appendix A. iii Contents Safety information i v Chapter 1. Adjusting and using your monitor 2-1 Comfort and accessibility 2-1 Arranging your work area 2-1 Quick tips for healthy work habits 2-2 Accessibility information 2-2 Adjusting your monitor image 2-3 Using the direct access controls 2-3 Using the On-Screen Display controls 2-3 Selecting a supported display mode 2-5 Understanding power management 2-6 Caring...
... information 3-1 Monitor specifications 3-1 Troubleshooting 3-2 Manual image setup 3-3 Manually installing the monitor driver 3-4 Service information 3-6 Appendix A. iii Contents Safety information i v Chapter 1. Adjusting and using your monitor 2-1 Comfort and accessibility 2-1 Arranging your work area 2-1 Quick tips for healthy work habits 2-2 Accessibility information 2-2 Adjusting your monitor image 2-3 Using the direct access controls 2-3 Using the On-Screen Display controls 2-3 Selecting a supported display mode 2-5 Understanding power management 2-6 Caring...
User Manual
Page 5
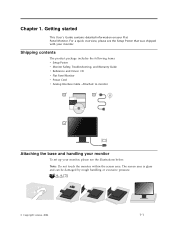
... set up your monitor, please see the Setup Poster that was shipped with your Flat fFffFffFffF Panel M onitor. The screen area is glass and can be damaged by rough handling or excessive pressure. © C opyright L enovo 2006. 1-1 Chapter 1. Shipping contents The product package includes the following items: v Setup Poster v Monitor Safety, Troubleshooting, and Warranty Guide v Reference and Driver CD v Flat Panel Monitor v Power Cord v Analog Interface Cable - For a quick...
... set up your monitor, please see the Setup Poster that was shipped with your Flat fFffFffFffF Panel M onitor. The screen area is glass and can be damaged by rough handling or excessive pressure. © C opyright L enovo 2006. 1-1 Chapter 1. Shipping contents The product package includes the following items: v Setup Poster v Monitor Safety, Troubleshooting, and Warranty Guide v Reference and Driver CD v Flat Panel Monitor v Power Cord v Analog Interface Cable - For a quick...
User Manual
Page 6
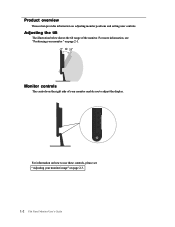
For information on page 2-3. 1-2 Flat Panel Monitor User 's Guide Product overview This section provides information on the right side of the monitor. Adjusting the tilt The illustration below shows the tilt range of your monitor enable you to use these controls, please see "Adjusting your monitor image" on how to adjust the display. For more information, see "Positioning your monitor " on page 2-1. -5 20 Monitor controls The controls on adjusting monitor positions and setting user controls.
For information on page 2-3. 1-2 Flat Panel Monitor User 's Guide Product overview This section provides information on the right side of the monitor. Adjusting the tilt The illustration below shows the tilt range of your monitor enable you to use these controls, please see "Adjusting your monitor image" on how to adjust the display. For more information, see "Positioning your monitor " on page 2-1. -5 20 Monitor controls The controls on adjusting monitor positions and setting user controls.
User Manual
Page 7
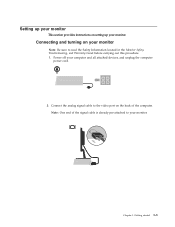
Note: One end of the computer. Chapter 1. Connect the analog signal cable to the video port on setting up your monitor This section provides instructions on the back of the signal cable is already pre-attached to your monitor Note: Be sure to read the Safety Information located in the Monitor Safety, Troubleshooting, and Warranty Guide before carrying out this procedure. 1. Getting started 1-3 Setting up your monitor. Connecting and turning on your monitor. Power off your computer and all attached devices, and unplug the computer power cord. 2.
Note: One end of the computer. Chapter 1. Connect the analog signal cable to the video port on setting up your monitor This section provides instructions on the back of the signal cable is already pre-attached to your monitor Note: Be sure to read the Safety Information located in the Monitor Safety, Troubleshooting, and Warranty Guide before carrying out this procedure. 1. Getting started 1-3 Setting up your monitor. Connecting and turning on your monitor. Power off your computer and all attached devices, and unplug the computer power cord. 2.
User Manual
Page 9
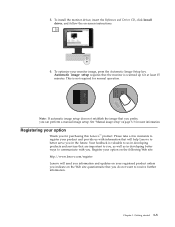
... site: http://www.lenovo.com/register Lenovo will help Lenovo to better serve you do not want to communicate with you can perform a manual image setup. To optimize your option Thank you for at least 15 minutes. Your feedback is warmed up for purchasing this Lenovo™ product. To install the monitor driver, insert the Reference and Driver CD, click Install driver, and follow the...
... site: http://www.lenovo.com/register Lenovo will help Lenovo to better serve you do not want to communicate with you can perform a manual image setup. To optimize your option Thank you for at least 15 minutes. Your feedback is warmed up for purchasing this Lenovo™ product. To install the monitor driver, insert the Reference and Driver CD, click Install driver, and follow the...
User Manual
Page 10
... setup to 30 in to achieve and maintain good working posture. Positioning your monitor Position and adjust your computer monitor for comfortable viewing by considering the following are in comfort. However, be sure to optimize your monitor height so the line of site between your eyes and the center the monitor suits your eye muscles are comfortably seated. Keep your eye-height when you use...
... setup to 30 in to achieve and maintain good working posture. Positioning your monitor Position and adjust your computer monitor for comfortable viewing by considering the following are in comfort. However, be sure to optimize your monitor height so the line of site between your eyes and the center the monitor suits your eye muscles are comfortably seated. Keep your eye-height when you use...
User Manual
Page 11
... to consider to help deter any adjustments that might arise. Periodically make minor modifications in your computer, the more information about product accessibility, vist: http://www-03.ibm.com/research/accessibility/requests/accvpat.nsf/lenovo-bidx?OpenForm 2-2 Flat Panel Monitor User 's Guide If you have a large effect on the screen's contents. A short break from using your monitor screen clean so you do work habits The...
... to consider to help deter any adjustments that might arise. Periodically make minor modifications in your computer, the more information about product accessibility, vist: http://www-03.ibm.com/research/accessibility/requests/accvpat.nsf/lenovo-bidx?OpenForm 2-2 Flat Panel Monitor User 's Guide If you have a large effect on the screen's contents. A short break from using your monitor screen clean so you do work habits The...
User Manual
Page 12
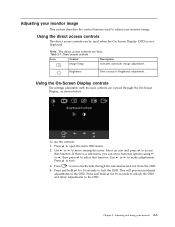
... seconds to unlock the OSD and allow adjustments to select that function. Adjusting and using or , then press to the OSD. Chapter 2. Direct access controls Icon Control Description Image Setup Activates automatic image adjustment. Select an icon and press to lock the OSD. Press to open the main OSD menu. 2. Adjusting your monitor image This section describes the control features used when the On- Using the On-Screen Display controls The settings adjustable with the user controls are blue. Brightness Direct access...
... seconds to unlock the OSD and allow adjustments to select that function. Adjusting and using or , then press to the OSD. Chapter 2. Direct access controls Icon Control Description Image Setup Activates automatic image adjustment. Select an icon and press to lock the OSD. Press to open the main OSD menu. 2. Adjusting your monitor image This section describes the control features used when the On- Using the On-Screen Display controls The settings adjustable with the user controls are blue. Brightness Direct access...
User Manual
Page 13
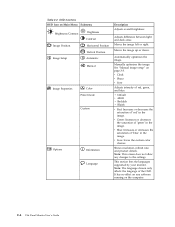
...Contrast Horizontal Position Vertical Position Automatic Manual Image Properties Color Preset mode Custom Options Information Language Description Adjusts overall brightness Adjusts difference between light and dark areas Moves the image left or right. v Default v sRGB v Reddish v Bluish v Red: Increases or decreases the saturation of red, green, and blue. Table 2-2. It has no effect on the computer. 2-4 Flat Panel Monitor User 's Guide v Clock v Phase v Save Adjusts intensity of 'red' in the image. v Save: Saves the custom color choices. Shows resolution, refresh rate...
...Contrast Horizontal Position Vertical Position Automatic Manual Image Properties Color Preset mode Custom Options Information Language Description Adjusts overall brightness Adjusts difference between light and dark areas Moves the image left or right. v Default v sRGB v Reddish v Bluish v Red: Increases or decreases the saturation of red, green, and blue. Table 2-2. It has no effect on the computer. 2-4 Flat Panel Monitor User 's Guide v Clock v Phase v Save Adjusts intensity of 'red' in the image. v Save: Saves the custom color choices. Shows resolution, refresh rate...

User Manual
Page 14
... menu settings for details on the screen. Unlike cathode-ray tube (CRT) monitors, which is normal and the image can be readjusted using your monitor 2-5 v Save v Cancel v Reset Resets monitor to the default settings. Therefore, refer to change when the display mode changes. Selecting a supported display mode The display mode the monitor uses is inherently flicker-free. This is the Native Resolution Display (NRD) mode. Button repeat rate: Select or to your system has previously been used with a CRT monitor and is pressed. v Vertical: Changes the vertical position...
... menu settings for details on the screen. Unlike cathode-ray tube (CRT) monitors, which is normal and the image can be readjusted using your monitor 2-5 v Save v Cancel v Reset Resets monitor to the default settings. Therefore, refer to change when the display mode changes. Selecting a supported display mode The display mode the monitor uses is inherently flicker-free. This is the Native Resolution Display (NRD) mode. Button repeat rate: Select or to your system has previously been used with a CRT monitor and is pressed. v Vertical: Changes the vertical position...

User Manual
Page 15
... optimal performance, switch off your monitor at the end of each working day, or whenever you have been optimized at the factory. Off Off Blank Press a key or ENERGY STAR move the mouse. There may be a slight delay before the image reappears. 2-6 Flat Panel Monitor User 's Guide Factory set display modes Addressability 640 x 350 640 x 480 720 x 400 800 x 600 1024 x 768 1280 x 1024 66 Refresh rate 70...
... optimal performance, switch off your monitor at the end of each working day, or whenever you have been optimized at the factory. Off Off Blank Press a key or ENERGY STAR move the mouse. There may be a slight delay before the image reappears. 2-6 Flat Panel Monitor User 's Guide Factory set display modes Addressability 640 x 350 640 x 480 720 x 400 800 x 600 1024 x 768 1280 x 1024 66 Refresh rate 70...
User Manual
Page 16
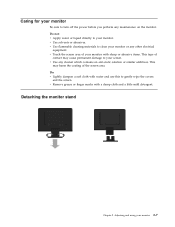
... wipe the covers and the screen. v Use any maintenance on the monitor. Detaching the monitor stand Chapter 2. Do not: v Apply water or liquid directly to your monitor 2-7 Adjusting and using your monitor. Caring for your monitor Be sure to turn off the power before you perform any cleaner which contains an anti-static solution or similar additives. v Touch the screen area of your monitor with sharp...
... wipe the covers and the screen. v Use any maintenance on the monitor. Detaching the monitor stand Chapter 2. Do not: v Apply water or liquid directly to your monitor 2-7 Adjusting and using your monitor. Caring for your monitor Be sure to turn off the power before you perform any cleaner which contains an anti-static solution or similar additives. v Touch the screen area of your monitor with sharp...
User Manual
Page 17
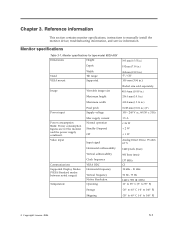
...° F) -20° to 60° C (-4° to 140° F) -20° to 60° C (-4° to manually install the monitor driver, troubleshooting information, and service information. Monitor specifications for type-model 6920-AXX 6 Dimensions Height Depth Stand VESA mount Width Tilt range Supported Image Power input Power consumption Note: Power consumption figures are for the monitor and the power supply combined. Reference information This section contains monitor specifications, instructions to 140° F) © C opyright L enovo 2006...
...° F) -20° to 60° C (-4° to 140° F) -20° to 60° C (-4° to manually install the monitor driver, troubleshooting information, and service information. Monitor specifications for type-model 6920-AXX 6 Dimensions Height Depth Stand VESA mount Width Tilt range Supported Image Power input Power consumption Note: Power consumption figures are for the monitor and the power supply combined. Reference information This section contains monitor specifications, instructions to 140° F) © C opyright L enovo 2006...
User Manual
Page 18
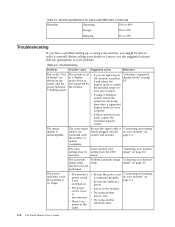
... a display old monitor, reconnect display mode" on page shown on . Troubleshooting Problem Possible cause Suggested action Reference The words ″Out The system is no power at the outlet. v If using another color setting from the OSD menu. v The power cord is connected properly. v Try using your monitor" on the monitor. The video signal cable is flashing green. on your monitor, you are replacing an "Selecting a supported of Range″ are appropriate to within power indicator the monitor. v Power on...
... a display old monitor, reconnect display mode" on page shown on . Troubleshooting Problem Possible cause Suggested action Reference The words ″Out The system is no power at the outlet. v If using another color setting from the OSD menu. v The power cord is connected properly. v Try using your monitor" on the monitor. The video signal cable is flashing green. on your monitor, you are replacing an "Selecting a supported of Range″ are appropriate to within power indicator the monitor. v Power on...
User Manual
Page 19
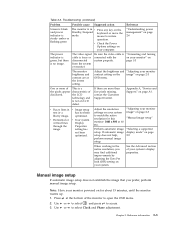
... brightness and "Adjusting your monitor powered on page 2-3 OSD menu. This is not an LCD defect. Note: Have your monitor contrast setting on the image" on for this monitor: 1440 x 900 at the lowest setting. Use or to restore operation. Be sure the video cable is loose or disconnected from the system or monitor. v Image setup has not been optimized. The video signal cable is connected with the system properly. v Horizontal or vertical lines through the image. "Adjusting...
... brightness and "Adjusting your monitor powered on page 2-3 OSD menu. This is not an LCD defect. Note: Have your monitor contrast setting on the image" on for this monitor: 1440 x 900 at the lowest setting. Use or to restore operation. Be sure the video cable is loose or disconnected from the system or monitor. v Image setup has not been optimized. The video signal cable is connected with the system properly. v Horizontal or vertical lines through the image. "Adjusting...
User Manual
Page 20
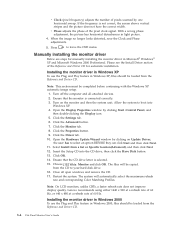
.... v Clock (pixel frequency) adjusts the number of the Reference and Driver CD for manually installing the monitor driver in Windows XP, files should be copied. If the frequency is not correct, the screen shows vertical stripes and the picture does not have the correct width. ChooseL192 Wide Monitor and click OK. Turn off the computer and all open windows and remove the CD. 17. Installing the monitor driver in Windows XP To use the Plug and...
.... v Clock (pixel frequency) adjusts the number of the Reference and Driver CD for manually installing the monitor driver in Windows XP, files should be copied. If the frequency is not correct, the screen shows vertical stripes and the picture does not have the correct width. ChooseL192 Wide Monitor and click OK. Turn off the computer and all open windows and remove the CD. 17. Installing the monitor driver in Windows XP To use the Plug and...
User Manual
Page 21
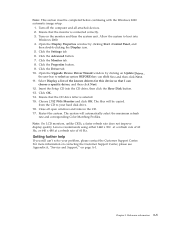
... corresponding Color Matching Profiles. Lenovo recommends using either 1440 x 900 at a refresh rate of 60 Hz, or 640 x 480 at a refresh rate of the known drivers for this device so that I can click Next and then click Next. 11. Turn on page A-1. Click the Advanced button. 7. Open the Upgrade Device Driver Wizard window by clicking Start →Control Panel, and then double-clicking the Display icon. 5. Choose L192 Wide Monitor...
... corresponding Color Matching Profiles. Lenovo recommends using either 1440 x 900 at a refresh rate of 60 Hz, or 640 x 480 at a refresh rate of the known drivers for this device so that I can click Next and then click Next. 11. Turn on page A-1. Click the Advanced button. 7. Open the Upgrade Device Driver Wizard window by clicking Start →Control Panel, and then double-clicking the Display icon. 5. Choose L192 Wide Monitor...
User Manual
Page 22
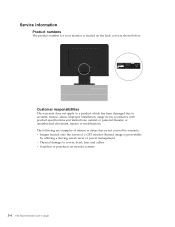
... been damaged due to covers, bezel, base and cables. v Physical damage to accident, misuse, abuse, improper installation, usage not in accordance with product specifications and instructions, natural or personal disaster, or unauthorized alterations, repairs or modifications. Burned image is located on monitor screens. 3-6 Flat Panel Monitor User 's Guide Service information Product numbers The product number for your monitor is preventable by warranty: v Images burned onto the screen of a CRT monitor. v Scratches or punctures...
... been damaged due to covers, bezel, base and cables. v Physical damage to accident, misuse, abuse, improper installation, usage not in accordance with product specifications and instructions, natural or personal disaster, or unauthorized alterations, repairs or modifications. Burned image is located on monitor screens. 3-6 Flat Panel Monitor User 's Guide Service information Product numbers The product number for your monitor is preventable by warranty: v Images burned onto the screen of a CRT monitor. v Scratches or punctures...
User Manual
Page 23
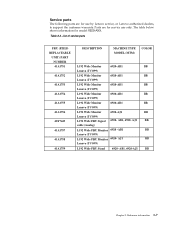
... information 3-7 Service parts The following parts are for service use by Lenovo service, or Lenovo authorized dealers, to support the customer warranty. AJ1 BB cable (Analog) L192 Wide FRU Monitor 6920 -AB1 BB Lenovo (TCO99) L192 Wide FRU Monitor 6920- List of service parts FRU (FIELD REPLACEABLE UNIT) PART NUMBER 41A1751 41A1752 41A1753 41A1754 41A1755 41A1756 40Y7443 41A1757 41A1758 41A1759 DESCRIPTION MACHINE TYPE MODEL (MTM) COLOR L192 Wide Monitor 6920-AB1 BB Lenovo (TCO99) L192 Wide Monitor 6920...
... information 3-7 Service parts The following parts are for service use by Lenovo service, or Lenovo authorized dealers, to support the customer warranty. AJ1 BB cable (Analog) L192 Wide FRU Monitor 6920 -AB1 BB Lenovo (TCO99) L192 Wide FRU Monitor 6920- List of service parts FRU (FIELD REPLACEABLE UNIT) PART NUMBER 41A1751 41A1752 41A1753 41A1754 41A1755 41A1756 40Y7443 41A1757 41A1758 41A1759 DESCRIPTION MACHINE TYPE MODEL (MTM) COLOR L192 Wide Monitor 6920-AB1 BB Lenovo (TCO99) L192 Wide Monitor 6920...

User Manual
Page 24
... problem • Hardware and software configuration information for a nominal fee. For the most current phone numbers, go to walk you determine the best alternative. If the number for replacement or exchange of defective components is available during the warranty period or throughout the life of Lenovo warranty terms. Online technical support Online technical support is available. Refer to your Lenovo...
... problem • Hardware and software configuration information for a nominal fee. For the most current phone numbers, go to walk you determine the best alternative. If the number for replacement or exchange of defective components is available during the warranty period or throughout the life of Lenovo warranty terms. Online technical support Online technical support is available. Refer to your Lenovo...


