User Manual
Page 3
... ...1-4 Connecting and turning on your monitor ...1-4 Registering your monitor ...2-8 Detaching the monitor stand ...2-9 Wall Mounting (Optional) ...2-9 Chapter 3. Notices B-1 Trademarks ...B-2 © Copyright Lenovo 2008. Reference information 3-1 Monitor specifications ...3-1 Troubleshooting ...3-3 Manual image setup ...3-4 Manually installing the monitor driver ...3-5 Getting further help ...3-8 Service information ...3-8 Product numbers ...3-8 Customer responsibilities ...3-8 Service parts ...3-9 Appendix A. Adjusting and using your monitor...
... ...1-4 Connecting and turning on your monitor ...1-4 Registering your monitor ...2-8 Detaching the monitor stand ...2-9 Wall Mounting (Optional) ...2-9 Chapter 3. Notices B-1 Trademarks ...B-2 © Copyright Lenovo 2008. Reference information 3-1 Monitor specifications ...3-1 Troubleshooting ...3-3 Manual image setup ...3-4 Manually installing the monitor driver ...3-5 Getting further help ...3-8 Service information ...3-8 Product numbers ...3-8 Customer responsibilities ...3-8 Service parts ...3-9 Appendix A. Adjusting and using your monitor...

User Manual
Page 14
This is warmed up for at least 15 minutes. See "Manual image setup" on the monitor and the computer. Power on page 3-4. 1-10 L2440p Wide Flat Panel Monitor User's Guide Automatic image setup requires that you ... the Automatic Image Setup key. Note: If automatic image setup does not establish the image that the monitor is not required if you prefer, perform manual image setup. To optimize your monitor image, if using the DVI cable. To install the monitor driver, insert the Reference and Driver CD, click Install...
This is warmed up for at least 15 minutes. See "Manual image setup" on the monitor and the computer. Power on page 3-4. 1-10 L2440p Wide Flat Panel Monitor User's Guide Automatic image setup requires that you ... the Automatic Image Setup key. Note: If automatic image setup does not establish the image that the monitor is not required if you prefer, perform manual image setup. To optimize your monitor image, if using the DVI cable. To install the monitor driver, insert the Reference and Driver CD, click Install...
User Manual
Page 20
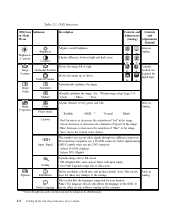
...DVI connector. . Off (Original AR): same Aspect Ratio with input signal. . On (Full): Expends image size to full screen. . Manually optimizes the image. Phase . Green: Increases or decreases the saturation of the OSD. Save: Saves the custom color choices. Note: The.... Options Information Shows resolution, refresh rate, and product details. Vertical Position Controls Locked not required for digital input Image Setup Automatic Manual Automatically optimizes the image. Selects D-SUB (Analog) . OSD functions OSD Icon Submenu on the computer. * Note: Brightness and...
...DVI connector. . Off (Original AR): same Aspect Ratio with input signal. . On (Full): Expends image size to full screen. . Manually optimizes the image. Phase . Green: Increases or decreases the saturation of the OSD. Save: Saves the custom color choices. Note: The.... Options Information Shows resolution, refresh rate, and product details. Vertical Position Controls Locked not required for digital input Image Setup Automatic Manual Automatically optimizes the image. Selects D-SUB (Analog) . OSD functions OSD Icon Submenu on the computer. * Note: Brightness and...

User Manual
Page 25
Monitor specifications for the monitor and the power supply combined. Video input (Analog) Video input (Digital) © Copyright Lenovo 2008. Monitor specifications Table 3-1. Viewable image size Maximum height Maximum width Pixel pitch Supply voltage Max supply current Max Consumption (Including USB hub) Typical ...205 MHz DVI VESA TMDS (Panel Link.) 1920 pixels (max) 1200 lines (max) 165 MHz 3-1 Chapter 3. Reference information This section contains monitor specifications, instructions to manually install the monitor driver, troubleshooting information, and service information.
Monitor specifications for the monitor and the power supply combined. Video input (Analog) Video input (Digital) © Copyright Lenovo 2008. Monitor specifications Table 3-1. Viewable image size Maximum height Maximum width Pixel pitch Supply voltage Max supply current Max Consumption (Including USB hub) Typical ...205 MHz DVI VESA TMDS (Panel Link.) 1920 pixels (max) 1200 lines (max) 165 MHz 3-1 Chapter 3. Reference information This section contains monitor specifications, instructions to manually install the monitor driver, troubleshooting information, and service information.

User Manual
Page 28
...than five pixels Appendix A, "Service of the LCD technology missing, contact the ILBeMnovo and Support," on page and is no image. Manual image setup If automatic image setup does not establish the image that you may find additional improvements by adjusting the Dots Per Inch (...open the OSD menu. 2. Perform automatic image setup. Press at the contrast setting on your computer. "Adjusting your monitor image" on page 2-3 "Manual image setup" "Selecting a supported display mode" on page 2-6 When working in Standby/Suspend mode · Press any key on the "Understanding ...
...than five pixels Appendix A, "Service of the LCD technology missing, contact the ILBeMnovo and Support," on page and is no image. Manual image setup If automatic image setup does not establish the image that you may find additional improvements by adjusting the Dots Per Inch (...open the OSD menu. 2. Perform automatic image setup. Press at the contrast setting on your computer. "Adjusting your monitor image" on page 2-3 "Manual image setup" "Selecting a supported display mode" on page 2-6 When working in Standby/Suspend mode · Press any key on the "Understanding ...

User Manual
Page 29
...the Advanced Settings button. 8. and then click the "Browse my computer for manually installing the monitor driver in Microsoft® Windows Vista, Microsoft Windows XP® and Microsoft Windows 2000 Professional. Select Lenovo L2440pwC and click Next. The files will be copied from a list of ...icon. 6. Click the Properties button. 10. If the "Windows needs your hard disk drive. If the frequency is connected correctly. 3. Manually installing the monitor driver Below are steps for driver software" button. 12. Allow the system to leave the OSD menu. When the image ...
...the Advanced Settings button. 8. and then click the "Browse my computer for manually installing the monitor driver in Microsoft® Windows Vista, Microsoft Windows XP® and Microsoft Windows 2000 Professional. Select Lenovo L2440pwC and click Next. The files will be copied from a list of ...icon. 6. Click the Properties button. 10. If the "Windows needs your hard disk drive. If the frequency is connected correctly. 3. Manually installing the monitor driver Below are steps for driver software" button. 12. Allow the system to leave the OSD menu. When the image ...

User Manual
Page 34
... available as possible: · Option name · Option number · Proof of purchase · Computer manufacturer, model, serial number, and manual · Exact wording of the error message (if any) · Description of defective components is installed in a Lenovo computer, you might want to service at your location. Refer to http://www...
... available as possible: · Option name · Option number · Proof of purchase · Computer manufacturer, model, serial number, and manual · Exact wording of the error message (if any) · Description of defective components is installed in a Lenovo computer, you might want to service at your location. Refer to http://www...
