User Manual
Page 3
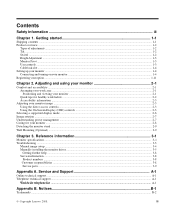
...Pivot ...1-3 User controls ...1-3 Cable lock slot ...1-4 Setting up your monitor ...1-4 Connecting and turning on your monitor ...1-4 Registering your monitor ...2-8 Detaching the monitor stand ...2-9 Wall Mounting (Optional) ...2-9 Chapter 3. ii Service and Support A-1 Online technical support ...A-1 Telephone technical support ...A-1 Worldwide telephone list ...A-1 Appendix B. Notices B-1 Trademarks ...B-2 © Copyright Lenovo 2008. Reference information 3-1 Monitor specifications ...3-1 Troubleshooting ...3-3 Manual image setup ...3-4 Manually installing the monitor driver...
...Pivot ...1-3 User controls ...1-3 Cable lock slot ...1-4 Setting up your monitor ...1-4 Connecting and turning on your monitor ...1-4 Registering your monitor ...2-8 Detaching the monitor stand ...2-9 Wall Mounting (Optional) ...2-9 Chapter 3. ii Service and Support A-1 Online technical support ...A-1 Telephone technical support ...A-1 Worldwide telephone list ...A-1 Appendix B. Notices B-1 Trademarks ...B-2 © Copyright Lenovo 2008. Reference information 3-1 Monitor specifications ...3-1 Troubleshooting ...3-3 Manual image setup ...3-4 Manually installing the monitor driver...

User Manual
Page 5
...; Analog Signal Cable · USB Cable · Cable Cover · Cable Wrapper Note: To attach a VESA mount, please see the Setup Poster that was shipped with your monitor. Shipping contents The product package should include the following items: · Setup Poster · Monitor Safety, Troubleshooting, and Warranty Guide · Reference and Driver CD · ThinkVision L2440p Wide Flat Panel Monitor · Power Cord · Digital Cable - Getting started This User's Guide contains detailed information on page 2-9. © Copyright Lenovo...
...; Analog Signal Cable · USB Cable · Cable Cover · Cable Wrapper Note: To attach a VESA mount, please see the Setup Poster that was shipped with your monitor. Shipping contents The product package should include the following items: · Setup Poster · Monitor Safety, Troubleshooting, and Warranty Guide · Reference and Driver CD · ThinkVision L2440p Wide Flat Panel Monitor · Power Cord · Digital Cable - Getting started This User's Guide contains detailed information on page 2-9. © Copyright Lenovo...

User Manual
Page 6
Product overview This section will provide information on adjusting monitor positions, setting user controls, and using the cable lock slot. Types of adjustments Tilt Please see the illustration below for an example of the tilt range. 0 30 Swivel With the built-in pedestal, you can tilt and swivel the monitor for the most comfortable viewing angle. -45o 45o 1-2 L2440p Wide Flat Panel Monitor User's Guide
Product overview This section will provide information on adjusting monitor positions, setting user controls, and using the cable lock slot. Types of adjustments Tilt Please see the illustration below for an example of the tilt range. 0 30 Swivel With the built-in pedestal, you can tilt and swivel the monitor for the most comfortable viewing angle. -45o 45o 1-2 L2440p Wide Flat Panel Monitor User's Guide

User Manual
Page 7
Chapter 1. Getting started 1-3 Rotate clockwise until the monitor stops at 90°. User controls Your monitor has controls on page 2-3. For information on how to use these controls, please see "Adjusting your monitor image" on the front which are used to the top position before rotation the monitor. - Adjust height to adjust the display. Height Adjustment After pressing the top of the monitor, remove the fixed pin and adjust the height of the monitor. 110mm Monitor Pivot 90O -
Chapter 1. Getting started 1-3 Rotate clockwise until the monitor stops at 90°. User controls Your monitor has controls on page 2-3. For information on how to use these controls, please see "Adjusting your monitor image" on the front which are used to the top position before rotation the monitor. - Adjust height to adjust the display. Height Adjustment After pressing the top of the monitor, remove the fixed pin and adjust the height of the monitor. 110mm Monitor Pivot 90O -
User Manual
Page 8
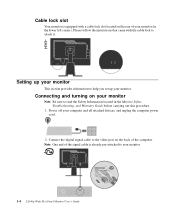
... turning on your monitor. 1-4 L2440p Wide Flat Panel Monitor User's Guide Please follow the instructions that came with a cable lock slot located on the back of your monitor (in the Monitor Safety, Troubleshooting, and Warranty Guide before carrying out this procedure. 1. Setting up your monitor This section provides information to help you set up your computer and all attached devices, and unplug the computer power cord. 2. Power off your monitor. Connect the digital signal cable to the video port...
... turning on your monitor. 1-4 L2440p Wide Flat Panel Monitor User's Guide Please follow the instructions that came with a cable lock slot located on the back of your monitor (in the Monitor Safety, Troubleshooting, and Warranty Guide before carrying out this procedure. 1. Setting up your monitor This section provides information to help you set up your computer and all attached devices, and unplug the computer power cord. 2. Power off your monitor. Connect the digital signal cable to the video port...

User Manual
Page 14
... 15 minutes. See "Manual image setup" on -screen instructions. Automatic image setup requires that you are using the analog cable, press the Automatic Image Setup key. To install the monitor driver, insert the Reference and Driver CD, click Install driver, and follow the on page 3-4. 1-10 L2440p Wide Flat Panel Monitor User's Guide Power on the monitor and the computer. To optimize your monitor image, if using the DVI cable. Note: If automatic image setup does not establish the image that the monitor is not required...
... 15 minutes. See "Manual image setup" on -screen instructions. Automatic image setup requires that you are using the analog cable, press the Automatic Image Setup key. To install the monitor driver, insert the Reference and Driver CD, click Install driver, and follow the on page 3-4. 1-10 L2440p Wide Flat Panel Monitor User's Guide Power on the monitor and the computer. To optimize your monitor image, if using the DVI cable. Note: If automatic image setup does not establish the image that the monitor is not required...

User Manual
Page 16
... performance and comfort while using your personal computer and to optimize your computer monitor for comfortable viewing by modifying your working area to work in a relaxed state. 2-1 © Copyright Lenovo 2008. Equipment layout and setup play a large role in a comfortable and neutral (vertical, or upright) position. However, be sure to avoid discomfort. Chapter 2. Positioning and viewing your monitor Position and adjust your monitor height so the line...
... performance and comfort while using your personal computer and to optimize your computer monitor for comfortable viewing by modifying your working area to work in a relaxed state. 2-1 © Copyright Lenovo 2008. Equipment layout and setup play a large role in a comfortable and neutral (vertical, or upright) position. However, be sure to avoid discomfort. Chapter 2. Positioning and viewing your monitor Position and adjust your monitor height so the line...

User Manual
Page 17
... longer you sit and work with equipment setup: The layout of your computer components and office furniture to best suit your preferences now and as your preferences change in posture can maintain a comfortable and productive posture. Periodically, stand up from your work . The following are performing. · Use the monitor brightness, contrast, and image adjustment controls, if equipped, to optimize the image on eye fatigue...
... longer you sit and work with equipment setup: The layout of your computer components and office furniture to best suit your preferences now and as your preferences change in posture can maintain a comfortable and productive posture. Periodically, stand up from your work . The following are performing. · Use the monitor brightness, contrast, and image adjustment controls, if equipped, to optimize the image on eye fatigue...

User Manual
Page 18
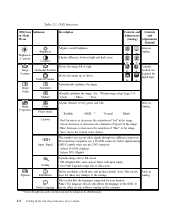
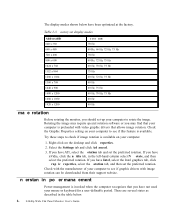
... access controls can be used to adjust your operating system; Table 2-1. others can be purchased through the On-Screen Display (OSD), as shown below. 2-3 L2440p Wide Flat Panel Monitor User's Guide Switches the video input source. With assistive technologies, users can access information in your monitor image. Accessibility information Lenovo is not displayed. Using the On-Screen Display (OSD) controls The settings adjustable with disabilities. Direct access to their disability. Direct access controls Icon Control Image Setup Brightness Input Change Description...
... access controls can be used to adjust your operating system; Table 2-1. others can be purchased through the On-Screen Display (OSD), as shown below. 2-3 L2440p Wide Flat Panel Monitor User's Guide Switches the video input source. With assistive technologies, users can access information in your monitor image. Accessibility information Lenovo is not displayed. Using the On-Screen Display (OSD) controls The settings adjustable with disabilities. Direct access to their disability. Direct access controls Icon Control Image Setup Brightness Input Change Description...
User Manual
Page 20
...computers use DVI connector. . Selects DVI (Digital) Scaling Expends image size to full screen. Note: This screen Same as does not allow any software running on the computer. * Note: Brightness and Contrast can accept video signals through two different connectors. Vertical Position Controls Locked not required for digital input Image Setup Automatic Manual Automatically optimizes the image. Reddish . Analog Menu Language This section lists the languages supported by your monitor. Save Image Properties Color Preset mode Adjusts intensity of red, green, and blue...
...computers use DVI connector. . Selects DVI (Digital) Scaling Expends image size to full screen. Note: This screen Same as does not allow any software running on the computer. * Note: Brightness and Contrast can accept video signals through two different connectors. Vertical Position Controls Locked not required for digital input Image Setup Automatic Manual Automatically optimizes the image. Reddish . Analog Menu Language This section lists the languages supported by your monitor. Save Image Properties Color Preset mode Adjusts intensity of red, green, and blue...

User Manual
Page 21
... the menu position to change when the display mode changes. preferably to 1920 x 1200 at 60 Hz, which require a high refresh rate to the original factory settings. Accessibility Button repeat rate: Select or to change. · Off · Default · Slow Menu time out: Sets the length of the OSD. · Save · Cancel Factory Default · Reset Resets monitor to minimize flicker, LCD or Flat Panel technology is inherently flicker-free. Custom · Horizontal: Changes the horizontal position of the OSD. · Vertical: Changes the vertical position...
... the menu position to change when the display mode changes. preferably to 1920 x 1200 at 60 Hz, which require a high refresh rate to the original factory settings. Accessibility Button repeat rate: Select or to change. · Off · Default · Slow Menu time out: Sets the length of the OSD. · Save · Cancel Factory Default · Reset Resets monitor to minimize flicker, LCD or Flat Panel technology is inherently flicker-free. Custom · Horizontal: Changes the horizontal position of the OSD. · Vertical: Changes the vertical position...
User Manual
Page 22
... see if graphic drivers with video graphic drivers that your computer to check if image rotation is preloaded with image rotation can be downloaded from their support website. Select the Settings tab and click Advanced. 3. The display modes shown below . 2-7 L2440p Wide Flat Panel Monitor User's Guide If you have been optimized at the factory. Understanding power management Power management is available. Try these steps to rotate the image. Factory set display modes Addressability 640 x 350...
... see if graphic drivers with video graphic drivers that your computer to check if image rotation is preloaded with image rotation can be downloaded from their support website. Select the Settings tab and click Advanced. 3. The display modes shown below . 2-7 L2440p Wide Flat Panel Monitor User's Guide If you have been optimized at the factory. Understanding power management Power management is available. Try these steps to rotate the image. Factory set display modes Addressability 640 x 350...

User Manual
Page 23
... turn off your monitor at the end of the screen area. Do not: · Apply water or liquid directly to your monitor. · Use solvents or abrasives. · Use flammable cleaning materials to clean your monitor or any maintenance on the monitor. Adjusting and using your monitor 2-8 Note: Standby also occurs if there is no image output to gently wipe the covers and the screen. · Remove...
... turn off your monitor at the end of the screen area. Do not: · Apply water or liquid directly to your monitor. · Use solvents or abrasives. · Use flammable cleaning materials to clean your monitor or any maintenance on the monitor. Adjusting and using your monitor 2-8 Note: Standby also occurs if there is no image output to gently wipe the covers and the screen. · Remove...

User Manual
Page 25
... Lift Range: 110.0mm Pivot Yes (clockwise 90 degree) VESA mount Supported 100 mm (3.94 in .) (V) 100 - 240 V~AC, 50/60 Hz 1.5 A < 50 W < 47 W < 1 W (Analog and Digital) < 0.5 W Analog Direct Drive, 75 ohm 0.7 V 1920 pixels (max) 1200 lines (max) 205 MHz DVI VESA TMDS (Panel Link.) 1920 pixels (max) 1200 lines (max) 165 MHz 3-1 Reference information This section contains monitor specifications, instructions to manually install the monitor driver, troubleshooting information, and service...
... Lift Range: 110.0mm Pivot Yes (clockwise 90 degree) VESA mount Supported 100 mm (3.94 in .) (V) 100 - 240 V~AC, 50/60 Hz 1.5 A < 50 W < 47 W < 1 W (Analog and Digital) < 0.5 W Analog Direct Drive, 75 ohm 0.7 V 1920 pixels (max) 1200 lines (max) 205 MHz DVI VESA TMDS (Panel Link.) 1920 pixels (max) 1200 lines (max) 165 MHz 3-1 Reference information This section contains monitor specifications, instructions to manually install the monitor driver, troubleshooting information, and service...
User Manual
Page 27
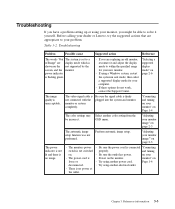
... work, contact the Support Center. Before calling your dealer or Lenovo, try the suggested actions that are display mode which is flashing green. · If you are replacing an old monitor, reconnect it yourself. Be sure the signal cable is unacceptable. OSD menu. and turning on loose or · Try using another electrical outlet. · There is no image. · The monitors power · Be sure the power cord is connected "Connecting switch...
... work, contact the Support Center. Before calling your dealer or Lenovo, try the suggested actions that are display mode which is flashing green. · If you are replacing an old monitor, reconnect it yourself. Be sure the signal cable is unacceptable. OSD menu. and turning on loose or · Try using another electrical outlet. · There is no image. · The monitors power · Be sure the power cord is connected "Connecting switch...

User Manual
Page 28
... connected with the system properly. The monitor brightness Adjust the brightness and and contrast are more of the monitor to match the native Your system resolution for about 15 minutes, until the monitor warms up. 1. "Adjusting your monitor image" on page 2-3 "Manual image setup" "Selecting a supported display mode" on page 2-3 One or more than five pixels Appendix A, "Service of your monitor powered on Page to access. 3-4 L2440p Wide Flat Panel Monitor User's Guide Note: Have your systems display properties. Troubleshooting (continued) Problem...
... connected with the system properly. The monitor brightness Adjust the brightness and and contrast are more of the monitor to match the native Your system resolution for about 15 minutes, until the monitor warms up. 1. "Adjusting your monitor image" on page 2-3 "Manual image setup" "Selecting a supported display mode" on page 2-3 One or more than five pixels Appendix A, "Service of your monitor powered on Page to access. 3-4 L2440p Wide Flat Panel Monitor User's Guide Note: Have your systems display properties. Troubleshooting (continued) Problem...

User Manual
Page 29
... leave the OSD menu. Use or to continue" window appears, click on Update Driver. Manually installing the monitor driver Below are steps for driver software" button. 12. Open the "Update Driver Software-Generic PnP Monitor" window by one horizontal sweep. Select Lenovo L2440pwC and click Next. Reference information 3-5 Click the Advanced Settings button. 8. Press to your permission to select Clock and Phase adjustment. · Clock (pixel frequency) adjusts the number of pixels scanned by clicking on Continue button. Click the...
... leave the OSD menu. Use or to continue" window appears, click on Update Driver. Manually installing the monitor driver Below are steps for driver software" button. 12. Open the "Update Driver Software-Generic PnP Monitor" window by one horizontal sweep. Select Lenovo L2440pwC and click Next. Reference information 3-5 Click the Advanced Settings button. 8. Press to your permission to select Clock and Phase adjustment. · Clock (pixel frequency) adjusts the number of pixels scanned by clicking on Continue button. Click the...
User Manual
Page 30
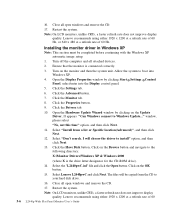
... Update Wizard window by clicking Start Settings Control Panel, select/enter into Windows XP. 4. Select "Don't search. I will be completed before continuing with the Windows XP automatic image setup. 1. Click on the monitor and then the system unit. The files will choose the driver to Windows Update..." Lenovo recommends using either 1920 x 1200 at a refresh rate of 60 3-6 L2440p Wide Flat Panel Monitor User's Guide Note: On LCD monitors, unlike CRTs, a faster refresh rate does not improve display quality. Select Lenovo...
... Update Wizard window by clicking Start Settings Control Panel, select/enter into Windows XP. 4. Select "Don't search. I will be completed before continuing with the Windows XP automatic image setup. 1. Click on the monitor and then the system unit. The files will choose the driver to Windows Update..." Lenovo recommends using either 1920 x 1200 at a refresh rate of 60 3-6 L2440p Wide Flat Panel Monitor User's Guide Note: On LCD monitors, unlike CRTs, a faster refresh rate does not improve display quality. Select Lenovo...

User Manual
Page 31
... the Windows 2000 automatic image setup. 1. Click on Update Driver, and then click Next. 11. Click the Have Disk button. Click on the monitor and then the system unit. Click the Settings tab. 6. Note: On LCD monitors, unlike CRTs, a faster refresh rate does not improve display quality. Hz, or 640 x 480 at a refresh rate of the known drivers for the CD-ROM drive). 13. Installing the monitor driver in Windows 2000...
... the Windows 2000 automatic image setup. 1. Click on Update Driver, and then click Next. 11. Click the Have Disk button. Click on the monitor and then the system unit. Click the Settings tab. 6. Note: On LCD monitors, unlike CRTs, a faster refresh rate does not improve display quality. Hz, or 640 x 480 at a refresh rate of the known drivers for the CD-ROM drive). 13. Installing the monitor driver in Windows 2000...

User Manual
Page 32
... on monitor screens. 3-10 L2440p Wide Flat Panel Monitor User's Guide Burned image is located on page A-1. For more information on contacting the Customer Support Center, please see Appendix A, "Service and Support," on the side of misuse or abuse and not covered by utilizing a moving screen saver or power management. · Physical damage to accident, misuse, abuse, improper installation, usage not in accordance with product specifications and instructions...
... on monitor screens. 3-10 L2440p Wide Flat Panel Monitor User's Guide Burned image is located on page A-1. For more information on contacting the Customer Support Center, please see Appendix A, "Service and Support," on the side of misuse or abuse and not covered by utilizing a moving screen saver or power management. · Physical damage to accident, misuse, abuse, improper installation, usage not in accordance with product specifications and instructions...


