User Manual
Page 3
Notices B-1 Trademarks ...B-2 © Copyright Lenovo 2008. Service and Support A-1 Online technical support ...A-1 Telephone technical support ...A-1 Worldwide telephone list ...A-1 Appendix B. ii Contents Safety information ...iii Chapter 1. Reference information 3-1 Monitor specifications ...3-1 Troubleshooting ...3-3 Manual image setup ...3-4 Manually installing the monitor driver ...3-5 Getting further help ...3-8 Service information ...3-8 Product numbers ...3-8 Customer responsibilities ...3-8 Service parts ...3-9 Appendix A. Adjusting and using your...
Notices B-1 Trademarks ...B-2 © Copyright Lenovo 2008. Service and Support A-1 Online technical support ...A-1 Telephone technical support ...A-1 Worldwide telephone list ...A-1 Appendix B. ii Contents Safety information ...iii Chapter 1. Reference information 3-1 Monitor specifications ...3-1 Troubleshooting ...3-3 Manual image setup ...3-4 Manually installing the monitor driver ...3-5 Getting further help ...3-8 Service information ...3-8 Product numbers ...3-8 Customer responsibilities ...3-8 Service parts ...3-9 Appendix A. Adjusting and using your...

User Manual
Page 5
... mount, please see the Setup Poster that was shipped with your monitor. For a quick overview, please see "Detaching the monitor stand" on the ThinkVision® L2440p Wide Flat Panel Monitor. Getting started This User's Guide contains detailed information on page 2-9. © Copyright Lenovo 2008. 1-1 Shipping contents The product package should include the following items...
... mount, please see the Setup Poster that was shipped with your monitor. For a quick overview, please see "Detaching the monitor stand" on the ThinkVision® L2440p Wide Flat Panel Monitor. Getting started This User's Guide contains detailed information on page 2-9. © Copyright Lenovo 2008. 1-1 Shipping contents The product package should include the following items...

User Manual
Page 6
Types of adjustments Tilt Please see the illustration below for an example of the tilt range. 0 30 Swivel With the built-in pedestal, you can tilt and swivel the monitor for the most comfortable viewing angle. -45o 45o 1-2 L2440p Wide Flat Panel Monitor User's Guide Product overview This section will provide information on adjusting monitor positions, setting user controls, and using the cable lock slot.
Types of adjustments Tilt Please see the illustration below for an example of the tilt range. 0 30 Swivel With the built-in pedestal, you can tilt and swivel the monitor for the most comfortable viewing angle. -45o 45o 1-2 L2440p Wide Flat Panel Monitor User's Guide Product overview This section will provide information on adjusting monitor positions, setting user controls, and using the cable lock slot.

User Manual
Page 7
Adjust height to adjust the display. User controls Your monitor has controls on page 2-3. Height Adjustment After pressing the top of the monitor, remove the fixed pin and adjust the height of the monitor. 110mm Monitor Pivot 90O - Chapter 1. Getting started 1-3 Rotate clockwise until the monitor stops at 90°. For information on how to use these controls, please see "Adjusting your monitor image" on the front which are used to the top position before rotation the monitor. -
Adjust height to adjust the display. User controls Your monitor has controls on page 2-3. Height Adjustment After pressing the top of the monitor, remove the fixed pin and adjust the height of the monitor. 110mm Monitor Pivot 90O - Chapter 1. Getting started 1-3 Rotate clockwise until the monitor stops at 90°. For information on how to use these controls, please see "Adjusting your monitor image" on the front which are used to the top position before rotation the monitor. -
User Manual
Page 8
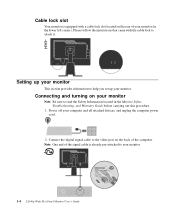
... to help you set up your computer and all attached devices, and unplug the computer power cord. 2. Connecting and turning on your monitor (in the Monitor Safety, Troubleshooting, and Warranty Guide before carrying out this procedure. 1. Please follow the instructions that came with a cable lock slot located... on the back of your monitor Note: Be sure to the video port on the rear of the computer. Connect the digital signal cable to read the Safety Information located...
... to help you set up your computer and all attached devices, and unplug the computer power cord. 2. Connecting and turning on your monitor (in the Monitor Safety, Troubleshooting, and Warranty Guide before carrying out this procedure. 1. Please follow the instructions that came with a cable lock slot located... on the back of your monitor Note: Be sure to the video port on the rear of the computer. Connect the digital signal cable to read the Safety Information located...

User Manual
Page 9
Getting started 1-5 Chapter 1. Connect one end of the USB hub cable to the upstream USB connector on the back of the computer. Connect the analog signal cable to the D-SUB connector of the monitor and the other end on the back of the computer, and the other end to the USB connector on the monitor.
Getting started 1-5 Chapter 1. Connect one end of the USB hub cable to the upstream USB connector on the back of the computer. Connect the analog signal cable to the D-SUB connector of the monitor and the other end on the back of the computer, and the other end to the USB connector on the monitor.

User Manual
Page 10
... cord has to IEC 60245 (designation H05RR-F 3G 0.75mm2) shall be considered. The relevant national installation and/or equipment regulations shall be used . Plug the monitor power cord and the computer cord into grounded electrical outlets. Alternative a flexible cord be of synthetic rubber according to be used . 1-6 L2440p Wide Flat Panel...
... cord has to IEC 60245 (designation H05RR-F 3G 0.75mm2) shall be considered. The relevant national installation and/or equipment regulations shall be used . Plug the monitor power cord and the computer cord into grounded electrical outlets. Alternative a flexible cord be of synthetic rubber according to be used . 1-6 L2440p Wide Flat Panel...

User Manual
Page 11
Chapter 1. Rotate the head of the monitor into portrait view. Getting started 1-7
Chapter 1. Rotate the head of the monitor into portrait view. Getting started 1-7

User Manual
Page 12
Place the cables through the Main Clip. Wrap the Cable Wrapper around the cables. 1-8 L2440p Wide Flat Panel Monitor User's Guide Then fasten the clip.
Place the cables through the Main Clip. Wrap the Cable Wrapper around the cables. 1-8 L2440p Wide Flat Panel Monitor User's Guide Then fasten the clip.

User Manual
Page 14
... the Automatic Image Setup key. Note: If automatic image setup does not establish the image that the monitor is not required if you prefer, perform manual image setup. To optimize your monitor image, if using the DVI cable. See "Manual image setup" on -screen instructions. This is warmed... up for at least 15 minutes. To install the monitor driver, insert the Reference and Driver CD, click Install driver,...
... the Automatic Image Setup key. Note: If automatic image setup does not establish the image that the monitor is not required if you prefer, perform manual image setup. To optimize your monitor image, if using the DVI cable. See "Manual image setup" on -screen instructions. This is warmed... up for at least 15 minutes. To install the monitor driver, insert the Reference and Driver CD, click Install driver,...

User Manual
Page 16
... in a relaxed state. 2-1 © Copyright Lenovo 2008. Comfort and accessibility Good ergonomic practice is important to get the most frequently, such as the computer mouse or telephone, within the easiest reach. In addition, use to 30 in) and can achieve different viewing distances by repositioning your monitor or by considering the following...
... in a relaxed state. 2-1 © Copyright Lenovo 2008. Comfort and accessibility Good ergonomic practice is important to get the most frequently, such as the computer mouse or telephone, within the easiest reach. In addition, use to 30 in) and can achieve different viewing distances by repositioning your monitor or by considering the following...

User Manual
Page 17
... be tiring for your eyes. Periodically make minor modifications in posture can maintain a comfortable and productive posture. A short break from using your monitor screen and focus on page 2-1 so you have a large effect on the screen's contents. Periodically, stand up from your work area, stretch... discomfort: The longer you sit and work area and the setup of your computer equipment have questions on the screen from your monitor 2-2 Chapter 2. Adjusting and using your computer. Be sure to periodically look away from overhead lighting or nearby windows. ·...
... be tiring for your eyes. Periodically make minor modifications in posture can maintain a comfortable and productive posture. A short break from using your monitor screen and focus on page 2-1 so you have a large effect on the screen's contents. Periodically, stand up from your work area, stretch... discomfort: The longer you sit and work area and the setup of your computer equipment have questions on the screen from your monitor 2-2 Chapter 2. Adjusting and using your computer. Be sure to periodically look away from overhead lighting or nearby windows. ·...

User Manual
Page 18
... With assistive technologies, users can be purchased through the On-Screen Display (OSD), as shown below. 2-3 L2440p Wide Flat Panel Monitor User's Guide others can be used to their disability. Direct access controls Icon Control Image Setup Brightness Input Change Description Activates automatic image...adjustable with disabilities. Some of these technologies are viewed through vendors or accessed at: http://www.ibm.com/able/ Adjusting your monitor image This section describes the user control features used when the On Screen Display (OSD) is committed to providing greater access ...
... With assistive technologies, users can be purchased through the On-Screen Display (OSD), as shown below. 2-3 L2440p Wide Flat Panel Monitor User's Guide others can be used to their disability. Direct access controls Icon Control Image Setup Brightness Input Change Description Activates automatic image...adjustable with disabilities. Some of these technologies are viewed through vendors or accessed at: http://www.ibm.com/able/ Adjusting your monitor image This section describes the user control features used when the On Screen Display (OSD) is committed to providing greater access ...

User Manual
Page 19
... the controls: 1. Press to make adjustments. Select an icon and press to save. 3. If there is a sub-menu, you can move between options using your monitor 2-4 Use or to open the main OSD menu. 2. Press to access that function.
... the controls: 1. Press to make adjustments. Select an icon and press to save. 3. If there is a sub-menu, you can move between options using your monitor 2-4 Use or to open the main OSD menu. 2. Press to access that function.
User Manual
Page 20
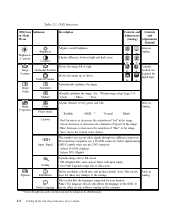
Save Image Properties Color Preset mode Adjusts intensity of "blue" in sRGB mode. 2-5 L2440p Wide Flat Panel Monitor User's Guide Bluish Same as Analog Image Position Moves the image left or right. Options Information Shows resolution, refresh rate, and product .... Horizontal Position Moves the image up or down. Manually optimizes the image. Red: Increases or decreases the saturation of the OSD. Input Signal This monitor can not be adjusted in the image. . Off (Original AR): same Aspect Ratio with input signal. . Note: The language chosen only affects the...
Save Image Properties Color Preset mode Adjusts intensity of "blue" in sRGB mode. 2-5 L2440p Wide Flat Panel Monitor User's Guide Bluish Same as Analog Image Position Moves the image left or right. Options Information Shows resolution, refresh rate, and product .... Horizontal Position Moves the image up or down. Manually optimizes the image. Red: Increases or decreases the saturation of the OSD. Input Signal This monitor can not be adjusted in the image. . Off (Original AR): same Aspect Ratio with input signal. . Note: The language chosen only affects the...

User Manual
Page 21
... OSD will remain active after the last time a button is inherently flicker-free. Note: If your system has previously been used with a CRT monitor and is controlled by the computer. Table 2-2. Change button repeat rate and menu time-out settings. Exit the main menu Exit Same as Analog... Default Returns the menu position to the default settings. Unlike CRT monitors, which is normal and the image can be readjusted using your computer documentation for details on the screen. Menu Position Same as Analog Selecting ...
... OSD will remain active after the last time a button is inherently flicker-free. Note: If your system has previously been used with a CRT monitor and is controlled by the computer. Table 2-2. Change button repeat rate and menu time-out settings. Exit the main menu Exit Same as Analog... Default Returns the menu position to the default settings. Unlike CRT monitors, which is normal and the image can be readjusted using your computer documentation for details on the screen. Menu Position Same as Analog Selecting ...
User Manual
Page 22
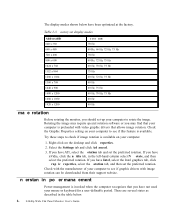
...Hz, 75 Hz 60 Hz 60 Hz, 75 Hz 60 Hz, 70 Hz, 75 Hz 60 Hz 60 Hz Image rotation Before rotating the monitor, you have ATI, select the Rotation tab and set the preferred rotation. Try these steps to check if image rotation is available on your ... been optimized at the factory. The display modes shown below have nVidia, click the nVidia tab, in the table below. 2-7 L2440p Wide Flat Panel Monitor User's Guide Check the Graphic Properties setting on the desktop and click Properties. 2. Understanding power management Power management is available. Table 2-3. There are several...
...Hz, 75 Hz 60 Hz 60 Hz, 75 Hz 60 Hz, 70 Hz, 75 Hz 60 Hz 60 Hz Image rotation Before rotating the monitor, you have ATI, select the Rotation tab and set the preferred rotation. Try these steps to check if image rotation is available on your ... been optimized at the factory. The display modes shown below have nVidia, click the nVidia tab, in the table below. 2-7 L2440p Wide Flat Panel Monitor User's Guide Check the Graphic Properties setting on the desktop and click Properties. 2. Understanding power management Power management is available. Table 2-3. There are several...

User Manual
Page 23
.... Do: · Lightly dampen a soft cloth with sharp or abrasive items. This type of each working day, or whenever you expect to turn off your monitor at the end of contact may cause permanent damage to your screen. · Use any maintenance on the... or abrasives. · Use flammable cleaning materials to clean your monitor or any other electrical equipment. · Touch the screen area of your monitor with water and use this to the monitor. Adjusting and using your monitor Be sure to leave it unused for your monitor 2-8 This may be a slight delay before the image reappears...
.... Do: · Lightly dampen a soft cloth with sharp or abrasive items. This type of each working day, or whenever you expect to turn off your monitor at the end of contact may cause permanent damage to your screen. · Use any maintenance on the... or abrasives. · Use flammable cleaning materials to clean your monitor or any other electrical equipment. · Touch the screen area of your monitor with water and use this to the monitor. Adjusting and using your monitor Be sure to leave it unused for your monitor 2-8 This may be a slight delay before the image reappears...

User Manual
Page 24
... Wall Mount Bracket with minimum weight/load bearing capacity of 5.90 kg. 100mm 4 Screws (M4) (Max Depth: 8mm) 2-9 L2440p Wide Flat Panel Monitor User's Guide 100mm Mount the monitor on the wall by following the instructions that come with the base mounting kit. Place the... monitor face down on stable flat table. 2. Attach the mounting bracket from the monitor. Detaching the monitor stand After placing the monitor face down on a non-abrasive surface on a clean surface or soft cloth, remove ...
... Wall Mount Bracket with minimum weight/load bearing capacity of 5.90 kg. 100mm 4 Screws (M4) (Max Depth: 8mm) 2-9 L2440p Wide Flat Panel Monitor User's Guide 100mm Mount the monitor on the wall by following the instructions that come with the base mounting kit. Place the... monitor face down on stable flat table. 2. Attach the mounting bracket from the monitor. Detaching the monitor stand After placing the monitor face down on a non-abrasive surface on a clean surface or soft cloth, remove ...

User Manual
Page 25
Reference information This section contains monitor specifications, instructions to manually install the monitor driver, troubleshooting information, and service information. Video input (Analog) Video input (Digital) © Copyright Lenovo 2008. Chapter 3. Viewable image size Maximum height Maximum width Pixel pitch Supply voltage Max supply current Max Consumption (...pixels (max) 1200 lines (max) 205 MHz DVI VESA TMDS (Panel Link.) 1920 pixels (max) 1200 lines (max) 165 MHz 3-1 Monitor specifications Table 3-1. Monitor specifications for the monitor and the power supply combined.
Reference information This section contains monitor specifications, instructions to manually install the monitor driver, troubleshooting information, and service information. Video input (Analog) Video input (Digital) © Copyright Lenovo 2008. Chapter 3. Viewable image size Maximum height Maximum width Pixel pitch Supply voltage Max supply current Max Consumption (...pixels (max) 1200 lines (max) 205 MHz DVI VESA TMDS (Panel Link.) 1920 pixels (max) 1200 lines (max) 165 MHz 3-1 Monitor specifications Table 3-1. Monitor specifications for the monitor and the power supply combined.


