
User Manual
Page 5
... to remove the hard-disk password . . . . 59 Power management 60 Screen blank mode 60 Sleep (standby) mode 60 Hibernation mode 61 © Copyright Lenovo 2008, 2010 Symptom-to-FRU index 62 Numeric error codes 62 Error messages 66 Beep symptoms 67 No-beep symptoms 67 LCD-related symptoms 68 Intermittent problems 69 Undetermined problems 69 Installing and configuring RAID . . . . 71 Supported RAID configurations 71 Configuring the system BIOS to enable embedded SATA RAID functionality 71 Creating RAID volumes...
... to remove the hard-disk password . . . . 59 Power management 60 Screen blank mode 60 Sleep (standby) mode 60 Hibernation mode 61 © Copyright Lenovo 2008, 2010 Symptom-to-FRU index 62 Numeric error codes 62 Error messages 66 Beep symptoms 67 No-beep symptoms 67 LCD-related symptoms 68 Intermittent problems 69 Undetermined problems 69 Installing and configuring RAID . . . . 71 Supported RAID configurations 71 Configuring the system BIOS to enable embedded SATA RAID functionality 71 Creating RAID volumes...
User Manual
Page 51
... reasons that the model of the machine and the FRU part number are servicing sequence might have nothing to read the entire page on page 45 - "PC-Doctor for DOS diagnostics program. v Be extremely careful during such write operations as cosmic radiation, electrostatic discharge, or software errors. Consider replacing a FRU only when a problem recurs. v Replace a FRU only with a hardware defect, such...
... reasons that the model of the machine and the FRU part number are servicing sequence might have nothing to read the entire page on page 45 - "PC-Doctor for DOS diagnostics program. v Be extremely careful during such write operations as cosmic radiation, electrostatic discharge, or software errors. Consider replacing a FRU only when a problem recurs. v Replace a FRU only with a hardware defect, such...
User Manual
Page 53
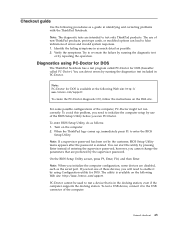
... enter BIOS Setup Utility, do as a guide in as much detail as the serial port. Diagnostics using PC-Doctor for DOS The ThinkPad Notebook has a test program called PC-Doctor for DOS (hereafter called PC-Doctor.) You can detect errors by using Configuration utility for DOS is available at the following Web site: http:// www.lenovo.com/support To create the PC-Doctor diagnostic CD, follow the instructions...
... enter BIOS Setup Utility, do as a guide in as much detail as the serial port. Diagnostics using PC-Doctor for DOS The ThinkPad Notebook has a test program called PC-Doctor for DOS (hereafter called PC-Doctor.) You can detect errors by using Configuration utility for DOS is available at the following Web site: http:// www.lenovo.com/support To create the PC-Doctor diagnostic CD, follow the instructions...

User Manual
Page 54
... model.) Note: PC-Doctor menu does not mean the formal support device list. Select Diagnostics with the TrackPoint® pointer. Use the cursor keys and ESC to select ATAPI CDx (x: 0, 1, ...) and then press Enter. 7. Turn on the screen. 8. Press cursor keys to move in the PC-Doctor menu. Diagnostics Interactive Tests Run Normal Test Run Quick Test CPU/Coprocessor Systemboard Video Adapter Fixed Disks Diskette Drives Other Devices ThinkPad Devices Communication Wireless LAN PM Memory Hardware...
... model.) Note: PC-Doctor menu does not mean the formal support device list. Select Diagnostics with the TrackPoint® pointer. Use the cursor keys and ESC to select ATAPI CDx (x: 0, 1, ...) and then press Enter. 7. Turn on the screen. 8. Press cursor keys to move in the PC-Doctor menu. Diagnostics Interactive Tests Run Normal Test Run Quick Test CPU/Coprocessor Systemboard Video Adapter Fixed Disks Diskette Drives Other Devices ThinkPad Devices Communication Wireless LAN PM Memory Hardware...

User Manual
Page 55
... on the system and reset them if they are as follows: Diagnostics Interactive Tests v Run Normal Test v Run Quick Test v CPU/Coprocessor v Systemboard v Video Adapter v Fixed Disks v Diskette Drives v Other Devices v ThinkPad Devices v Communication v Wireless LAN v PM Memory v Keyboard v Video v Internal Speaker v Mouse v Diskette v System Load v Optical Drive Test v Intel 5XXX WLAN Radio Test Notes: v In the Keyboard test in Interactive Tests, the Fn key should be set to your computer, detach...
... on the system and reset them if they are as follows: Diagnostics Interactive Tests v Run Normal Test v Run Quick Test v CPU/Coprocessor v Systemboard v Video Adapter v Fixed Disks v Diskette Drives v Other Devices v ThinkPad Devices v Communication v Wireless LAN v PM Memory v Keyboard v Video v Internal Speaker v Mouse v Diskette v System Load v Optical Drive Test v Intel 5XXX WLAN Radio Test Notes: v In the Keyboard test in Interactive Tests, the Fn key should be set to your computer, detach...
User Manual
Page 58
... --> ThinkPad Devices --> ExpressCard slot. 1. While the message, "To interrupt normal startup, press the blue ThinkVangate button," is displayed at the lower left of the screen, press F1 to start the diagnostic program. 1. In this case, turn on a horizontal surface, and run this test. Press Enter to enter the BIOS Setup Utility. 4. Diagnostics --> CPU/Coprocessor 2. Interactive Tests --> Video Enter the BIOS Setup Utility and change Serial ATA (SATA) setting to Compatibility, and run Diagnostics --> Fixed Disks...
... --> ThinkPad Devices --> ExpressCard slot. 1. While the message, "To interrupt normal startup, press the blue ThinkVangate button," is displayed at the lower left of the screen, press F1 to start the diagnostic program. 1. In this case, turn on a horizontal surface, and run this test. Press Enter to enter the BIOS Setup Utility. 4. Diagnostics --> CPU/Coprocessor 2. Interactive Tests --> Video Enter the BIOS Setup Utility and change Serial ATA (SATA) setting to Compatibility, and run Diagnostics --> Fixed Disks...
User Manual
Page 64
... Setup Utility program opens. If you hear repeating beeps, release the F1 key. Insert the Operating System Recovery Disc into the DVD drive. 3. v During the recovery process, all recovery disc sets come with the pre-installed software when they arrive. For information on which discs to select Startup → Boot. When the logo screen is displayed. Use the arrow keys to order, see "Recovery discs" on the method you must have an internal DVD drive, you start the recovery process...
... Setup Utility program opens. If you hear repeating beeps, release the F1 key. Insert the Operating System Recovery Disc into the DVD drive. 3. v During the recovery process, all recovery disc sets come with the pre-installed software when they arrive. For information on which discs to select Startup → Boot. When the logo screen is displayed. Use the arrow keys to order, see "Recovery discs" on the method you must have an internal DVD drive, you start the recovery process...

User Manual
Page 65
..., the Set Up Windows screen is booted. Start the Setup Utility program and then press F9 to save and exit the Setup Utility. Press F10 to restore the default settings. Note: After restoring a drive to the factory default settings, you . Power-on password A power-on password (POP) protects the system from the last disc in the displayed window to begin the operating system recovery process. 7. For how to remove the POP, see "How to remove the power-on password" on...
..., the Set Up Windows screen is booted. Start the Setup Utility program and then press F9 to save and exit the Setup Utility. Press F10 to restore the default settings. Note: After restoring a drive to the factory default settings, you . Power-on password A power-on password (POP) protects the system from the last disc in the displayed window to begin the operating system recovery process. 7. For how to remove the POP, see "How to remove the power-on password" on...

User Manual
Page 66
... master HDP is displayed in order to get access to remove the POP, see "1100 Backup battery" on the screen; Select Security, using the cursor directional keys to the system user. For how to the BIOS Setup Utility and change the system configuration. Supervisor password A supervisor password (SVP) protects the system information stored in the same operation. The system board must enter the SVP in the menu, this function is known by...
... master HDP is displayed in order to get access to remove the POP, see "1100 Backup battery" on the screen; Select Security, using the cursor directional keys to the system user. For how to the BIOS Setup Utility and change the system configuration. Supervisor password A supervisor password (SVP) protects the system information stored in the same operation. The system board must enter the SVP in the menu, this function is known by...

User Manual
Page 67
... the Changes have been removed. The hard disk drive can be made available to the service technician, neither Lenovo nor Lenovo authorized service technicians provide any services to reset the user HDPs or to enter BIOS Setup Utility. For the other models, enter the master HDP. Select Security, using the cursor directional keys to remove the hard-disk password Attention: If User only mode is the letter of the hard disk drive. How to move down the menu. 4. Turn on the screen; Type...
... the Changes have been removed. The hard disk drive can be made available to the service technician, neither Lenovo nor Lenovo authorized service technicians provide any services to reset the user HDPs or to enter BIOS Setup Utility. For the other models, enter the master HDP. Select Security, using the cursor directional keys to remove the hard-disk password Attention: If User only mode is the letter of the hard disk drive. How to move down the menu. 4. Turn on the screen; Type...
User Manual
Page 68
... operation, press any operation with the keyboard, the TrackPoint, the hard disk, the parallel connector, or the diskette drive within that the battery power is a Windows 7 model, it does not support ThinkVantage Productivity Center. v Open the LCD cover. To cause the computer to what occurs in addition to return from sleep (standby) mode and resume operation, do as follows: 1. v Turn on the power switch. 60 ThinkPad W700, W700ds, W701, and W701ds Hardware Maintenance Manual Power management...
... operation, press any operation with the keyboard, the TrackPoint, the hard disk, the parallel connector, or the diskette drive within that the battery power is a Windows 7 model, it does not support ThinkVantage Productivity Center. v Open the LCD cover. To cause the computer to what occurs in addition to return from sleep (standby) mode and resume operation, do as follows: 1. v Turn on the power switch. 60 ThinkPad W700, W700ds, W701, and W701ds Hardware Maintenance Manual Power management...
User Manual
Page 69
... system status, RAM, VRAM, and setup data are using the APM operating system and have set on the hard disk. To cause the computer to Power switch mode [Hibernation], turn off . When the power is turned on the hard disk drive is read, and system status is signaled by a serial device or a PC Card device. The hibernation file in the boot record on , the computer returns from the hard disk drive. Closing the lid...
... system status, RAM, VRAM, and setup data are using the APM operating system and have set on the hard disk. To cause the computer to Power switch mode [Hibernation], turn off . When the power is turned on the hard disk drive is read, and system status is signaled by a serial device or a PC Card device. The hibernation file in the boot record on , the computer returns from the hard disk drive. Closing the lid...
User Manual
Page 70
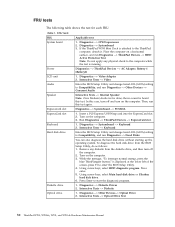
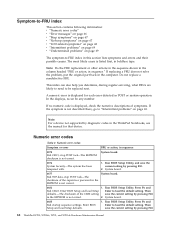
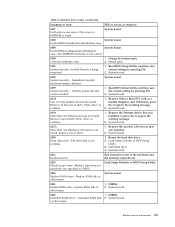
... regular servicing, what FRUs are likely to need to be any number. Numeric error codes Table 2. System board. 0176 System Security-The system has been tampered with. 1. Enter BIOS Setup and load Setup defaults. 1. Run BIOS Setup Utility. A numeric error is listed first, in the computer. Run BIOS Setup Utility, and save the current setting by diagnostic codes in the ThinkPad Notebooks, see the manual for each error detected in this section lists symptoms and errors and...
... regular servicing, what FRUs are likely to need to be any number. Numeric error codes Table 2. System board. 0176 System Security-The system has been tampered with. 1. Enter BIOS Setup and load Setup defaults. 1. Run BIOS Setup Utility. A numeric error is listed first, in the computer. Run BIOS Setup Utility, and save the current setting by diagnostic codes in the ThinkPad Notebooks, see the manual for each error detected in this section lists symptoms and errors and...
User Manual
Page 71
... Change requested. 1. Press to continue. 1. Remove the wireless LAN device that you installed. 2. Reseat the hard disk drive. 2. Run interactive tests of them. DIMM. System board. 0188 System board. Remove all but one of them . Remove either a Mini-PCI Card or a modem daughter card. Remove one specified in BIOS Setup Utility. 3. DIMM. 2. Extended RAM error- System board. 0192 System Security- Security password retry count exceeded. 1. Remove one of the keyboard and the auxiliary input device. 0220 Monitor type error-Monitor type...
... Change requested. 1. Press to continue. 1. Remove the wireless LAN device that you installed. 2. Reseat the hard disk drive. 2. Run interactive tests of them. DIMM. System board. 0188 System board. Remove all but one of them . Remove either a Mini-PCI Card or a modem daughter card. Remove one specified in BIOS Setup Utility. 3. DIMM. 2. Extended RAM error- System board. 0192 System Security- Security password retry count exceeded. 1. Remove one of the keyboard and the auxiliary input device. 0220 Monitor type error-Monitor type...
User Manual
Page 72
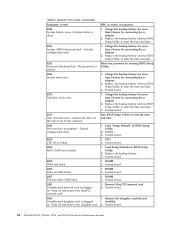
... Software NMI failed 1. Charge the backup battery for more than 8 hours by connecting the ac adapter. 2. Default configuration used . 1. Replace the backup battery. 3. System board. 02F7 Fail-safe timer NMI failed 1. System board. 1803 1. Remove the daughter card that you Unauthorized daughter card is plugged in BIOS Setup Utility. 2. in BIOS Setup Utility. 2. System board. 64 ThinkPad W700, W700ds, W701, and W701ds Hardware Maintenance Manual System board. 0270 Real-time clock error. 1. Remove Mini PCI network card. 2. Reset the password by connecting...
... Software NMI failed 1. Charge the backup battery for more than 8 hours by connecting the ac adapter. 2. Default configuration used . 1. Replace the backup battery. 3. System board. 02F7 Fail-safe timer NMI failed 1. System board. 1803 1. Remove the daughter card that you Unauthorized daughter card is plugged in BIOS Setup Utility. 2. in BIOS Setup Utility. 2. System board. 64 ThinkPad W700, W700ds, W701, and W701ds Hardware Maintenance Manual System board. 0270 Real-time clock error. 1. Remove Mini PCI network card. 2. Reset the password by connecting...
User Manual
Page 73
... board. Power off and remove all but the reader that you installed. 2. Undock docking station or port replicator if it by pressing ESC. Place the ThinkPad Notebook on HDD0 (Main hard disk drive) 1. Do not apply any physical shock to the ThinkPad Notebook. 2. Location of the DIMM slot, see "1050 DIMM slot cover and DIMM" on HDD0 (Main hard disk drive) 2. Reseat the hard disk drive. 2. Remove all but not in -Power off and install a memory module to enter SETUP 1. Install...
... board. Power off and remove all but the reader that you installed. 2. Undock docking station or port replicator if it by pressing ESC. Place the ThinkPad Notebook on HDD0 (Main hard disk drive) 1. Do not apply any physical shock to the ThinkPad Notebook. 2. Location of the DIMM slot, see "1050 DIMM slot cover and DIMM" on HDD0 (Main hard disk drive) 2. Reseat the hard disk drive. 2. Remove all but not in -Power off and install a memory module to enter SETUP 1. Install...
User Manual
Page 75
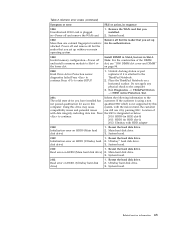
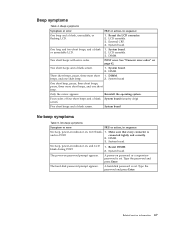
.... 3. System board. A power-on page 62. Related service information 67 External CRT. 4. DIMM. System board. 2. Five short beeps and a blank screen. Make sure that every connector is set . System board. No beep, power-on indicator on password prompt appears. Reseat DIMM. 2. The power-on , and LCD blank during POST. 1. The hard-disk password prompt appears. Two short beeps and a blank screen. 1. Type the password and press Enter. Type the password and press Enter. LCD assembly...
.... 3. System board. A power-on page 62. Related service information 67 External CRT. 4. DIMM. System board. 2. Five short beeps and a blank screen. Make sure that every connector is set . System board. No beep, power-on indicator on password prompt appears. Reseat DIMM. 2. The power-on , and LCD blank during POST. 1. The hard-disk password prompt appears. Two short beeps and a blank screen. 1. Type the password and press Enter. Type the password and press Enter. LCD assembly...

User Manual
Page 79
... devices and configuring RAID for this product, if the BIOS was formatted or the system board was replaced, RAID is not enabled by default. Press F10 to enable embedded SATA RAID functionality" v "Creating RAID volumes" on page 72 v "Deleting RAID volumes" on ThinkPad W700, W700ds, W701, and W701ds: RAID Level 0 (RAID 0) - v "Supported RAID configurations" v "Configuring the system BIOS to save the settings. © Copyright Lenovo 2008, 2010 71 Configuring the system BIOS...
... devices and configuring RAID for this product, if the BIOS was formatted or the system board was replaced, RAID is not enabled by default. Press F10 to enable embedded SATA RAID functionality" v "Creating RAID volumes" on page 72 v "Deleting RAID volumes" on ThinkPad W700, W700ds, W701, and W701ds: RAID Level 0 (RAID 0) - v "Supported RAID configurations" v "Configuring the system BIOS to save the settings. © Copyright Lenovo 2008, 2010 71 Configuring the system BIOS...
User Manual
Page 80
... Ctrl key, and press the I key. 3. Using the up and down arrow keys, Tab keys, and Enter key select the RAID level and fill in BIOS, create RAID volume, and then reinstall the operating system. Creating RAID volumes This section describes how to use the Intel Matrix Storage Manager option ROM Configuration Utility to delete RAID volumes. During the startup, when a prompt to press Ctrl+I to enter the Configuration Utility is displayed on the screen, press...
... Ctrl key, and press the I key. 3. Using the up and down arrow keys, Tab keys, and Enter key select the RAID level and fill in BIOS, create RAID volume, and then reinstall the operating system. Creating RAID volumes This section describes how to use the Intel Matrix Storage Manager option ROM Configuration Utility to delete RAID volumes. During the startup, when a prompt to press Ctrl+I to enter the Configuration Utility is displayed on the screen, press...

User Manual
Page 86
..., and change the settings. v Configure EasyEject Actions: This button is used to select, stop, or remove external devices connected to open the EasyEject Utility main window. v This function does not work while a DVD movie or a video clip is also available. Change the settings of the UltraNav® pointing device. If you click this function and use the Fn+F7 key combination for the Fn+F9 function. Reserved. For Windows 7: Switch a display output location v Computer display only (LCD) v Computer display and external monitor...
..., and change the settings. v Configure EasyEject Actions: This button is used to select, stop, or remove external devices connected to open the EasyEject Utility main window. v This function does not work while a DVD movie or a video clip is also available. Change the settings of the UltraNav® pointing device. If you click this function and use the Fn+F7 key combination for the Fn+F9 function. Reserved. For Windows 7: Switch a display output location v Computer display only (LCD) v Computer display and external monitor...


