Lenovo 08862AU Support and Manuals
Get Help and Manuals for this Lenovo item

View All Support Options Below
Free Lenovo 08862AU manuals!
Problems with Lenovo 08862AU?
Ask a Question
Free Lenovo 08862AU manuals!
Problems with Lenovo 08862AU?
Ask a Question
Popular Lenovo 08862AU Manual Pages
Lenovo IdeaPad V460 Hardware Maintenance Manual V2.0 - Page 3

... service information 23 Restoring the factory contents by using OneKey Recovery 23
Restore of factory default 23 Using recovery discs 23 Passwords 24 Power-on password 24 Supervisor password 24 Power management 25 Screen blank mode 25 Sleep (standby) mode 25 Hibernation mode 26
Lenovo IdeaPad V460 27 Specifications 27 Status indicators 29 Fn key combinations 31 FRU replacement...
Lenovo IdeaPad V460 Hardware Maintenance Manual V2.0 - Page 4
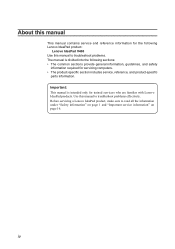
..., guidelines, and safety
information required for servicing computers. •• The product-specific section includes service, reference, and product-specific
parts information. Use this manual to troubleshoot problems. The manual is intended only for trained servicers who are familiar with Lenovo IdeaPad products. Before servicing a Lenovo IdeaPad product, make sure to read all the...
Lenovo IdeaPad V460 Hardware Maintenance Manual V2.0 - Page 25
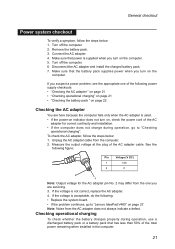
... voltage for correct continuity and installation. •• If the computer does not charge during operation, use a discharged battery pack or a battery pack that power is not correct, replace the AC adapter. 4. See the
following : •• Replace the system board. •• If the problem continues, go to "Lenovo IdeaPad V460" on the
computer. Connect the AC adapter...
Lenovo IdeaPad V460 Hardware Maintenance Manual V2.0 - Page 33
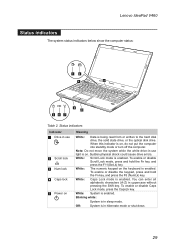
... You can enter all alphabetic characters (A-Z) in sleep mode.
Sudden physical shock could cause drive errors. White:
Scroll Lock mode is enabled. White:
Caps Lock mode is enabled. To enable or... on , do not put the computer into standby mode or turn off the computer. When this indicator is enabled.
Lenovo IdeaPad V460
Status indicators
The system status indicators below show the...
Lenovo IdeaPad V460 Hardware Maintenance Manual V2.0 - Page 37
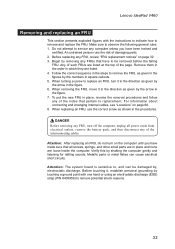
... the figure. 7. DANGER Before removing any of damaging parts. 2. Attention: The system board is sensitive to remove the FRU, as given in the figures by the arrow in the direction as given by shaking the computer gently and listening for rattling sounds. Lenovo IdeaPad V460
Removing and replacing an FRU
This section presents exploded figures with...
Lenovo IdeaPad V460 Hardware Maintenance Manual V2.0 - Page 45

...the card in the direction shown by arrow 3.
3
When installing: •• In models with a wireless LAN card that has two antenna connectors,...models with a wireless LAN card that has three antenna connectors, plug the black cable (1st) (MAIN) into the jack labeled 1, the grey cable (3rd) into jack labeled 3, and the white cable (2nd) (AUX) into jack labeled 2 on the card.
41 Lenovo IdeaPad V460...
Lenovo IdeaPad V460 Hardware Maintenance Manual V2.0 - Page 47
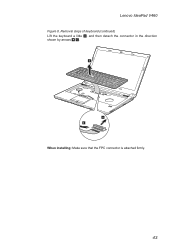
Removal steps of keyboard (continued)
Lift the keyboard a little 3, and then detach the connector in the direction shown by arrows 4 5.
3
4 5
When installing: Make sure that the FPC connector is attached firmly.
43 Lenovo IdeaPad V460
Figure 8.
Lenovo IdeaPad V460 Hardware Maintenance Manual V2.0 - Page 49
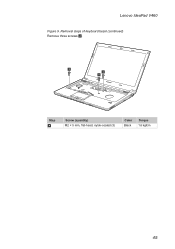
Removal steps of keyboard bezel (continued)
Remove three screws 4.
4 4
4
Step
4
Screw (quantity) M2 × 5 mm, flat-head, nylok-coated (3)
Color Black
Torque 1.6 kgfcm
45 Lenovo IdeaPad V460
Figure 9.
Lenovo IdeaPad V460 Hardware Maintenance Manual V2.0 - Page 51
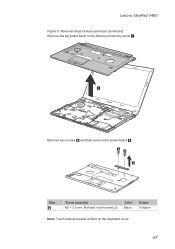
Removal steps of keyboard bezel (continued)
Remove the keyboard bezel in the direction shown by arrow 7.
7
Remove two screws 8 and then remove the power board 9.
8 8 9
Step
8
Screw (quantity) M2 × 3.5 mm, flat-head, nylok-coated (2)
Color Black
Torque 1.6 kgfcm
Note: Touch inductive panel is fixed on the keyboard cover.
47 Lenovo IdeaPad V460
Figure 9.
Lenovo IdeaPad V460 Hardware Maintenance Manual V2.0 - Page 53
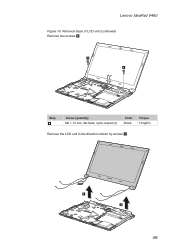
Removal steps of LCD unit (continued)
Remove two screws 4.
4 4
Step
4
Screw (quantity) M2 × 12 mm, flat-head, nylok-coated (4)
Color Black
Torque 1.6 kgfcm
Remove the LCD unit in the direction shown by arrows 5.
5 5
49 Lenovo IdeaPad V460
Figure 10.
Lenovo IdeaPad V460 Hardware Maintenance Manual V2.0 - Page 55
Lenovo IdeaPad V460
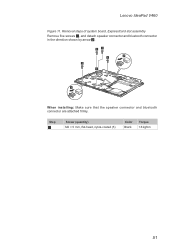
Figure 11. Removal steps of system board, ExpressCard slot assembly
Remove five screws 1, and detach speaker connector and bluetooth connector in the direction shown by arrow 2.
11 2
1 1
1
2
When installing: Make sure that the speaker connector and bluetooth connector are attached firmly. Step
1
Screw (quantity) M2 × 5 mm, flat-head, nylok-coated (5)
Color...
Lenovo IdeaPad V460 Hardware Maintenance Manual V2.0 - Page 57
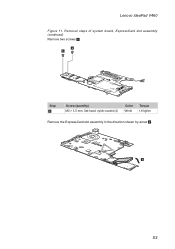
Removal steps of system board, ExpressCard slot assembly (continued)
Remove two screws 5.
5 5
Step
5
Screw (quantity) M2 × 3.5 mm, flat-head, nylok-coated (2)
Color White
Torque 1.6 kgfcm
Remove the ExpressCard slot assembly in the direction shown by arrow 6.
6
53 Lenovo IdeaPad V460
Figure 11.
Lenovo IdeaPad V460 Hardware Maintenance Manual V2.0 - Page 59
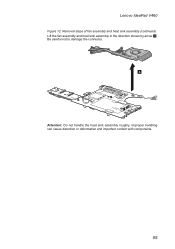
Removal steps of fan assembly and heat sink assembly (continued)
Lift the fan assembly and heat sink assembly in the direction shown by arrow 3. Be careful not to damage the connector. 3
Attention: Do not handle the heat sink assembly roughly.
Lenovo IdeaPad V460
Figure 12. Improper handling can cause distortion or deformation and imperfect contact with components.
55
Lenovo IdeaPad V460 Hardware Maintenance Manual V2.0 - Page 61
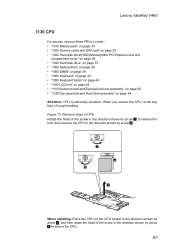
... in the direction shown by arrow 1 to secure the CPU.
57 Figure 13. When you service the CPU, avoid any kind of rough handling. Lenovo IdeaPad V460
1130 CPU
For access, remove these FRUs in order: •• "1010 Battery pack" on...the lock, then remove the CPU in the direction shown by arrow 2.
1
a b
2
When installing: Place the CPU on page 54 Attention: CPU is extremely sensitive.
Lenovo IdeaPad V460 Hardware Maintenance Manual V2.0 - Page 63
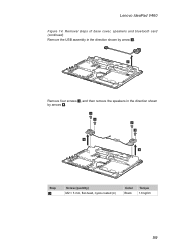
Removal steps of base cover, speakers and bluetooth card (continued)
Remove the USB assembly in the direction shown by arrow 2.
2
Remove four screws 3, and then remove the speakers in the direction shown by arrows 4.
3 3 3 3
4
4
Step
3
Screw (quantity) M2 × 5 mm, flat-head, nylok-coated (4)
Color Black
Torque 1.6 kgfcm
59 Lenovo IdeaPad V460
Figure 14.
Lenovo 08862AU Reviews
We have not received any reviews for Lenovo yet.