Hardware Maintenance Manual
Page 3
... Intermittent problems 40 Undetermined problems 41 Chapter 5. Status indicators . . . . . 43 Chapter 6. Removing and replacing a FRU 51 1010 Battery pack 52 1020 Bottom slot cover 52 1030 DIMM 54 1040 Hard disk drive (HDD 55 1050 PCI Express Mini Card for wireless LAN . . 56 1060 PCI Express Mini Card for CTO, CMV, and GAV products 21 Chapter 3. Related service information 33 Restoring the factory contents by using Recovery Disc Set 33 Passwords 34 Power-on password 34 Hard-disk password...
... Intermittent problems 40 Undetermined problems 41 Chapter 5. Status indicators . . . . . 43 Chapter 6. Removing and replacing a FRU 51 1010 Battery pack 52 1020 Bottom slot cover 52 1030 DIMM 54 1040 Hard disk drive (HDD 55 1050 PCI Express Mini Card for wireless LAN . . 56 1060 PCI Express Mini Card for CTO, CMV, and GAV products 21 Chapter 3. Related service information 33 Restoring the factory contents by using Recovery Disc Set 33 Passwords 34 Power-on password 34 Hard-disk password...

Hardware Maintenance Manual
Page 8
... maintenance information. Pumps - Use caution; Performing a mechanical inspection - Blowers and fans - If you work alone under hazardous conditions or near power supplies - When using testers, set the controls correctly and use the approved probe leads and accessories for safe operational condition. • Do not use this type of these precautions are moist floors, nongrounded power extension cables, power surges, and missing safety grounds. • Do not touch...
... maintenance information. Pumps - Use caution; Performing a mechanical inspection - Blowers and fans - If you work alone under hazardous conditions or near power supplies - When using testers, set the controls correctly and use the approved probe leads and accessories for safe operational condition. • Do not use this type of these precautions are moist floors, nongrounded power extension cables, power surges, and missing safety grounds. • Do not touch...
Hardware Maintenance Manual
Page 25
... software fixes, drivers, and BIOS downloads. Enter the product number of more than one , to use error message" on page 20 • "Strategy for replacing FRUs for replacing FRUs" on page 20 - then, when service has been completed, verify that changed the symptoms. Attention: The setup configuration on the screen. 3. Chapter 2. After a system board is loaded to http://support.lenovo.com. 2. Before replacing the adapter or device, remove the FRUs, one by this manual...
... software fixes, drivers, and BIOS downloads. Enter the product number of more than one , to use error message" on page 20 • "Strategy for replacing FRUs for replacing FRUs" on page 20 - then, when service has been completed, verify that changed the symptoms. Attention: The setup configuration on the screen. 3. Chapter 2. After a system board is loaded to http://support.lenovo.com. 2. Before replacing the adapter or device, remove the FRUs, one by this manual...
Hardware Maintenance Manual
Page 29
... FRU part number are servicing sequence might be responsible for repair costs if the computer damage was subjected to stress beyond normal use new nylon-coated screws. • Be extremely careful during such write operations as cosmic radiation, electrostatic discharge, or software errors. Chapter 3. Drives in which the failing FRU was detected • Failing FRU name and part number • Machine type, model number, and serial number...
... FRU part number are servicing sequence might be responsible for repair costs if the computer damage was subjected to stress beyond normal use new nylon-coated screws. • Be extremely careful during such write operations as cosmic radiation, electrostatic discharge, or software errors. Chapter 3. Drives in which the failing FRU was detected • Failing FRU name and part number • Machine type, model number, and serial number...
Hardware Maintenance Manual
Page 30
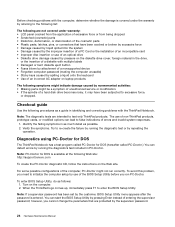
... the supervisor password. 24 Hardware Maintenance Manual Diagnostics using PC-Doctor for DOS The ThinkPad Notebook has a test program called PC-Doctor.) You can start the BIOS Setup Utility by the customer, BIOS Setup Utility menu appears after the password is entered. Turn on the diskette drive cover, foreign material in identifying and correcting problems with the ThinkPad Notebook. Note: If a supervisor password has been set by pressing Enter instead of entering the supervisor password; Checkout guide Use the following...
... the supervisor password. 24 Hardware Maintenance Manual Diagnostics using PC-Doctor for DOS The ThinkPad Notebook has a test program called PC-Doctor.) You can start the BIOS Setup Utility by the customer, BIOS Setup Utility menu appears after the password is entered. Turn on the diskette drive cover, foreign material in identifying and correcting problems with the ThinkPad Notebook. Note: If a supervisor password has been set by pressing Enter instead of entering the supervisor password; Checkout guide Use the following...
Hardware Maintenance Manual
Page 31
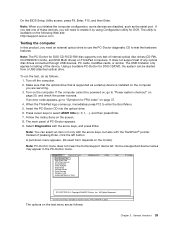
... need to enable it by using Configuration utility for DOS. Diagnostics Interactive Tests Run Normal Test Run Quick Test CPU/Coprocessor Systemboard Video Adapter Fixed Disks Diskette Drives Other Devices Wireless LAN Advanced Memory Tests Hardware Info Utility Quit F1=Help PC-DOCTOR 2.0 Copyright 2008 PC-Doctor, Inc. If the computer cannot be started from a USB attached optical drive. Press cursor keys to "Power system checkout" on the test menu are disabled, such as a startup device is supported...
... need to enable it by using Configuration utility for DOS. Diagnostics Interactive Tests Run Normal Test Run Quick Test CPU/Coprocessor Systemboard Video Adapter Fixed Disks Diskette Drives Other Devices Wireless LAN Advanced Memory Tests Hardware Info Utility Quit F1=Help PC-DOCTOR 2.0 Copyright 2008 PC-Doctor, Inc. If the computer cannot be started from a USB attached optical drive. Press cursor keys to "Power system checkout" on the test menu are disabled, such as a startup device is supported...

Hardware Maintenance Manual
Page 32
... • Run Quick Test • CPU/Coprocessor • System board • Video Adapter • Fixed Disks • Diskette Drives • Other Devices • Wireless LAN • Advanced Memory Tests • Keyboard • Video • Internal Speaker • Mouse • Diskette • System Load • Optical Drive Test • Intel WLAN Radio Test Notes: • In the Keyboard test in Interactive Tests, the Fn key should be set to Active. 10. To...
... • Run Quick Test • CPU/Coprocessor • System board • Video Adapter • Fixed Disks • Diskette Drives • Other Devices • Wireless LAN • Advanced Memory Tests • Keyboard • Video • Internal Speaker • Mouse • Diskette • System Load • Optical Drive Test • Intel WLAN Radio Test Notes: • In the Keyboard test in Interactive Tests, the Fn key should be set to Active. 10. To...

Hardware Maintenance Manual
Page 33
..., along with the Windows 7 operating system. If an error code is not installed with the Lenovo Solution Center program, you to start the test. Note: The Lenovo Solution Center program is detected, information messages will be downloaded from the Lenovo Support Web site. • The two programs are servicing is displayed, go to "Power system checkout" on the screen to test memory and internal storage problems, view system...
..., along with the Windows 7 operating system. If an error code is not installed with the Lenovo Solution Center program, you to start the test. Note: The Lenovo Solution Center program is detected, information messages will be downloaded from the Lenovo Support Web site. • The two programs are servicing is displayed, go to "Power system checkout" on the screen to test memory and internal storage problems, view system...

Hardware Maintenance Manual
Page 34
... the Boot Menu window opens, release the F12 key. 4. Turn on a USB device or CD. The options on page 37 for error code descriptions and troubleshooting hints. 2. To use the diagnostic medium you have created, do one of the UEFI diagnostic program is displayed, go to "Power system checkout" on the screen to -FRU index" on the main screen are as follows: Tests • Quick Memory Test • Quick Storage Device Test...
... the Boot Menu window opens, release the F12 key. 4. Turn on a USB device or CD. The options on page 37 for error code descriptions and troubleshooting hints. 2. To use the diagnostic medium you have created, do one of the UEFI diagnostic program is displayed, go to "Power system checkout" on the screen to -FRU index" on the main screen are as follows: Tests • Quick Memory Test • Quick Storage Device Test...

Hardware Maintenance Manual
Page 35
... follows: Click Start ➙ Control Panel ➙ System and Security ➙ Lenovo's System Health and Diagnostics Follow the instructions on the computer. Keyboard 1. Interactive Tests ➙ Keyboard Hard disk drive or solid state Enter the BIOS Setup Utility and change Serial ATA (SATA) setting to Compatibility, drive and run Diagnostics ➙ Other Device ➙ Conexant Audio Speaker Interactive Tests ➙ Internal Speaker Note: Once Audio test is done, the no sound is available...
... follows: Click Start ➙ Control Panel ➙ System and Security ➙ Lenovo's System Health and Diagnostics Follow the instructions on the computer. Keyboard 1. Interactive Tests ➙ Keyboard Hard disk drive or solid state Enter the BIOS Setup Utility and change Serial ATA (SATA) setting to Compatibility, drive and run Diagnostics ➙ Other Device ➙ Conexant Audio Speaker Interactive Tests ➙ Internal Speaker Note: Once Audio test is done, the no sound is available...
Hardware Maintenance Manual
Page 39
... on the computer. To restore the computer to the original factory configuration using the following information: • "Restoring the factory contents by using Recovery Disc Set" on page 33 • "Passwords" on page 34 • "Power management" on page 36 • "Symptom-to select Startup Boot. Make the CD/DVD drive the first startup device in the startup sequence using the recovery disc set consists of the user instructions and the following : Note: Recovery can recover the new drive with a Supplemental Recovery Disc.
... on the computer. To restore the computer to the original factory configuration using the following information: • "Restoring the factory contents by using Recovery Disc Set" on page 33 • "Passwords" on page 34 • "Power management" on page 36 • "Symptom-to select Startup Boot. Make the CD/DVD drive the first startup device in the startup sequence using the recovery disc set consists of the user instructions and the following : Note: Recovery can recover the new drive with a Supplemental Recovery Disc.

Hardware Maintenance Manual
Page 40
... to reinstall some device drivers. Select your language and click Next. 5. If you might want to the factory default settings, you might experience periods when no activity is turned on password (POP), the hard-disk password (HDP), and the supervisor password (SVP). When all of the recovery process is fully automated and no master HDP is booted. Note: After restoring a drive to restore the original startup sequence. Note...
... to reinstall some device drivers. Select your language and click Next. 5. If you might want to the factory default settings, you might experience periods when no activity is turned on password (POP), the hard-disk password (HDP), and the supervisor password (SVP). When all of the recovery process is fully automated and no master HDP is booted. Note: After restoring a drive to restore the original startup sequence. Note...

Hardware Maintenance Manual
Page 41
... other models, enter the POP. If the Using Passphrase item is available on the computer. Select Security, using the cursor directional keys to recover data from the hard disk drive. Select Power-On Password. 6. Type the current SVP in the BIOS Setup Utility. then, in the menu, this function is displayed in the Setup confirmation window, select Yes. To remove a user HDP that you are known, do the following : 1. Turn on the ThinkPad Notebook. 3. Chapter...
... other models, enter the POP. If the Using Passphrase item is available on the computer. Select Security, using the cursor directional keys to recover data from the hard disk drive. Select Power-On Password. 6. Type the current SVP in the BIOS Setup Utility. then, in the menu, this function is displayed in the Setup confirmation window, select Yes. To remove a user HDP that you are known, do the following : 1. Turn on the ThinkPad Notebook. 3. Chapter...

Hardware Maintenance Manual
Page 42
... following events occur in addition to move down the menu. 4. Select Hard-disk x password, where x is appearing on the right side of the hard disk drive. Hibernation mode By using the cursor directional keys to what occurs in the Setup Configuration window. For the other models, enter the master HDP. then select Sleep. Click Start. 2. then select Hibernate. Select Password. 5. Select Yes in screen blank mode: • The LCD is powered off display.
... following events occur in addition to move down the menu. 4. Select Hard-disk x password, where x is appearing on the right side of the hard disk drive. Hibernation mode By using the cursor directional keys to what occurs in the Setup Configuration window. For the other models, enter the master HDP. then select Sleep. Click Start. 2. then select Hibernate. Select Password. 5. Select Yes in screen blank mode: • The LCD is powered off display.
Hardware Maintenance Manual
Page 43
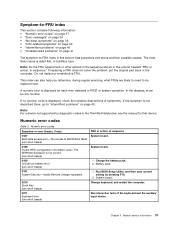
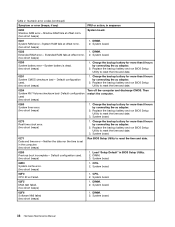
... a device not supported by pressing F10. 2. In the displays, n can also help you determine, during regular servicing, what FRUs are likely to need to -FRU index in the ThinkPad Notebooks, see the manual for each error detected in boldface type. Numeric error codes Symptom or error (beeps, if any number. This index can be replaced next. Do not replace a nondefective FRU. Run BIOS Setup Utility, and then save current setting...
... a device not supported by pressing F10. 2. In the displays, n can also help you determine, during regular servicing, what FRUs are likely to need to -FRU index in the ThinkPad Notebooks, see the manual for each error detected in boldface type. Numeric error codes Symptom or error (beeps, if any number. This index can be replaced next. Do not replace a nondefective FRU. Run BIOS Setup Utility, and then save current setting...
Hardware Maintenance Manual
Page 44
... Software NMI failed (two short beeps) 1. Replace the backup battery and run BIOS Setup Utility to reset the time and date. 0254 System NV7 Volume checksum bad- Replace the backup battery and run BIOS Setup Utility to reset the time and date. 0251 System CMOS checksum bad- Table 2. System board. 0232 Extended RAM error- System board. 0270 Real-time clock error. (two short beeps) 1. Charge the backup battery for more than 8 hours by connecting the ac adapter. 2. Default configuration used...
... Software NMI failed (two short beeps) 1. Replace the backup battery and run BIOS Setup Utility to reset the time and date. 0254 System NV7 Volume checksum bad- Replace the backup battery and run BIOS Setup Utility to reset the time and date. 0251 System CMOS checksum bad- Table 2. System board. 0232 Extended RAM error- System board. 0270 Real-time clock error. (two short beeps) 1. Charge the backup battery for more than 8 hours by connecting the ac adapter. 2. Default configuration used...

Hardware Maintenance Manual
Page 45
... to enter BIOS Setup Utility. Remove the Mini PCI network card. 2. Thermal grease. 3. Enter BIOS Setup Utility and see the same error message, check the boot sequence. 3. Reinstall the hard disk drive. 4. No-beep symptoms Table 4. Make sure that the operating system has no POST. System board. System Configuration Data Read Error (two short beeps) FRU or action, in sequence Press F1 to enter BIOS Setup Utility. Check that every connector is installed correctly. 2. Reseat DIMM. 2. Enter BIOS Setup Utility...
... to enter BIOS Setup Utility. Remove the Mini PCI network card. 2. Thermal grease. 3. Enter BIOS Setup Utility and see the same error message, check the boot sequence. 3. Reinstall the hard disk drive. 4. No-beep symptoms Table 4. Make sure that the operating system has no POST. System board. System Configuration Data Read Error (two short beeps) FRU or action, in sequence Press F1 to enter BIOS Setup Utility. Check that every connector is installed correctly. 2. Reseat DIMM. 2. Enter BIOS Setup Utility...

Hardware Maintenance Manual
Page 46
...-pixels. If any error is set . Table 4. LCD-related symptoms Symptom or error No beep, power-on indicator on, and a blank LCD during POST. • LCD backlight not working. • LCD too dark. • LCD brightness cannot be adjusted. • LCD contrast cannot be considered only when a problem recurs. Reseat all ThinkPad Notebooks purchased on password or a supervisor password is detected, replace the FRU shown by Lenovo and it should not...
...-pixels. If any error is set . Table 4. LCD-related symptoms Symptom or error No beep, power-on indicator on, and a blank LCD during POST. • LCD backlight not working. • LCD too dark. • LCD brightness cannot be adjusted. • LCD contrast cannot be considered only when a problem recurs. Reseat all ThinkPad Notebooks purchased on password or a supervisor password is detected, replace the FRU shown by Lenovo and it should not...

Hardware Maintenance Manual
Page 51
... Power Option in the Control Panel or use the Power Manager. © Copyright Lenovo 2009, 2013 45 To change the default brightness level, change the brightness level temporarily. Note: To use each special key. this key. The following table shows the function of the recording devices are set on mute or unmute; Speaker volume down (F2) Speaker volume up or Speaker volume down (F7) For Windows 7: Switch between the computer display and an external monitor, the Win+P key...
... Power Option in the Control Panel or use the Power Manager. © Copyright Lenovo 2009, 2013 45 To change the default brightness level, change the brightness level temporarily. Note: To use each special key. this key. The following table shows the function of the recording devices are set on mute or unmute; Speaker volume down (F2) Speaker volume up or Speaker volume down (F7) For Windows 7: Switch between the computer display and an external monitor, the Win+P key...
Hardware Maintenance Manual
Page 99
... customers: Some problems with your product can install yourself, called a "Customer Replaceable Unit" or "CRU." You may include the memory module, wireless card, keyboard, and palm rest with specific models listed and described as xxU (where U is an example of a unique configuration) should be resolved with your product and are concealed by an access panel that is an Optional-service CRU. Other Self-service CRUs depending on...
... customers: Some problems with your product can install yourself, called a "Customer Replaceable Unit" or "CRU." You may include the memory module, wireless card, keyboard, and palm rest with specific models listed and described as xxU (where U is an example of a unique configuration) should be resolved with your product and are concealed by an access panel that is an Optional-service CRU. Other Self-service CRUs depending on...


