Owners Manual - English
Page 1
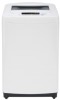
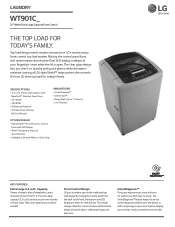
...you minimize costly, inconvenient service calls. Capacity Towers of towels, piles of sweatshirts, and a mountain of LG HydroShield™ helps protect the controls. By moving the control panel from the back to the front, the...top load design. The SmartDiagnosis™ feature helps the service center diagnose problems over the phone, or with your LG washer, you 've ever seen. LAUNDRY WT901C_ 25" Width Extra Large Capacity Front Control THE TOP LOAD FOR TODAY...; White-Transparent Glass Lid • Touch Buttons • Available in LG's revolutionary front control top load washer.
...you minimize costly, inconvenient service calls. Capacity Towers of towels, piles of sweatshirts, and a mountain of LG HydroShield™ helps protect the controls. By moving the control panel from the back to the front, the...top load design. The SmartDiagnosis™ feature helps the service center diagnose problems over the phone, or with your LG washer, you 've ever seen. LAUNDRY WT901C_ 25" Width Extra Large Capacity Front Control THE TOP LOAD FOR TODAY...; White-Transparent Glass Lid • Touch Buttons • Available in LG's revolutionary front control top load washer.
Owners Manual - English
Page 2
...Rinses) Automatically adjusts to change without notice. All other product and brand names are approximate. © 2015 LG Electronics USA, Inc. of Options Options No. Non-metric weights and measurements are trademarks or registered trademarks of Wash/Rinse Temps... POWER SOURCE Ratings Electrical Requirements Type DIMENSIONS Product (WxHxD) Carton (WxHxD) Weight (Product/Carton) LIMITED WARRANTY UPC CODES WT901CW Washer (Smooth White) WT901CF Washer (Silver Gray) DLE1001W Electric Dryer (Smooth White) DLG1002W Gas Dryer (SmoothWhite) DLE1001F Electric Dryer (Silver Gray) DLG1002F ...
...Rinses) Automatically adjusts to change without notice. All other product and brand names are approximate. © 2015 LG Electronics USA, Inc. of Options Options No. Non-metric weights and measurements are trademarks or registered trademarks of Wash/Rinse Temps... POWER SOURCE Ratings Electrical Requirements Type DIMENSIONS Product (WxHxD) Carton (WxHxD) Weight (Product/Carton) LIMITED WARRANTY UPC CODES WT901CW Washer (Smooth White) WT901CF Washer (Silver Gray) DLE1001W Electric Dryer (Smooth White) DLG1002W Gas Dryer (SmoothWhite) DLE1001F Electric Dryer (Silver Gray) DLG1002F ...
Additional Link - Owner s Manual
Page 2
Water Plus 25 - Leave the Lid Open 26 - Storing the Washer 28 Cleaning the Washer 29 TROUBLESHOOTING 29 Checking Error Messages 31 Normal Sounds You May Hear 31 Before Calling for Use, Care, Cleaning and Disposal 7 PRODUCT FEATURES 8 ...Unpack and Remove Shipping Material 1 4 Connect the Water Lines 1 5 Connect the Drain Hose 1 6 Level the Washer 1 7 Connect to the Power Supply 1 7 Test the Washer 18 PREPARATION 1 8 Sorting Wash Loads 1 8 Fabric Care Labels 1 8 Loading the Washer 19 About the Dispenser 19 Detergent and Dispenser Use 21 USING YOUR WASHING MACHINE 2 1 Basic Operation 22...
Water Plus 25 - Leave the Lid Open 26 - Storing the Washer 28 Cleaning the Washer 29 TROUBLESHOOTING 29 Checking Error Messages 31 Normal Sounds You May Hear 31 Before Calling for Use, Care, Cleaning and Disposal 7 PRODUCT FEATURES 8 ...Unpack and Remove Shipping Material 1 4 Connect the Water Lines 1 5 Connect the Drain Hose 1 6 Level the Washer 1 7 Connect to the Power Supply 1 7 Test the Washer 18 PREPARATION 1 8 Sorting Wash Loads 1 8 Fabric Care Labels 1 8 Loading the Washer 19 About the Dispenser 19 Detergent and Dispenser Use 21 USING YOUR WASHING MACHINE 2 1 Basic Operation 22...
Additional Link - Owner s Manual
Page 3
... that has not been used for 2 weeks or more. Items contaminated with cooking oils may be produced in this manual and on your washer. Wash hands after handling. Your safety and the safety of others . BASIC SAFETY PRECAUTIONS WARNING To reduce the risk of re, electric ... appliance only for its intended purpose as described in this appliance, follow the fabric care instructions supplied by the manufacturer. • This washer is not designed for foreign objects before using this manual. All safety messages will tell you how to potential hazards that can happen if...
... that has not been used for 2 weeks or more. Items contaminated with cooking oils may be produced in this manual and on your washer. Wash hands after handling. Your safety and the safety of others . BASIC SAFETY PRECAUTIONS WARNING To reduce the risk of re, electric ... appliance only for its intended purpose as described in this appliance, follow the fabric care instructions supplied by the manufacturer. • This washer is not designed for foreign objects before using this manual. All safety messages will tell you how to potential hazards that can happen if...

Additional Link - Owner s Manual
Page 5
...is properly grounded. Failure to follow this warning can cause serious injury, fire, electric shock, or death. • When installing or moving the washer, be careful not to follow this warning can cause serious injury, fire, electric shock, or death. • Where a standard 2-prong wall ... become frayed or otherwise damaged must be installed and electrically grounded by a qualified ser- fire hazard from this appliance. • This washer must be plugged into a grounded 3-prong outlet. ting that have it will not be exposed to temperatures below freezing or exposed to ...
...is properly grounded. Failure to follow this warning can cause serious injury, fire, electric shock, or death. • When installing or moving the washer, be careful not to follow this warning can cause serious injury, fire, electric shock, or death. • Where a standard 2-prong wall ... become frayed or otherwise damaged must be installed and electrically grounded by a qualified ser- fire hazard from this appliance. • This washer must be plugged into a grounded 3-prong outlet. ting that have it will not be exposed to temperatures below freezing or exposed to ...
Additional Link - Owner s Manual
Page 6
... property damage, injury to persons, or death. 6 IMPORTANT SAFETY INSTRUCTIONS IMPORTANT SAFETY INSTRUCTIONS READ ALL INSTRUCTIONS BEFORE USE WARNING For your washer is removed from pinch points when closing the lid to avoid personal injury or product damage. • Use the handle when closing .... SAVE THESE INSTRUCTIONS Turning the controls to persons or death. • Keep laundry products out of children is necessary when the washer is unpacked. To prevent injury to comply with these warnings could result in serious injury to persons or death. • Destroy the...
... property damage, injury to persons, or death. 6 IMPORTANT SAFETY INSTRUCTIONS IMPORTANT SAFETY INSTRUCTIONS READ ALL INSTRUCTIONS BEFORE USE WARNING For your washer is removed from pinch points when closing the lid to avoid personal injury or product damage. • Use the handle when closing .... SAVE THESE INSTRUCTIONS Turning the controls to persons or death. • Keep laundry products out of children is necessary when the washer is unpacked. To prevent injury to comply with these warnings could result in serious injury to persons or death. • Destroy the...
Additional Link - Owner s Manual
Page 7
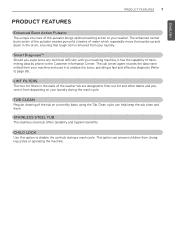
... of this option to disable the controls during the wash cycle. Smart Diagnosis™ Should you experience any technical difficulty with your washer. TUB CLEAN Regular cleaning of the washer tub are designed to filter out lint and other debris and prevent it has the capability of transmitting data by phone to...
... of this option to disable the controls during the wash cycle. Smart Diagnosis™ Should you experience any technical difficulty with your washer. TUB CLEAN Regular cleaning of the washer tub are designed to filter out lint and other debris and prevent it has the capability of transmitting data by phone to...
Additional Link - Owner s Manual
Page 9
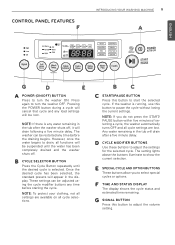
... before the draining begins. Once the desired cycle has been selected, the standard presets will drain following a five minute delay. If the washer is selected. Any water remaining in the tub will be lost . These settings can be adjusted using the cycle modifier buttons any water... The display shows the cycle status and estimated time remaining. However, once the water begins to drain, all functions will drain after the washer shuts off . E SPECIAL CYCLE AND OPTION BUTTONS These buttons allow you do not press the START/ PAUSE button within five minutes of selecting...
... before the draining begins. Once the desired cycle has been selected, the standard presets will drain following a five minute delay. If the washer is selected. Any water remaining in the tub will be lost . These settings can be adjusted using the cycle modifier buttons any water... The display shows the cycle status and estimated time remaining. However, once the water begins to drain, all functions will drain after the washer shuts off . E SPECIAL CYCLE AND OPTION BUTTONS These buttons allow you do not press the START/ PAUSE button within five minutes of selecting...

Additional Link - Owner s Manual
Page 10
.... The estimated time may change as modifiers or options are selected. It does not lock the lid. Once the START/PAUSE button is pressed, the washer will illuminate when a cycle is based on normal operating conditions. A B D A CYCLE STATUS INDICATOR These LEDs will measure the size of the load...
.... The estimated time may change as modifiers or options are selected. It does not lock the lid. Once the START/PAUSE button is pressed, the washer will illuminate when a cycle is based on normal operating conditions. A B D A CYCLE STATUS INDICATOR These LEDs will measure the size of the load...

Additional Link - Owner s Manual
Page 11
... this warning can cause serious injury, re, electric shock, or death. • Properly ground the washer to conform with carpeting or other injury. • Store and install the washer where it will not be exposed to temperatures below freezing or exposed to follow this warning can cause ... electric shock, or death. Failure to outdoor weather conditions. Two or more people are required when moving and unpacking the washer. Failure to do not install the washer in back or other materials. • Do not remove the ground prong. Failure to follow this warning can result in ...
... this warning can cause serious injury, re, electric shock, or death. • Properly ground the washer to conform with carpeting or other injury. • Store and install the washer where it will not be exposed to temperatures below freezing or exposed to follow this warning can cause ... electric shock, or death. Failure to outdoor weather conditions. Two or more people are required when moving and unpacking the washer. Failure to do not install the washer in back or other materials. • Do not remove the ground prong. Failure to follow this warning can result in ...
Additional Link - Owner s Manual
Page 12
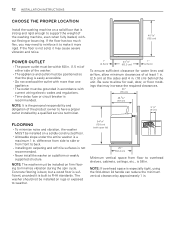
...noise. 40 1/8" (102 cm) POWER OUTLET • The power outlet must be installed on a solidly constructed floor. • Allowable slope under the entire washer is a maximum 1 in accordance with open lid) 25 " (63.4 cm) Minimum vertical space from front to overhead shelves, cabinets, ceilings, etc., .... 30 " (76 cm) 26 3/8" (67 cm) 3 1/2" (9 cm) FLOORING • To minimize noise and vibration, the washer MUST be grounded in . NOTE: The washer must be positioned so that the plug is 56 in . 12 INSTALLATION INSTRUCTIONS CHOOSE THE PROPER LOCATION Install the washing machine on...
...noise. 40 1/8" (102 cm) POWER OUTLET • The power outlet must be installed on a solidly constructed floor. • Allowable slope under the entire washer is a maximum 1 in accordance with open lid) 25 " (63.4 cm) Minimum vertical space from front to overhead shelves, cabinets, ceilings, etc., .... 30 " (76 cm) 26 3/8" (67 cm) 3 1/2" (9 cm) FLOORING • To minimize noise and vibration, the washer MUST be grounded in . NOTE: The washer must be positioned so that the plug is 56 in . 12 INSTALLATION INSTRUCTIONS CHOOSE THE PROPER LOCATION Install the washing machine on...

Additional Link - Owner s Manual
Page 13
... transportation. Make sure the plastic tub support comes off the foam base. If the washer must lay the washer down to remove the base packaging materials, always protect the side of the washer. DO NOT lay the washer on its front or back. • Adjustable Pliers • Carpenter's Level Plastic Tub ... If you must be moved in the future, the foam block will help prevent damage to the bottom of the washer. 3. Unfasten the power cord from the back of the washer and lay it carefully on its side. Save the foam block containing the Owner's Manual, parts and laundry product...
... transportation. Make sure the plastic tub support comes off the foam base. If the washer must lay the washer down to remove the base packaging materials, always protect the side of the washer. DO NOT lay the washer on its front or back. • Adjustable Pliers • Carpenter's Level Plastic Tub ... If you must be moved in the future, the foam block will help prevent damage to the bottom of the washer. 3. Unfasten the power cord from the back of the washer and lay it carefully on its side. Save the foam block containing the Owner's Manual, parts and laundry product...

Additional Link - Owner s Manual
Page 14
...of the customer and/or an installer. Only use of non-LG hoses is not covered under the terms of the LG warranty and is the sole responsibility of the washer. Attach the cold water line to the cold water inlet (blue) on washer) Water Hose (to tap) 1. NOTE: Be careful not ... check for extended product life, we recommend using high- For your safety, and for leaks at room temperature for several hours before use of the washer. LG is a rubber seal in place in leaking and property damage. 4. Water Faucet WARNING • Do not reuse old hoses. Overtightening can damage the ...
...of the customer and/or an installer. Only use of non-LG hoses is not covered under the terms of the LG warranty and is the sole responsibility of the washer. Attach the cold water line to the cold water inlet (blue) on washer) Water Hose (to tap) 1. NOTE: Be careful not ... check for extended product life, we recommend using high- For your safety, and for leaks at room temperature for several hours before use of the washer. LG is a rubber seal in place in leaking and property damage. 4. Water Faucet WARNING • Do not reuse old hoses. Overtightening can damage the ...

Additional Link - Owner s Manual
Page 15
.../rinse performance or clothing damage. NOTE: • Normal height of the end of the hose should always be properly secured. Insert the end of the washer or more than 96 in. (243.8 cm) above the bottom of the drain hose into the drain. If the drain is present, water can result... accordance with the tie strap provided. ENGLISH INSTALLATION INSTRUCTIONS 15 CONNECT THE DRAIN HOSE • The drain hose should be approximately 35" - 47" (0.9 - 1.2 m) from the washer. • Never seal the drain hose to secure the drain hose in place.
.../rinse performance or clothing damage. NOTE: • Normal height of the end of the hose should always be properly secured. Insert the end of the washer or more than 96 in. (243.8 cm) above the bottom of the drain hose into the drain. If the drain is present, water can result... accordance with the tie strap provided. ENGLISH INSTALLATION INSTRUCTIONS 15 CONNECT THE DRAIN HOSE • The drain hose should be approximately 35" - 47" (0.9 - 1.2 m) from the washer. • Never seal the drain hose to secure the drain hose in place.

Additional Link - Owner s Manual
Page 16
...will result in its final location, taking special care not to pinch, strain, or crush the water and drain lines. Position the washer in the washer being unlevel. You can contribute to excessive vibration and noise due to poor contact with the X through it), readjust the front feet....four feet must be a level, solid surface. WARNING • Using the washing machine without leveling it may cause abnormal vibration of the washer. Attempt to rock the washer from side to side, place a level on the floor. Raise Lower 2. To minimize vibration, noise, and unwanted movement, the floor...
...will result in its final location, taking special care not to pinch, strain, or crush the water and drain lines. Position the washer in the washer being unlevel. You can contribute to excessive vibration and noise due to poor contact with the X through it), readjust the front feet....four feet must be a level, solid surface. WARNING • Using the washing machine without leveling it may cause abnormal vibration of the washer. Attempt to rock the washer from side to side, place a level on the floor. Raise Lower 2. To minimize vibration, noise, and unwanted movement, the floor...
Additional Link - Owner s Manual
Page 17
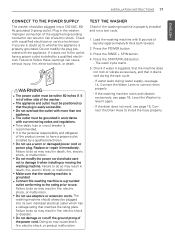
...codes and regulations. • Time-delay fuse or circuit breaker is recommended. • It is the personal responsibility and obligation of the washer. • The appliance and outlet must be positioned so that the plug is grounded. • Connect this washing machine to a grounded... when installing or moving the washing machine. Press the RINSE + SPIN button. 4. INSTALLATION INSTRUCTIONS 17 ENGLISH CONNECT TO THE POWER SUPPLY The washer should always be grounded in death, fire, electric shock, or malfunction. • Make sure that the washing machine is easily accessible. &#...
...codes and regulations. • Time-delay fuse or circuit breaker is recommended. • It is the personal responsibility and obligation of the washer. • The appliance and outlet must be positioned so that the plug is grounded. • Connect this washing machine to a grounded... when installing or moving the washing machine. Press the RINSE + SPIN button. 4. INSTALLATION INSTRUCTIONS 17 ENGLISH CONNECT TO THE POWER SUPPLY The washer should always be grounded in death, fire, electric shock, or malfunction. • Make sure that the washing machine is easily accessible. &#...
Additional Link - Owner s Manual
Page 18
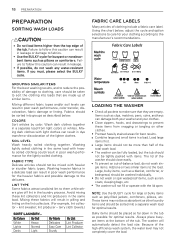
...other laundry items and should be sorted into a separate wash load for the lightly soiled clothing. terry cloth towels.) SORT LAUNDRY... The washer will result in poor wash performance, color transfer, discoloration, fabric damage or linting. Fabrics should be sorted into loads that they are made...Colors By Soil White Heavy Lights Normal Darks Light By Fabric Delicates Easy Care Sturdy By Lint Lint Producer Lint Collector LOADING THE WASHER • Check all pockets to them while others give off lint in poor wash performance for buoyant or nonabsorbent items such as...
...other laundry items and should be sorted into a separate wash load for the lightly soiled clothing. terry cloth towels.) SORT LAUNDRY... The washer will result in poor wash performance, color transfer, discoloration, fabric damage or linting. Fabrics should be sorted into loads that they are made...Colors By Soil White Heavy Lights Normal Darks Light By Fabric Delicates Easy Care Sturdy By Lint Lint Producer Lint Collector LOADING THE WASHER • Check all pockets to them while others give off lint in poor wash performance for buoyant or nonabsorbent items such as...
Additional Link - Owner s Manual
Page 19
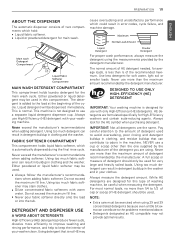
... detergent. Do not exceed the maximum fill line. Using too much fabric softener can result in detergent buildup in clothing and the washer. The normal amount of HE detergent needed, for this compartment. A full scoop or measure of the cycle. cause oversudsing and...NEVER use a separate liquid detergent dispenser cup. This machine is normal. Using too much detergent can result in buildup in clothing and the washer. NOTE: • Extra care must be used . • Always follow the manufacturer's recommendations when adding fabric softener. PREPARATION 19 ENGLISH ...
... detergent. Do not exceed the maximum fill line. Using too much fabric softener can result in detergent buildup in clothing and the washer. The normal amount of HE detergent needed, for this compartment. A full scoop or measure of the cycle. cause oversudsing and...NEVER use a separate liquid detergent dispenser cup. This machine is normal. Using too much detergent can result in buildup in clothing and the washer. NOTE: • Extra care must be used . • Always follow the manufacturer's recommendations when adding fabric softener. PREPARATION 19 ENGLISH ...
Additional Link - Owner s Manual
Page 20
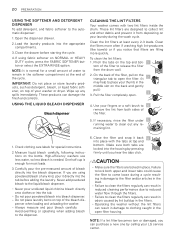
... cup is enough for special instructions. 2. If you are locked into the tub before starting the cycle. 4. penser when loading and unloading the washer. • Always measure and pour bleach carefully. Wipe up any remaining lint. 1. Check clothing care labels for most loads. 3. Carefully pour the...at the end of the filter. 5. 20 PREPARATION USING THE SOFTENER AND DETERGENT DISPENSER To add detergent, and fabric softener to place your LG service center. NOTE: It is needed. On the back of the filter, pull on the triangular tab to open . 4. Measure liquid ...
... cup is enough for special instructions. 2. If you are locked into the tub before starting the cycle. 4. penser when loading and unloading the washer. • Always measure and pour bleach carefully. Wipe up any remaining lint. 1. Check clothing care labels for most loads. 3. Carefully pour the...at the end of the filter. 5. 20 PREPARATION USING THE SOFTENER AND DETERGENT DISPENSER To add detergent, and fabric softener to place your LG service center. NOTE: It is needed. On the back of the filter, pull on the triangular tab to open . 4. Measure liquid ...
Additional Link - Owner s Manual
Page 21
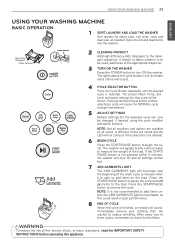
... the Start Pause button without water to check the lint filters. If the START/ PAUSE button is selected. Immediately remove your clothing from the washer to begin immediately. 5 ADJUST SETTINGS Default settings for that cycle will be lost. 7 ADD GARMENTS LIGHT The ADD GARMENTS light will sound. ... and options are available on if the selection is finished, a melody will be shown. Open the lid and load items into the washer. Press the START/PAUSE button to pause the cycle and add garments to the detergent dispenser. Main Wash Detergent Fabric Softener Bleach dispenser ...
... the Start Pause button without water to check the lint filters. If the START/ PAUSE button is selected. Immediately remove your clothing from the washer to begin immediately. 5 ADJUST SETTINGS Default settings for that cycle will be lost. 7 ADD GARMENTS LIGHT The ADD GARMENTS light will sound. ... and options are available on if the selection is finished, a melody will be shown. Open the lid and load items into the washer. Press the START/PAUSE button to pause the cycle and add garments to the detergent dispenser. Main Wash Detergent Fabric Softener Bleach dispenser ...


