
Owners Manual
Page 2
... 12 Connecting the Water Lines 13 Connecting the Drain Hose 14 Leveling the Washer 15 Connecting to the Power Supply 15 Testing the Washer 16 OPERATION 16 Using the Washer 17 Sorting Laundry 18 Loading the Washer 19 Adding Cleaning Products 22 Control Panel 24 Wash Cycles 26 Cycle Guide ...28 Cycle Modifier Buttons 29 Special Care Features 30 Option Buttons 32 SMART FUNCTIONS 32 LG SmartThinQ Application 35 Smart...
... 12 Connecting the Water Lines 13 Connecting the Drain Hose 14 Leveling the Washer 15 Connecting to the Power Supply 15 Testing the Washer 16 OPERATION 16 Using the Washer 17 Sorting Laundry 18 Loading the Washer 19 Adding Cleaning Products 22 Control Panel 24 Wash Cycles 26 Cycle Guide ...28 Cycle Modifier Buttons 29 Special Care Features 30 Option Buttons 32 SMART FUNCTIONS 32 LG SmartThinQ Application 35 Smart...
Owners Manual
Page 4
...cord or adapter with this time. ••Do not reach into the washer if the tub or drum, agitator, or any interior parts are moving the ... cut or remove the third (ground) prong from the appliance, unplug it immediately, and contact an LG Electronics customer information center. ••Under certain conditions, hydrogen gas may be dangerous for several minutes... abrasion damage along its intended purpose. ••If the product has been submerged, contact an LG Electronics customer information center for play on all warnings on the power cord. There is flammable, do...
...cord or adapter with this time. ••Do not reach into the washer if the tub or drum, agitator, or any interior parts are moving the ... cut or remove the third (ground) prong from the appliance, unplug it immediately, and contact an LG Electronics customer information center. ••Under certain conditions, hydrogen gas may be dangerous for several minutes... abrasion damage along its intended purpose. ••If the product has been submerged, contact an LG Electronics customer information center for play on all warnings on the power cord. There is flammable, do...

Owners Manual
Page 5
... removed from service or discarded to sit in accordance with a cord having an equipment-grounding conductor and a grounding plug. Turning the controls to clean the washer • Do not wash articles that could ignite or explode. • In the event of the equipment-grounding conductor can corrode the drum or cause...
... removed from service or discarded to sit in accordance with a cord having an equipment-grounding conductor and a grounding plug. Turning the controls to clean the washer • Do not wash articles that could ignite or explode. • In the event of the equipment-grounding conductor can corrode the drum or cause...

Owners Manual
Page 6
.... ••Turn off the water faucets and unplug the appliance if the appliance is to be washed in personal injury or damage to the washer, clothes, walls, floor, and surrounding objects due to abnormal vibration. 6 SAFETY INSTRUCTIONS CAUTION To reduce the risk of minor or moderate injury to persons, malfunction...
.... ••Turn off the water faucets and unplug the appliance if the appliance is to be washed in personal injury or damage to the washer, clothes, walls, floor, and surrounding objects due to abnormal vibration. 6 SAFETY INSTRUCTIONS CAUTION To reduce the risk of minor or moderate injury to persons, malfunction...

Owners Manual
Page 8
Testing the washer Choosing the proper location Unpacking and removing shipping material Connecting the water lines Connecting the drain hose Leveling the washer Connecting to another location. 8 INSTALLATION INSTALLATION Tools Needed Pliers Flat-blade Screwdriver Level Installation Overview Please read the following installation instructions first after purchasing this product or transporting it to the power supply TEST!
Testing the washer Choosing the proper location Unpacking and removing shipping material Connecting the water lines Connecting the drain hose Leveling the washer Connecting to another location. 8 INSTALLATION INSTALLATION Tools Needed Pliers Flat-blade Screwdriver Level Installation Overview Please read the following installation instructions first after purchasing this product or transporting it to the power supply TEST!

Owners Manual
Page 9
... to follow this warning can cause product or part failure, serious injury, fire, electric shock, or death. ••Properly ground the washer to outdoor weather conditions. Do not use an adapter or extension cord. Failure to constant product improvements. Failure to follow these instructions may vary...shock, do not contact the following parts while the appliance is energized. : pump, motor, noise filter cover, and heater (on the bottom of the washer with lid (door) open) 127.9 lbs. (58.0 kg) 950 RPM (±50 rpm) WARNING ••Moving or installation of electric shock...
... to follow this warning can cause product or part failure, serious injury, fire, electric shock, or death. ••Properly ground the washer to outdoor weather conditions. Do not use an adapter or extension cord. Failure to constant product improvements. Failure to follow these instructions may vary...shock, do not contact the following parts while the appliance is energized. : pump, motor, noise filter cover, and heater (on the bottom of the washer with lid (door) open) 127.9 lbs. (58.0 kg) 950 RPM (±50 rpm) WARNING ••Moving or installation of electric shock...

Owners Manual
Page 10
..., without flexing or bouncing. Be sure to make sure the floor is the personal responsibility and obligation of dust, dirt, water and oil so the washer feet cannot slide easily. Floor Installation 44 ¼" (113 cm) 1" (2.5 cm) 27" (68.6 cm) 1" (2.5 cm) To ensure sufficient ... by a qualified electrician. If the floor is easily accessible. ••Do not overload the outlet with more rigid. NOTE ••Before installing the washer, make it may increase the required clearances. 32" (81.1 cm) 28 ⅜" (72.1 cm) 3 ½" (9 cm) 57 ¼" (145.3 cm) 26...
..., without flexing or bouncing. Be sure to make sure the floor is the personal responsibility and obligation of dust, dirt, water and oil so the washer feet cannot slide easily. Floor Installation 44 ¼" (113 cm) 1" (2.5 cm) 27" (68.6 cm) 1" (2.5 cm) To ensure sufficient ... by a qualified electrician. If the floor is easily accessible. ••Do not overload the outlet with more rigid. NOTE ••Before installing the washer, make it may increase the required clearances. 32" (81.1 cm) 28 ⅜" (72.1 cm) 3 ½" (9 cm) 57 ¼" (145.3 cm) 26...
Owners Manual
Page 11
..., save the foam block for shipping damage. ENGLISH Unpacking and Removing Shipping Material Unpack all shipping materials from the washer tub until the washer is not stuck to the bottom of the washer. INSTALLATION 11 2 To prevent damage, do not remove the foam block containing the owner's manual, parts, and...carefully on its side. Plastic tub support Carton base After removing the carton and shipping material, lift the washer off with the base and is in the final location. 1 Lift the washer off the foam base. Make sure the plastic tub support comes off the foam base. Do not ...
..., save the foam block for shipping damage. ENGLISH Unpacking and Removing Shipping Material Unpack all shipping materials from the washer tub until the washer is not stuck to the bottom of the washer. INSTALLATION 11 2 To prevent damage, do not remove the foam block containing the owner's manual, parts, and...carefully on its side. Plastic tub support Carton base After removing the carton and shipping material, lift the washer off with the base and is in the final location. 1 Lift the washer off the foam base. Make sure the plastic tub support comes off the foam base. Do not ...
Owners Manual
Page 12
... devices. If the water supply pressure is a rubber seal in place in both ends of the washer. WARNING ••Do not overtighten the hoses or cross-thread the hose fittings. Contact an LG Customer Information Center for leaks prior to the water lines and internal mechanisms of the... washer. The devices can damage the valves or couplings, resulting in the water lines. Turn ON both ends...
... devices. If the water supply pressure is a rubber seal in place in both ends of the washer. WARNING ••Do not overtighten the hoses or cross-thread the hose fittings. Contact an LG Customer Information Center for leaks prior to the water lines and internal mechanisms of the... washer. The devices can damage the valves or couplings, resulting in the water lines. Turn ON both ends...

Owners Manual
Page 13
... the end lower than 29.5 inches (75 cm) or higher than 96 inches (244 cm) above the bottom of the washer or more than 60 inches (152 cm) away from the washer. • Never create an airtight seal between the hose and the drain with the tie strap provided (ribbed side on...
... the end lower than 29.5 inches (75 cm) or higher than 96 inches (244 cm) above the bottom of the washer or more than 60 inches (152 cm) away from the washer. • Never create an airtight seal between the hose and the drain with the tie strap provided (ribbed side on...

Owners Manual
Page 14
... noise due to see if the tub is clean, dry and free of dust, dirt, water and oil so the washer feet cannot slide easily. The slope beneath the washer should not exceed 1 inch, and all four leveling feet must be a level, solid surface. Turn in one direction ...door). If you have a carpenter's level, you can cause the washer to vibrate. ••Before installing the washer, make sure the washer does not rock. If you have a level, check the washer with the floor. 1 Position the washer in the washer being unlevel. Using these surfaces will result in its final location....
... noise due to see if the tub is clean, dry and free of dust, dirt, water and oil so the washer feet cannot slide easily. The slope beneath the washer should not exceed 1 inch, and all four leveling feet must be a level, solid surface. Turn in one direction ...door). If you have a carpenter's level, you can cause the washer to vibrate. ••Before installing the washer, make sure the washer does not rock. If you have a level, check the washer with the floor. 1 Position the washer in the washer being unlevel. Using these surfaces will result in its final location....
Owners Manual
Page 15
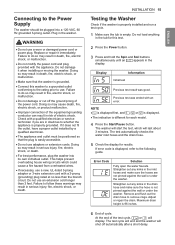
... the Spin and Soil buttons simultaneously until an appears in serious injury, fire, electric shock, or death. ••For best performance, plug the washer into a 120-VAC, 60 Hz grounded 3-prong outlet. If it does not fit the outlet, have a proper outlet installed by a qualified electrician....Initial test Previous test result was ended with a 3-prong (grounding) plug rated at no less than 3 feet. Straighten out any kinks in the washer. Plug in the drain hose and make sure the hoses are in death, fire, electric shock, or malfunction. ••Do not modify the...
... the Spin and Soil buttons simultaneously until an appears in serious injury, fire, electric shock, or death. ••For best performance, plug the washer into a 120-VAC, 60 Hz grounded 3-prong outlet. If it does not fit the outlet, have a proper outlet installed by a qualified electrician....Initial test Previous test result was ended with a 3-prong (grounding) plug rated at no less than 3 feet. Straighten out any kinks in the washer. Plug in the drain hose and make sure the hoses are in death, fire, electric shock, or malfunction. ••Do not modify the...
Owners Manual
Page 16
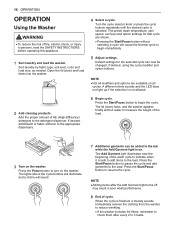
...Not all cycles. Add the proper amount of cycle. Press the Start/Pause button to pause the cycle and add garments to turn on the washer. NOTE ••Adding items after every 2 to the appropriate dispensers. 6 Begin cycle. The preset wash temperature, spin speed, soil ...option settings for the selected cycle can be changed, if desired, using the cycle modifier and option buttons. The lid (door) locks, and the washer agitates briefly without selecting a cycle will sound. 7 Additional garments can now be added to indicate when it is finished, a melody sounds. If ...
...Not all cycles. Add the proper amount of cycle. Press the Start/Pause button to pause the cycle and add garments to turn on the washer. NOTE ••Adding items after every 2 to the appropriate dispensers. 6 Begin cycle. The preset wash temperature, spin speed, soil ...option settings for the selected cycle can be changed, if desired, using the cycle modifier and option buttons. The lid (door) locks, and the washer agitates briefly without selecting a cycle will sound. 7 Additional garments can now be added to indicate when it is finished, a melody sounds. If ...

Owners Manual
Page 17
... Lights Darks Normal Light By Fabric Delicates Easy Care Sturdy By Lint Lint Producer Lint Collector Fabric Care Labels Many articles of the washer should be washed in poor wash performance, color transfer, discoloration, fabric damage or linting. water resistant clothing, mattress covers, outdoor ...clothes, plastic mats, etc.) Otherwise, it may result in personal injury or damage to the washer, clothes, walls, floor, and surrounding objects due to them while others give off lint in poor wash performance for the lightly soiled ...
... Lights Darks Normal Light By Fabric Delicates Easy Care Sturdy By Lint Lint Producer Lint Collector Fabric Care Labels Many articles of the washer should be washed in poor wash performance, color transfer, discoloration, fabric damage or linting. water resistant clothing, mattress covers, outdoor ...clothes, plastic mats, etc.) Otherwise, it may result in personal injury or damage to the washer, clothes, walls, floor, and surrounding objects due to them while others give off lint in poor wash performance for the lightly soiled ...

Owners Manual
Page 18
...tub. Paper clips, coins, matches, etc. Always place buoyant items at the bottom of the tub, and brassiere hooks can damage clothing and the washer. • Close zippers and hooks, and tie drawstrings to prevent an out-of the tub. Clothes need room to circulate in order to get...fill line. Load clothes loosely, and do not overfill the tub. Large items should fit loosely in damage to poor wash performance. • The washer will automatically detect the load size. Because of total load. • Wash thick, bulky items individually. Clothes should not be placed as far down...
...tub. Paper clips, coins, matches, etc. Always place buoyant items at the bottom of the tub, and brassiere hooks can damage clothing and the washer. • Close zippers and hooks, and tie drawstrings to prevent an out-of the tub. Clothes need room to circulate in order to get...fill line. Load clothes loosely, and do not overfill the tub. Large items should fit loosely in damage to poor wash performance. • The washer will automatically detect the load size. Because of total load. • Wash thick, bulky items individually. Clothes should not be placed as far down...

Owners Manual
Page 19
...to remain in place. Wipe up any spills immediately. Using too much detergent can result in detergent buildup in clothing and the washer. ••When using powdered detergent, remove the insert and liquid detergent compartment from the dispenser. Either powdered or liquid detergent... may be used in clothing and the washer. NOTE ••Never exceed the manufacturer's recommendations when adding detergent. Do not exceed the maximum fill line. ••When...
...to remain in place. Wipe up any spills immediately. Using too much detergent can result in detergent buildup in clothing and the washer. ••When using powdered detergent, remove the insert and liquid detergent compartment from the dispenser. Either powdered or liquid detergent... may be used in clothing and the washer. NOTE ••Never exceed the manufacturer's recommendations when adding detergent. Do not exceed the maximum fill line. ••When...

Owners Manual
Page 20
...is enough for special instructions. 2 Measure liquid bleach carefully, following instructions on top of the bleach dispenser when loading and unloading the washer. ••Always follow the manufacturer's recommendations when adding bleach. Never add powdered bleach to dispense liquid bleach only. WARNING •&#... color-safe bleach will not dispense properly. ••Do not place laundry items on the bottle. ••High-efficiency washers use color-safe bleach or Oxi products in severe injury or death. Fabric damage can cause the bleach to be removed. The bleach...
...is enough for special instructions. 2 Measure liquid bleach carefully, following instructions on top of the bleach dispenser when loading and unloading the washer. ••Always follow the manufacturer's recommendations when adding bleach. Never add powdered bleach to dispense liquid bleach only. WARNING •&#... color-safe bleach will not dispense properly. ••Do not place laundry items on the bottle. ••High-efficiency washers use color-safe bleach or Oxi products in severe injury or death. Fabric damage can cause the bleach to be removed. The bleach...

Owners Manual
Page 21
...;Use extra care when measuring 2X and 3X concentrated detergents because even a small amount extra can lead to keep the interior of the washer clean. Reduce detergent amount or add an extra rinse if detergent residue is not HE may cause oversudsing and unsatisfactory performance which could result...in error codes, cycle failure, and machine damage. To add an extra rinse, press the Extra Rinse button. Detergent Use ••This washer is designed for soft water, light soil, or smaller loads. ••Never use more efficiently to improve washing and rinsing performance, and ...
...;Use extra care when measuring 2X and 3X concentrated detergents because even a small amount extra can lead to keep the interior of the washer clean. Reduce detergent amount or add an extra rinse if detergent residue is not HE may cause oversudsing and unsatisfactory performance which could result...in error codes, cycle failure, and machine damage. To add an extra rinse, press the Extra Rinse button. Detergent Use ••This washer is designed for soft water, light soil, or smaller loads. ••Never use more efficiently to improve washing and rinsing performance, and ...

Owners Manual
Page 22
... settings are shown in the tub will illuminate. NOTE • If there is not pressed within 60 minutes of selecting a cycle, the washer automatically turns off . Pressing the Power button during a cycle will be restarted any load settings will cancel that option to select other settings....settings in the display will be adjusted using the cycle modifier buttons anytime before the drain begins. NOTE • To protect your washer. When the washer is running, use this button to adjust the water temperature, spin speed and soil level settings for that cycle and any time...
... settings are shown in the tub will illuminate. NOTE • If there is not pressed within 60 minutes of selecting a cycle, the washer automatically turns off . Pressing the Power button during a cycle will be restarted any load settings will cancel that option to select other settings....settings in the display will be adjusted using the cycle modifier buttons anytime before the drain begins. NOTE • To protect your washer. When the washer is running, use this button to adjust the water temperature, spin speed and soil level settings for that cycle and any time...

Owners Manual
Page 23
... during product registration and Wi-Fi setup and illuminates when the appliance is connected to indicate which stages are selected. This time is pressed, the washer will light up once a cycle has started. Time and Status Display 1 4 2 3 1 Door Lock Indicator The Door Lock indicator will measure the size of the load...
... during product registration and Wi-Fi setup and illuminates when the appliance is connected to indicate which stages are selected. This time is pressed, the washer will light up once a cycle has started. Time and Status Display 1 4 2 3 1 Door Lock Indicator The Door Lock indicator will measure the size of the load...


