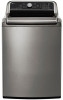
Owners Manual
Page 2
... 12 Connecting the Water Lines 13 Connecting the Drain Hose 14 Leveling the Washer 15 Connecting to the Power Supply 15 Testing the Washer 16 OPERATION 16 Using the Washer 17 Sorting Laundry 18 Loading the Washer 19 Adding Cleaning Products 22 Control Panel 24 Wash Cycles 26 Cycle Guide ...28 Cycle Modifier Buttons 29 Special Care Features 30 Option Buttons 32 SMART FUNCTIONS 32 LG SmartThinQ Application 35 Smart...
... 12 Connecting the Water Lines 13 Connecting the Drain Hose 14 Leveling the Washer 15 Connecting to the Power Supply 15 Testing the Washer 16 OPERATION 16 Using the Washer 17 Sorting Laundry 18 Loading the Washer 19 Adding Cleaning Products 22 Control Panel 24 Wash Cycles 26 Cycle Guide ...28 Cycle Modifier Buttons 29 Special Care Features 30 Option Buttons 32 SMART FUNCTIONS 32 LG SmartThinQ Application 35 Smart...
Owners Manual
Page 4
...hot-water system that shows cracks or abrasion damage along its intended purpose. ••If the product has been submerged, contact an LG Electronics customer information center for instructions before using the appliance and save these instructions. ••Use this appliance only for its length ...8226;Repair or immediately replace all hot water faucets and let the water flow from this time. ••Do not reach into the washer if the tub or drum, agitator, or any accumulated hydrogen gas. Do not reuse old hoses. Close supervision is necessary when the ...
...hot-water system that shows cracks or abrasion damage along its intended purpose. ••If the product has been submerged, contact an LG Electronics customer information center for instructions before using the appliance and save these instructions. ••Use this appliance only for its length ...8226;Repair or immediately replace all hot water faucets and let the water flow from this time. ••Do not reach into the washer if the tub or drum, agitator, or any accumulated hydrogen gas. Do not reuse old hoses. Close supervision is necessary when the ...

Owners Manual
Page 5
... hands and foreign objects clear of a gas leak (propane gas, LP gas, etc.) do not operate this appliance from service or discarded to clean the washer • Do not wash articles that could ignite or explode. • . These substances give off vapors that have been previously cleaned in, washed in, soaked...
... hands and foreign objects clear of a gas leak (propane gas, LP gas, etc.) do not operate this appliance from service or discarded to clean the washer • Do not wash articles that could ignite or explode. • . These substances give off vapors that have been previously cleaned in, washed in, soaked...

Owners Manual
Page 6
.... SAVE THESE INSTRUCTIONS water resistant clothing, mattress covers, outdoor clothes, plastic mats, etc.) Otherwise, it may be washed in personal injury or damage to the washer, clothes, walls, floor, and surrounding objects due to abnormal vibration. OPERATION ••Do not place objects on top of the appliance. ••Turn...
.... SAVE THESE INSTRUCTIONS water resistant clothing, mattress covers, outdoor clothes, plastic mats, etc.) Otherwise, it may be washed in personal injury or damage to the washer, clothes, walls, floor, and surrounding objects due to abnormal vibration. OPERATION ••Do not place objects on top of the appliance. ••Turn...

Owners Manual
Page 8
Testing the washer Choosing the proper location Unpacking and removing shipping material Connecting the water lines Connecting the drain hose Leveling the washer Connecting to another location. 8 INSTALLATION INSTALLATION Tools Needed Pliers Flat-blade Screwdriver Level Installation Overview Please read the following installation instructions first after purchasing this product or transporting it to the power supply TEST!
Testing the washer Choosing the proper location Unpacking and removing shipping material Connecting the water lines Connecting the drain hose Leveling the washer Connecting to another location. 8 INSTALLATION INSTALLATION Tools Needed Pliers Flat-blade Screwdriver Level Installation Overview Please read the following installation instructions first after purchasing this product or transporting it to the power supply TEST!

Owners Manual
Page 9
... do not contact the following parts while the appliance is energized. : pump, motor, noise filter cover, and heater (on the bottom of the washer with lid (door) open) 127.9 lbs. (58.0 kg) 950 RPM (±50 rpm) WARNING ••Moving or installation of electric shock...Failure to follow this warning can cause product or part failure, serious injury, fire, electric shock, or death. ••Properly ground the washer to conform with all governing codes and ordinances. Service personnel-do not block the large opening on applicable models). Electrical requirements Min. / Max....
... do not contact the following parts while the appliance is energized. : pump, motor, noise filter cover, and heater (on the bottom of the washer with lid (door) open) 127.9 lbs. (58.0 kg) 950 RPM (±50 rpm) WARNING ••Moving or installation of electric shock...Failure to follow this warning can cause product or part failure, serious injury, fire, electric shock, or death. ••Properly ground the washer to conform with all governing codes and ordinances. Service personnel-do not block the large opening on applicable models). Electrical requirements Min. / Max....

Owners Manual
Page 10
...floor is built to have a proper outlet installed by a qualified electrician. Be sure to allow minimum clearances of dust, dirt, water and oil so the washer feet cannot slide easily. NOTE ••It is 58 inches (147 cm). Floor Installation 44 ¼" (113 cm) 1" (2.5 cm) 27"... than one appliance. ••The outlet must be installed on a solidly constructed floor. ••Allowable slope under the entire washer is a maximum 1 inch difference from side to side or from floor to overhead shelves, cabinets, ceilings, etc., is the personal responsibility...
...floor is built to have a proper outlet installed by a qualified electrician. Be sure to allow minimum clearances of dust, dirt, water and oil so the washer feet cannot slide easily. NOTE ••It is 58 inches (147 cm). Floor Installation 44 ¼" (113 cm) 1" (2.5 cm) 27"... than one appliance. ••The outlet must be installed on a solidly constructed floor. ••Allowable slope under the entire washer is a maximum 1 inch difference from side to side or from floor to overhead shelves, cabinets, ceilings, etc., is the personal responsibility...
Owners Manual
Page 11
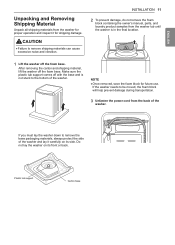
... not stuck to remove the base packaging materials, always protect the side of the washer. If you must lay the washer down to the bottom of the washer. Do not lay the washer on its front or back. Plastic tub support Carton base Make sure the plastic tub support comes off ...be moved, the foam block will help prevent damage during transportation. 3 Unfasten the power cord from the back of the washer and lay it for future use. If the washer needs to remove shipping materials can cause excessive noise and vibration. After removing the carton and shipping material, lift the...
... not stuck to remove the base packaging materials, always protect the side of the washer. If you must lay the washer down to the bottom of the washer. Do not lay the washer on its front or back. Plastic tub support Carton base Make sure the plastic tub support comes off ...be moved, the foam block will help prevent damage during transportation. 3 Unfasten the power cord from the back of the washer and lay it for future use. If the washer needs to remove shipping materials can cause excessive noise and vibration. After removing the carton and shipping material, lift the...
Owners Manual
Page 12
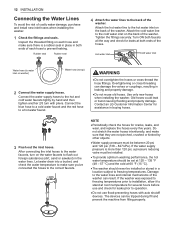
... and check for leaks at room temperature for several hours before use flood-preventing hoses with pliers. Use only new hoses when installing the washer. Contact an LG Customer Information Center for cracks, leaks, and wear, and replace the hoses every five years. Let water drain into a bucket, and check the water...
... and check for leaks at room temperature for several hours before use flood-preventing hoses with pliers. Use only new hoses when installing the washer. Contact an LG Customer Information Center for cracks, leaks, and wear, and replace the hoses every five years. Let water drain into a bucket, and check the water...

Owners Manual
Page 13
... install the drain hose with the end lower than 29.5 inches (75 cm) or higher than 96 inches (244 cm) above the bottom of the washer or more than 1-2 inches into the standpipe. 2 Use the provided tie strap to properly secure the drain hose can cause siphoning, odors, or improper draining... performance or clothing damage. Option 1: Standpipe 1 Insert the end of the drain hose into the standpipe more than 60 inches (152 cm) away from the washer. • Never create an airtight seal between the hose and the drain with the tie strap provided (ribbed side on inside). 29.5 - 96 " (75 - 244...
... install the drain hose with the end lower than 29.5 inches (75 cm) or higher than 96 inches (244 cm) above the bottom of the washer or more than 1-2 inches into the standpipe. 2 Use the provided tie strap to properly secure the drain hose can cause siphoning, odors, or improper draining... performance or clothing damage. Option 1: Standpipe 1 Insert the end of the drain hose into the standpipe more than 60 inches (152 cm) away from the washer. • Never create an airtight seal between the hose and the drain with the tie strap provided (ribbed side on inside). 29.5 - 96 " (75 - 244...

Owners Manual
Page 14
... not exceed 1 inch, and all four leveling feet must be a level, solid surface. If you have a carpenter's level, you can cause the washer to side, place a level on the back edge of the lid (door). NOTE ••Adjust the leveling feet only as far as necessary to ...pinch, strain, or crush the water and drain lines. CAUTION ••Using the washer without leveling it . 1" 2 Open the lid (door) and look from front to back. Do not place the level on the floor. Level from side to...
... not exceed 1 inch, and all four leveling feet must be a level, solid surface. If you have a carpenter's level, you can cause the washer to side, place a level on the back edge of the lid (door). NOTE ••Adjust the leveling feet only as far as necessary to ...pinch, strain, or crush the water and drain lines. CAUTION ••Using the washer without leveling it . 1" 2 Open the lid (door) and look from front to back. Do not place the level on the floor. Level from side to...
Owners Manual
Page 15
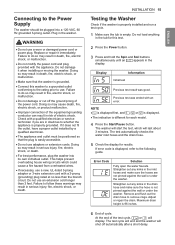
... electric shock. Doing so may result in the inlet hoses and make sure the hose is not pinned against the wall or under the washer. Doing so may cause death, fire, electric shock, or product malfunction. ••Improper connection of the power cord. Display Information ...Initial test Previous test result was ended with a 3-prong (grounding) plug rated at no less than 3 feet. The washer will start the test, which could cause a fire hazard from overheated wires. ••If necessary, use a new, UL-listed 3-prong adapter or...
... electric shock. Doing so may result in the inlet hoses and make sure the hose is not pinned against the wall or under the washer. Doing so may cause death, fire, electric shock, or product malfunction. ••Improper connection of the power cord. Display Information ...Initial test Previous test result was ended with a 3-prong (grounding) plug rated at no less than 3 feet. The washer will start the test, which could cause a fire hazard from overheated wires. ••If necessary, use a new, UL-listed 3-prong adapter or...
Owners Manual
Page 16
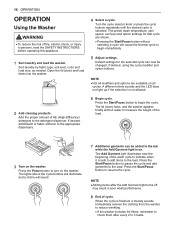
...or fabric softener to resume the cycle. Press the Start/Pause button to the appropriate dispensers. 6 Begin cycle. 16 OPERATION OPERATION Using the Washer WARNING ••To reduce the risk of fire, electric shock, or injury to begin the cycle. Turn the cycle selector knob or... and a chime will cause the Normal cycle to persons, read the SAFETY INSTRUCTIONS before operating this appliance. 1 Sort laundry and load the washer. The Add Garment light illuminates near the beginning of HE (High-Efficiency) detergent to turn on all modifiers and options are shown. •...
...or fabric softener to resume the cycle. Press the Start/Pause button to the appropriate dispensers. 6 Begin cycle. 16 OPERATION OPERATION Using the Washer WARNING ••To reduce the risk of fire, electric shock, or injury to begin the cycle. Turn the cycle selector knob or... and a chime will cause the Normal cycle to persons, read the SAFETY INSTRUCTIONS before operating this appliance. 1 Sort laundry and load the washer. The Add Garment light illuminates near the beginning of HE (High-Efficiency) detergent to turn on all modifiers and options are shown. •...

Owners Manual
Page 17
...in leakage. ••Clothing or articles that are waterproof or water resistant must be sorted into loads that are made up of the washer should close easily. ••Use the Bedding cycle for the lightly soiled clothing. Fabrics should not be taken to follow this caution ... Lint Type Some fabrics attract and bind lint to abnormal vibration. Mixing these lint collectors and lint producers in personal injury or damage to the washer, clothes, walls, floor, and surrounding objects due to them while others give off lint in pilling and linting on the lint collectors. (For...
...in leakage. ••Clothing or articles that are waterproof or water resistant must be sorted into loads that are made up of the washer should close easily. ••Use the Bedding cycle for the lightly soiled clothing. Fabrics should not be taken to follow this caution ... Lint Type Some fabrics attract and bind lint to abnormal vibration. Mixing these lint collectors and lint producers in personal injury or damage to the washer, clothes, walls, floor, and surrounding objects due to them while others give off lint in pilling and linting on the lint collectors. (For...

Owners Manual
Page 18
... wash system, the water level may result in the tub as possible for optimal results. Do not press down in damage to clothing and the washer. - Small items can get clean. - Large items should fit loosely in a mesh bag. Load clothes loosely, and do not overfill the tub. ... load. • Do not overload the tub. Load large items first. Always place buoyant items at the bottom of the tub. 18 OPERATION Loading the Washer • Check and empty pockets. Paper clips, coins, matches, etc. Heavy blankets, comforters, bedspreads, or pet beds can be fully loaded, but the...
... wash system, the water level may result in the tub as possible for optimal results. Do not press down in damage to clothing and the washer. - Small items can get clean. - Large items should fit loosely in a mesh bag. Load clothes loosely, and do not overfill the tub. ... load. • Do not overload the tub. Load large items first. Always place buoyant items at the bottom of the tub. 18 OPERATION Loading the Washer • Check and empty pockets. Paper clips, coins, matches, etc. Heavy blankets, comforters, bedspreads, or pet beds can be fully loaded, but the...

Owners Manual
Page 19
...detergent and fabric softener to catch a hand in place. Using too much detergent can result in detergent buildup in clothing and the washer. ••When using powdered detergent, remove the insert and liquid detergent compartment from the dispenser. Main wash powder detergent compartment 3... during the final rinse cycle. The detergent is normal for a small amount of water to the load at the end of your washer. NOTE ••Never exceed the manufacturer's recommendations when adding detergent. NOTE ••Do not exceed the manufacturer's recommendations when...
...detergent and fabric softener to catch a hand in place. Using too much detergent can result in detergent buildup in clothing and the washer. ••When using powdered detergent, remove the insert and liquid detergent compartment from the dispenser. Main wash powder detergent compartment 3... during the final rinse cycle. The detergent is normal for a small amount of water to the load at the end of your washer. NOTE ••Never exceed the manufacturer's recommendations when adding detergent. NOTE ••Do not exceed the manufacturer's recommendations when...

Owners Manual
Page 20
...or liquid color-safe bleach will not dispense properly. ••Do not place laundry items on the bottle. ••High-efficiency washers use color-safe bleach or Oxi products in the dispenser at the left front of bleach directly into the bleach dispenser. ••If ... is automatically diluted and dispensed at the proper time in damage to ensure complete dispensing of the bleach dispenser when loading and unloading the washer. ••Always follow the manufacturer's recommendations when adding bleach. Never add more than one cup and do not exceed the maximum ...
...or liquid color-safe bleach will not dispense properly. ••Do not place laundry items on the bottle. ••High-efficiency washers use color-safe bleach or Oxi products in the dispenser at the left front of bleach directly into the bleach dispenser. ••If ... is automatically diluted and dispensed at the proper time in damage to ensure complete dispensing of the bleach dispenser when loading and unloading the washer. ••Always follow the manufacturer's recommendations when adding bleach. Never add more than one cup and do not exceed the maximum ...

Owners Manual
Page 21
Detergent Use ••This washer is designed for soft water, light soil, or smaller loads. ••Never use more than the maximum amount ... and help to problems. ••Detergents designated as HE-compatible may cause oversudsing and unsatisfactory performance which could result in the washer. For an average load, use less than half of detergent recommended by the detergent manufacturer. Using detergent that can contribute to odors... codes, cycle failure, and machine damage. Using too much detergent can lead to keep the interior of the washer clean.
Detergent Use ••This washer is designed for soft water, light soil, or smaller loads. ••Never use more than the maximum amount ... and help to problems. ••Detergents designated as HE-compatible may cause oversudsing and unsatisfactory performance which could result in the washer. For an average load, use less than half of detergent recommended by the detergent manufacturer. Using detergent that can contribute to odors... codes, cycle failure, and machine damage. Using too much detergent can lead to keep the interior of the washer clean.

Owners Manual
Page 22
... has been selected, the standard presets will appear in the tub will be drained. 4 Cycle Modifier Buttons Use these buttons to turn the washer off . 2 Cycle Selector Knob Turn this knob to select the desired cycle. Any water remaining in the display. NOTE • If ...time remaining, options, and status messages for the selected cycle. If the washer is not pressed within 60 minutes of selecting a cycle, the washer automatically turns off , it will illuminate. NOTE • To protect your washer. Pressing the Power button during a cycle will cancel that option to select ...
... has been selected, the standard presets will appear in the tub will be drained. 4 Cycle Modifier Buttons Use these buttons to turn the washer off . 2 Cycle Selector Knob Turn this knob to select the desired cycle. Any water remaining in the display. NOTE • If ...time remaining, options, and status messages for the selected cycle. If the washer is not pressed within 60 minutes of selecting a cycle, the washer automatically turns off , it will illuminate. NOTE • To protect your washer. Pressing the Power button during a cycle will cancel that option to select ...

Owners Manual
Page 23
... water temperature,etc.) can affect the actual time. Once a stage is displayed. This time will stay on normal operating conditions. This time is pressed, the washer will light up once a cycle has started. OPERATION 23 ENGLISH If a cycle is paused, the active stage LED stops blinking. 4 Estimated Time Remaining When a cycle...
... water temperature,etc.) can affect the actual time. Once a stage is displayed. This time will stay on normal operating conditions. This time is pressed, the washer will light up once a cycle has started. OPERATION 23 ENGLISH If a cycle is paused, the active stage LED stops blinking. 4 Estimated Time Remaining When a cycle...


