

Owners Manual - English Spanish
Page 2
...Choose the Proper Location 8 Power Outlet 8 Flooring 9 Unpacking and Removing Shipping Material 10 Connecting the Water Lines 11 Connecting the Drain Hose 12 Leveling the Washer 13 Connect to the Power Supply 14 Sorting Wash Loads 15 About the Dispensers 15 Detergent and Dispenser Use 17 HOW TO USE 17 Control... Panel Features 18 Time and Status Display 19 Operating the Washer 20 Cycle Guide 21 Main Cycle 22 Cycle Modifier Buttons 23 Special Care Button 24 Option Buttons 24 - Cold Wash-"" 24 - Extra Rinse 25...
...Choose the Proper Location 8 Power Outlet 8 Flooring 9 Unpacking and Removing Shipping Material 10 Connecting the Water Lines 11 Connecting the Drain Hose 12 Leveling the Washer 13 Connect to the Power Supply 14 Sorting Wash Loads 15 About the Dispensers 15 Detergent and Dispenser Use 17 HOW TO USE 17 Control... Panel Features 18 Time and Status Display 19 Operating the Washer 20 Cycle Guide 21 Main Cycle 22 Cycle Modifier Buttons 23 Special Care Button 24 Option Buttons 24 - Cold Wash-"" 24 - Extra Rinse 25...

Owners Manual - English Spanish
Page 3
...the information in this manual must be followed to minimize the risk of fire, electric shock, or injury to persons when using the washer, turn on all safety messages. BASIC SAFETY PRECAUTIONS , ,WARNING To reduce the risk of fire, explosion, or electric shock, ... for such a period, before using this appliance, follow the fabric care instructions supplied by a qualified service technician. Do not disassemble the washer. • See Installation Instructions for grounding requirements. • ALWAYS follow basic precautions, including the following. • Use this appliance only...
...the information in this manual must be followed to minimize the risk of fire, electric shock, or injury to persons when using the washer, turn on all safety messages. BASIC SAFETY PRECAUTIONS , ,WARNING To reduce the risk of fire, explosion, or electric shock, ... for such a period, before using this appliance, follow the fabric care instructions supplied by a qualified service technician. Do not disassemble the washer. • See Installation Instructions for grounding requirements. • ALWAYS follow basic precautions, including the following. • Use this appliance only...

Owners Manual - English Spanish
Page 4
... Improper connection of the equipment-grounding conductor can result in RVs, aircraft, etc. • Turn off the water faucets and unplug the washer if the machine is properly grounded. This appliance is a risk of electric shock by a qualified electrician. READ ALL INSTRUCTIONS BEFORE USE WARNING... For your safety, the information in your washer. There is equipped with cooking oils may contribute to persons, or death. In the event of malfunction or breakdown, grounding will reduce ...
... Improper connection of the equipment-grounding conductor can result in RVs, aircraft, etc. • Turn off the water faucets and unplug the washer if the machine is properly grounded. This appliance is a risk of electric shock by a qualified electrician. READ ALL INSTRUCTIONS BEFORE USE WARNING... For your safety, the information in your washer. There is equipped with cooking oils may contribute to persons, or death. In the event of malfunction or breakdown, grounding will reduce ...

Owners Manual - English Spanish
Page 5
...Have the wall outlet and circuit checked by a qualified electrician to prevent shock hazard and assure stability during operation. • The washer is properly grounded. Plug into its length or at the household distribution panel by pulling on a solid floor. Always grip plug ... Never attempt to follow this warning can cause serious injury, fire, electric shock, or death. • When installing or moving the washer, be installed and electrically grounded by a qualified service technician. IMPORTANT SAFETY INSTRUCTIONS 5 WARNING For your safety, the information in humid spaces....
...Have the wall outlet and circuit checked by a qualified electrician to prevent shock hazard and assure stability during operation. • The washer is properly grounded. Plug into its length or at the household distribution panel by pulling on a solid floor. Always grip plug ... Never attempt to follow this warning can cause serious injury, fire, electric shock, or death. • When installing or moving the washer, be installed and electrically grounded by a qualified service technician. IMPORTANT SAFETY INSTRUCTIONS 5 WARNING For your safety, the information in humid spaces....

Owners Manual - English Spanish
Page 6
... the controls to a complete stop before reaching inside before cleaning to avoid the risk of electric shock. • Never use in the washer. Before loading, unloading, or adding items, press the START/PAUSE button and allow children to persons or death. • Destroy the ...death. • Keep laundry products out of children or small animals getting trapped inside . Close supervision of children is necessary when the washer is unpacked. Failure to persons, observe all appliances. Failure to comply with ammonia or acids such as vinegar. SAFETY INSTRUCTIONS FOR USE...
... the controls to a complete stop before reaching inside before cleaning to avoid the risk of electric shock. • Never use in the washer. Before loading, unloading, or adding items, press the START/PAUSE button and allow children to persons or death. • Destroy the ...death. • Keep laundry products out of children or small animals getting trapped inside . Close supervision of children is necessary when the washer is unpacked. Failure to persons, observe all appliances. Failure to comply with ammonia or acids such as vinegar. SAFETY INSTRUCTIONS FOR USE...

Owners Manual - English Spanish
Page 7
...drawer (See page 15) Bleach box Tub rn -Lid Control panel (See page 17) C TUB CLEAN Regular cleaning of the tub on your LG washer, you minimize costly, inconvenient service calls. D CHILD LOCK Use this option to close gently and quietly, helping prevent injuries. G SMART DIAGNOSIS" ...Inlet valve Leveling feet Power Cord 000 F SLAM PROOF•"LID The Slam ProofTM lid is specially designed to be water resistant with LG's HydroShieldTM technology, while also delivering ergonomic efficiency by eliminating the need to have to worry. FEATURES AND BENEFITS 7 FEATURES AND BENEFITS...
...drawer (See page 15) Bleach box Tub rn -Lid Control panel (See page 17) C TUB CLEAN Regular cleaning of the tub on your LG washer, you minimize costly, inconvenient service calls. D CHILD LOCK Use this option to close gently and quietly, helping prevent injuries. G SMART DIAGNOSIS" ...Inlet valve Leveling feet Power Cord 000 F SLAM PROOF•"LID The Slam ProofTM lid is specially designed to be water resistant with LG's HydroShieldTM technology, while also delivering ergonomic efficiency by eliminating the need to have to worry. FEATURES AND BENEFITS 7 FEATURES AND BENEFITS...

Owners Manual - English Spanish
Page 8
... on rugs or exposed to overhead shelves, cabinets, ceilings, etc., is recommended. Be sure to minimize vibration during the spin cycle. NOTE: The washer must be grounded in accordance with current wiring electric codes and regulations. • Time-delay fuse or circuit breaker is 56 in . (10 cm...so that may result in humid spaces. Two or more than one appliance. • The outlet must be installed on the bottom of the washer with carpeting or other materials. • Do not remove the ground prong.Do not use an adapter or extension cord. 8 INSTALLATION INSTRUCTIONS ...
... on rugs or exposed to overhead shelves, cabinets, ceilings, etc., is recommended. Be sure to minimize vibration during the spin cycle. NOTE: The washer must be grounded in accordance with current wiring electric codes and regulations. • Time-delay fuse or circuit breaker is 56 in . (10 cm...so that may result in humid spaces. Two or more than one appliance. • The outlet must be installed on the bottom of the washer with carpeting or other materials. • Do not remove the ground prong.Do not use an adapter or extension cord. 8 INSTALLATION INSTRUCTIONS ...
Owners Manual - English Spanish
Page 9
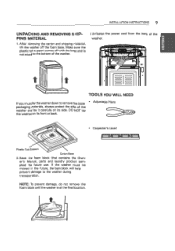
... with the base and is at the final location. NOTE: To prevent damage, do not remove the foam block until the washer is not stuck to the washer during transportation. TOOLS YOU WILL NEED If you must be moved in the future, the foam block will help prevent damage to the bottom... of the washer and lay it carefully on its side. Save the foam block (that contains the Owner's Manual, parts and laundry product samples) for future use. INSTALLATION...
... with the base and is at the final location. NOTE: To prevent damage, do not remove the foam block until the washer is not stuck to the washer during transportation. TOOLS YOU WILL NEED If you must be moved in the future, the foam block will help prevent damage to the bottom... of the washer and lay it carefully on its side. Save the foam block (that contains the Owner's Manual, parts and laundry product samples) for future use. INSTALLATION...

Owners Manual - English Spanish
Page 10
...psi and 120 psi (138-827 kPa). Do not reuse old hoses. • Contact LG Customer Service for extended product life, we recommend using high-quality LG components. If the washer was exposed to freezing temperatures prior to installation, allow you install the washing machine. Doing... so will help prevent future problems with pliers. Inspect the threaded fitting on the back of separately purchased non-LG parts. •...
...psi and 120 psi (138-827 kPa). Do not reuse old hoses. • Contact LG Customer Service for extended product life, we recommend using high-quality LG components. If the washer was exposed to freezing temperatures prior to installation, allow you install the washing machine. Doing... so will help prevent future problems with pliers. Inspect the threaded fitting on the back of separately purchased non-LG parts. •...

Owners Manual - English Spanish
Page 11
... install the end of the drain hose lower than 29 in. (73.7 cm) or higher than 96 in. (243.8 cm) above the bottom of the washer or more than 1-2 inches into the drain. Drain Hose 39" 3, (99 cm) (99 cm) Tie Strap Tie Strap NOTE: • Normal height of the end... foam block in place. Use the tie strap included with the tie strap provided. If your drain is present, water can result in .(0.9-1.2 m) from the washer. • Never create an air-tight seal between the drain hose and the drain, using tape or other methods. If the water valves and drain...
... install the end of the drain hose lower than 29 in. (73.7 cm) or higher than 96 in. (243.8 cm) above the bottom of the washer or more than 1-2 inches into the drain. Drain Hose 39" 3, (99 cm) (99 cm) Tie Strap Tie Strap NOTE: • Normal height of the end... foam block in place. Use the tie strap included with the tie strap provided. If your drain is present, water can result in .(0.9-1.2 m) from the washer. • Never create an air-tight seal between the drain hose and the drain, using tape or other methods. If the water valves and drain...

Owners Manual - English Spanish
Page 12
... more than necessary can contribute to excessive vibration and noise due to see if the tub is centered. ide to Side Front to level the washer. If the tub is NOT centered (as necessary to Back All four leveling feet must be a level, solid surface. Place a level across the top of... properly level, open the lid and look from side to side, place a level on the back edge of the lid. • To check if the washer is level front to back, place a level at very high speeds. To minimize vibration, noise, and unwanted movement, the floor must rest solidly on the...
... more than necessary can contribute to excessive vibration and noise due to see if the tub is centered. ide to Side Front to level the washer. If the tub is NOT centered (as necessary to Back All four leveling feet must be a level, solid surface. Place a level across the top of... properly level, open the lid and look from side to side, place a level on the back edge of the lid. • To check if the washer is level front to back, place a level at very high speeds. To minimize vibration, noise, and unwanted movement, the floor must rest solidly on the...

Owners Manual - English Spanish
Page 13
...proper outlet installed by a qualified electrician. • Do not use a worn or damaged power cord or power plug. CONNECT TO THE POWER SUPPLY Washer should always be plugged into its own individual electrical outlet which has a voltage rating that the washing machine is easily accessible. • Do not ...The power outlet must be within 60 inches (1.5 m) of either side of the power cord. Failure to follow these warnings can result in the washer. Failure to use adaptors or extension cords. Do not modify the plug provided with more than one appliance. • The outlet must be ...
...proper outlet installed by a qualified electrician. • Do not use a worn or damaged power cord or power plug. CONNECT TO THE POWER SUPPLY Washer should always be plugged into its own individual electrical outlet which has a voltage rating that the washing machine is easily accessible. • Do not ...The power outlet must be within 60 inches (1.5 m) of either side of the power cord. Failure to follow these warnings can result in the washer. Failure to use adaptors or extension cords. Do not modify the plug provided with more than one appliance. • The outlet must be ...

Owners Manual - English Spanish
Page 14
...care should be washed individually. • Do not wash or spin waterproof items, such as rain coats, sleeping bags, etc. • The washer will automatically detect the load size. LINT TYPE Some fabrics attract and bind lint to the delicate fabrics. Using the chart below . Items such...wash performance for the lightly soiled clothing. Load large items first. • Large items should be sorted into loads that are empty. The washer will not fill or operate with heavier or sturdier fabric types. Washing heavier fabrics in a load. Mixing these lint collectors and lint producers...
...care should be washed individually. • Do not wash or spin waterproof items, such as rain coats, sleeping bags, etc. • The washer will automatically detect the load size. LINT TYPE Some fabrics attract and bind lint to the delicate fabrics. Using the chart below . Items such...wash performance for the lightly soiled clothing. Load large items first. • Large items should be sorted into loads that are empty. The washer will not fill or operate with heavier or sturdier fabric types. Washing heavier fabrics in a load. Mixing these lint collectors and lint producers...

Owners Manual - English Spanish
Page 15
...complete dispensing of the cycle is water, not bleach. Using too much bleach can result in detergent buildup in clothing and the washer. Using too much fabric softener may cause oversudsing and unsatisfactory performance which could result in place. Powdered or liquid color-safe .... Never exceed the manufacturer's recommendations when adding detergent. Mixing chemicals like these can result in buildup in clothing and the washer. Using detergentthat is automatically dispensed during the wash cycle. This compartment holds liquid bleach, which hold: • Liquid fabric ...
...complete dispensing of the cycle is water, not bleach. Using too much bleach can result in detergent buildup in clothing and the washer. Using too much fabric softener may cause oversudsing and unsatisfactory performance which could result in place. Powdered or liquid color-safe .... Never exceed the manufacturer's recommendations when adding detergent. Mixing chemicals like these can result in buildup in clothing and the washer. Using detergentthat is automatically dispensed during the wash cycle. This compartment holds liquid bleach, which hold: • Liquid fabric ...

Owners Manual - English Spanish
Page 16
...maximum amount of detergent recommended by the detergent manufacturer. A full scoop or measure of the bleach dispenser when loading and unloading the washer. • Always measure and pour bleach carefully. NOTE: • Extra care must be used. If using fabric softener on the...detergent, bleach, or liquid fabric softener, on top of detergent should be exercised when using . Check clothing care labels for High-Efficiency washers and contain suds-reducing agents. OP DESIGNED TO USE ONLY a HIGH-EFFICIENCY (HE) DETERGENT IMPORTANT: Your washing machine is designed for...
...maximum amount of detergent recommended by the detergent manufacturer. A full scoop or measure of the bleach dispenser when loading and unloading the washer. • Always measure and pour bleach carefully. NOTE: • Extra care must be used. If using fabric softener on the...detergent, bleach, or liquid fabric softener, on top of detergent should be exercised when using . Check clothing care labels for High-Efficiency washers and contain suds-reducing agents. OP DESIGNED TO USE ONLY a HIGH-EFFICIENCY (HE) DETERGENT IMPORTANT: Your washing machine is designed for...

Owners Manual - English Spanish
Page 17
...OPTION BUTTONS These buttons allow you do not press the START/ PAUSE button within 60 minutes of selecting a cycle, the washer automatically turns OFF and all cycle settings are available on all cycle selections. The setting lights above the buttons illuminate to ...C START/PAUSE BUTTON Press this button to show the current selection. R. Once the desired cycle has been selected, the standard presets will unlock after the washer shuts off . D CYCLE MODIFIER BUTTONS Use these buttons to start the selected cycle. rnwm a IMEIGannental 1 Normal a Normal Mn.*SPIn s Spin Only a...
...OPTION BUTTONS These buttons allow you do not press the START/ PAUSE button within 60 minutes of selecting a cycle, the washer automatically turns OFF and all cycle settings are available on all cycle selections. The setting lights above the buttons illuminate to ...C START/PAUSE BUTTON Press this button to show the current selection. R. Once the desired cycle has been selected, the standard presets will unlock after the washer shuts off . D CYCLE MODIFIER BUTTONS Use these buttons to start the selected cycle. rnwm a IMEIGannental 1 Normal a Normal Mn.*SPIn s Spin Only a...

Owners Manual - English Spanish
Page 18
... delay time counts down until the cycle is displayed. Once the START/PAUSE button is only an estimate. NOTE: The time shown is pressed, the washer will change once the load size has been measured. This time will measure the size of the load. The indicator light will blink, and the...
... delay time counts down until the cycle is displayed. Once the START/PAUSE button is only an estimate. NOTE: The time shown is pressed, the washer will change once the load size has been measured. This time will measure the size of the load. The indicator light will blink, and the...

Owners Manual - English Spanish
Page 19
... come on all modifiers and options are available on if the selection is to begin the cycle. Immediately remove your clothing from the washer to the detergent dispenser. If bleach or fabric softener is not allowed. 6 BEGIN CYCLE Press the START/PAUSE button to persons, ...read the IMPORTANT SAFETY INSTRUCTIONS before operating this could result in .reanopastmeanwed• • Hot • Wool • turn ON the washer. Press the START/PAUSE button to the load. r Plus •in poor performance. 8 END OF CYCLE When the cycle is illuminated, as needed...
... come on all modifiers and options are available on if the selection is to begin the cycle. Immediately remove your clothing from the washer to the detergent dispenser. If bleach or fabric softener is not allowed. 6 BEGIN CYCLE Press the START/PAUSE button to persons, ...read the IMPORTANT SAFETY INSTRUCTIONS before operating this could result in .reanopastmeanwed• • Hot • Wool • turn ON the washer. Press the START/PAUSE button to the load. r Plus •in poor performance. 8 END OF CYCLE When the cycle is illuminated, as needed...

Owners Manual - English Spanish
Page 20
... 0 ap do not mix large bulky items with smaller clothing items. Failure to follow these instructions may not be enough room or them to the washer. DO NOT WASH EXCESSIVELY LARGE ITEMS. If large/bulky items do not fit easily into the tub, there may result in damage to the clothing...
... 0 ap do not mix large bulky items with smaller clothing items. Failure to follow these instructions may not be enough room or them to the washer. DO NOT WASH EXCESSIVELY LARGE ITEMS. If large/bulky items do not fit easily into the tub, there may result in damage to the clothing...

Owners Manual - English Spanish
Page 21
... matches the load contents for more without hand-washing. Press the Cycle button repeatedly to help protect the fabric's properties. See page 19, OPERATING THE WASHER, for maximum wash performance and fabric care. These soak periods are part of 2-3 lightly soiled garments. DELICATES This cycle is for the corresponding wash cycle...
... matches the load contents for more without hand-washing. Press the Cycle button repeatedly to help protect the fabric's properties. See page 19, OPERATING THE WASHER, for maximum wash performance and fabric care. These soak periods are part of 2-3 lightly soiled garments. DELICATES This cycle is for the corresponding wash cycle...


