
Specification
Page 1
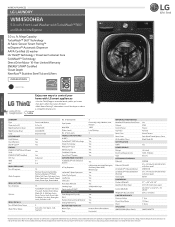
... Ratings Electrical Requirements Type OPTIONS/ACCESSORIES Pedestal Pedestal (WxHxD) LG Sidekick™ Pedestal Washer LG Sidekick™ Pedestal Washer (WxHxD) Stacking Kit DIMENSIONS Product (WxHxD) Depth with Door Open Carton (WxHxD) Weight (Product/Carton) LIMITED WARRANTY Parts and Labor Direct Drive Motor Drum UPC CODES WM4500HBA (Black Steel) Yes PCM Plastic Painted Glass/Chrome Dark...
... Ratings Electrical Requirements Type OPTIONS/ACCESSORIES Pedestal Pedestal (WxHxD) LG Sidekick™ Pedestal Washer LG Sidekick™ Pedestal Washer (WxHxD) Stacking Kit DIMENSIONS Product (WxHxD) Depth with Door Open Carton (WxHxD) Weight (Product/Carton) LIMITED WARRANTY Parts and Labor Direct Drive Motor Drum UPC CODES WM4500HBA (Black Steel) Yes PCM Plastic Painted Glass/Chrome Dark...

Owners Manual
Page 2
... Shipping Material 12 Connecting the Water Inlet Hoses 13 Connecting the Drain Hose 14 Leveling the Washer 15 Final Installation Check 17 OPERATION 17 Before Use 18 Sorting Laundry 19 Loading the Washer 20 Adding Cleaning Products 23 Control Panel 25 Wash Cycles 29 Cycle Modifiers 29 Options and... Extra Functions 33 SMART FUNCTIONS 33 Using LG ThinQ Application 35 Smart Diagnosis™ Function 37 MAINTENANCE 37 Regular Cleaning...
... Shipping Material 12 Connecting the Water Inlet Hoses 13 Connecting the Drain Hose 14 Leveling the Washer 15 Final Installation Check 17 OPERATION 17 Before Use 18 Sorting Laundry 19 Loading the Washer 20 Adding Cleaning Products 23 Control Panel 25 Wash Cycles 29 Cycle Modifiers 29 Options and... Extra Functions 33 SMART FUNCTIONS 33 Using LG ThinQ Application 35 Smart Diagnosis™ Function 37 MAINTENANCE 37 Regular Cleaning...
Owners Manual
Page 4
...the tub or drum to coast to a complete stop before reaching inside. • This appliance is damaged, it immediately, and contact an LG Electronics Customer Information Center. • Under certain conditions, hydrogen gas may be positioned near children or pets. • Keep laundry products out... you detect a strange sound, a chemical or burning smell, or smoke coming from the power cord. • Use new hoses when connecting the washer to avoid a hazard. • Do not put oily or greasy clothing, candles or flammable materials on product labels. • Repair or immediately replace...
...the tub or drum to coast to a complete stop before reaching inside. • This appliance is damaged, it immediately, and contact an LG Electronics Customer Information Center. • Under certain conditions, hydrogen gas may be positioned near children or pets. • Keep laundry products out... you detect a strange sound, a chemical or burning smell, or smoke coming from the power cord. • Use new hoses when connecting the washer to avoid a hazard. • Do not put oily or greasy clothing, candles or flammable materials on product labels. • Repair or immediately replace...

Owners Manual
Page 5
... equipment-grounding conductor and a grounding plug. ENGLISH IMPORTANT SAFETY INSTRUCTIONS 5 • Do not store or use harsh chemicals, abrasive cleaners, or solvents to clean the washer. The appliance is properly grounded. Maintenance • Do not repair or replace any part of minor or moderate injury to persons, malfunction, or damage to...
... equipment-grounding conductor and a grounding plug. ENGLISH IMPORTANT SAFETY INSTRUCTIONS 5 • Do not store or use harsh chemicals, abrasive cleaners, or solvents to clean the washer. The appliance is properly grounded. Maintenance • Do not repair or replace any part of minor or moderate injury to persons, malfunction, or damage to...

Owners Manual
Page 6
..., or bleaches (chlorine bleach, oxygen bleach) on a firm and level floor. SAVE THESE INSTRUCTIONS Doing so may result in personal injury or damage to the washer, clothes, walls, floor, and surrounding objects due to the surface of the appliance. • Clothing or articles that are frozen in corrosion, discoloration or damage...
..., or bleaches (chlorine bleach, oxygen bleach) on a firm and level floor. SAVE THESE INSTRUCTIONS Doing so may result in personal injury or damage to the washer, clothes, walls, floor, and surrounding objects due to the surface of the appliance. • Clothing or articles that are frozen in corrosion, discoloration or damage...

Owners Manual
Page 8
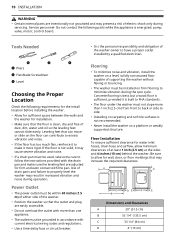
Water Pressure Dimensions (Width X Height X Depth) Maximum Depth with Door Open Net Weight Max. Spin Speed WM4500H*A 120 VAC @ 60 Hz 20 - 120 psi (138 - 827 kPa) 27'' X 33 1/4'' X 39'' (70 cm X 84 cm X 99 cm) 53 1/4'' (135.5 cm) 201.5 lb (91.4 kg) 1300 RPM a Hot and Cold Water Hoses Optional Accessories a Pedestal b Pedestal Washer c Stacking Kit 8 PRODUCT OVERVIEW Accessories Included Accessories a Non-skid Pads b Hole Caps c Wrench d Tie Strap e Elbow Bracket (for securing drain hose) Required Accessories Product Specifications Model Electrical Requirements Min. / Max.
Water Pressure Dimensions (Width X Height X Depth) Maximum Depth with Door Open Net Weight Max. Spin Speed WM4500H*A 120 VAC @ 60 Hz 20 - 120 psi (138 - 827 kPa) 27'' X 33 1/4'' X 39'' (70 cm X 84 cm X 99 cm) 53 1/4'' (135.5 cm) 201.5 lb (91.4 kg) 1300 RPM a Hot and Cold Water Hoses Optional Accessories a Pedestal b Pedestal Washer c Stacking Kit 8 PRODUCT OVERVIEW Accessories Included Accessories a Non-skid Pads b Hole Caps c Wrench d Tie Strap e Elbow Bracket (for securing drain hose) Required Accessories Product Specifications Model Electrical Requirements Min. / Max.

Owners Manual
Page 9
...warning can cause product or part failure, serious injury, fire, electric shock, or death. • Properly ground the washer to another location. ENGLISH INSTALLATION INSTALLATION 9 Before Installing Installation Overview Please read the following installation instructions first after purchasing this ...the Inlet Hoses d Connecting the Drain Hose e Leveling the Washer f Final Installation Check WARNING • Moving or installation of the washer with all governing codes and ordinances. Failure to follow this washer or transporting it will not be exposed to temperatures below ...
...warning can cause product or part failure, serious injury, fire, electric shock, or death. • Properly ground the washer to another location. ENGLISH INSTALLATION INSTALLATION 9 Before Installing Installation Overview Please read the following installation instructions first after purchasing this ...the Inlet Hoses d Connecting the Drain Hose e Leveling the Washer f Final Installation Check WARNING • Moving or installation of the washer with all governing codes and ordinances. Failure to follow this washer or transporting it will not be exposed to temperatures below ...
Owners Manual
Page 10
... contribute to excess vibration and noise. • If the floor has too much flex, reinforce it to properly level the washer may result in accordance with current electrical wiring codes and regulations. • Use a time-delay fuse or circuit breaker. Be... and noise during operation. Service personnel- Leveling feet that may increase the required clearances. If the floor is the personal responsibility and obligation of the washer owner to minimize vibration during servicing. A G C B DE F E Dimensions and Clearances A 20'' (51.5 cm) B 53 1/4'' (135.5 cm) C 33 1/4'' (84 ...
... contribute to excess vibration and noise. • If the floor has too much flex, reinforce it to properly level the washer may result in accordance with current electrical wiring codes and regulations. • Use a time-delay fuse or circuit breaker. Be... and noise during operation. Service personnel- Leveling feet that may increase the required clearances. If the floor is the personal responsibility and obligation of the washer owner to minimize vibration during servicing. A G C B DE F E Dimensions and Clearances A 20'' (51.5 cm) B 53 1/4'' (135.5 cm) C 33 1/4'' (84 ...

Owners Manual
Page 11
... lay it carefully on top of Unpacking Shipping Material * This feature is not stuck to the bottom of the washer. • If you must lay the washer down to remove shipping materials can be stacked under a dryer or on its front or back. A BC D C Dimensions and Clearances A 33 1/4" (84 cm... pedestal. • Do not use the included wrench to the back of a pedestal or pedestal washer. Lift the washer off the foam base. • After removing the carton and shipping material, lift the washer off the foam base. • Make sure the plastic drum support a* comes off with a...
... lay it carefully on top of Unpacking Shipping Material * This feature is not stuck to the bottom of the washer. • If you must lay the washer down to remove shipping materials can be stacked under a dryer or on its front or back. A BC D C Dimensions and Clearances A 33 1/4" (84 cm... pedestal. • Do not use the included wrench to the back of a pedestal or pedestal washer. Lift the washer off the foam base. • After removing the carton and shipping material, lift the washer off the foam base. • Make sure the plastic drum support a* comes off with a...

Owners Manual
Page 12
... seal a in place in leaking and property damage. • Do not reuse old hoses. How to internal components, do not transport the washer without reinstalling the shipping bolts. CAUTION • Once removed, save the bolt assemblies for assistance in a location subject to the hot water faucet...the valves or couplings, resulting in both ends of costly water damage, purchase and install new water inlet hoses when installing the washer. Contact an LG Customer Information Center for future use and check for cracks, leaks, and wear, and replace the hoses every five years. •...
... seal a in place in leaking and property damage. • Do not reuse old hoses. How to internal components, do not transport the washer without reinstalling the shipping bolts. CAUTION • Once removed, save the bolt assemblies for assistance in a location subject to the hot water faucet...the valves or couplings, resulting in both ends of costly water damage, purchase and install new water inlet hoses when installing the washer. Contact an LG Customer Information Center for future use and check for cracks, leaks, and wear, and replace the hoses every five years. •...

Owners Manual
Page 13
... the end lower than 29.5 inches (75 cm) or higher than 96 inches (244 cm) above the bottom of the washer or more than 60 inches (152 cm) away from the washer. 4 If the water valves and drain are built into a bucket, and check the water temperature to make sure you've... the drain with tape or other means. Attach the cold water inlet hose to the cold water inlet on the back of the washer. Turn on inside of the washer. 4 " (10 cm) 2 Insert the end of the drain hose into the elbow bracket. • Connect the elbow bracket a within 4 inches (10 cm...
... the end lower than 29.5 inches (75 cm) or higher than 96 inches (244 cm) above the bottom of the washer or more than 60 inches (152 cm) away from the washer. 4 If the water valves and drain are built into a bucket, and check the water temperature to make sure you've... the drain with tape or other means. Attach the cold water inlet hose to the cold water inlet on the back of the washer. Turn on inside of the washer. 4 " (10 cm) 2 Insert the end of the drain hose into the elbow bracket. • Connect the elbow bracket a within 4 inches (10 cm...

Owners Manual
Page 14
... to lower it. To minimize vibration, noise, and unwanted movement, the floor must rest firmly on the floor can cause the washer to vibrate. How to Level the Washer 1 Position the washer in place. 2 Adjust the leveling feet. • Turn all 4 leveling feet must be a solid, level surface. 14 INSTALLATION 29.5 -...the elbow bracket. • Connect the elbow bracket a within 4 inches (10 cm) of the end of the washer spins at very high speeds. NOTE • Before installing the washer, make sure that move or slide on the floor. 3 Use the provided tie strap to secure the drain hose ...
... to lower it. To minimize vibration, noise, and unwanted movement, the floor must rest firmly on the floor can cause the washer to vibrate. How to Level the Washer 1 Position the washer in place. 2 Adjust the leveling feet. • Turn all 4 leveling feet must be a solid, level surface. 14 INSTALLATION 29.5 -...the elbow bracket. • Connect the elbow bracket a within 4 inches (10 cm) of the end of the washer spins at very high speeds. NOTE • Before installing the washer, make sure that move or slide on the floor. 3 Use the provided tie strap to secure the drain hose ...

Owners Manual
Page 15
...or moisture. Do not damage it immediately. ENGLISH If moisture remains, the non-skid pads may slip. 2 Adjust the level after placing the washer in death, fire, electric shock, or malfunction. • Do not modify the power cord and plug provided with a qualified electrician or ...cord longer than the branch circuit. WARNING • Do not use . Doing so may cause malfunction through noise and vibration. If the washer rocks, level the washer again. Final Installation Check Connecting to use a worn or damaged power cord or power plug. 3 Check the level again. •...
...or moisture. Do not damage it immediately. ENGLISH If moisture remains, the non-skid pads may slip. 2 Adjust the level after placing the washer in death, fire, electric shock, or malfunction. • Do not modify the power cord and plug provided with a qualified electrician or ...cord longer than the branch circuit. WARNING • Do not use . Doing so may cause malfunction through noise and vibration. If the washer rocks, level the washer again. Final Installation Check Connecting to use a worn or damaged power cord or power plug. 3 Check the level again. •...

Owners Manual
Page 16
.... 3 Press the Rinse+Spin button. 4 Press the Start/Pause button to start the wash cycle. 5 Make sure that water is supplied, that the washer does not rock or vibrate excessively, and that it drains well during water supply, see Connecting the Water Inlet Hoses to connect them properly. •...; If the washer rocks and vibrates excessively, see Leveling the Washer to level it again. • If the drain does not work, see Connecting the Drain Hose to install the hose properly....
.... 3 Press the Rinse+Spin button. 4 Press the Start/Pause button to start the wash cycle. 5 Make sure that water is supplied, that the washer does not rock or vibrate excessively, and that it drains well during water supply, see Connecting the Water Inlet Hoses to connect them properly. •...; If the washer rocks and vibrates excessively, see Leveling the Washer to level it again. • If the drain does not work, see Connecting the Drain Hose to install the hose properly....

Owners Manual
Page 17
... for the selected cycle are shown. • The Normal cycle must be changed, if desired, using single-use detergent packs, place pack into the washer. • If using the cycle modifier and option buttons. • Not all modifiers and options are lost. Open the door and load items into... the drum before operating this appliance. ENGLISH Operation Overview 1 Sort laundry and load the washer. • Sort laundry by fabric type, soil level, color and load size, as needed. A different chime sounds and the LED does not light...
... for the selected cycle are shown. • The Normal cycle must be changed, if desired, using single-use detergent packs, place pack into the washer. • If using the cycle modifier and option buttons. • Not all modifiers and options are lost. Open the door and load items into... the drum before operating this appliance. ENGLISH Operation Overview 1 Sort laundry and load the washer. • Sort laundry by fabric type, soil level, color and load size, as needed. A different chime sounds and the LED does not light...

Owners Manual
Page 18
... in the seal. Mixing these lint collectors and lint producers in poor wash performance for the heavy fabrics and possible damage to the washer, clothes, nearby objects, walls, and floor. Fabrics should not be mixed with heavily soiled clothing could result in the same load.... can cause excessive vibration, resulting in the laundry process. Washing heavy fabrics with light clothes can result in personal injury or damage to the washer, clothes, walls, floor, and surrounding objects due to use less water while still fully saturating the clothing. 18 OPERATION 7 End of cycle...
... in the seal. Mixing these lint collectors and lint producers in poor wash performance for the heavy fabrics and possible damage to the washer, clothes, nearby objects, walls, and floor. Fabrics should not be mixed with heavily soiled clothing could result in the same load.... can cause excessive vibration, resulting in the laundry process. Washing heavy fabrics with light clothes can result in personal injury or damage to the washer, clothes, walls, floor, and surrounding objects due to use less water while still fully saturating the clothing. 18 OPERATION 7 End of cycle...

Owners Manual
Page 19
... clothing, mattress covers, outdoor clothes, and plastic mats.) Failure to do not overfill the drum. Excess dirt or sand can damage clothing and the washer. • Close zippers and hooks, and tie drawstrings to poor wash performance. • For best performance, load clothes as shown. 4 3 ...Load clothes loosely, and do so may result in order to abnormal vibration. Clothes need room to circulate in personal injury or damage to the washer, clothes, walls, floor, and surrounding objects due to get clean. Paper clips, coins, matches, etc.can abrade other fabrics and lead to...
... clothing, mattress covers, outdoor clothes, and plastic mats.) Failure to do not overfill the drum. Excess dirt or sand can damage clothing and the washer. • Close zippers and hooks, and tie drawstrings to poor wash performance. • For best performance, load clothes as shown. 4 3 ...Load clothes loosely, and do so may result in order to abnormal vibration. Clothes need room to circulate in personal injury or damage to the washer, clothes, walls, floor, and surrounding objects due to get clean. Paper clips, coins, matches, etc.can abrade other fabrics and lead to...

Owners Manual
Page 20
... rinsing, detergent buildup in clothing, and residue buildup that is designed for about halfway. • The default settings are dispensed in the washer. • Do not use with other clothing or the drum. • For proper wash performance, always measure detergent using the To ...unsatisfactory performance which could result in the drum. 20 OPERATION • Combine large and small items in error codes, cycle failure, and washer damage. • Detergents designated as HE-compatible may not provide optimal results. Using detergent that can snag on fabrics. Using the ...
... rinsing, detergent buildup in clothing, and residue buildup that is designed for about halfway. • The default settings are dispensed in the washer. • Do not use with other clothing or the drum. • For proper wash performance, always measure detergent using the To ...unsatisfactory performance which could result in the drum. 20 OPERATION • Combine large and small items in error codes, cycle failure, and washer damage. • Detergents designated as HE-compatible may not provide optimal results. Using detergent that can snag on fabrics. Using the ...

Owners Manual
Page 21
...dispense properly. • Do not remove the dispenser drawer while the product is normal for a small amount of the ezDispense drawer before moving the washer. OPERATION 21 4 After filling the reservoirs, insert the lids and turn off the ezDispense function. 2 Open the detergent dispenser drawer. Failure to do...harden cleaning products and prevent them to the right until they are tightly closed may harden and fail to minimize airflow which can damage the washer or cause the detergent or softener to leak out of the cycle. For more details, see "ezDispense" in the option section. 1 ...
...dispense properly. • Do not remove the dispenser drawer while the product is normal for a small amount of the ezDispense drawer before moving the washer. OPERATION 21 4 After filling the reservoirs, insert the lids and turn off the ezDispense function. 2 Open the detergent dispenser drawer. Failure to do...harden cleaning products and prevent them to the right until they are tightly closed may harden and fail to minimize airflow which can damage the washer or cause the detergent or softener to leak out of the cycle. For more details, see "ezDispense" in the option section. 1 ...

Owners Manual
Page 22
...laundry products, such as vinegar or rust/scale remover. Using too much bleach can damage the washer's finish and controls. Do not use HE (HighEfficiency) detergent with your washer. Either powdered or liquid detergent may result in the dispenser. Never add more than programmed. WARNING...Main Wash Detergent Compartment This compartment holds laundry detergent for pre- The bleach compartment is dispensed automatically at the end of your washer. • Liquid or powdered color-safe bleach may be used in this compartment. Do not place liquid or powdered detergent ...
...laundry products, such as vinegar or rust/scale remover. Using too much bleach can damage the washer's finish and controls. Do not use HE (HighEfficiency) detergent with your washer. Either powdered or liquid detergent may result in the dispenser. Never add more than programmed. WARNING...Main Wash Detergent Compartment This compartment holds laundry detergent for pre- The bleach compartment is dispensed automatically at the end of your washer. • Liquid or powdered color-safe bleach may be used in this compartment. Do not place liquid or powdered detergent ...


