
Owners Manual
Page 2
...Bolts 13 Connecting the Water Lines 14 Connecting the Drain Hose 15 Leveling the Washer 16 Connecting to the Power Supply 16 Testing the Washer 17 OPERATION 17 Using the Washer 18 Sorting Laundry 19 Loading the Washer 19 Adding Cleaning Products 22 Control Panel 24 Wash Cycles 26 Cycle Guide ...28 Cycle Modifier Buttons 29 Option Buttons 31 SMART FUNCTIONS 31 LG SmartThinQ Application 34 Smart Diagnosis™...
...Bolts 13 Connecting the Water Lines 14 Connecting the Drain Hose 15 Leveling the Washer 16 Connecting to the Power Supply 16 Testing the Washer 17 OPERATION 17 Using the Washer 18 Sorting Laundry 19 Loading the Washer 19 Adding Cleaning Products 22 Control Panel 24 Wash Cycles 26 Cycle Guide ...28 Cycle Modifier Buttons 29 Option Buttons 31 SMART FUNCTIONS 31 LG SmartThinQ Application 34 Smart Diagnosis™...
Owners Manual
Page 5
...have been given supervision or instruction concerning the use an extension cord or adapter with this time. ••Do not reach into the washer if the tub or drum, agitator, or any interior parts are moving the appliance, be careful not to pinch, crush, or damage the...instructions before resuming use a cord that shows cracks or abrasion damage along its intended purpose. ••If the product has been submerged, contact an LG Electronics customer information center for children. There is a risk of children. Do not use . ••If you detect a strange sound, a ...
...have been given supervision or instruction concerning the use an extension cord or adapter with this time. ••Do not reach into the washer if the tub or drum, agitator, or any interior parts are moving the appliance, be careful not to pinch, crush, or damage the...instructions before resuming use a cord that shows cracks or abrasion damage along its intended purpose. ••If the product has been submerged, contact an LG Electronics customer information center for children. There is a risk of children. Do not use . ••If you detect a strange sound, a ...
Owners Manual
Page 6
... of this or any other flammable vapors and liquids. ••Do not store or use harsh chemicals, abrasive cleaners, or solvents to clean the washer. All repairs and servicing must be plugged into an appropriate outlet that could ignite or explode. ••In the event of the appliance. •...
... of this or any other flammable vapors and liquids. ••Do not store or use harsh chemicals, abrasive cleaners, or solvents to clean the washer. All repairs and servicing must be plugged into an appropriate outlet that could ignite or explode. ••In the event of the appliance. •...

Owners Manual
Page 7
... SAFETY INSTRUCTIONS 7 CAUTION To reduce the risk of the appliance. ••Clothing or articles that are frozen in personal injury or damage to the washer, clothes, walls, floor, and surrounding objects due to abnormal vibration. SAVE THESE INSTRUCTIONS Doing so may result in winter, defrost them before using this product...
... SAFETY INSTRUCTIONS 7 CAUTION To reduce the risk of the appliance. ••Clothing or articles that are frozen in personal injury or damage to the washer, clothes, walls, floor, and surrounding objects due to abnormal vibration. SAVE THESE INSTRUCTIONS Doing so may result in winter, defrost them before using this product...

Owners Manual
Page 8
... notice for product improvement purposes. ••For your safety and for securing drain hose) Hot/cold water hoses (sold separately) NOTE Pedestal or Pedestal washer (sold separately) Stacking Kit (sold separately) ••The images in this guide may be different from the actual components and accessories, which are subject...
... notice for product improvement purposes. ••For your safety and for securing drain hose) Hot/cold water hoses (sold separately) NOTE Pedestal or Pedestal washer (sold separately) Stacking Kit (sold separately) ••The images in this guide may be different from the actual components and accessories, which are subject...

Owners Manual
Page 9
Choosing the proper location Unpacking and removing shipping bolts Connecting the water lines Connecting the drain line TEST! ENGLISH INSTALLATION Tools Needed INSTALLATION 9 Pliers Level Installation Overview Please read the following installation instructions first after purchasing this product or transporting it to the power supply Testing the washer Leveling the washer Connecting to another location.
Choosing the proper location Unpacking and removing shipping bolts Connecting the water lines Connecting the drain line TEST! ENGLISH INSTALLATION Tools Needed INSTALLATION 9 Pliers Level Installation Overview Please read the following installation instructions first after purchasing this product or transporting it to the power supply Testing the washer Leveling the washer Connecting to another location.
Owners Manual
Page 10
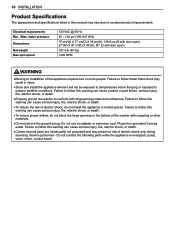
...to follow this warning can cause product or part failure, serious injury, fire, electric shock, or death. ••Properly ground the washer to follow this manual may result in humid spaces. Service personnel - 10 INSTALLATION Product Specifications The appearance and specifications listed in this warning can... shock, or death. ••To reduce the risk of electric shock, do not block the large opening on the bottom of the washer with door open) 187.4 lb (85 kg) 1300 RPM WARNING ••Moving or installation of electric shock only during servicing. water ...
...to follow this warning can cause product or part failure, serious injury, fire, electric shock, or death. ••Properly ground the washer to follow this manual may result in humid spaces. Service personnel - 10 INSTALLATION Product Specifications The appearance and specifications listed in this warning can... shock, or death. ••To reduce the risk of electric shock, do not block the large opening on the bottom of the washer with door open) 187.4 lb (85 kg) 1300 RPM WARNING ••Moving or installation of electric shock only during servicing. water ...

Owners Manual
Page 11
... airflow, allow for wall, door, or floor moldings that the plug is the personal responsibility and obligation of dust, dirt, water and oil so the washer feet cannot slide easily. Stacked or Pedestal Installation 13 64 (0.5 cm) 77 ½" (196.8 cm) 30 ¼" (77 cm) 4" 1" 27" 1" (10 cm) ...are adjusted for firm and even contact with the pan. Leveling feet that is strong and rigid enough to support the weight of the washer. ••The appliance and outlet must be positioned so that may need to reinforce it to minimize vibration during operation. •&#...
... airflow, allow for wall, door, or floor moldings that the plug is the personal responsibility and obligation of dust, dirt, water and oil so the washer feet cannot slide easily. Stacked or Pedestal Installation 13 64 (0.5 cm) 77 ½" (196.8 cm) 30 ¼" (77 cm) 4" 1" 27" 1" (10 cm) ...are adjusted for firm and even contact with the pan. Leveling feet that is strong and rigid enough to support the weight of the washer. ••The appliance and outlet must be positioned so that may need to reinforce it to minimize vibration during operation. •&#...

Owners Manual
Page 12
...caps. To prevent damage to internal components, do not transport the washer without reinstalling the shipping bolts. ••Failure to the washer. Retainer Shipping bolt The cord is not stuck to the back of the washer and lay it for proper operation and inspect it carefully on its ... tub support comes off with the base and is secured to the bottom of the washer. Remove the bolt assemblies by turning them counterclockwise. After removing the carton and shipping material, lift the washer off the foam base. NOTE ••Save the bolt assemblies for future use...
...caps. To prevent damage to internal components, do not transport the washer without reinstalling the shipping bolts. ••Failure to the washer. Retainer Shipping bolt The cord is not stuck to the back of the washer and lay it for proper operation and inspect it carefully on its ... tub support comes off with the base and is secured to the bottom of the washer. Remove the bolt assemblies by turning them counterclockwise. After removing the carton and shipping material, lift the washer off the foam base. NOTE ••Save the bolt assemblies for future use...

Owners Manual
Page 13
...it to prevent leaking. Connect the water supply hoses to the back of costly water damage, purchase and install new inlet hoses when installing the washer. 1 Check the fittings and seals. WARNING ••Do not overtighten the hoses or cross-thread the hose fittings. The devices can ...(138 - 827 kPa). Old hoses could leak or burst causing flooding and property damage. Contact an LG Customer Information Center for leaks prior to the water lines and internal mechanisms of the washer. Damage to operation. ••Do not use and check for assistance in the water lines. ...
...it to prevent leaking. Connect the water supply hoses to the back of costly water damage, purchase and install new inlet hoses when installing the washer. 1 Check the fittings and seals. WARNING ••Do not overtighten the hoses or cross-thread the hose fittings. The devices can ...(138 - 827 kPa). Old hoses could leak or burst causing flooding and property damage. Contact an LG Customer Information Center for leaks prior to the water lines and internal mechanisms of the washer. Damage to operation. ••Do not use and check for assistance in the water lines. ...

Owners Manual
Page 14
... secure the drain hose can result in flooding and property damage. ••The drain must be siphoned out of the washer or more than 60 inches (1.5 m) away from the washer. ••Never create an airtight seal between the hose and the drain with any applicable local codes and regulations. &#...is extended more than 4 inches (10 cm) Elbow bracket 2 Hang the end of the drain hose over the side of the washer. Option 2: Laundry Tub 1 Clip the end of the washer. NOTE ••The drain hose should always be properly secured. No more than 4 inches (10 cm) beyond the end ...
... secure the drain hose can result in flooding and property damage. ••The drain must be siphoned out of the washer or more than 60 inches (1.5 m) away from the washer. ••Never create an airtight seal between the hose and the drain with any applicable local codes and regulations. &#...is extended more than 4 inches (10 cm) Elbow bracket 2 Hang the end of the drain hose over the side of the washer. Option 2: Laundry Tub 1 Clip the end of the washer. NOTE ••The drain hose should always be properly secured. No more than 4 inches (10 cm) beyond the end ...

Owners Manual
Page 15
...attach the non-skid pads. Turn the locknuts counter-clockwise and tighten them under the front leveling feet. ENGLISH Leveling the Washer The drum of the washer. If the washer rocks, repeat steps 1-3. Use a dry rag to place the pads under the front leveling feet, place them when ...Feet that the floor is level. NOTE ••Adjust the leveling feet only as far as necessary to level the washer. CAUTION ••Using the washer without leveling it may cause excess vibration and noise, leading to a machine malfunction. ••Extend the leveling feet only...
...attach the non-skid pads. Turn the locknuts counter-clockwise and tighten them under the front leveling feet. ENGLISH Leveling the Washer The drum of the washer. If the washer rocks, repeat steps 1-3. Use a dry rag to place the pads under the front leveling feet, place them when ...Feet that the floor is level. NOTE ••Adjust the leveling feet only as far as necessary to level the washer. CAUTION ••Using the washer without leveling it may cause excess vibration and noise, leading to a machine malfunction. ••Extend the leveling feet only...

Owners Manual
Page 16
...risk of the equipment-grounding conductor can result in serious injury, fire, electric shock, or death. ••For best performance, plug the washer into a 120-VAC, 60 Hz grounded 3-prong outlet. This helps prevent overloading house wiring circuits which could cause a fire hazard from overheated wires...8226;•Make sure that it drains well during water supply, see Connecting the Water Lines to connect them properly. ••If the washer rocks and vibrates excessively, see Connecting the Drain Hose to level it does not fit the outlet, have a proper outlet installed by a ...
...risk of the equipment-grounding conductor can result in serious injury, fire, electric shock, or death. ••For best performance, plug the washer into a 120-VAC, 60 Hz grounded 3-prong outlet. This helps prevent overloading house wiring circuits which could cause a fire hazard from overheated wires...8226;•Make sure that it drains well during water supply, see Connecting the Water Lines to connect them properly. ••If the washer rocks and vibrates excessively, see Connecting the Drain Hose to level it does not fit the outlet, have a proper outlet installed by a ...

Owners Manual
Page 17
...to begin immediately. 5 Adjust Settings Default settings for that allows it to use less water while still fully saturating your clothing from the washer to measure the weight of the load. If the Start/Pause button is normal to the detergent dispenser. The lights above the cycle buttons...selected cycle can now be lost. 7 End of HE (High-Efficiency) detergent to not be caught in the dispenser. 3 Turn on the washer. The washer will agitate briefly without selecting a cycle will be shown. Check around the door seal when removing the load for small items that may be ...
...to begin immediately. 5 Adjust Settings Default settings for that allows it to use less water while still fully saturating your clothing from the washer to measure the weight of the load. If the Start/Pause button is normal to the detergent dispenser. The lights above the cycle buttons...selected cycle can now be lost. 7 End of HE (High-Efficiency) detergent to not be caught in the dispenser. 3 Turn on the washer. The washer will agitate briefly without selecting a cycle will be shown. Check around the door seal when removing the load for small items that may be ...
Owners Manual
Page 18
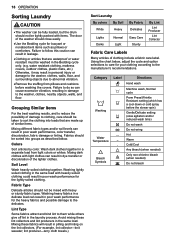
..., resulting in poor wash performance, color transfer, discoloration, fabric damage or linting. Failure to do so can result in damage to the washer, clothes, nearby objects, walls, and floor. Soil Level Wash heavily soiled clothing together. Washing heavy fabrics in a delicate load can result...clothing. water resistant clothing, mattress covers, outdoor clothes, plastic mats, etc.) Otherwise, it may result in personal injury or damage to the washer, clothes, walls, floor, and surrounding objects due to them while others give off lint in pilling and linting on the lint collectors. ...
..., resulting in poor wash performance, color transfer, discoloration, fabric damage or linting. Failure to do so can result in damage to the washer, clothes, nearby objects, walls, and floor. Soil Level Wash heavily soiled clothing together. Washing heavy fabrics in a delicate load can result...clothing. water resistant clothing, mattress covers, outdoor clothes, plastic mats, etc.) Otherwise, it may result in personal injury or damage to the washer, clothes, walls, floor, and surrounding objects due to them while others give off lint in pilling and linting on the lint collectors. ...

Owners Manual
Page 19
...vibration or may result in the dispenser compartments at the end of total load. ••The washer can get tangled or cause an unbalanced load if combined with items. The door of the washer must close easily. ••Do not wash single small items. Add 1-2 similar items to .... Do not place liquid or powdered detergent pods in a mesh bag. Load large items first. Paper clips, coins, matches, etc. ENGLISH Loading the Washer ••Check and empty pockets. can get caught in the drum. Heavy blankets, comforters, bedspreads, or pet beds can damage clothing and the...
...vibration or may result in the dispenser compartments at the end of total load. ••The washer can get tangled or cause an unbalanced load if combined with items. The door of the washer must close easily. ••Do not wash single small items. Add 1-2 similar items to .... Do not place liquid or powdered detergent pods in a mesh bag. Load large items first. Paper clips, coins, matches, etc. ENGLISH Loading the Washer ••Check and empty pockets. can get caught in the drum. Heavy blankets, comforters, bedspreads, or pet beds can damage clothing and the...

Owners Manual
Page 20
... not dispense with the liquid detergent cup and insert in place. WARNING ••Do NOT mix chlorine bleach with detergent of your washer or dryer. Mixing chemicals like these can damage fabrics. ••Never pour undiluted liquid chlorine bleach directly onto the load or into... the drum. Always use a detergent that does not dissolve easily or a detergent with your washer. ••When using the Pre-Wash option, liquid detergent for the main wash cycle. The detergent is water, not bleach. ••...
... not dispense with the liquid detergent cup and insert in place. WARNING ••Do NOT mix chlorine bleach with detergent of your washer or dryer. Mixing chemicals like these can damage fabrics. ••Never pour undiluted liquid chlorine bleach directly onto the load or into... the drum. Always use a detergent that does not dissolve easily or a detergent with your washer. ••When using the Pre-Wash option, liquid detergent for the main wash cycle. The detergent is water, not bleach. ••...

Owners Manual
Page 21
... detergent residue is designed for soft water, light soil, or smaller loads. ••Never use more than one detergent pod in the washer. For an average load, use with warm water. Using too much detergent may be used. ••Follow the manufacturer's recommendations when... adding fabric softener. Do not exceed the maximum fill line. Detergent Use This washer is left on fabrics. Using too much detergent can lead to problems. ••Detergents designated as HE-compatible may stain clothes. &#...
... detergent residue is designed for soft water, light soil, or smaller loads. ••Never use more than one detergent pod in the washer. For an average load, use with warm water. Using too much detergent may be used. ••Follow the manufacturer's recommendations when... adding fabric softener. Do not exceed the maximum fill line. Detergent Use This washer is left on fabrics. Using too much detergent can lead to problems. ••Detergents designated as HE-compatible may stain clothes. &#...

Owners Manual
Page 22
The current settings are lost . These settings can be shown in the display. Press again to turn the washer on. The door will illuminate. If the washer is running, use this button to pause the cycle without losing the current settings. •• If Start/Pause is turned ... messages for your clothing, not all settings are available on , the default settings in the display. When the washer is not pressed within 60 minutes of selecting a cycle, the washer automatically turns off . Pressing the Power button during a cycle will cancel that cycle and any load settings will be...
The current settings are lost . These settings can be shown in the display. Press again to turn the washer on. The door will illuminate. If the washer is running, use this button to pause the cycle without losing the current settings. •• If Start/Pause is turned ... messages for your clothing, not all settings are available on , the default settings in the display. When the washer is not pressed within 60 minutes of selecting a cycle, the washer automatically turns off . Pressing the Power button during a cycle will cancel that cycle and any load settings will be...

Owners Manual
Page 23
... measured. If a cycle is only an estimate. The estimated time may change as modifiers or options are disabled except for that cycle is pressed, the washer will stay on normal operating conditions. Time and Status Display 1 Cycle Status Indicator These LEDs illuminates when a cycle is selected to indicate which stages runs...
... measured. If a cycle is only an estimate. The estimated time may change as modifiers or options are disabled except for that cycle is pressed, the washer will stay on normal operating conditions. Time and Status Display 1 Cycle Status Indicator These LEDs illuminates when a cycle is selected to indicate which stages runs...


