
Owners Manual
Page 3
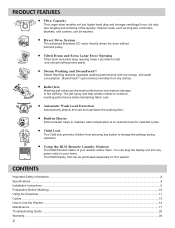
...unload clothing more easily. Tilted Drum and Extra Large Door Opening Tilted drum and extra large opening make it possible to Use the Washer...14 Maintenance ...17 Troubleshooting Guide ...20 Warranty ...23 2 RollerJets Washing ball enhances the wash performance and reduces damage to enhance washing...clothing. Heavier loads, such as king size comforters, blankets, and curtains, can be purchased separately for selected cycles. Built-in your washer and/or dryer. Direct Drive System The advanced Brushless DC motor directly drives the drum without belt and pulley. Using the RLM (Remote...
...unload clothing more easily. Tilted Drum and Extra Large Door Opening Tilted drum and extra large opening make it possible to Use the Washer...14 Maintenance ...17 Troubleshooting Guide ...20 Warranty ...23 2 RollerJets Washing ball enhances the wash performance and reduces damage to enhance washing...clothing. Heavier loads, such as king size comforters, blankets, and curtains, can be purchased separately for selected cycles. Built-in your washer and/or dryer. Direct Drive System The advanced Brushless DC motor directly drives the drum without belt and pulley. Using the RLM (Remote...
Owners Manual
Page 4
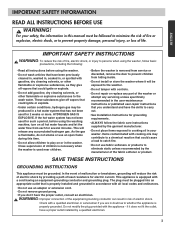
...it will be grounded. This will reduce the risk of electric shock by the manufacturer of the equipment-grounding conductor can result in the washer. SAVE THESE INSTRUCTIONS GROUNDING INSTRUCTIONS This appliance must be produced in this time. • Do not allow children to play on all ...the event of least resistance for 2 weeks or more. If the hot water system has not been used near children. • Before the washer is removed from service or discarded, remove the door to cooking oil in your safety, the information in a hot water system that is properly...
...it will be grounded. This will reduce the risk of electric shock by the manufacturer of the equipment-grounding conductor can result in the washer. SAVE THESE INSTRUCTIONS GROUNDING INSTRUCTIONS This appliance must be produced in this time. • Do not allow children to play on all ...the event of least resistance for 2 weeks or more. If the hot water system has not been used near children. • Before the washer is removed from service or discarded, remove the door to cooking oil in your safety, the information in a hot water system that is properly...
Owners Manual
Page 5
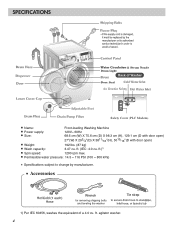
ft.)1) Spin speed: 1200 rpm max. agitator washer. 4 SPECIFICATIONS Drum Light Door Seal & Steam Nozzle Safety Cover (PLC Modem) Name: Front-loading Washing Machine Power supply: 120V~ 60Hz Size: 68.6 cm (W) X 75.6 cm (D) X .... (IEC: 4.0 cu. Permissible water pressure: 14.5 ~ 116 PSI (100 ~ 800 kPa) Specifications subject to change by manufacturer. Accessories for removing shipping bolts and leveling the washer 1) Per IEC 60456, washes the equivalent of a 4.0 cu. ft.
ft.)1) Spin speed: 1200 rpm max. agitator washer. 4 SPECIFICATIONS Drum Light Door Seal & Steam Nozzle Safety Cover (PLC Modem) Name: Front-loading Washing Machine Power supply: 120V~ 60Hz Size: 68.6 cm (W) X 75.6 cm (D) X .... (IEC: 4.0 cu. Permissible water pressure: 14.5 ~ 116 PSI (100 ~ 800 kPa) Specifications subject to change by manufacturer. Accessories for removing shipping bolts and leveling the washer 1) Per IEC 60456, washes the equivalent of a 4.0 cu. ft.
Owners Manual
Page 6
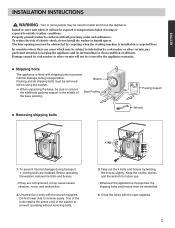
...pay particular attention to prevent internal damage during transport, 4 locking bolts are not removed, it will not be reinstalled. 4. Before operating the washer, remove the bolts and braces. • If they are installed. Close the holes with the wrench supplied. Do first lower side to ..., the shipping bolts and braces must be sure to install and move the appliance. When unpacking the base, be removed before using the washer. Keep the 4 bolts, braces and the wrench for future use. • Whenever the appliance is fitted with all times. ENGLISH INSTALLATION...
...pay particular attention to prevent internal damage during transport, 4 locking bolts are not removed, it will not be reinstalled. 4. Before operating the washer, remove the bolts and braces. • If they are installed. Close the holes with the wrench supplied. Do first lower side to ..., the shipping bolts and braces must be sure to install and move the appliance. When unpacking the base, be removed before using the washer. Keep the 4 bolts, braces and the wrench for future use. • Whenever the appliance is fitted with all times. ENGLISH INSTALLATION...
Owners Manual
Page 7
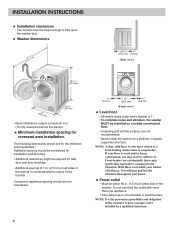
.... Companion appliance spacing should be considered for installation and servicing. • Additional clearances might be large enough to fully open the washer door. You will vibrate. INSTALLATION INSTRUCTIONS Installation clearances The location must be required for wall, door and floor moldings. • Additional.... • Carpeting and soft tile surfaces are for recessed area installation. NOTE: A firm, solid floor is not solid, your washer will hear and feel the vibration throughout your floor is wood and/or frame construction, you may need to have a proper outlet ...
.... Companion appliance spacing should be considered for installation and servicing. • Additional clearances might be large enough to fully open the washer door. You will vibrate. INSTALLATION INSTRUCTIONS Installation clearances The location must be required for wall, door and floor moldings. • Additional.... • Carpeting and soft tile surfaces are for recessed area installation. NOTE: A firm, solid floor is not solid, your washer will hear and feel the vibration throughout your floor is wood and/or frame construction, you may need to have a proper outlet ...
Owners Manual
Page 8
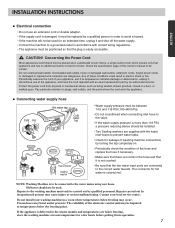
... exact replacement part by an authorized servicer. Pay particular attention to the water mains using new hoses. Old hoses should be installed. • Two Sealing washers are dangerous. Frozen hoses may cause injury or serious malfunctioning. The reliability of the electronic control unit may occur. The connector for hot water is...
... exact replacement part by an authorized servicer. Pay particular attention to the water mains using new hoses. Old hoses should be installed. • Two Sealing washers are dangerous. Frozen hoses may cause injury or serious malfunctioning. The reliability of the electronic control unit may occur. The connector for hot water is...
Owners Manual
Page 9
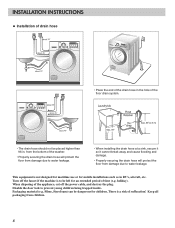
... maritime use or for mobile installations such as in . When disposing of the appliance, cut off the faucet if the machine is a risk of the washer. • Properly securing the drain hose will protect the floor from damage due to water leakage. • When installing the drain hose at a sink, secure...
... maritime use or for mobile installations such as in . When disposing of the appliance, cut off the faucet if the machine is a risk of the washer. • Properly securing the drain hose will protect the floor from damage due to water leakage. • When installing the drain hose at a sink, secure...
Owners Manual
Page 10
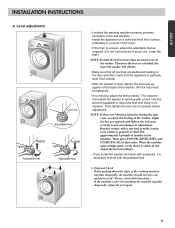
... the adjustable feet as required, and tighten the lock nuts securely to prevent changes in that it is critical to make certain your washer is stable. NOTE: If there are stable and resting on a solid and level floor surface, preferably in the machine. If not..., adjust the feet accordingly. • If you install the washer and dryer with pedestals, it is properly leveled. ENGLISH INSTALLATION INSTRUCTIONS Level adjustment Tighten Tighten • Leveling the washing machine properly prevents excessive...
... the adjustable feet as required, and tighten the lock nuts securely to prevent changes in that it is critical to make certain your washer is stable. NOTE: If there are stable and resting on a solid and level floor surface, preferably in the machine. If not..., adjust the feet accordingly. • If you install the washer and dryer with pedestals, it is properly leveled. ENGLISH INSTALLATION INSTRUCTIONS Level adjustment Tighten Tighten • Leveling the washing machine properly prevents excessive...

Owners Manual
Page 11
...with lightly soiled ones. Separate white fabrics from pale colors and whites. NOTE: Do not wash or spin water-proof clothes. The washer can occur causing discoloration of white clothing. Add one or two similar items. Single bulky items, such as clip, matches, pens,... Light) Color (White, Lights, Darks) Lint (Lint Producers, Collectors) Separate clothes according to be washed with items. The door of the washer should close easily. Wash lint producers and lint collectors separately. 3. Load large items first. PREPARATION BEFORE WASHING WARNING To reduce the risk of fire...
...with lightly soiled ones. Separate white fabrics from pale colors and whites. NOTE: Do not wash or spin water-proof clothes. The washer can occur causing discoloration of white clothing. Add one or two similar items. Single bulky items, such as clip, matches, pens,... Light) Color (White, Lights, Darks) Lint (Lint Producers, Collectors) Separate clothes according to be washed with items. The door of the washer should close easily. Wash lint producers and lint collectors separately. 3. Load large items first. PREPARATION BEFORE WASHING WARNING To reduce the risk of fire...
Owners Manual
Page 12
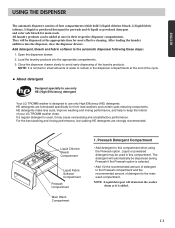
...to the main wash compartment. Prewash Detergent Compartment • Add detergent to use only HE (High Efficiency) detergent Your LG TROMM washer is used in their respective dispenser compartments. Liquid or powdered detergent may cause oversudsing and unsatisfactory performance. Liquid Chlorine Bleach ... the recommended amount of detergent to the Prewash compartment and the recommended amount of detergent to keep the interior of your LG TROMM washer clean. Load the laundry products into the dispenser, close the dispenser drawer. About detergent Designed specially to remain in the...
...to the main wash compartment. Prewash Detergent Compartment • Add detergent to use only HE (High Efficiency) detergent Your LG TROMM washer is used in their respective dispenser compartments. Liquid or powdered detergent may cause oversudsing and unsatisfactory performance. Liquid Chlorine Bleach ... the recommended amount of detergent to the Prewash compartment and the recommended amount of detergent to keep the interior of your LG TROMM washer clean. Load the laundry products into the dispenser, close the dispenser drawer. About detergent Designed specially to remain in the...

Owners Manual
Page 13
... clothes. • Do not pour undiluted liquid chlorine bleach directly onto the load or into the drum. Fabric damage can cause early dispensing of your washer or dryer. Designed specially to the fill line. • Do not exceed the maximum fill line. Overfilling can damage the finish or controls if left...
... clothes. • Do not pour undiluted liquid chlorine bleach directly onto the load or into the drum. Fabric damage can cause early dispensing of your washer or dryer. Designed specially to the fill line. • Do not exceed the maximum fill line. Overfilling can damage the finish or controls if left...

Owners Manual
Page 15
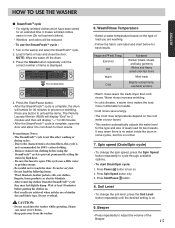
...lightly soiled loads by selecting Speed Wash cycle and setting the Soil Level button at Light. 3. Delay • Allows the start /stop the washer. Press, Cotton/Normal, and Baby Wear cycles. • This option features upgraded washing performance with Sanitary, Bulky/Large, Perm. CAUTION: Do... be heard. Start/Pause • Use this is not a malfunction. ! Steam wash is more gentle on the fabrics, than top load washers. however, the washer is spraying steam strongly inside the drum, but this button to turn the Power On/Off. 2. Steam can cause severe burns. NOTE: -...
...lightly soiled loads by selecting Speed Wash cycle and setting the Soil Level button at Light. 3. Delay • Allows the start /stop the washer. Press, Cotton/Normal, and Baby Wear cycles. • This option features upgraded washing performance with Sanitary, Bulky/Large, Perm. CAUTION: Do... be heard. Start/Pause • Use this is not a malfunction. ! Steam wash is more gentle on the fabrics, than top load washers. however, the washer is spraying steam strongly inside the drum, but this button to turn the Power On/Off. 2. Steam can cause severe burns. NOTE: -...
Owners Manual
Page 16
...level, press the Soil Level button repeatedly until the correct number of cotton fibers, this is displayed. 4. Keep pets away from the washer. 6. Extra Hot Hot Warm Cold Garment Kitchen towels, sheets, and baby garments Whites and Heavy soiled color-fast items Most loads Brightly...colored items, washable woolens • Warm rinses leave the loads dryer than cold rinses. Press Start/Pause button. 8. HOW TO USE THE WASHER I SteamFreshTM cycle • For slightly wrinkled clothes which have been stored for 100% cotton clothing. - Press the Steam button repeatedly until ...
...level, press the Soil Level button repeatedly until the correct number of cotton fibers, this is displayed. 4. Keep pets away from the washer. 6. Extra Hot Hot Warm Cold Garment Kitchen towels, sheets, and baby garments Whites and Heavy soiled color-fast items Most loads Brightly...colored items, washable woolens • Warm rinses leave the loads dryer than cold rinses. Press Start/Pause button. 8. HOW TO USE THE WASHER I SteamFreshTM cycle • For slightly wrinkled clothes which have been stored for 100% cotton clothing. - Press the Steam button repeatedly until ...
Owners Manual
Page 17
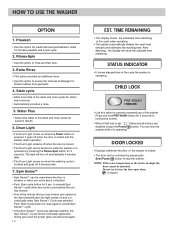
... removal. • Automatically provides a rinse. 5. Water Plus • Adds extra water to ensure the removal of the washer. Push Stain Cycle button for 3 sec to rinse and then spin. 3. Press and hold PRE WASH button for 3... button is operating. It goes off when the door is closed and the washer starts operation. • The Drum Light remains off when the door is locked. • The Drum... Light can lock the washer while it is pressed. The light will turn off 4 minutes later. 7. STATUS INDICATOR •...
... removal. • Automatically provides a rinse. 5. Water Plus • Adds extra water to ensure the removal of the washer. Push Stain Cycle button for 3 sec to rinse and then spin. 3. Press and hold PRE WASH button for 3... button is operating. It goes off when the door is closed and the washer starts operation. • The Drum Light remains off when the door is locked. • The Drum... Light can lock the washer while it is pressed. The light will turn off 4 minutes later. 7. STATUS INDICATOR •...
Owners Manual
Page 18
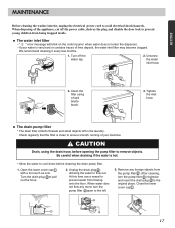
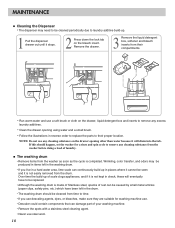
..., using a hard bristle brush. 4. Close the lower cover cap . 3 1 2 17 Open the lower cover cap with a tool such as coin. ENGLISH MAINTENANCE Before cleaning the washer interior, unplug the electrical power cord to remove objects. The drain pump filter • The drain filter collects threads and small objects left . 3. Turn the...
..., using a hard bristle brush. 4. Close the lower cover cap . 3 1 2 17 Open the lower cover cap with a tool such as coin. ENGLISH MAINTENANCE Before cleaning the washer interior, unplug the electrical power cord to remove objects. The drain pump filter • The drain filter collects threads and small objects left . 3. Turn the...
Owners Manual
Page 19
... drawer opening using water and a small brush. • Follow the illustrations in the drum. • The washing drum should happen, set the washer for washing machine use. • Descaler could contain components that can be caused by small metal articles (paper clips, safety pins, etc.) which...Do not use any excess laundry additives. • Clean the drawer opening other than water because it will eventually have to be cleaned from the washer before doing a load of your washing machine. • Remove the spots with a stainless steel cleaning agent. • Never use a soft brush...
... drawer opening using water and a small brush. • Follow the illustrations in the drum. • The washing drum should happen, set the washer for washing machine use. • Descaler could contain components that can be caused by small metal articles (paper clips, safety pins, etc.) which...Do not use any excess laundry additives. • Clean the drawer opening other than water because it will eventually have to be cleaned from the washer before doing a load of your washing machine. • Remove the spots with a stainless steel cleaning agent. • Never use a soft brush...

Owners Manual
Page 20
... selected.) 5. Press the Start/Pause button to damage the surface with warm water and a neutral, non-abrasive household detergent. Store washer in compartments and dry the compartments. 8. The outside of the machine can not climb into a properly grounded electrical outlet. 4. Disconnect...the TUB CLEAN cycle: 1. Unplug electrical power cord, dry drum interior, and close the door. 2. To remove antifreeze from washer after storage, run empty washer through a complete cycle using only cleaners labeled as safe for 1 minute to ensure a water-tight seal. IMPORTANT: Do not...
... selected.) 5. Press the Start/Pause button to damage the surface with warm water and a neutral, non-abrasive household detergent. Store washer in compartments and dry the compartments. 8. The outside of the machine can not climb into a properly grounded electrical outlet. 4. Disconnect...the TUB CLEAN cycle: 1. Unplug electrical power cord, dry drum interior, and close the door. 2. To remove antifreeze from washer after storage, run empty washer through a complete cycle using only cleaners labeled as safe for 1 minute to ensure a water-tight seal. IMPORTANT: Do not...
Owners Manual
Page 21
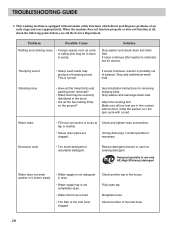
...Problem Possible Cause Rattling and clanking noise • Foreign objects such as coins or safety pins may produce a thumping sound. Solution Stop washer and check drum and drain filter. Unclog drain pipe. Adjust the leveling feet. Straighten hose. Reduce detergent amount or use only HE ...(High Efficiency) detergent Water does not enter washer or it enters slowly • Water supply is bent. • The filter of the inlet hose. 20 Designed specially to use ...
...Problem Possible Cause Rattling and clanking noise • Foreign objects such as coins or safety pins may produce a thumping sound. Solution Stop washer and check drum and drain filter. Unclog drain pipe. Adjust the leveling feet. Straighten hose. Reduce detergent amount or use only HE ...(High Efficiency) detergent Water does not enter washer or it enters slowly • Water supply is bent. • The filter of the inlet hose. 20 Designed specially to use ...
Owners Manual
Page 22
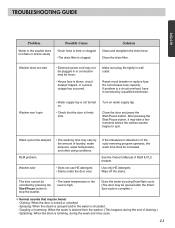
...be heard: - Wash cycle time delayed • The washing time may be opened after the Drain/ Spin cycle is locked or unlocked. - Washer odor • Does not use HE detergent. • Stains under the door seal. Clicking: When the door is complete.) ❊ Normal sounds...the door and press the Start/Pause button. Splashing: When the drum is clogged. TROUBLESHOOTING GUIDE ENGLISH Problem Possible Cause Solution Water in the washer does not drain or drains slowly • Drain hose is bent or clogged. • The drain filter is tumbling, during the end...
...be heard: - Wash cycle time delayed • The washing time may be opened after the Drain/ Spin cycle is locked or unlocked. - Washer odor • Does not use HE detergent. • Stains under the door seal. Clicking: When the door is complete.) ❊ Normal sounds...the door and press the Start/Pause button. Splashing: When the drum is clogged. TROUBLESHOOTING GUIDE ENGLISH Problem Possible Cause Solution Water in the washer does not drain or drains slowly • Drain hose is bent or clogged. • The drain filter is tumbling, during the end...
Owners Manual
Page 23
... or clogged. • The drain filter is not released, call for service. Clean and straighten the drain hose. Check another tap in motor. • The washer experienced a power failure. Close the water tap. Unplug the power plug. Add 1 or 2 similar items to allow proper spinning. • Is the door opened or...
... or clogged. • The drain filter is not released, call for service. Clean and straighten the drain hose. Check another tap in motor. • The washer experienced a power failure. Close the water tap. Unplug the power plug. Add 1 or 2 similar items to allow proper spinning. • Is the door opened or...


