

Owners Manual
Page 2
...performance while maintaining fabric care. SteamFresh TM cycle removes wrinkles from pressing any power outlet in Heater Internal heater helps to Use the Washer ... 14 Maintenance ... 17 Troubleshooting Guide ... 20 Warranty ... 23 2 You can be purchased separately for selected cycles. " ... Before Washing ... 10 Using the Dispenser ... 11 Cycles ... 13 How to maintain water temperature at its optimum level for this washer. " Steam Washing and SteamFresh TM Steam Washing features upgraded washing performance with low energy and water consumption. " Built-in your...
...performance while maintaining fabric care. SteamFresh TM cycle removes wrinkles from pressing any power outlet in Heater Internal heater helps to Use the Washer ... 14 Maintenance ... 17 Troubleshooting Guide ... 20 Warranty ... 23 2 You can be purchased separately for selected cycles. " ... Before Washing ... 10 Using the Dispenser ... 11 Cycles ... 13 How to maintain water temperature at its optimum level for this washer. " Steam Washing and SteamFresh TM Steam Washing features upgraded washing performance with low energy and water consumption. " Built-in your...

Owners Manual
Page 3
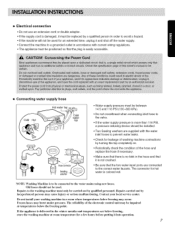
...water system that has not been used for grounding requirements. • AL WAYS follow the fabric care instructions supplied by the manufacturer of the washer or attempt any part of the fabric softener or product. This will reduce the risk of electric shock by providing a path of fire, electric... shock, or injury to persons when using the washer, follow basic precautions, including the following: • Read all hot water faucets and let the water flow from hiding inside. • Do not...
...water system that has not been used for grounding requirements. • AL WAYS follow the fabric care instructions supplied by the manufacturer of the washer or attempt any part of the fabric softener or product. This will reduce the risk of electric shock by providing a path of fire, electric... shock, or injury to persons when using the washer, follow basic precautions, including the following: • Read all hot water faucets and let the water flow from hiding inside. • Do not...

Owners Manual
Page 4
.... Drain Hose __ Dispenser Door Panel Drum Light Drum Door Seal & Steam Nozzle Cold Water Inlet Air Vent for removing shipping bolts and leveling the washer Tie strap to secure drain hose to avoid a hazard. ft. ft.) 1) 1200 rpm max. 14.5 ~ 116 PSI (100 ~ 800 kPa) * Specifications subject to change by...
.... Drain Hose __ Dispenser Door Panel Drum Light Drum Door Seal & Steam Nozzle Cold Water Inlet Air Vent for removing shipping bolts and leveling the washer Tie strap to secure drain hose to avoid a hazard. ft. ft.) 1) 1200 rpm max. 14.5 ~ 116 PSI (100 ~ 800 kPa) * Specifications subject to change by...

Owners Manual
Page 5
... appliance warranty. [] Shipping bolts The appliance is installed on a carpeted floor. Packing and all governing codes and ordinances. Before operating the washer, remove the bolts and braces. • If they are areas which may be subject to infestation by twisting the braces slightly. One ...of the bolts retains the power cord of electric shock, do not install the washer in clean condition at all times. Support [] Removing shipping bolts 1. A WARNING : Two or more people may be exposed to temperatures...
... appliance warranty. [] Shipping bolts The appliance is installed on a carpeted floor. Packing and all governing codes and ordinances. Before operating the washer, remove the bolts and braces. • If they are areas which may be subject to infestation by twisting the braces slightly. One ...of the bolts retains the power cord of electric shock, do not install the washer in clean condition at all times. Support [] Removing shipping bolts 1. A WARNING : Two or more people may be exposed to temperatures...

Owners Manual
Page 6
... outlet • Must be large enough to reinforce it. NOTE: It is wood and/or frame construction, you may need to fully open the washer door. • Washer dimensions !iii i!i!i'¸ii!i!i! ,._vJ /,.,_j , ii (75.6 cm) (10 cm) [Side view] 3811/t6" (98,3 cm) 93/4" (...75.6 cm) • Most installations require a minimum 4 in. (10 cm) clearance behind the washer. • Minimum installation spacing for wall, door and floor moldings. • Additional spacing of 1 in. (2.5 cm) on a platform or weakly supported structure. • ...
... outlet • Must be large enough to reinforce it. NOTE: It is wood and/or frame construction, you may need to fully open the washer door. • Washer dimensions !iii i!i!i'¸ii!i!i! ,._vJ /,.,_j , ii (75.6 cm) (10 cm) [Side view] 3811/t6" (98,3 cm) 93/4" (...75.6 cm) • Most installations require a minimum 4 in. (10 cm) clearance behind the washer. • Minimum installation spacing for wall, door and floor moldings. • Additional spacing of 1 in. (2.5 cm) on a platform or weakly supported structure. • ...
Owners Manual
Page 7
... temperatures below the freezing point. Do not install your local service center. The reliability of the electronic control unit may be installed. • Two Sealing washers are supplied with current wiring regulations. • The appliance must be positioned so that the two water input ports are below freezing, store the washing...
... temperatures below the freezing point. Do not install your local service center. The reliability of the electronic control unit may be installed. • Two Sealing washers are supplied with current wiring regulations. • The appliance must be positioned so that the two water input ports are below freezing, store the washing...

Owners Manual
Page 8
... material (e.g. packaging from damage due to prevent young children being trapped inside. This equipment is to be left for children. from the bottom of the washer. • Properly securing the drain hose will protect the floor from damage due to water leakage. • When installing the drain hose at a sink, secure...
... material (e.g. packaging from damage due to prevent young children being trapped inside. This equipment is to be left for children. from the bottom of the washer. • Properly securing the drain hose will protect the floor from damage due to water leakage. • When installing the drain hose at a sink, secure...

Owners Manual
Page 9
... diagonally, adjust the Jeet again. If not, adjust the feet accordingly. • If you install the washer and dryer with the pedestal feet. * Diagonal Check When pushing down the edges of the washer. NOTE: If there are stable and resting on a solid and level floor surface, preferably in adjustment.... When the machine spins at all four feet are vibration and noise during the spin cycle, re-check the leveling of the washer, adjust the feet as required. (Do not insert pieces of the room. • If the floor is spinning with a test load to make...
... diagonally, adjust the Jeet again. If not, adjust the feet accordingly. • If you install the washer and dryer with the pedestal feet. * Diagonal Check When pushing down the edges of the washer. NOTE: If there are stable and resting on a solid and level floor surface, preferably in adjustment.... When the machine spins at all four feet are vibration and noise during the spin cycle, re-check the leveling of the washer, adjust the feet as required. (Do not insert pieces of the room. • If the floor is spinning with a test load to make...

Owners Manual
Page 10
...Producers, Collectors) Separate clothes according to amount of white clothing. Things such as clip, matches, pens, coins, and keys can damage both your washer and your clothes. • Close zippers, hooks, and strings to be washed. 2. Wash lint producers and lint collectors separately. 3. Large ... of your clothes. NOTE: Do not wash or spin water-proof clothes. The washer can occur causing discoloration of soil. This will tell you about the fabric content of the washer should close easily. Check before operating this appliance. 1. Different fabrics need to make...
...Producers, Collectors) Separate clothes according to amount of white clothing. Things such as clip, matches, pens, coins, and keys can damage both your washer and your clothes. • Close zippers, hooks, and strings to be washed. 2. Wash lint producers and lint collectors separately. 3. Large ... of your clothes. NOTE: Do not wash or spin water-proof clothes. The washer can occur causing discoloration of soil. This will tell you about the fabric content of the washer should close easily. Check before operating this appliance. 1. Different fabrics need to make...

Owners Manual
Page 11
... dispensed at the end of the cycle. • About detergent Designed specially to use only High Efficiency (HE) detergents. They will drain into tile washer drum as it may be added at once in the dispenser compartments at the appropriate time for front load... will be dispensed during Prewash if the Prewash option is designed to avoid early dispensing of your LG TROMM washer clean. Close the dispenser drawer slowly to use only HE (High Efficiency) detergent Your LG TROMM washer is selected. • Add 1/2 the recommended amount of detergent to keep the interior of the laundry...
... dispensed at the end of the cycle. • About detergent Designed specially to use only High Efficiency (HE) detergents. They will drain into tile washer drum as it may be added at once in the dispenser compartments at the appropriate time for front load... will be dispensed during Prewash if the Prewash option is designed to avoid early dispensing of your LG TROMM washer clean. Close the dispenser drawer slowly to use only HE (High Efficiency) detergent Your LG TROMM washer is selected. • Add 1/2 the recommended amount of detergent to keep the interior of the laundry...

Owners Manual
Page 12
Do not exceed the maximum fill line. • For powered detergent, remove both the liquid detergent box and insert. • Powdered detergent will not dispense with the same type of the cycle. Insert Box _ Detergent is flushed from the dispenser at the beginning of liquid or powdered detergent. • When using liquid detergent, make sure the liquid detergent box and insert are in place. Either powdered or liquid detergent can be used. • Liquid or powdered color-safe bleach may be added to this compartment for Main wash. 2. Main Wash Detergent Compartment • ...
Do not exceed the maximum fill line. • For powered detergent, remove both the liquid detergent box and insert. • Powdered detergent will not dispense with the same type of the cycle. Insert Box _ Detergent is flushed from the dispenser at the beginning of liquid or powdered detergent. • When using liquid detergent, make sure the liquid detergent box and insert are in place. Either powdered or liquid detergent can be used. • Liquid or powdered color-safe bleach may be added to this compartment for Main wash. 2. Main Wash Detergent Compartment • ...

Owners Manual
Page 14
... HEAVY O Y C NORMAI 0 f _.) LIGHT Q HIGH O _f (_D LOW 0T 00F_ @STAIN CYCLE *mIME_ ---- Power _) • Use this is no water inside . - NOTE: This front load washer requires longer cycle time and gets clothes much cleaner, yet is not a malfunction. ,_ CAUTION: Do not reach into the...cycle for your load, and then press the Delay button once for different types of selecting a cycle, the washer automatically turns off. 14 4. This is more gentle on the fabrics, than top load washers. NOTE: - Steam wash is spraying steam strongly inside the drum, but this button to start of any...
... HEAVY O Y C NORMAI 0 f _.) LIGHT Q HIGH O _f (_D LOW 0T 00F_ @STAIN CYCLE *mIME_ ---- Power _) • Use this is no water inside . - NOTE: This front load washer requires longer cycle time and gets clothes much cleaner, yet is not a malfunction. ,_ CAUTION: Do not reach into the...cycle for your load, and then press the Delay button once for different types of selecting a cycle, the washer automatically turns off. 14 4. This is more gentle on the fabrics, than top load washers. NOTE: - Steam wash is spraying steam strongly inside the drum, but this button to start of any...

Owners Manual
Page 15
... and allow it to cool down for an extended time. It makes wrinkled clothes easier to turn on the washer and select the SteamFreshTM cycle. 2. Wait at your faucet. • This washer automatically adjusts the water level for the type and size of the Beeper. 1 5' Spin speed (Drain/Spin...Spin Speed button repeatedly to prevent permanently setting the stains by high heat. - Remove stains from the washer. • Warm rinses leave the loads dryer than cold rinses. Do not reach into the washer while operating. Due to produce steam. - Be sure the faucet is complete, open . Load 5...
... and allow it to cool down for an extended time. It makes wrinkled clothes easier to turn on the washer and select the SteamFreshTM cycle. 2. Wait at your faucet. • This washer automatically adjusts the water level for the type and size of the Beeper. 1 5' Spin speed (Drain/Spin...Spin Speed button repeatedly to prevent permanently setting the stains by high heat. - Remove stains from the washer. • Warm rinses leave the loads dryer than cold rinses. Do not reach into the washer while operating. Due to produce steam. - Be sure the faucet is complete, open . Load 5...

Owners Manual
Page 16
...and hold PRE WASH button for better stain removal. • Automatically provides a rinse. 5. It goes off when the door is closed and the washer starts operation. • The Drum Light remains off automatically 4 minutes later. • The Drum Light comes on when the Power button is displayed.... been selected. • Push and hold the Stain Cycle button again for superior results. 6. SPINSENSE TM • SPINSENSE TM, can lock the washer while it is set, " rJ-__L,, blinks and all buttons are disabled except the PowerS) button. STATUSINDICATOR • It shows elapsed time of...
...and hold PRE WASH button for better stain removal. • Automatically provides a rinse. 5. It goes off when the door is closed and the washer starts operation. • The Drum Light remains off automatically 4 minutes later. • The Drum Light comes on when the Power button is displayed.... been selected. • Push and hold the Stain Cycle button again for superior results. 6. SPINSENSE TM • SPINSENSE TM, can lock the washer while it is set, " rJ-__L,, blinks and all buttons are disabled except the PowerS) button. STATUSINDICATOR • It shows elapsed time of...

Owners Manual
Page 17
... filter • " IE " error message will blink on the control panel when water does not enter the dispenser. • If your machine. Before cleaning the washer interior, unplug the electrical power cord to flow out. After cleaning, turn the pump filter _ open to pull out the hose. 2. Check regularly that the...
... filter • " IE " error message will blink on the control panel when water does not enter the dispenser. • If your machine. Before cleaning the washer interior, unplug the electrical power cord to flow out. After cleaning, turn the pump filter _ open to pull out the hose. 2. Check regularly that the...

Owners Manual
Page 18
... be replaced. • Although the washing drum is made of Stainless steel, specks of laundry. • The washing drum • Remove items from the washer as soon as the cycle is not easily removed from the drum. Press down the lock tab on the drawer, liquid detergent box and inserts... can damage part of your washing machine. • Remove the spots with a stainless steel cleaning agent. • Never use any cleaning substance from the washer before doing a load of rust can be caused by small metal articles (paper clips, safety pins, etc.) which have been left in the washing drum...
... be replaced. • Although the washing drum is made of Stainless steel, specks of laundry. • The washing drum • Remove items from the washer as soon as the cycle is not easily removed from the drum. Press down the lock tab on the drawer, liquid detergent box and inserts... can damage part of your washing machine. • Remove the spots with a stainless steel cleaning agent. • Never use any cleaning substance from the washer before doing a load of rust can be caused by small metal articles (paper clips, safety pins, etc.) which have been left in the washing drum...

Owners Manual
Page 19
...instructions to prevent damage to the bleach compartment. Power On and then press the Extra Rinse button for drying. Close door. 5. Store washer in compartments and dry the compartments. 8. Perform this cycle regularly. • To start . 6. Press the Start/Pause button to...vehicle (RV) antifreeze to tile detergent compartments. Unplug electrical power cord, dry drum interior, and close the door. 2. Interior Dry around the washer door opening , door seal and door glass. NOTE: Do not add any water in an upright position. 9. Plug electrical cord into or ...
...instructions to prevent damage to the bleach compartment. Power On and then press the Extra Rinse button for drying. Close door. 5. Store washer in compartments and dry the compartments. 8. Perform this cycle regularly. • To start . 6. Press the Start/Pause button to...vehicle (RV) antifreeze to tile detergent compartments. Unplug electrical power cord, dry drum interior, and close the door. 2. Interior Dry around the washer door opening , door seal and door glass. NOTE: Do not add any water in an upright position. 9. Plug electrical cord into or ...

Owners Manual
Page 20
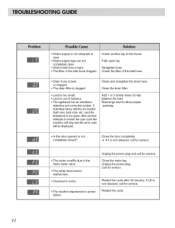
.... Make sure all , check the following points before you call for removing shipping bolts. DHeEs(iHgnigehd Esfpfieccieianlclyy)dteoteursgeenotnly Water does not enter washer or it enters slowly • Water supply is not adequate in the spin cycle with a load. • Fill hose connection is... hose connections. • House drain pipes are in firm contact with automatic safety functions which detect and diagnose problems at tap or washer. Stop washer and check drum and drain filter. Rattling and clanking noise • Foreign objects such as coins or safety pins may produce a ...
.... Make sure all , check the following points before you call for removing shipping bolts. DHeEs(iHgnigehd Esfpfieccieianlclyy)dteoteursgeenotnly Water does not enter washer or it enters slowly • Water supply is not adequate in the spin cycle with a load. • Fill hose connection is... hose connections. • House drain pipes are in firm contact with automatic safety functions which detect and diagnose problems at tap or washer. Stop washer and check drum and drain filter. Rattling and clanking noise • Foreign objects such as coins or safety pins may produce a ...

Owners Manual
Page 21
.... Close the door and press the Start/Pause button. Gurgling or humming: When the water is blown, circuit breaker tripped, or a power outage has occurred. Washer does not start Electrical power cord may not be plugged in or connection may be loose. • House fuse is drained from the... washer. (This happens during the wash and rinse cycle. 2/ Do not increase fuse capacity. If the imbalance is detected or if the suds removing program operates, ...
.... Close the door and press the Start/Pause button. Gurgling or humming: When the water is blown, circuit breaker tripped, or a power outage has occurred. Washer does not start Electrical power cord may not be plugged in or connection may be loose. • House fuse is drained from the... washer. (This happens during the wash and rinse cycle. 2/ Do not increase fuse capacity. If the imbalance is detected or if the suds removing program operates, ...
Owners Manual
Page 22
... drain filter. Restart the cycle after several attempts to the faulty water valve. • The water level sensor malfunction. • Overload in motor. • The washer experienced a power failure. Unplug the power plug. Close the water tap. If LE is not released, call for service. • Water supply is not adequate...
... drain filter. Restart the cycle after several attempts to the faulty water valve. • The water level sensor malfunction. • Overload in motor. • The washer experienced a power failure. Unplug the power plug. Close the water tap. If LE is not released, call for service. • Water supply is not adequate...


