Owner's Manual
Page 2
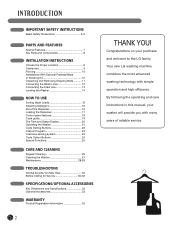
... with many years of reliable service. Congratulations on your washer will provide you with simple operation and high efficiency. By following the operating and care instructions in this manual, your purchase and welcome to the LG family. INTRODUCTION IMPORTANT SAFETY INSTRUCTIONS Basic Safety Precautions 3-6...23 Load size sensing system 23 Cycle Option Buttons 24 Special Functions 25 CARE AND CLEANING Regular Cleaning 26 Cleaning the Washer 27 Maintenance 28-29 TROUBLESHOOTING Normal Sounds You May Hear 30 Before Calling for Service 30-32 SPECIFICATIONS/OPTIONAL ACCESSORIES Key...
... with many years of reliable service. Congratulations on your washer will provide you with simple operation and high efficiency. By following the operating and care instructions in this manual, your purchase and welcome to the LG family. INTRODUCTION IMPORTANT SAFETY INSTRUCTIONS Basic Safety Precautions 3-6...23 Load size sensing system 23 Cycle Option Buttons 24 Special Functions 25 CARE AND CLEANING Regular Cleaning 26 Cleaning the Washer 27 Maintenance 28-29 TROUBLESHOOTING Normal Sounds You May Hear 30 Before Calling for Service 30-32 SPECIFICATIONS/OPTIONAL ACCESSORIES Key...
Owner's Manual
Page 4
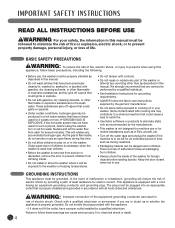
.... • Do not allow children to be left for electric current. These substances give off the water taps and unplug the washer if the machine is equipped with the appliance - We strongly recommend that any service be performed by providing a path of least resistance...Packaging material can be dangerous for foreign objects before using this appliance, follow basic precautions, including the following. • Before use, the washer must be plugged into an appropriate outlet that have a proper outlet installed by the garment manufacturer. • Do not place items exposed to...
.... • Do not allow children to be left for electric current. These substances give off the water taps and unplug the washer if the machine is equipped with the appliance - We strongly recommend that any service be performed by providing a path of least resistance...Packaging material can be dangerous for foreign objects before using this appliance, follow basic precautions, including the following. • Before use, the washer must be plugged into an appropriate outlet that have a proper outlet installed by the garment manufacturer. • Do not place items exposed to...
Owner's Manual
Page 5
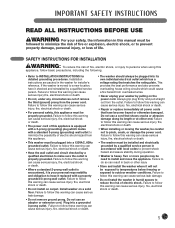
...with a standard 3-prong (grounding) wall outlet to minimize the possibillty of electric shock hazard from overheated wires. • Never unplug your washer by pulling on a solid floor. Failure to follow this warning can cause serious injury, fire, electrical shock or death.... properly grounded. Failure to follow this warning can cause serious injury, fire, electrical shock or death. • The washer should always be exposed to temperatures below freezing or exposed to outdoor weather conditions. Failure to follow these warnings can cause serious injury...
...with a standard 3-prong (grounding) wall outlet to minimize the possibillty of electric shock hazard from overheated wires. • Never unplug your washer by pulling on a solid floor. Failure to follow this warning can cause serious injury, fire, electrical shock or death.... properly grounded. Failure to follow this warning can cause serious injury, fire, electrical shock or death. • The washer should always be exposed to temperatures below freezing or exposed to outdoor weather conditions. Failure to follow these warnings can cause serious injury...
Owner's Manual
Page 6
... materials after laundering. Before loading, unloading or adding items, push in serious injury or death. • Do not reach into the washer while parts are soiled with ammonia or acids such as vinegar. Follow package directions when using this manual must be followed to minimize the... risk of fire or explosion, electric shock, or to clean the washer. Incorrect usage can result in this appliance, follow this appliance from the power supply. Children might use harsh chemicals, abrasive cleaners, or ...
... materials after laundering. Before loading, unloading or adding items, push in serious injury or death. • Do not reach into the washer while parts are soiled with ammonia or acids such as vinegar. Follow package directions when using this manual must be followed to minimize the... risk of fire or explosion, electric shock, or to clean the washer. Incorrect usage can result in this appliance, follow this appliance from the power supply. Children might use harsh chemicals, abrasive cleaners, or ...

Owner's Manual
Page 7
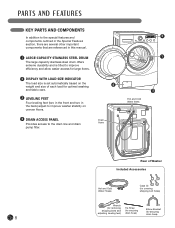
... spray clothes to further improve washing efficiency. 4 DIRECT-DRIVE MOTOR Direct-drive motor eliminates the belt and pulleys found on most washers to prevent the door from being opened until the washer interior has cooled and the water level has lowered. 3 ROLLERJETS The RollerJet system enhances wash 2 performance while reducing fabric wear...
... spray clothes to further improve washing efficiency. 4 DIRECT-DRIVE MOTOR Direct-drive motor eliminates the belt and pulleys found on most washers to prevent the door from being opened until the washer interior has cooled and the water level has lowered. 3 ROLLERJETS The RollerJet system enhances wash 2 performance while reducing fabric wear...
Owner's Manual
Page 8
...each load for optimal washing and fabric care. 3 LEVELING FEET Four leveling feet (two in the front and two in the back) adjust to improve washer stability on uneven floors. 4 DRAIN ACCESS PANEL Provides access to the drain line and drain pump filter. 4 Drain Hose 2 1 3 Hot and ...Cold Water Inlets Rear of Washer Included Accessories Hot and Cold Water Hoses Caps (4) (for covering shipping bolt holes) Wrench (for removing shipping bolts and adjusting leveling feet) Tie Strap (for...
...each load for optimal washing and fabric care. 3 LEVELING FEET Four leveling feet (two in the front and two in the back) adjust to improve washer stability on uneven floors. 4 DRAIN ACCESS PANEL Provides access to the drain line and drain pump filter. 4 Drain Hose 2 1 3 Hot and ...Cold Water Inlets Rear of Washer Included Accessories Hot and Cold Water Hoses Caps (4) (for covering shipping bolt holes) Wrench (for removing shipping bolts and adjusting leveling feet) Tie Strap (for...
Owner's Manual
Page 9
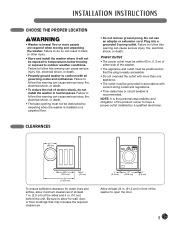
.... • The outlet must not be obstructed by a qualified electrician. Do not use an adapter or extension cord. Failure to do not install the washer in accordance with all governing codes and ordinances. Plug into a grounded 3-prong outlet. CLEARANCES 211/4" (54 cm) 293/4" (75.6 cm) 51" ...floor moldings that the plug is easily accessible. • Do not overload the outlet with more people are required when moving and unpacking the washer. Failure to open the door. 9 Failure to follow this warning can cause serious injury, fire, electrical shock, or death. ...
.... • The outlet must not be obstructed by a qualified electrician. Do not use an adapter or extension cord. Failure to do not install the washer in accordance with all governing codes and ordinances. Plug into a grounded 3-prong outlet. CLEARANCES 211/4" (54 cm) 293/4" (75.6 cm) 51" ...floor moldings that the plug is easily accessible. • Do not overload the outlet with more people are required when moving and unpacking the washer. Failure to open the door. 9 Failure to follow this warning can cause serious injury, fire, electrical shock, or death. ...

Owner's Manual
Page 10
...your pedestal or stacking kit before proceeding with the installation. Required Dimensions for Installation With Pedestal Required Dimensions for a top-loading washer may need to reinforce it to make it more rigid. INSTALLATIONS WITH OPTIONAL PEDESTAL BASE OR STACKING KIT IMPORTANT: If you may...on a platform or weakly supported structure. If your floor has too much flex in it, you are not recommended. • Never install the washer on a solidly constructed floor. A floor that the floor must be rigid enough for your house. NOTE: Please note that is 1°...
...your pedestal or stacking kit before proceeding with the installation. Required Dimensions for Installation With Pedestal Required Dimensions for a top-loading washer may need to reinforce it to make it more rigid. INSTALLATIONS WITH OPTIONAL PEDESTAL BASE OR STACKING KIT IMPORTANT: If you may...on a platform or weakly supported structure. If your floor has too much flex in it, you are not recommended. • Never install the washer on a solidly constructed floor. A floor that the floor must be rigid enough for your house. NOTE: Please note that is 1°...
Owner's Manual
Page 11
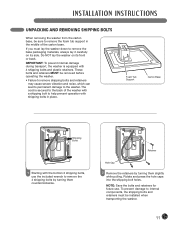
...Remove the retainers by turning them slightly while pulling. To prevent damage to internal components, the shipping bolts and retainers must lay the washer down to remove the 4 shipping bolts by turning them counterclockwise. NOTE: Save the bolts and retainers for future use the included wrench... plastic retainers. The cord is equipped with the bottom 2 shipping bolts, use . IMPORTANT: To prevent internal damage during transport, the washer is secured to the washer. Rotate and press the hole caps into the shipping bolt holes. If you must be removed before operating the...
...Remove the retainers by turning them slightly while pulling. To prevent damage to internal components, the shipping bolts and retainers must lay the washer down to remove the 4 shipping bolts by turning them counterclockwise. NOTE: Save the bolts and retainers for future use the included wrench... plastic retainers. The cord is equipped with the bottom 2 shipping bolts, use . IMPORTANT: To prevent internal damage during transport, the washer is secured to the washer. Rotate and press the hole caps into the shipping bolt holes. If you must be removed before operating the...
Owner's Manual
Page 12
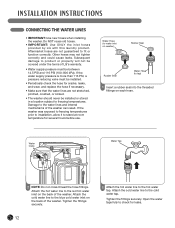
...O RTA N T: U s e O N LY t h e i n l e t h o s e s provided by LG with this laundry product. Aftermarket hoses are not stretched, pinched, crushed, or kinked. • The washer should never be covered under the terms of the washer. Subsequent damage to product or property will not be installed or stored in...hose fittings. INSTALLATION INSTRUCTIONS CONNECTING THE WATER LINES • IMPORTANT: Use new hoses when installing the washer. If the washer was exposed to freezing temperatures prior to installation, allow it to freezing temperatures. Attach the cold water line...
...O RTA N T: U s e O N LY t h e i n l e t h o s e s provided by LG with this laundry product. Aftermarket hoses are not stretched, pinched, crushed, or kinked. • The washer should never be covered under the terms of the washer. Subsequent damage to product or property will not be installed or stored in...hose fittings. INSTALLATION INSTRUCTIONS CONNECTING THE WATER LINES • IMPORTANT: Use new hoses when installing the washer. If the washer was exposed to freezing temperatures prior to installation, allow it to freezing temperatures. Attach the cold water line...

Owner's Manual
Page 13
...;ooding and property damage. • Do not install the end of the drain hose higher than 96 in. (244.8 cm) above the bottom of the washer. • The drain must be properly secured. Option 3: Floor Drain Drain Hose Floor Drain Insert the end of the drain hose into a standpipe. NOTE: Total... the elbow bracket. INSTALLATION INSTRUCTIONS CONNECTING THE DRAIN LINE • The drain hose should always be installed in . (244.8 cm) from the bottom of the washer. Failure to secure the drain hose in . (244.8 cm) from the bottom of the...
...;ooding and property damage. • Do not install the end of the drain hose higher than 96 in. (244.8 cm) above the bottom of the washer. • The drain must be properly secured. Option 3: Floor Drain Drain Hose Floor Drain Insert the end of the drain hose into a standpipe. NOTE: Total... the elbow bracket. INSTALLATION INSTRUCTIONS CONNECTING THE DRAIN LINE • The drain hose should always be installed in . (244.8 cm) from the bottom of the washer. Failure to secure the drain hose in . (244.8 cm) from the bottom of the...

Owner's Manual
Page 14
...noise, and unwanted movement, the floor must be fully retracted and locked into position with the locknuts. Level Leveling Feet Leveling Feet 1 Position the washer in the final location, taking special care to vibrate. • All four leveling feet must use the leveling feet on the floor....RINSE+SPIN, and then press the START/PAUSE button. See the following sections for additional information on all 4 leveling feet are installing the washer on the optional pedestal, you are in the machine. Extending the leveling feet more than necessary can turn the feet with the floor. ...
...noise, and unwanted movement, the floor must be fully retracted and locked into position with the locknuts. Level Leveling Feet Leveling Feet 1 Position the washer in the final location, taking special care to vibrate. • All four leveling feet must use the leveling feet on the floor....RINSE+SPIN, and then press the START/PAUSE button. See the following sections for additional information on all 4 leveling feet are installing the washer on the optional pedestal, you are in the machine. Extending the leveling feet more than necessary can turn the feet with the floor. ...

Owner's Manual
Page 15
... include instructions for proper care. HOW TO USE SORTING WASH LOADS Fabric Care Labels Most articles of the total washload. • The washer can be fully loaded, but the drum should not be tightly packed with lightly soiled ones. The chart below shows recommended groupings. Sort...wash dark colors separately from snagging or tangling on other clothes. • Pretreat heavily stained areas for small items. NOTE: The front loading washer rotates the wet laundry to wash it is not a problem because the laundry is sufficiently wet. 15 Items such as a blanket, comforter, ...
... include instructions for proper care. HOW TO USE SORTING WASH LOADS Fabric Care Labels Most articles of the total washload. • The washer can be fully loaded, but the drum should not be tightly packed with lightly soiled ones. The chart below shows recommended groupings. Sort...wash dark colors separately from snagging or tangling on other clothes. • Pretreat heavily stained areas for small items. NOTE: The front loading washer rotates the wet laundry to wash it is not a problem because the laundry is sufficiently wet. 15 Items such as a blanket, comforter, ...

Owner's Manual
Page 16
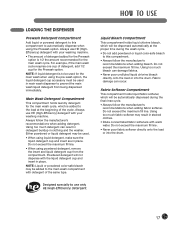
... IMPORTANT: Do not place or store laundry products, such as detergent, bleach, or liquid fabric softener, on top of your washer or dryer. All laundry products can damage the finish and controls. HE detergents produce fewer suds, dissolve more efficiently to improve ...Liquid Chlorine Bleach Compartment Liquid Fabric Softener Compartment To add detergent, bleach, and fabric softener to keep the interior of your washer clean. Main Wash Detergent Compartment Insert Liquid Detergent Cup Prewash Detergent Compartment 16 HE detergents are formulated specifically for the HE symbol...
... IMPORTANT: Do not place or store laundry products, such as detergent, bleach, or liquid fabric softener, on top of your washer or dryer. All laundry products can damage the finish and controls. HE detergents produce fewer suds, dissolve more efficiently to improve ...Liquid Chlorine Bleach Compartment Liquid Fabric Softener Compartment To add detergent, bleach, and fabric softener to keep the interior of your washer clean. Main Wash Detergent Compartment Insert Liquid Detergent Cup Prewash Detergent Compartment 16 HE detergents are formulated specifically for the HE symbol...
Owner's Manual
Page 17
... powdered color-safe bleach may result in stained clothes. • Dilute concentrated fabric softeners with the liquid detergent cup and insert in clothing and the washer. Using too much fabric softener may be added to the main wash compartment with your washing machine. • The amount of the same type.
... powdered color-safe bleach may result in stained clothes. • Dilute concentrated fabric softeners with the liquid detergent cup and insert in clothing and the washer. Using too much fabric softener may be added to the main wash compartment with your washing machine. • The amount of the same type.
Owner's Manual
Page 18
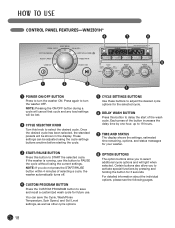
... settings will be shown in the display. For detailed information about the individual options, please see the following pages. 18 Press again to turn the washer OFF. Once the desired cycle has been selected, the standard presets will be adjusted using the cycle settings buttons anytime before starting the cycle. 3 ...up to PAUSE the cycle without losing the current settings. HOW TO USE CONTROL PANEL FEATURES-WM2301H* 4 7 6 8 1 2 3 1 POWER ON/OFF BUTTON Press to turn the washer ON. You can be lost. 2 CYCLE SELECTOR KNOB Turn this button to delay the start of the wash cycle.
... settings will be shown in the display. For detailed information about the individual options, please see the following pages. 18 Press again to turn the washer OFF. Once the desired cycle has been selected, the standard presets will be adjusted using the cycle settings buttons anytime before starting the cycle. 3 ...up to PAUSE the cycle without losing the current settings. HOW TO USE CONTROL PANEL FEATURES-WM2301H* 4 7 6 8 1 2 3 1 POWER ON/OFF BUTTON Press to turn the washer ON. You can be lost. 2 CYCLE SELECTOR KNOB Turn this button to delay the start of the wash cycle.
Owner's Manual
Page 20
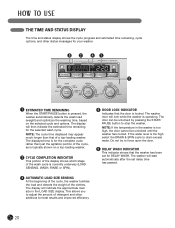
... cycle is currently underway (LOAD SENSING, WASH, RINSE or SPIN). 4 DOOR LOCK INDICATOR Indicates that of detergent and other status messages for your washer. 3 2 41 5 1 ESTIMATED TIME REMAINING When the START/PAUSE button is too high, the door cannot be unlocked by pressing the START/... PAUSE button to adjust the amount of a top-loading washer. The display will indicate the approximate load size in the washer is pressed, the washer automatically detects the wash load (weight) and optimizes the washing time, based on a top-loading...
... cycle is currently underway (LOAD SENSING, WASH, RINSE or SPIN). 4 DOOR LOCK INDICATOR Indicates that of detergent and other status messages for your washer. 3 2 41 5 1 ESTIMATED TIME REMAINING When the START/PAUSE button is too high, the door cannot be unlocked by pressing the START/... PAUSE button to adjust the amount of a top-loading washer. The display will indicate the approximate load size in the washer is pressed, the washer automatically detects the wash load (weight) and optimizes the washing time, based on a top-loading...

Owner's Manual
Page 21
... START/PAUSE. The door will latch, the display will change the settings for that cycle, press the appropriate cycle settings button(s) until the washer has cooled. Washing time can be unlocked until the indicator light for the desired setting is finished, the beeper (if set) will sound ...for the complete cycle, rather than that option. 5 Press the START/PAUSE button to begin the cycle. Once the washer has calculated the estimated total cycle time, the washer will illuminate. 2 Turn the cycle selector knob to the desired cycle. The displayed time is available with every cycle....
... START/PAUSE. The door will latch, the display will change the settings for that cycle, press the appropriate cycle settings button(s) until the washer has cooled. Washing time can be unlocked until the indicator light for the desired setting is finished, the beeper (if set) will sound ...for the complete cycle, rather than that option. 5 Press the START/PAUSE button to begin the cycle. Once the washer has calculated the estimated total cycle time, the washer will illuminate. 2 Turn the cycle selector knob to the desired cycle. The displayed time is available with every cycle....
Owner's Manual
Page 22
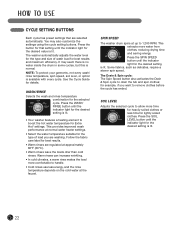
...8226; Warm rinses are selected automatically. The Drain & Spin cycle: The Spin Speed button also activates the Drain & Spin cycle to 1,200 RPM. The washer automatically adjusts the water level for the type and size of load you want to handle. • Cold rinses use less energy, and the rinse... water heater settings. • Select the water temperature suitable for the type of wash load for best results and maximum efficiency. SPIN SPEED The washer drum spins at approximately 86°F (30°C). • Warm rinses leave the loads drier than cold rinses. HOW TO USE CYCLE SETTING ...
...8226; Warm rinses are selected automatically. The Drain & Spin cycle: The Spin Speed button also activates the Drain & Spin cycle to 1,200 RPM. The washer automatically adjusts the water level for the type and size of load you want to handle. • Cold rinses use less energy, and the rinse... water heater settings. • Select the water temperature suitable for the type of wash load for best results and maximum efficiency. SPIN SPEED The washer drum spins at approximately 86°F (30°C). • Warm rinses leave the loads drier than cold rinses. HOW TO USE CYCLE SETTING ...
Owner's Manual
Page 23
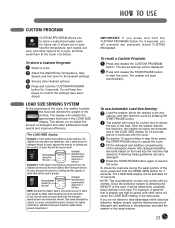
...the cycle, press and hold the CUSTOM PROGRAM button for 3 seconds. This saves detergent by pressing the START/PAUSE button. 2 The washer will show the detected size in the LOAD SIZE display for 10 seconds before it continues with other additives for heavily soiled loads, ...for best results and improved efficiency. You will cause the LOAD SIZE reading to resume the cycle. The LOAD SIZE display: Example 1: If the washer has detected a small load size, the display may show one lighted bar. For example, a garment that is greater. Never exceed manufacturer IMPORTANT:...
...the cycle, press and hold the CUSTOM PROGRAM button for 3 seconds. This saves detergent by pressing the START/PAUSE button. 2 The washer will show the detected size in the LOAD SIZE display for 10 seconds before it continues with other additives for heavily soiled loads, ...for best results and improved efficiency. You will cause the LOAD SIZE reading to resume the cycle. The LOAD SIZE display: Example 1: If the washer has detected a small load size, the display may show one lighted bar. For example, a garment that is greater. Never exceed manufacturer IMPORTANT:...


