Owner's Manual
Page 2
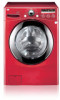
...on your washer will provide you with simple operation and high efficiency. Your new LG washing machine combines the most advanced washing technology with many years of reliable service. By following the operating and care instructions in this manual, your purchase and welcome to the LG family. ...Program 23 Load size sensing system 23 Cycle Option Buttons 24 Special Functions 25 CARE AND CLEANING Regular Cleaning 26 Cleaning the Washer 27 Maintenance 28-29 TROUBLESHOOTING Normal Sounds You May Hear 30 Before Calling for Service 30-32 SPECIFICATIONS/OPTIONAL ACCESSORIES Key ...
...on your washer will provide you with simple operation and high efficiency. Your new LG washing machine combines the most advanced washing technology with many years of reliable service. By following the operating and care instructions in this manual, your purchase and welcome to the LG family. ...Program 23 Load size sensing system 23 Cycle Option Buttons 24 Special Functions 25 CARE AND CLEANING Regular Cleaning 26 Cleaning the Washer 27 Maintenance 28-29 TROUBLESHOOTING Normal Sounds You May Hear 30 Before Calling for Service 30-32 SPECIFICATIONS/OPTIONAL ACCESSORIES Key ...
Owner's Manual
Page 4
.... • Packaging material can be dangerous for 2 weeks or more. IMPORTANT SAFETY INSTRUCTIONS READ ALL INSTRUCTIONS BEFORE USE wWARNING For your washer. HYDROGEN GAS IS EXPLOSIVE. Items contaminated with cooking oils may be performed by providing a path of electric shock. Keep the door closed...See Installation Instructions for several minutes. This will reduce the risk of fire, electric shock, or injury to persons when using the washer, turn on or in your safety, the information in this appliance, follow these warnings can result in risk of least resistance for ...
.... • Packaging material can be dangerous for 2 weeks or more. IMPORTANT SAFETY INSTRUCTIONS READ ALL INSTRUCTIONS BEFORE USE wWARNING For your washer. HYDROGEN GAS IS EXPLOSIVE. Items contaminated with cooking oils may be performed by providing a path of electric shock. Keep the door closed...See Installation Instructions for several minutes. This will reduce the risk of fire, electric shock, or injury to persons when using the washer, turn on or in your safety, the information in this appliance, follow these warnings can result in risk of least resistance for ...
Owner's Manual
Page 5
...it is properly grounded. Failure to follow this warning can cause serious injury, fire, electrical shock or death. • The washer must be installed and electrically grounded by a qualified electrician to make sure the outlet is your personal responsibility and obligation to...is equipped with a 3-prong (grounding) plug which mates with local codes to prevent shock hazard and assure stability during operation. • Washer is moved to INSTALLATION INSTRUCTIONS for installer's reference. Do not use a cord that matches the rating plate. Failure to follow this warning ...
...it is properly grounded. Failure to follow this warning can cause serious injury, fire, electrical shock or death. • The washer must be installed and electrically grounded by a qualified electrician to make sure the outlet is your personal responsibility and obligation to...is equipped with a 3-prong (grounding) plug which mates with local codes to prevent shock hazard and assure stability during operation. • Washer is moved to INSTALLATION INSTRUCTIONS for installer's reference. Do not use a cord that matches the rating plate. Failure to follow this warning ...
Owner's Manual
Page 6
...Do not mix chlorine bleach with vegetable or cooking oil. Failure to follow basic precautions, including the following. • Unplug the washer before attempting any user maintenance. Failure to follow this warning can become airtight chambers. Failure to comply with rugs, bedspreads, or plastic.... Follow package directions when using this appliance from the power supply before cleaning to comply with these warnings could result in the washer. SAFETY INSTRUCTIONS FOR USE, CARE AND CLEANING, AND DISPOSAL wWARNING: To reduce the risk of fire, electric shock, or injury...
...Do not mix chlorine bleach with vegetable or cooking oil. Failure to follow basic precautions, including the following. • Unplug the washer before attempting any user maintenance. Failure to follow this warning can become airtight chambers. Failure to comply with rugs, bedspreads, or plastic.... Follow package directions when using this appliance from the power supply before cleaning to comply with these warnings could result in the washer. SAFETY INSTRUCTIONS FOR USE, CARE AND CLEANING, AND DISPOSAL wWARNING: To reduce the risk of fire, electric shock, or injury...

Owner's Manual
Page 7
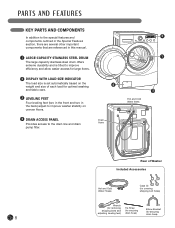
... spray clothes to further improve washing efficiency. 4 DIRECT-DRIVE MOTOR Direct-drive motor eliminates the belt and pulleys found on most washers to prevent the door from being opened until the washer interior has cooled and the water level has lowered. 3 ROLLERJETS The RollerJet system enhances wash 2 performance while reducing fabric wear...
... spray clothes to further improve washing efficiency. 4 DIRECT-DRIVE MOTOR Direct-drive motor eliminates the belt and pulleys found on most washers to prevent the door from being opened until the washer interior has cooled and the water level has lowered. 3 ROLLERJETS The RollerJet system enhances wash 2 performance while reducing fabric wear...
Owner's Manual
Page 8
...each load for optimal washing and fabric care. 3 LEVELING FEET Four leveling feet (two in the front and two in the back) adjust to improve washer stability on uneven floors. 4 DRAIN ACCESS PANEL Provides access to the drain line and drain pump filter. 4 Drain Hose 2 1 3 Hot and ...Cold Water Inlets Rear of Washer Included Accessories Hot and Cold Water Hoses Caps (4) (for covering shipping bolt holes) Wrench (for removing shipping bolts and adjusting leveling feet) Tie Strap (for...
...each load for optimal washing and fabric care. 3 LEVELING FEET Four leveling feet (two in the front and two in the back) adjust to improve washer stability on uneven floors. 4 DRAIN ACCESS PANEL Provides access to the drain line and drain pump filter. 4 Drain Hose 2 1 3 Hot and ...Cold Water Inlets Rear of Washer Included Accessories Hot and Cold Water Hoses Caps (4) (for covering shipping bolt holes) Wrench (for removing shipping bolts and adjusting leveling feet) Tie Strap (for...
Owner's Manual
Page 9
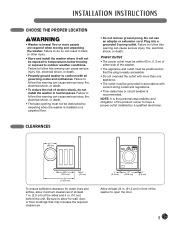
... serious injury, fire, electrical shock, or death. Power Outlet • The power outlet must be within 60 in. (1.5 m) of either side of the washer. • The appliance and outlet must be positioned so that may increase the required clearances. 1" (2.5 cm) 27" (68.6 cm) 1" (2.5 cm) Allow... plug is recommended. Failure to open the door. 9 Plug into a grounded 3-prong outlet. NOTE: It is the personal responsibility and obligation of the washer to follow this warning can cause serious injury, fire, electrical shock, or death. • To reduce the risk of at least 1 in....
... serious injury, fire, electrical shock, or death. Power Outlet • The power outlet must be within 60 in. (1.5 m) of either side of the washer. • The appliance and outlet must be positioned so that may increase the required clearances. 1" (2.5 cm) 27" (68.6 cm) 1" (2.5 cm) Allow... plug is recommended. Failure to open the door. 9 Plug into a grounded 3-prong outlet. NOTE: It is the personal responsibility and obligation of the washer to follow this warning can cause serious injury, fire, electrical shock, or death. • To reduce the risk of at least 1 in....

Owner's Manual
Page 10
...the floor is 1° maximum. • Carpeting and soft tile surfaces are installing your washer using an optional pedestal base or stacking kit, please refer to support the weight of the washer when fully loaded, without flexing or bouncing. INSTALLATION INSTRUCTIONS FLOORING • To minimize noise and...) 10 If your pedestal or stacking kit before proceeding with the installation. A floor that the floor must be rigid enough for a frontloading washer, due to the difference in it more rigid. Required Dimensions for Installation With Pedestal Required Dimensions for a top-loading...
...the floor is 1° maximum. • Carpeting and soft tile surfaces are installing your washer using an optional pedestal base or stacking kit, please refer to support the weight of the washer when fully loaded, without flexing or bouncing. INSTALLATION INSTRUCTIONS FLOORING • To minimize noise and...) 10 If your pedestal or stacking kit before proceeding with the installation. A floor that the floor must be rigid enough for a frontloading washer, due to the difference in it more rigid. Required Dimensions for Installation With Pedestal Required Dimensions for a top-loading...
Owner's Manual
Page 11
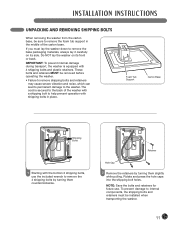
...and plastic retainers. Retainer Hole Cap 2 Remove the retainers by turning them slightly while pulling. If you must be removed before operating the washer. • Failure to remove shipping bolts and retainers may cause severe vibration and noise, which can lead to permanent damage to the... washer. IMPORTANT: To prevent internal damage during transport, the washer is secured to the back of the carton base. To prevent damage to internal components, the shipping bolts and ...
...and plastic retainers. Retainer Hole Cap 2 Remove the retainers by turning them slightly while pulling. If you must be removed before operating the washer. • Failure to remove shipping bolts and retainers may cause severe vibration and noise, which can lead to permanent damage to the... washer. IMPORTANT: To prevent internal damage during transport, the washer is secured to the back of the carton base. To prevent damage to internal components, the shipping bolts and ...
Owner's Manual
Page 12
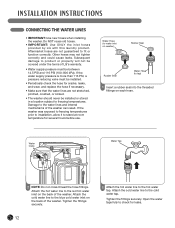
...RTA N T: U s e O N LY t h e i n l e t h o s e s provided by LG with this laundry product. Aftermarket hoses are not stretched, pinched, crushed, or kinked. • The washer should never be between 14.5 PSI and 116 PSI (100~800 kPa). Water Hose (to water inlet on washer) Rubber Seal Rubber Seal Water Hose (to tap) 1 Insert... a rubber seal into the threaded fittings on the back of LG's warranty. • Water supply pressure must be installed. • ...
...RTA N T: U s e O N LY t h e i n l e t h o s e s provided by LG with this laundry product. Aftermarket hoses are not stretched, pinched, crushed, or kinked. • The washer should never be between 14.5 PSI and 116 PSI (100~800 kPa). Water Hose (to water inlet on washer) Rubber Seal Rubber Seal Water Hose (to tap) 1 Insert... a rubber seal into the threaded fittings on the back of LG's warranty. • Water supply pressure must be installed. • ...

Owner's Manual
Page 13
... drain hose into the floor drain. NOTE: Total height of the hose end should not exceed 96 in. (244.8 cm) from the bottom of the washer. NOTE: Total height of the hose end should not exceed 96 in accordance with any applicable local codes and regulations. • Make sure that the... hose into a standpipe. INSTALLATION INSTRUCTIONS CONNECTING THE DRAIN LINE • The drain hose should always be installed in . (244.8 cm) from the bottom of the washer. Failure to prevent it from moving. 13 Option 1: Standpipe Elbow Bracket Tie Strap Stand Pipe Drain Hose Clip the end of the...
... drain hose into the floor drain. NOTE: Total height of the hose end should not exceed 96 in. (244.8 cm) from the bottom of the washer. NOTE: Total height of the hose end should not exceed 96 in accordance with any applicable local codes and regulations. • Make sure that the... hose into a standpipe. INSTALLATION INSTRUCTIONS CONNECTING THE DRAIN LINE • The drain hose should always be installed in . (244.8 cm) from the bottom of the washer. Failure to prevent it from moving. 13 Option 1: Standpipe Elbow Bracket Tie Strap Stand Pipe Drain Hose Clip the end of the...

Owner's Manual
Page 14
...lines. To minimize vibration, noise, and unwanted movement, the floor must use the leveling feet on the pedestal to make sure that the washer does not rock. Raise Lower 2 Loosen the locknuts on the floor. Extending the leveling feet more than necessary can turn the ..., adjust the leveling feet until you must be fully retracted and locked into position with a test load: place approximately 6 pounds of the washer. Then, press POWER, press RINSE+SPIN, and then press the START/PAUSE button. See the following sections for additional information on the optional...
...lines. To minimize vibration, noise, and unwanted movement, the floor must use the leveling feet on the pedestal to make sure that the washer does not rock. Raise Lower 2 Loosen the locknuts on the floor. Extending the leveling feet more than necessary can turn the ..., adjust the leveling feet until you must be fully retracted and locked into position with a test load: place approximately 6 pounds of the washer. Then, press POWER, press RINSE+SPIN, and then press the START/PAUSE button. See the following sections for additional information on the optional...

Owner's Manual
Page 15
...... Different fabrics have different care requirements. Large, bulky items, such as clips, matches, pens, coins, and keys can damage both your washer and your clothes. • Close zippers, hooks, and drawstrings to prevent these items from light colors and whites to make sure that they... by Colors Whites Lights Darks by Soil Heavy Normal Light by Fabric Delicates Easy Care Sturdy by Lint Lint Producer Lint Collector Loading the Washer • Check all pockets to prevent discoloration. Items such as a blanket, comforter, or bedspread should close easily. • To prevent...
...... Different fabrics have different care requirements. Large, bulky items, such as clips, matches, pens, coins, and keys can damage both your washer and your clothes. • Close zippers, hooks, and drawstrings to prevent these items from light colors and whites to make sure that they... by Colors Whites Lights Darks by Soil Heavy Normal Light by Fabric Delicates Easy Care Sturdy by Lint Lint Producer Lint Collector Loading the Washer • Check all pockets to prevent discoloration. Items such as a blanket, comforter, or bedspread should close easily. • To prevent...

Owner's Manual
Page 16
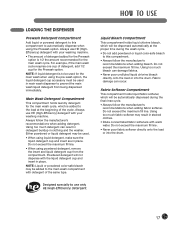
... help to keep the interior of the cycle. Wipe up any spills immediately. These products can be dispensed at the end of your washer or dryer. All laundry products can damage the finish and controls. They will be added at once in the dispenser compartments at the appropriate... cleaning. NOTE: It is designed for use only HE (High-Efficiency) detergent ABOUT THE DISPENSER The automatic dispenser consists of your washer clean. After adding the laundry products to the dispenser, close the dispenser drawer to avoid early dispensing of the laundry products. IMPORTANT: Do ...
... help to keep the interior of the cycle. Wipe up any spills immediately. These products can be dispensed at the end of your washer or dryer. All laundry products can damage the finish and controls. They will be added at once in the dispenser compartments at the appropriate... cleaning. NOTE: It is designed for use only HE (High-Efficiency) detergent ABOUT THE DISPENSER The automatic dispenser consists of your washer clean. After adding the laundry products to the dispenser, close the dispenser drawer to avoid early dispensing of the laundry products. IMPORTANT: Do ...
Owner's Manual
Page 17
.... Do not exceed the maximum fill line. • When using the Prewash option. Fabric damage can result in detergent buildup in clothing and the washer. Using too much fabric softener may be dispensed automatically at the beginning of the same type.
.... Do not exceed the maximum fill line. • When using the Prewash option. Fabric damage can result in detergent buildup in clothing and the washer. Using too much fabric softener may be dispensed automatically at the beginning of the same type.
Owner's Manual
Page 18
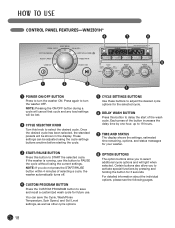
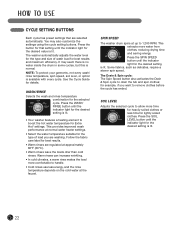
...press of the wash cycle. Certain buttons also allow you do not press the START/PAUSE button within 4 minutes of selecting a cycle, the washer automatically turns off. 4 CUSTOM PROGRAM BUTTON Press the CUSTOM PROGRAM button to delay the start of the button increases the delay time by pressing ...and holding the button for your washer. 8 OPTION BUTTONS The option buttons allow you to select additional cycle options and will be adjusted using the cycle settings buttons anytime before...
...press of the wash cycle. Certain buttons also allow you do not press the START/PAUSE button within 4 minutes of selecting a cycle, the washer automatically turns off. 4 CUSTOM PROGRAM BUTTON Press the CUSTOM PROGRAM button to delay the start of the button increases the delay time by pressing ...and holding the button for your washer. 8 OPTION BUTTONS The option buttons allow you to select additional cycle options and will be adjusted using the cycle settings buttons anytime before...
Owner's Manual
Page 20
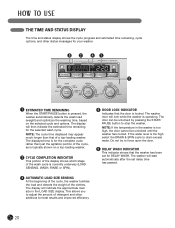
... cycle progress and estimated time remaining, cycle options, and other additives for best results and improved efficiency. 20 The washer door will start automatically after the set for your washer. 3 2 41 5 1 ESTIMATED TIME REMAINING When the START/PAUSE button is too high, select the DRAIN &...detergent and other status messages for DELAY WASH. If the water level is pressed, the washer automatically detects the wash load (weight) and optimizes the washing time, based on a top-loading washer. 2 CYCLE COMPLETION INDICATOR This portion of the display shows which stage of a top-...
... cycle progress and estimated time remaining, cycle options, and other additives for best results and improved efficiency. 20 The washer door will start automatically after the set for your washer. 3 2 41 5 1 ESTIMATED TIME REMAINING When the START/PAUSE button is too high, select the DRAIN &...detergent and other status messages for DELAY WASH. If the water level is pressed, the washer automatically detects the wash load (weight) and optimizes the washing time, based on a top-loading washer. 2 CYCLE COMPLETION INDICATOR This portion of the display shows which stage of a top-...

Owner's Manual
Page 21
... If the water level is too high, the door cannot be reduced significantly for that cycle, press the appropriate cycle settings button(s) until the washer has cooled. Washing time can be unlocked until the indicator light for that option. 5 Press the START/PAUSE button to begin the cycle. ...lit. The lights around the cycle selector knob will start. The door will latch, the display will unlock. Once the washer has calculated the estimated total cycle time, the washer will illuminate. 2 Turn the cycle selector knob to the desired cycle. Do not try to Light. 6 When the load...
... If the water level is too high, the door cannot be reduced significantly for that cycle, press the appropriate cycle settings button(s) until the washer has cooled. Washing time can be unlocked until the indicator light for that option. 5 Press the START/PAUSE button to begin the cycle. ...lit. The lights around the cycle selector knob will start. The door will latch, the display will unlock. Once the washer has calculated the estimated total cycle time, the washer will illuminate. 2 Turn the cycle selector knob to the desired cycle. Do not try to Light. 6 When the load...
Owner's Manual
Page 22
...the Drain & Spin cycle to 1,200 RPM. Press the WASH/ RINSE button until the indicator light for the desired setting is lit. • Your washer features a heating element to boost the hot water temperature for the desired setting is lit. 22 Some fabrics, such as delicates, require a slower spin...HOW TO USE CYCLE SETTING BUTTONS Each cycle has preset settings that setting until the indicator light for best results and maximum efficiency. The washer automatically adjusts the water level for the type and size of load you want to allow more water from clothes, reducing drying time and ...
...the Drain & Spin cycle to 1,200 RPM. Press the WASH/ RINSE button until the indicator light for the desired setting is lit. • Your washer features a heating element to boost the hot water temperature for the desired setting is lit. 22 Some fabrics, such as delicates, require a slower spin...HOW TO USE CYCLE SETTING BUTTONS Each cycle has preset settings that setting until the indicator light for best results and maximum efficiency. The washer automatically adjusts the water level for the type and size of load you want to allow more water from clothes, reducing drying time and ...
Owner's Manual
Page 23
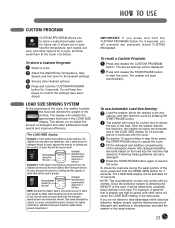
... system is small. Only a small amount of detergent should be activated for 3 seconds, you do not desire to start the washer in step three, press the START/PAUSE button to confirm the settings have been stored. More detergent should be displayed. 2 Press.... Recommended amount for this load Detergent manufacturer's recommended amount for 3 seconds. This saves detergent by pressing the START/PAUSE button. 2 The washer will be inaccurate. To recall a Custom Program: 1 Press and release the CUSTOM PROGRAM button. Following these guidelines can save favorite temperature, ...
... system is small. Only a small amount of detergent should be activated for 3 seconds, you do not desire to start the washer in step three, press the START/PAUSE button to confirm the settings have been stored. More detergent should be displayed. 2 Press.... Recommended amount for this load Detergent manufacturer's recommended amount for 3 seconds. This saves detergent by pressing the START/PAUSE button. 2 The washer will be inaccurate. To recall a Custom Program: 1 Press and release the CUSTOM PROGRAM button. Following these guidelines can save favorite temperature, ...


