
Owners Manual
Page 3
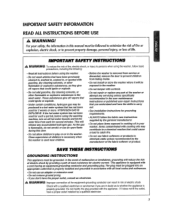
...Is used for several minutes. The plug must be exposed to the weather_ • Do not tamper with controls. • Do not repair or replace any part of electric shock Check wfth a quaEitiedelectrician or serviceman it will be grounded, in doubt as they give off vapors that... to a chemical reaction that could cause a load to cooking otlin your safety, the information in the user-maintenance instructions or published user-repair instructions that have been previously cleaned in, washed in, soaked in the washer. Do not use fabric softeners or products to eliminate static ...
...Is used for several minutes. The plug must be exposed to the weather_ • Do not tamper with controls. • Do not repair or replace any part of electric shock Check wfth a quaEitiedelectrician or serviceman it will be grounded, in doubt as they give off vapors that... to a chemical reaction that could cause a load to cooking otlin your safety, the information in the user-maintenance instructions or published user-repair instructions that have been previously cleaned in, washed in, soaked in the washer. Do not use fabric softeners or products to eliminate static ...
Owners Manual
Page 7
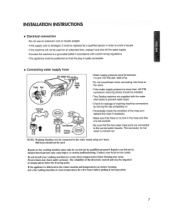
... red _0"1 E: Washing Machine is delivered in the winter months aml temperatures are below freezing may cause injury or serinus maffunctionlng. Repairs to the correct water faucets. INSTALLATION INSTRUCTIONS = Electrical connection • Do not use an extension cord or double adapter •... water supply hose Hot watertap _..__,_ / "_'__ V/// water • Water supply pressure must be carried out by qualified personnel, Repairs carried out by inexperienced persons may occur. Frozen hoses may burst under pressure_ The reliability of the hose and replace the hose if necessary...
... red _0"1 E: Washing Machine is delivered in the winter months aml temperatures are below freezing may cause injury or serinus maffunctionlng. Repairs to the correct water faucets. INSTALLATION INSTRUCTIONS = Electrical connection • Do not use an extension cord or double adapter •... water supply hose Hot watertap _..__,_ / "_'__ V/// water • Water supply pressure must be carried out by qualified personnel, Repairs carried out by inexperienced persons may occur. Frozen hoses may burst under pressure_ The reliability of the hose and replace the hose if necessary...
Owners Manual
Page 23
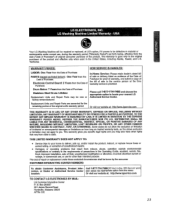
... BY MAIL: LG Customer Interactive Center P. This warranty is provided. In-Home Service: Please retain dealer's dated bill of sole or delivery ticket as listed be new or factory remenufactured. The cost of repair or rep{acement under these excluded circumstances shaft be defective in the Untied States, ... hours a day, 365 days per year) and select the appropriate option from the Dote of Purchase Stainless Steel Drum; Your LG Washing Machine will be repaired or mp{aced, at the time warranty service is good only to the odgInal purchaser of the product and effective only when ...
... BY MAIL: LG Customer Interactive Center P. This warranty is provided. In-Home Service: Please retain dealer's dated bill of sole or delivery ticket as listed be new or factory remenufactured. The cost of repair or rep{acement under these excluded circumstances shaft be defective in the Untied States, ... hours a day, 365 days per year) and select the appropriate option from the Dote of Purchase Stainless Steel Drum; Your LG Washing Machine will be repaired or mp{aced, at the time warranty service is good only to the odgInal purchaser of the product and effective only when ...

Service Manual
Page 24
... terminal with the wiring diagram. 3. First of all, check the connection of electric shock if disconnecting parts while troubleshooting. 2. YES Replace DISPLAY PWB ASSEMBLY or repair wire. NO Replace the MAIN PWB ASSEMBLY. 23 Are the connectors (2) on ? If you replace the MAIN PWB ASSEMBLY, reinsert the connectors correctly. Is the...
... terminal with the wiring diagram. 3. First of all, check the connection of electric shock if disconnecting parts while troubleshooting. 2. YES Replace DISPLAY PWB ASSEMBLY or repair wire. NO Replace the MAIN PWB ASSEMBLY. 23 Are the connectors (2) on ? If you replace the MAIN PWB ASSEMBLY, reinsert the connectors correctly. Is the...

Service Manual
Page 29
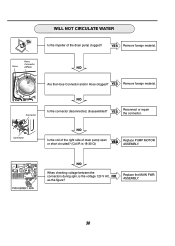
NO Is the connector disconnected, disassembled? Replace the MAIN PWB ASSEMBLY. 28 Is the voltage 120 V AC? YES Reconnect or repair the connector YES Replace the DRAIN PUMP ASSEMBLY. YES Replace the SENSOR SWITCH ASSEMBLY. Check the voltage between 230 - 243 ? DRAIN MALFUNCTION ...in the figure? When pressing SPIN SPEED and SOIL LEVEL buttons NO at the same time after draining, is 10-20 Ω) NO YES Repair the DRAIN HOSE ASSEMBLY. When checking voltage between connectors during NO spin, is the water level frequency between two pins while pressing the POWER button...
NO Is the connector disconnected, disassembled? Replace the MAIN PWB ASSEMBLY. 28 Is the voltage 120 V AC? YES Reconnect or repair the connector YES Replace the DRAIN PUMP ASSEMBLY. YES Replace the SENSOR SWITCH ASSEMBLY. Check the voltage between 230 - 243 ? DRAIN MALFUNCTION ...in the figure? When pressing SPIN SPEED and SOIL LEVEL buttons NO at the same time after draining, is 10-20 Ω) NO YES Repair the DRAIN HOSE ASSEMBLY. When checking voltage between connectors during NO spin, is the water level frequency between two pins while pressing the POWER button...
Service Manual
Page 31
YES Remove foreign material. YES Reconnect or repair the connector. NO When checking voltage between the connectors during spin, is 18-30 Ω) YES Replace PUMP MOTOR ASSEMBLY. Replace the MAIN PWB ASSEMBLY. ...
YES Remove foreign material. YES Reconnect or repair the connector. NO When checking voltage between the connectors during spin, is 18-30 Ω) YES Replace PUMP MOTOR ASSEMBLY. Replace the MAIN PWB ASSEMBLY. ...

Service Manual
Page 33
DISASSEMBLY INSTRUCTIONS Be sure to unplug the machine out of the top plate. TOP PLATE ASSEMBLY Unscrew 2 screws on the back of the outlet before disassembling and repairing the parts. Disassemble the Display PWB Assembly. 32 DRAWER CONTROL PANEL ASSEMBLY Disconnect the Display PWB Assembly connector from the Control Panel Assembly. Lift the left side of the Control Panel Assembly and pull it out. 9. Pull the top plate backward and upward as shown. Pull out the drawer and unscrew 2 screws. DISPLAY PWB ASSEMBLY Unscrew the 9 screws from Trans cable.
DISASSEMBLY INSTRUCTIONS Be sure to unplug the machine out of the top plate. TOP PLATE ASSEMBLY Unscrew 2 screws on the back of the outlet before disassembling and repairing the parts. Disassemble the Display PWB Assembly. 32 DRAWER CONTROL PANEL ASSEMBLY Disconnect the Display PWB Assembly connector from the Control Panel Assembly. Lift the left side of the Control Panel Assembly and pull it out. 9. Pull the top plate backward and upward as shown. Pull out the drawer and unscrew 2 screws. DISPLAY PWB ASSEMBLY Unscrew the 9 screws from Trans cable.


