
Owners Manual
Page 4
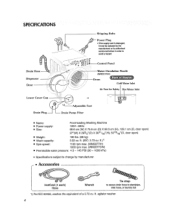
...rpm max. (WM2077CW) • Permissible water pressure: 4.5 ~. 145 PSI (30 ~ t000 kPa) * Specifications subject to avoid a hazard Drain Hose Dispenser Door , Cold Water Inlet Lower Cover Cap Drain Plug ,:: Adjustable Feet Drain Pump Filter Air Vent?_.__S:a_ffeotyr Hot Water Inlet = Name: =...must ba replacedby lho manufactureror itsauthorized ge_ce technician In order to change by manufacturer - Accessories Hot/Cold (1 each) Hose Wrench Tie strap to secure drain hose to standpipe, inlet hose, or taundry tub 1 ) Per IEC 60456, washes the equivalent of a 3.72 cu, It. agitator ...
...rpm max. (WM2077CW) • Permissible water pressure: 4.5 ~. 145 PSI (30 ~ t000 kPa) * Specifications subject to avoid a hazard Drain Hose Dispenser Door , Cold Water Inlet Lower Cover Cap Drain Plug ,:: Adjustable Feet Drain Pump Filter Air Vent?_.__S:a_ffeotyr Hot Water Inlet = Name: =...must ba replacedby lho manufactureror itsauthorized ge_ce technician In order to change by manufacturer - Accessories Hot/Cold (1 each) Hose Wrench Tie strap to secure drain hose to standpipe, inlet hose, or taundry tub 1 ) Per IEC 60456, washes the equivalent of a 3.72 cu, It. agitator ...
Owners Manual
Page 7
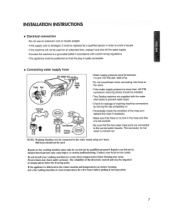
... control unit may he impaired at room temperature fnr a few hours before putting it into operation. 7 Do not crossthread when connecting inlet hose to the valve. • tfthe water supply pressure is more than 145 PSI, a pressure reducing device should be installed. • ... not be used. Contact your washing machine in a room where temperatnres below the freezing polnL If the appliance is easily accessible = Connecting water supply hose Hot watertap _..__,_ / "_'__ V/// water • Water supply pressure must be between 4 5 and 145 PSI (30-1000 kPa). - INSTALLATION INSTRUCTIONS...
... control unit may he impaired at room temperature fnr a few hours before putting it into operation. 7 Do not crossthread when connecting inlet hose to the valve. • tfthe water supply pressure is more than 145 PSI, a pressure reducing device should be installed. • ... not be used. Contact your washing machine in a room where temperatnres below the freezing polnL If the appliance is easily accessible = Connecting water supply hose Hot watertap _..__,_ / "_'__ V/// water • Water supply pressure must be between 4 5 and 145 PSI (30-1000 kPa). - INSTALLATION INSTRUCTIONS...
Owners Manual
Page 8
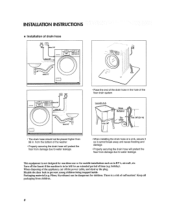
... the power cable_ and destroy the plug. There is to prevent young children being trapped inside. INSTALLATION iNSTRUCTIONS i ':¸ ,, Installation of drain hose • Place the end of the drain hose in the hole of the floor drain system Laundrytub HOS_ /_ T_e _ " _I_ rnax'B6"(?_4ml • The drain...p_aced higher than 96 in, from the bottom of the washer, • Property securing the drain hose will protect the floor from damage due to water leakage. • When installing the drain hose at a sink, secure it so it cannot break away and cause flooding and damage • ...
... the power cable_ and destroy the plug. There is to prevent young children being trapped inside. INSTALLATION iNSTRUCTIONS i ':¸ ,, Installation of drain hose • Place the end of the drain hose in the hole of the floor drain system Laundrytub HOS_ /_ T_e _ " _I_ rnax'B6"(?_4ml • The drain...p_aced higher than 96 in, from the bottom of the washer, • Property securing the drain hose will protect the floor from damage due to water leakage. • When installing the drain hose at a sink, secure it so it cannot break away and cause flooding and damage • ...
Owners Manual
Page 17
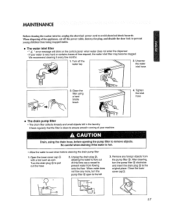
... the left 3. Remove any more, turn the pump filter (_ clockwise and insert the drain plug (__to the original place. Unscrew water tap the water inlet hose 3. Close the lower cover cap,_ i7 If your machine, Drain, using a hard bristle brush -- 4. Open the lower cover cap _) with a tool such as coin...filter •" IE "error message will blink on the controt panei when water does net enter the dispenser - Clean the filter using the drain hose, before opening the pump filter to remove objects, Be careful when draining if the water is very hard or contains traces of the appliance, ...
... the left 3. Remove any more, turn the pump filter (_ clockwise and insert the drain plug (__to the original place. Unscrew water tap the water inlet hose 3. Close the lower cover cap,_ i7 If your machine, Drain, using a hard bristle brush -- 4. Open the lower cover cap _) with a tool such as coin...filter •" IE "error message will blink on the controt panei when water does net enter the dispenser - Clean the filter using the drain hose, before opening the pump filter to remove objects, Be careful when draining if the water is very hard or contains traces of the appliance, ...
Owners Manual
Page 19
Remove the two-compartment container from hoses 3, Plug electrical cord into a properly grounded electrical outlet 4_ Add l gaffon (3 8 _ ) nontoxic recreational vehicle (RV) antifreeze to empty wash drum. Store washer in an upright ... stored in an area where freezing can be cIeaned with warm water and a neutral, non-abrasive household detergent,, Immediately wipe off water suppty tap 2, Disconnect hoses from water supply and drain water from the Dispenser Drain any spills Wipe with a damp cloth Try not to drain out all the water Not...
Remove the two-compartment container from hoses 3, Plug electrical cord into a properly grounded electrical outlet 4_ Add l gaffon (3 8 _ ) nontoxic recreational vehicle (RV) antifreeze to empty wash drum. Store washer in an upright ... stored in an area where freezing can be cIeaned with warm water and a neutral, non-abrasive household detergent,, Immediately wipe off water suppty tap 2, Disconnect hoses from water supply and drain water from the Dispenser Drain any spills Wipe with a damp cloth Try not to drain out all the water Not...
Owners Manual
Page 20
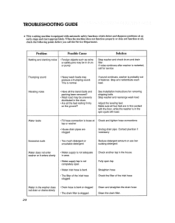
...produce a thumping sound This is normal If sound continues, washer is probably ot_t of the inlet hose clogged. Water leaks • Fill hose connection is c[oggedM Clean and straighten the drain hose Clean the drain filter. Excessive suds • Too much detergent or unsuitable detergent Reduce detergent .... * Water supply tap is in the spin cycle with automatic safety [unctions which detect and diagnnse problems at Check and tighten hose connections tap or washer, • House drain pipes are in firm contact with the floor, whi_e the washer is not completely open ...
...produce a thumping sound This is normal If sound continues, washer is probably ot_t of the inlet hose clogged. Water leaks • Fill hose connection is c[oggedM Clean and straighten the drain hose Clean the drain filter. Excessive suds • Too much detergent or unsuitable detergent Reduce detergent .... * Water supply tap is in the spin cycle with automatic safety [unctions which detect and diagnnse problems at Check and tighten hose connections tap or washer, • House drain pipes are in firm contact with the floor, whi_e the washer is not completely open ...

Owners Manual
Page 22
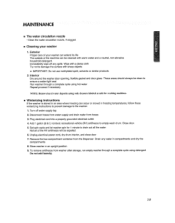
...filter of balance. • The appliance has an imbalance detection and correction system i_individual heavy aMicles are not completely open,, • Water inlet hose is not released, call for service • Overload in motor. Problem Possible Cause Solution • Water suppty is not adequate in the ...house Fully open tap. Straighten hose Check the filter o[ the inlet hose, • Drain hose is bent or clogged,, • The drain filter is clogged Clean and straighten the drain hose CIean the drain fi]ter , Load is too small. • Load...
...filter of balance. • The appliance has an imbalance detection and correction system i_individual heavy aMicles are not completely open,, • Water inlet hose is not released, call for service • Overload in motor. Problem Possible Cause Solution • Water suppty is not adequate in the ...house Fully open tap. Straighten hose Check the filter o[ the inlet hose, • Drain hose is bent or clogged,, • The drain filter is clogged Clean and straighten the drain hose CIean the drain fi]ter , Load is too small. • Load...
Service Manual
Page 10
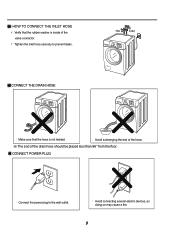
Avoid submerging the end of the drain hose should be placed less than 96" from the floor. Avoid connecting several electric devices, as doing so may cause a fire. 9 The end of the hose. Tighten the inlet hose securely to the wall outlet. CONNECT POWER PLUG Connect the power plug to prevent leaks. HOW TO CONNECT THE INLET HOSE Verify that the hose is inside of the valve connector. CONNECT THE DRAIN HOSE Make sure that the rubber washer is not twisted.
Avoid submerging the end of the drain hose should be placed less than 96" from the floor. Avoid connecting several electric devices, as doing so may cause a fire. 9 The end of the hose. Tighten the inlet hose securely to the wall outlet. CONNECT POWER PLUG Connect the power plug to prevent leaks. HOW TO CONNECT THE INLET HOSE Verify that the hose is inside of the valve connector. CONNECT THE DRAIN HOSE Make sure that the rubber washer is not twisted.

Service Manual
Page 11
...SPIN SPEED button. Check the spin and drain functions. TEST OPERATION Preparation for a click to determine if the door has locked. Connect the inlet hoses. Press the START/PAUSE button. Connect the power plug to the outlet. If SVC is supplied through the detergent dispenser. Check if the drum ...rotates clockwise and counterclockwise. Check if water is needed during check, remove the remaining water by pulling out the hose cap. 10 Press the START/PAUSE button. Press the POWER button. Press the Start/Pause button. Check the drain and spin functions.
...SPIN SPEED button. Check the spin and drain functions. TEST OPERATION Preparation for a click to determine if the door has locked. Connect the inlet hoses. Press the START/PAUSE button. Connect the power plug to the outlet. If SVC is supplied through the detergent dispenser. Check if the drum ...rotates clockwise and counterclockwise. Check if water is needed during check, remove the remaining water by pulling out the hose cap. 10 Press the START/PAUSE button. Press the POWER button. Press the Start/Pause button. Check the drain and spin functions.

Service Manual
Page 29
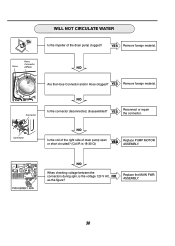
...NO Is the connector disconnected, disassembled? Check the voltage between connectors during NO spin, is 10-20 Ω) NO YES Repair the DRAIN HOSE ASSEMBLY. NO Is the coil of the drain pump too high or low? (resistance of the drain pump clogged? YES Reconnect or repair... the connector YES Replace the DRAIN PUMP ASSEMBLY. Is the voltage 120 V AC? DRAIN MALFUNCTION Is the drain hose twisted or frozen? Replace the MAIN PWB ASSEMBLY. 28 YES Replace the MAIN PWB ASSEMBLY. YES Remove foreign material. YES Replace the SENSOR SWITCH...
...NO Is the connector disconnected, disassembled? Check the voltage between connectors during NO spin, is 10-20 Ω) NO YES Repair the DRAIN HOSE ASSEMBLY. NO Is the coil of the drain pump too high or low? (resistance of the drain pump clogged? YES Reconnect or repair... the connector YES Replace the DRAIN PUMP ASSEMBLY. Is the voltage 120 V AC? DRAIN MALFUNCTION Is the drain hose twisted or frozen? Replace the MAIN PWB ASSEMBLY. 28 YES Replace the MAIN PWB ASSEMBLY. YES Remove foreign material. YES Replace the SENSOR SWITCH...
Service Manual
Page 31
... NO Is the coil of the right side of the drain pump clogged? YES Reconnect or repair the connector. Replace the MAIN PWB ASSEMBLY. 30 Hose Hose Connector (White) NO Are the Hose Connector and/or Hose clogged? YES Remove foreign material.
... NO Is the coil of the right side of the drain pump clogged? YES Reconnect or repair the connector. Replace the MAIN PWB ASSEMBLY. 30 Hose Hose Connector (White) NO Are the Hose Connector and/or Hose clogged? YES Remove foreign material.

Service Manual
Page 32
...it disconnected, or disassembled? [Red: 3pin (1), NA: 4pin (2)] Check the motor connector, Is the resistance of Latch Hook actuate? Check the SENSOR SWITCH ASSEMBLY or HOSE (Pressure). If the problem is pressed to start the cycle? (Red 3 pin, Yellow 4 pin and (1) white 3 pin connector (1)). Replace Door Assembly. Is DOOR... once or twice when the ASSEMBLY Connector and MAIN PWB ASSEMBLY START/PAUSE button is on the SENSOR SWITCH ASSEMBLY or the HOSE, replace the SENSOR SWITCH ASSEMBLY or the HOSE. Press the START/PAUSE button 2 times in QC Test mode, is 248 or more.
...it disconnected, or disassembled? [Red: 3pin (1), NA: 4pin (2)] Check the motor connector, Is the resistance of Latch Hook actuate? Check the SENSOR SWITCH ASSEMBLY or HOSE (Pressure). If the problem is pressed to start the cycle? (Red 3 pin, Yellow 4 pin and (1) white 3 pin connector (1)). Replace Door Assembly. Is DOOR... once or twice when the ASSEMBLY Connector and MAIN PWB ASSEMBLY START/PAUSE button is on the SENSOR SWITCH ASSEMBLY or the HOSE, replace the SENSOR SWITCH ASSEMBLY or the HOSE. Press the START/PAUSE button 2 times in QC Test mode, is 248 or more.

Service Manual
Page 39
Disassemble the cabinet cover. Unplug the white connector from the pump assembly. Separate the pump hose, the bellows and the circulation hose assembly from the thermistor. Disassemble the cabinet cover. Disassemble the pump assembly in arrow direction. CAUTION • When assembling the heater, insert the heater into ...
Disassemble the cabinet cover. Unplug the white connector from the pump assembly. Separate the pump hose, the bellows and the circulation hose assembly from the thermistor. Disassemble the cabinet cover. Disassemble the pump assembly in arrow direction. CAUTION • When assembling the heater, insert the heater into ...


