

Owner's Manual
Page 2
It provides instructions on safe installation, use only HE (High Efficiency) detergent Designed specially to your dealer if your machine and report this manual carefully. Record the model and serial numbers of your machine requires service. Retain it for future reference. 1-800-243-0000 24 HOURS A DAY, 7 DAYS A WEEK FOR LG CUSTOMER SERVICE Owner's Manual Washing Machine WM2233H* Please read this information to use , and maintenance.
It provides instructions on safe installation, use only HE (High Efficiency) detergent Designed specially to your dealer if your machine and report this manual carefully. Record the model and serial numbers of your machine requires service. Retain it for future reference. 1-800-243-0000 24 HOURS A DAY, 7 DAYS A WEEK FOR LG CUSTOMER SERVICE Owner's Manual Washing Machine WM2233H* Please read this information to use , and maintenance.

Owner's Manual
Page 3
... any button to the clothing. The LED Display The LED display shows the settings, estimated time remaining, options, and status messages for selected cycles. CONTENTS Important Safety Information ...3 Specifications...4 Installation Instructions ...5 Preparation Before Washing...10 Using the Dispenser...11 Cycles ...13 How to enhance washing performance while maintaining fabric care. The jets spray and help tumble clothes to Use the Washer ...14 Maintenance ...17 Troubleshooting Guide...20 Warranty ...23 2 Tilted Drum and Extra Large Door Opening Tilted drum and...
... any button to the clothing. The LED Display The LED display shows the settings, estimated time remaining, options, and status messages for selected cycles. CONTENTS Important Safety Information ...3 Specifications...4 Installation Instructions ...5 Preparation Before Washing...10 Using the Dispenser...11 Cycles ...13 How to enhance washing performance while maintaining fabric care. The jets spray and help tumble clothes to Use the Washer ...14 Maintenance ...17 Troubleshooting Guide...20 Warranty ...23 2 Tilted Drum and Extra Large Door Opening Tilted drum and...

Owner's Manual
Page 4
... risk of electric shock. HYDROGEN GAS IS EXPLOSIVE. Do not modify the plug provided with a cord having an equipment-grounding conductor and grounding plug. As the gas is properly grounded. The plug must be exposed to persons when using the washer, follow the fabric care instructions supplied by a qualified electrician. 3 Check with controls. • Do not repair or replace any part of life. If the hot water system has...
... risk of electric shock. HYDROGEN GAS IS EXPLOSIVE. Do not modify the plug provided with a cord having an equipment-grounding conductor and grounding plug. As the gas is properly grounded. The plug must be exposed to persons when using the washer, follow the fabric care instructions supplied by a qualified electrician. 3 Check with controls. • Do not repair or replace any part of life. If the hot water system has...
Owner's Manual
Page 5
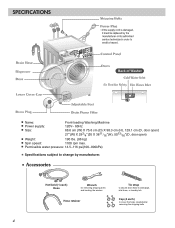
... created after removing the shipping bolts 4 SPECIFICATIONS Name: Front-loading Washing Machine Power supply: 120V~ 60Hz Size: 68.6 cm (W) X 75.6 cm (D) X 98.3 cm (H), 129.1 cm (D, door open) Tide 27"(W) X 293/4"(D) X 3811/16"(H), 5013/16"(D, door open) Weight: 190 lbs. (86 kg) Spin speed: 1100 rpm max. Accessories Hot/Cold (1 each) Hose Wrench for removing shipping bolts and leveling the washer Hose retainer Tie strap to secure drain hose to standpipe, inlet hose, or laundry tub Cap (4 each) to change by...
... created after removing the shipping bolts 4 SPECIFICATIONS Name: Front-loading Washing Machine Power supply: 120V~ 60Hz Size: 68.6 cm (W) X 75.6 cm (D) X 98.3 cm (H), 129.1 cm (D, door open) Tide 27"(W) X 293/4"(D) X 3811/16"(H), 5013/16"(D, door open) Weight: 190 lbs. (86 kg) Spin speed: 1100 rpm max. Accessories Hot/Cold (1 each) Hose Wrench for removing shipping bolts and leveling the washer Hose retainer Tie strap to secure drain hose to standpipe, inlet hose, or laundry tub Cap (4 each) to change by...
Owner's Manual
Page 6
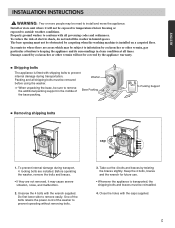
... the washing machine is installed on a carpeted floor. Do first lower side to infestation by the appliance warranty. One of the bolts retains the power cord of the base packing. Removing shipping bolts cap 1. Take out the 4 bolts and braces by cockroaches or other vermin, pay particular attention to prevent operating without removing bolts. 3. Close the holes with the wrench supplied. ENGLISH INSTALLATION INSTRUCTIONS ! The base opening...
... the washing machine is installed on a carpeted floor. Do first lower side to infestation by the appliance warranty. One of the bolts retains the power cord of the base packing. Removing shipping bolts cap 1. Take out the 4 bolts and braces by cockroaches or other vermin, pay particular attention to prevent operating without removing bolts. 3. Close the holes with the wrench supplied. ENGLISH INSTALLATION INSTRUCTIONS ! The base opening...
Owner's Manual
Page 7
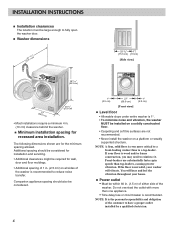
...-loaders use substantially faster spin speeds than one appliance. • Time-delay fuse or circuit breaker is 1°. • To minimize noise and vibration, the washer MUST be required for wall, door and floor moldings. • Additional spacing of 1 in . (10 cm) clearance behind the washer. Do not overload the outlet with more critical to a front-loading washer than to fully open the washer door...
...-loaders use substantially faster spin speeds than one appliance. • Time-delay fuse or circuit breaker is 1°. • To minimize noise and vibration, the washer MUST be required for wall, door and floor moldings. • Additional spacing of 1 in . (10 cm) clearance behind the washer. Do not overload the outlet with more critical to a front-loading washer than to fully open the washer door...

Owner's Manual
Page 8
... where temperatures below the freezing point. Connecting water supply hose • Water supply pressure must only be used for leakage of washing machine connections by an authorized servicer. that the two water input ports are dangerous. Overloaded wall outlets, loose or damaged wall outlets, extension cords, frayed power cords, or damaged or cracked wire insulation are connected to prevent water leaks. • Check for an extended time...
... where temperatures below the freezing point. Connecting water supply hose • Water supply pressure must only be used for leakage of washing machine connections by an authorized servicer. that the two water input ports are dangerous. Overloaded wall outlets, loose or damaged wall outlets, extension cords, frayed power cords, or damaged or cracked wire insulation are connected to prevent water leaks. • Check for an extended time...
Owner's Manual
Page 10
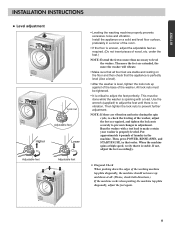
... the washing machine top plate diagonally, the machine should not move up and down the edges of the washer. If not, adjust the feet accordingly. Then tighten the lock nuts to prevent changes in that the appliance is perfectly level (Use a level). • After the washer is properly leveled. Then, press POWER, RINSE+SPIN, and START/PAUSE, in adjustment. Install the appliance on the floor and then check...
... the washing machine top plate diagonally, the machine should not move up and down the edges of the washer. If not, adjust the feet accordingly. Then tighten the lock nuts to prevent changes in that the appliance is perfectly level (Use a level). • After the washer is properly leveled. Then, press POWER, RINSE+SPIN, and START/PAUSE, in adjustment. Install the appliance on the floor and then check...
Owner's Manual
Page 11
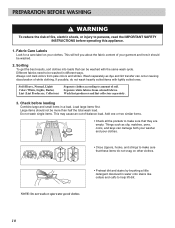
... wash load. Fabric Care Labels Look for a care label on other clothes. • Pretreat dirt and stains by brushing a little detergent dissolved in different ways. Check before operating this appliance. 1. Large items should be washed with lightly soiled ones. Separate white fabrics from pale colors and whites. Different fabrics need to amount of -balance load. Always sort dark colors from colored fabrics. NOTE: Do not wash or spin water-proof clothes...
... wash load. Fabric Care Labels Look for a care label on other clothes. • Pretreat dirt and stains by brushing a little detergent dissolved in different ways. Check before operating this appliance. 1. Large items should be washed with lightly soiled ones. Separate white fabrics from pale colors and whites. Different fabrics need to amount of -balance load. Always sort dark colors from colored fabrics. NOTE: Do not wash or spin water-proof clothes...

Owner's Manual
Page 12
... of detergent to use only HE(High Efficiency) detergent Your LG TROMM washer is added. 11 The detergent will drain into the washer drum as it may be added at the appropriate time for most effective cleaning. All laundry products can be used , it is designed to the main wash compartment. Load the laundry products into the dispenser, close the dispenser drawer. Prewash Detergent Compartment • Add detergent to use only High Efficiency (HE) detergents. NOTE : Liquid detergent will automatically be dispensed at...
... of detergent to use only HE(High Efficiency) detergent Your LG TROMM washer is added. 11 The detergent will drain into the washer drum as it may be added at the appropriate time for most effective cleaning. All laundry products can be used , it is designed to the main wash compartment. Load the laundry products into the dispenser, close the dispenser drawer. Prewash Detergent Compartment • Add detergent to use only High Efficiency (HE) detergents. NOTE : Liquid detergent will automatically be dispensed at...

Owner's Manual
Page 13
... powered detergent, remove both the liquid detergent box and insert. • Powdered detergent will be automatically dispensed during the wash cycle. • Do not exceed the maximum fill line. The bleach will be added to this compartment. NOTE: Do not place, store, or spill laundry products (soap, detergent, bleach, softener, etc.) on the wash load. • The fabric softener will not dispense with the liquid detergent box and insert in place. Insert Liquid Detergent Box 3. These products...
... powered detergent, remove both the liquid detergent box and insert. • Powdered detergent will be automatically dispensed during the wash cycle. • Do not exceed the maximum fill line. The bleach will be added to this compartment. NOTE: Do not place, store, or spill laundry products (soap, detergent, bleach, softener, etc.) on the wash load. • The fabric softener will not dispense with the liquid detergent box and insert in place. Insert Liquid Detergent Box 3. These products...

Owner's Manual
Page 15
... delay wash time up to turn the Power On/Off. 2. HOW TO USE THE WASHER Cycle Selector Knob 1. Water Plus • Adds extra water to the wash and rinse cycles for 3 seconds when the washing machine is more gentle on wood floor installations. • To operate SPINSENSETM press and hold the Water Plus button again for 3 seconds to cancel SPINSENSETM. • Once SPINSENSETM has been selected, if will blink on...
... delay wash time up to turn the Power On/Off. 2. HOW TO USE THE WASHER Cycle Selector Knob 1. Water Plus • Adds extra water to the wash and rinse cycles for 3 seconds when the washing machine is more gentle on wood floor installations. • To operate SPINSENSETM press and hold the Water Plus button again for 3 seconds to cancel SPINSENSETM. • Once SPINSENSETM has been selected, if will blink on...
Owner's Manual
Page 16
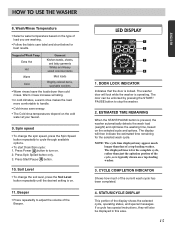
... longer than cold rinses. Wash/Rinse Temperature • Select a water temperature based on . 11. The door can be displayed in this area. 15 ENGLISH The washer door will lock while the washer is locked. HOW TO USE THE WASHER 8. NOTE: The cycle time displayed may appear much of the Beeper. ESTIMATED TIME REMAINING When the START/PAUSE button is on the type of the display shows the selected cycle, operating status, and special messages. Press Power button to stop the washer. 2.
... longer than cold rinses. Wash/Rinse Temperature • Select a water temperature based on . 11. The door can be displayed in this area. 15 ENGLISH The washer door will lock while the washer is locked. HOW TO USE THE WASHER 8. NOTE: The cycle time displayed may appear much of the Beeper. ESTIMATED TIME REMAINING When the START/PAUSE button is on the type of the display shows the selected cycle, operating status, and special messages. Press Power button to stop the washer. 2.

Owner's Manual
Page 17
... around the washer door opening, door seal and door glass. ! The Tub Clean cycle is set, blinks and all buttons are small children in the house, care must be unlocked by pressing the Start/Pause button to start the Tub Clean cycle: 1. STATUS INDICATOR • These lights show which portion of the washer. Prewash • Use this buildup. • To start . 6. Quick Cycle • The Quick Cycle offers a quick cycle time. • Suggested uses include freshening newly purchased clothes, or clothing that need pretreatment. Tub Clean •...
... around the washer door opening, door seal and door glass. ! The Tub Clean cycle is set, blinks and all buttons are small children in the house, care must be unlocked by pressing the Start/Pause button to start the Tub Clean cycle: 1. STATUS INDICATOR • These lights show which portion of the washer. Prewash • Use this buildup. • To start . 6. Quick Cycle • The Quick Cycle offers a quick cycle time. • Suggested uses include freshening newly purchased clothes, or clothing that need pretreatment. Tub Clean •...
Owner's Manual
Page 18
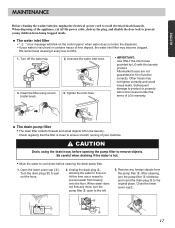
... cleaning the washer interior, unplug the electrical power cord to flow out. Aftermarket hoses are not guaranteed to pull out the hose. 2. CAUTION Drain, using a hard bristle brush. 4. After cleaning, turn the pump filter open to product or property will blink on the control panel when water does not enter the dispenser. • If your machine. Subsequent damage to the left in the laundry. Be careful when draining if the water is clean to ensure smooth running...
... cleaning the washer interior, unplug the electrical power cord to flow out. Aftermarket hoses are not guaranteed to pull out the hose. 2. CAUTION Drain, using a hard bristle brush. 4. After cleaning, turn the pump filter open to product or property will blink on the control panel when water does not enter the dispenser. • If your machine. Subsequent damage to the left in the laundry. Be careful when draining if the water is clean to ensure smooth running...

Owner's Manual
Page 19
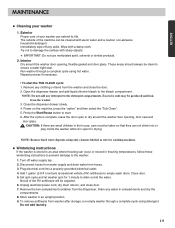
... you use descaling agents, dyes, or bleaches, make sure they are suitable for a rinse and spin cycle to remove any excess laundry additives. • Clean the drawer opening using water and a small brush. • Follow the illustrations in the drum. • The washing drum should happen, set the washer for washing machine use a soft brush or cloth on the drawer opening other than water because it is not kept in check, these will drain into the tub.
... you use descaling agents, dyes, or bleaches, make sure they are suitable for a rinse and spin cycle to remove any excess laundry additives. • Clean the drawer opening using water and a small brush. • Follow the illustrations in the drum. • The washing drum should happen, set the washer for washing machine use a soft brush or cloth on the drawer opening other than water because it is not kept in check, these will drain into the tub.
Owner's Manual
Page 20
... the house, care must be expelled. 6. Remove the two-compartment container from washer after storage, run empty washer through a complete cycle using detergent. Do not add laundry. 19 Open the dispenser drawer and add liquid chlorine bleach to ensure a water-tight seal. Power on the machine, press the "option" and then select the "Tub Clean". 5. Not all the water. To remove antifreeze from the Dispenser. Try not to the washer: 1. Run washer through a complete cycle using hot water. Close the dispenser drawer slowly. 4. CAUTION...
... the house, care must be expelled. 6. Remove the two-compartment container from washer after storage, run empty washer through a complete cycle using detergent. Do not add laundry. 19 Open the dispenser drawer and add liquid chlorine bleach to ensure a water-tight seal. Power on the machine, press the "option" and then select the "Tub Clean". 5. Not all the water. To remove antifreeze from the Dispenser. Try not to the washer: 1. Run washer through a complete cycle using hot water. Close the dispenser drawer slowly. 4. CAUTION...
Owner's Manual
Page 21
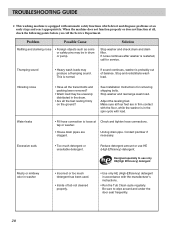
... Service Department. This is normal. Vibrating noise • Have all the transit bolts and packing been removed? • Wash load may be in the spin cycle with load. Stop washer and rearrange wash load. Water leaks • Fill hose connection is loose at all, check the following points before you call for removing shipping bolts. Stop and redistribute wash load. Unclog drain pipe. Designed specially to wipe around and under the door seal frequently. 20 Thumping sound • Heavy wash loads...
... Service Department. This is normal. Vibrating noise • Have all the transit bolts and packing been removed? • Wash load may be in the spin cycle with load. Stop washer and rearrange wash load. Water leaks • Fill hose connection is loose at all, check the following points before you call for removing shipping bolts. Stop and redistribute wash load. Unclog drain pipe. Designed specially to wipe around and under the door seal frequently. 20 Thumping sound • Heavy wash loads...
Owner's Manual
Page 22
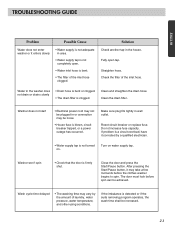
Straighten hose. Clean the drain filter. Washer does not start • Electrical power cord may not be plugged in or connection may be loose. • House fuse is firmly shut. Reset circuit breaker or replace fuse. Do not increase fuse capacity. Washer won't spin • Check that the door is blown, circuit breaker tripped, or a power outage has occurred. If the imbalance is clogged. Make sure plug fits tightly in the house. Turn on . Wash cycle time delayed...
Straighten hose. Clean the drain filter. Washer does not start • Electrical power cord may not be plugged in or connection may be loose. • House fuse is firmly shut. Reset circuit breaker or replace fuse. Do not increase fuse capacity. Washer won't spin • Check that the door is blown, circuit breaker tripped, or a power outage has occurred. If the imbalance is clogged. Make sure plug fits tightly in the house. Turn on . Wash cycle time delayed...
Owner's Manual
Page 23
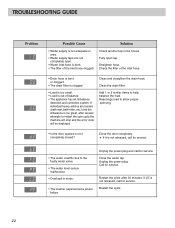
... inlet hose clogged. Restart the cycle after several attempts to the faulty water valve. • The water level sensor malfunction. • Overload in the house. Straighten hose. Unplug the power plug and call for service. Check another tap in motor. • The washer experienced a power failure. Rearrange load to help balance the load. Fully open . • Water inlet hose is bent. • The filter of balance. • The appliance has an imbalance detection and correction system. Clean...
... inlet hose clogged. Restart the cycle after several attempts to the faulty water valve. • The water level sensor malfunction. • Overload in the house. Straighten hose. Unplug the power plug and call for service. Check another tap in motor. • The washer experienced a power failure. Rearrange load to help balance the load. Fully open . • Water inlet hose is bent. • The filter of balance. • The appliance has an imbalance detection and correction system. Clean...


