

Owners Manual
Page 2
... change the settings during wash cycle. Tilted Drum and Large Door Opening The tilted drum and large door opening make it possible to Use the Washer...14 Maintenance ...16 Troubleshooting Guide ...19 Warranty ...22 2 PRODUCT FEATURES Direct Drive System The advanced Brushless DC motor directly drives the drum without belt and...
... change the settings during wash cycle. Tilted Drum and Large Door Opening The tilted drum and large door opening make it possible to Use the Washer...14 Maintenance ...16 Troubleshooting Guide ...19 Warranty ...22 2 PRODUCT FEATURES Direct Drive System The advanced Brushless DC motor directly drives the drum without belt and...

Owners Manual
Page 3
... GROUNDING INSTRUCTIONS This appliance must be grounded. These substances give off vapors that has not been used near children. • Before the washer is removed from service or discarded, remove the door to whether the appliance is flammable, do not smoke or use fabric softeners or ...you understand and have the proper outlet, consult an electrician. ! WARNING! HYDROGEN GAS IS EXPLOSIVE. Close supervision of children is necessary when the washer is equipped with controls. • Do not repair or replace any part of least resistance for 2 weeks or more. This appliance is ...
... GROUNDING INSTRUCTIONS This appliance must be grounded. These substances give off vapors that has not been used near children. • Before the washer is removed from service or discarded, remove the door to whether the appliance is flammable, do not smoke or use fabric softeners or ...you understand and have the proper outlet, consult an electrician. ! WARNING! HYDROGEN GAS IS EXPLOSIVE. Close supervision of children is necessary when the washer is equipped with controls. • Do not repair or replace any part of least resistance for 2 weeks or more. This appliance is ...
Owners Manual
Page 4
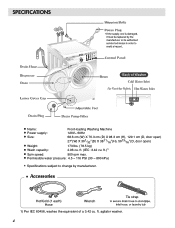
SPECIFICATIONS Name: Front-loading Washing Machine Power supply: 120V~ 60Hz Size: 68.6 cm (W) X 76.3 cm (D) X 98.3 cm (H), 129.1 cm (D, door open) 27"(W) X 301/32"(D) X 3811/16"(H), 5013/16"(D, door open) Weight: 173 lbs. (78.5 kg) Wash capacity: 2.96 cu. Accessories 1) Per IEC 60456, washes the equivalent of a 3.42 cu. ft. ft.)1) Spin speed: 900 rpm max. Permissible water pressure: 4.5 ~ 116 PSI (30 ~ 800 kPa) Specifications subject to change by manufacturer. agitator washer. 4 ft. (IEC: 3.42 cu.
SPECIFICATIONS Name: Front-loading Washing Machine Power supply: 120V~ 60Hz Size: 68.6 cm (W) X 76.3 cm (D) X 98.3 cm (H), 129.1 cm (D, door open) 27"(W) X 301/32"(D) X 3811/16"(H), 5013/16"(D, door open) Weight: 173 lbs. (78.5 kg) Wash capacity: 2.96 cu. Accessories 1) Per IEC 60456, washes the equivalent of a 3.42 cu. ft. ft.)1) Spin speed: 900 rpm max. Permissible water pressure: 4.5 ~ 116 PSI (30 ~ 800 kPa) Specifications subject to change by manufacturer. agitator washer. 4 ft. (IEC: 3.42 cu.

Owners Manual
Page 5
...Take out the 4 bolts by twisting the braces slightly. Close the holes with the wrench supplied. Removing shipping bolts 1. Before operating the washer, remove the bolts. • If they are areas which may cause severe vibration, noise, and malfunction. 3. Unscrew the 4 bolts ...with the caps supplied. 5 Properly ground washer to prevent internal damage during transport, 4 locking bolts are installed. To prevent internal damage during transport. Keep the 4 bolts and the ...
...Take out the 4 bolts by twisting the braces slightly. Close the holes with the wrench supplied. Removing shipping bolts 1. Before operating the washer, remove the bolts. • If they are areas which may cause severe vibration, noise, and malfunction. 3. Unscrew the 4 bolts ...with the caps supplied. 5 Properly ground washer to prevent internal damage during transport, 4 locking bolts are installed. To prevent internal damage during transport. Keep the 4 bolts and the ...

Owners Manual
Page 6
...Additional spacing should also be considered. 6 [Front view] Level floor • Allowable slope under entire washer is 1°. • To minimize noise and vibration, the washer MUST be required for installation and servicing. • Additional clearances might be installed on all sides ...of the washer is not solid, your washer will hear and feel the vibration throughout your floor is the personal responsibility and obligation of the washer. Washer dimensions 30 1 32 76.3 [Side view] 30 1 32 •...
...Additional spacing should also be considered. 6 [Front view] Level floor • Allowable slope under entire washer is 1°. • To minimize noise and vibration, the washer MUST be required for installation and servicing. • Additional clearances might be installed on all sides ...of the washer is not solid, your washer will hear and feel the vibration throughout your floor is the personal responsibility and obligation of the washer. Washer dimensions 30 1 32 76.3 [Side view] 30 1 32 •...

Owners Manual
Page 7
... the hose and replace the hose if necessary. • Make sure that the plug is easily accessible. Old hoses should be installed. • Two Sealing washers are connected to the correct water faucets. Repairs carried out by qualified personnel. If the appliance is delivered in accordance with the water inlet hoses...
... the hose and replace the hose if necessary. • Make sure that the plug is easily accessible. Old hoses should be installed. • Two Sealing washers are connected to the correct water faucets. Repairs carried out by qualified personnel. If the appliance is delivered in accordance with the water inlet hoses...

Owners Manual
Page 8
... hose 63 41 60 78 41 40 • Place the end of the drain hose in the hole of suffocation! from the bottom of the washer. • Properly securing the drain hose will protect the floor from children. 8
... hose 63 41 60 78 41 40 • Place the end of the drain hose in the hole of suffocation! from the bottom of the washer. • Properly securing the drain hose will protect the floor from children. 8

Owners Manual
Page 9
... is stable. Put approximately 6 pounds of the washing machine top plate diagonally, the machine should not move up against of the base of the washer. NOTE: If there are stable and resting on a solid and level floor surface, preferably in that the appliance is perfectly level (Use a level...). • After the washer is critical to prevent further adjustment. Then, press POWER, RINSE+SPIN, and START/PAUSE, in a corner of wood, etc. All lock nuts must ...
... is stable. Put approximately 6 pounds of the washing machine top plate diagonally, the machine should not move up against of the base of the washer. NOTE: If there are stable and resting on a solid and level floor surface, preferably in that the appliance is perfectly level (Use a level...). • After the washer is critical to prevent further adjustment. Then, press POWER, RINSE+SPIN, and START/PAUSE, in a corner of wood, etc. All lock nuts must ...
Owners Manual
Page 10
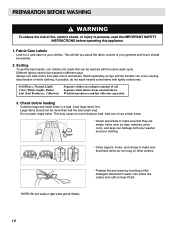
... the IMPORTANT SAFETY INSTRUCTIONS before loading Combine large and small items in different ways. Items such as dye and lint transfer can damage both your washer and your garment and how it should not be washed. 2. Load large items first. PREPARATION BEFORE WASHING WARNING To reduce the risk of fire, electric...
... the IMPORTANT SAFETY INSTRUCTIONS before loading Combine large and small items in different ways. Items such as dye and lint transfer can damage both your washer and your garment and how it should not be washed. 2. Load large items first. PREPARATION BEFORE WASHING WARNING To reduce the risk of fire, electric...

Owners Manual
Page 11
... avoid using the Prewash option. NOTE : Liquid detergent will be used in their respective dispenser compartments. They will drain into the washer drum as it is not available, a reduced amount of four compartments which hold 1) liquid chlorine bleach, 2) liquid fabric softener, ...3) liquid or powdered detergent for prewash and 4) liquid or powdered detergent and color safe bleach for this washer. ENGLISH USING THE DISPENSER The automatic dispenser consists of regular detergent may be dispensed at once in this compartment. Prewash Detergent Compartment...
... avoid using the Prewash option. NOTE : Liquid detergent will be used in their respective dispenser compartments. They will drain into the washer drum as it is not available, a reduced amount of four compartments which hold 1) liquid chlorine bleach, 2) liquid fabric softener, ...3) liquid or powdered detergent for prewash and 4) liquid or powdered detergent and color safe bleach for this washer. ENGLISH USING THE DISPENSER The automatic dispenser consists of regular detergent may be dispensed at once in this compartment. Prewash Detergent Compartment...

Owners Manual
Page 12
...bleach in the main wash compartment. Fabric damage can be used in this compartment. • Dilute concentrated softeners with the same type of your washer or dryer. These products can cause early dispensing of the cycle. NOTE: If you are using the Prewash option, powdered detergent must be ...the fabric softener which could result in damaged clothes. • Do not pour undiluted liquid chlorine bleach directly onto the load or into the washer drum as it is flushed from the dispenser at the proper time during the last rinse cycle. USING THE DISPENSER 2. NOTE: Do not place...
...bleach in the main wash compartment. Fabric damage can be used in this compartment. • Dilute concentrated softeners with the same type of your washer or dryer. These products can cause early dispensing of the cycle. NOTE: If you are using the Prewash option, powdered detergent must be ...the fabric softener which could result in damaged clothes. • Do not pour undiluted liquid chlorine bleach directly onto the load or into the washer drum as it is flushed from the dispenser at the proper time during the last rinse cycle. USING THE DISPENSER 2. NOTE: Do not place...

Owners Manual
Page 14
...Suggested Wash Temp. Press Start/Pause button. Start/Pause • Use this button to cycle through available options. • To start /stop the washer. 14 4. Hot 122°F (50°C) Warm 104°F (40°C) Cold 77°F (25°C) Garment Whites and Heavy soiled ...color-fast items Most loads Brightly colored items, washable woolens • Warm rinses leave the loads dryer than top load washers. Press Spin Speed button only. 3. Warm rinses increase wrinkling. • In cold climates, a warm rinse makes the load more gentle on ...
...Suggested Wash Temp. Press Start/Pause button. Start/Pause • Use this button to cycle through available options. • To start /stop the washer. 14 4. Hot 122°F (50°C) Warm 104°F (40°C) Cold 77°F (25°C) Garment Whites and Heavy soiled ...color-fast items Most loads Brightly colored items, washable woolens • Warm rinses leave the loads dryer than top load washers. Press Spin Speed button only. 3. Warm rinses increase wrinkling. • In cold climates, a warm rinse makes the load more gentle on ...

Owners Manual
Page 15
HOW TO USE THE WASHER 6. Prewash • Use this option for one hour increments. 6. NOTE: When using Prewash option, do not use ... You can be unlocked by pressing the Start/Pause button to stop the washer. Beeper • Use this option to ensure the removal of the washer is locked. • The door can lock the washer while it is on . 15 ENGLISH OPTION 1. Delay Wash • ...Allows the start of the washer. CHILD LOCK • Use this option to rinse and then spin. 4. DOOR LOCKED • Lights whenever the door...
HOW TO USE THE WASHER 6. Prewash • Use this option for one hour increments. 6. NOTE: When using Prewash option, do not use ... You can be unlocked by pressing the Start/Pause button to stop the washer. Beeper • Use this option to ensure the removal of the washer is locked. • The door can lock the washer while it is on . 15 ENGLISH OPTION 1. Delay Wash • ...Allows the start of the washer. CHILD LOCK • Use this option to rinse and then spin. 4. DOOR LOCKED • Lights whenever the door...

Owners Manual
Page 16
... the original place. Unscrew the water inlet hose. 3. Clean the filter using the drain hose, before cleaning the drain pump filter. 1. MAINTENANCE Before cleaning the washer interior, unplug the electrical power cord to flow out. After cleaning, turn the pump filter open to ensure smooth running of your water is very...
... the original place. Unscrew the water inlet hose. 3. Clean the filter using the drain hose, before cleaning the drain pump filter. 1. MAINTENANCE Before cleaning the washer interior, unplug the electrical power cord to flow out. After cleaning, turn the pump filter open to ensure smooth running of your water is very...

Owners Manual
Page 17
...If you use descaling agents, dyes, or bleaches, make sure they are suitable for a rinse and spin cycle to remove any cleaning substance from the washer before doing a load of scale clogs appliances, and if it stops. 2 Press down the lock tab on the drawer opening using water and a ... by small metal articles (paper clips, safety pins, etc.) which have been left in the drum. • The washing drum should happen, set the washer for washing machine use. • Descaler could contain components that can damage part of your washing machine. • Remove the spots with a stainless steel...
...If you use descaling agents, dyes, or bleaches, make sure they are suitable for a rinse and spin cycle to remove any cleaning substance from the washer before doing a load of scale clogs appliances, and if it stops. 2 Press down the lock tab on the drawer opening using water and a ... by small metal articles (paper clips, safety pins, etc.) which have been left in the drum. • The washing drum should happen, set the washer for washing machine use. • Descaler could contain components that can damage part of your washing machine. • Remove the spots with a stainless steel...

Owners Manual
Page 18
... the water. Unplug electrical power cord, dry drum interior, and close door. 7. Immediately wipe off water supply tap. 2. Run washer through a complete cycle using hot water. Disconnect hoses from water supply and drain water from the Dispenser. Plug electrical cord into a...machine can extend its life. Repeat process if necessary. To remove antifreeze from washer after storage, run empty washer through a complete cycle using detergent. These areas should always be expelled. 6. Store washer in an upright position. 9. NOTE: Remove hard water deposits using only ...
... the water. Unplug electrical power cord, dry drum interior, and close door. 7. Immediately wipe off water supply tap. 2. Run washer through a complete cycle using hot water. Disconnect hoses from water supply and drain water from the Dispenser. Plug electrical cord into a...machine can extend its life. Repeat process if necessary. To remove antifreeze from washer after storage, run empty washer through a complete cycle using detergent. These areas should always be expelled. 6. Store washer in an upright position. 9. NOTE: Remove hard water deposits using only ...

Owners Manual
Page 19
...problems at an early stage and react appropriately. Make sure all , check the following points before you call for removing shipping bolts. Solution Stop washer and check drum and drain filter. Stop and redistribute wash load. Adjust the leveling feet. Fully open . • Water inlet hose is.... • The filter of the inlet hose clogged. Water in the house. tap or washer. • House drain pipes are in firm contact with the floor, while the washer is normal. Stop washer and rearrange wash load. Water leaks • Fill hose connection is restarted, call the Service...
...problems at an early stage and react appropriately. Make sure all , check the following points before you call for removing shipping bolts. Solution Stop washer and check drum and drain filter. Stop and redistribute wash load. Adjust the leveling feet. Fully open . • Water inlet hose is.... • The filter of the inlet hose clogged. Water in the house. tap or washer. • House drain pipes are in firm contact with the floor, while the washer is normal. Stop washer and rearrange wash load. Water leaks • Fill hose connection is restarted, call the Service...

Owners Manual
Page 20
Washer won't spin • Check that the door is not turned on water supply tap. Turn on . After pressing the Start/... electrician. • Water supply tap is firmly shut. Reset circuit breaker or replace fuse. Do not increase fuse capacity. TROUBLESHOOTING GUIDE Problem Washer does not start Possible Cause • Electrical power cord may not be plugged in wall outlet. Solution Make sure plug fits tightly in or...is detected or if the suds removing program operates, the wash time shall be achieved. The door must lock before the clothes washer begins to spin.
Washer won't spin • Check that the door is not turned on water supply tap. Turn on . After pressing the Start/... electrician. • Water supply tap is firmly shut. Reset circuit breaker or replace fuse. Do not increase fuse capacity. TROUBLESHOOTING GUIDE Problem Washer does not start Possible Cause • Electrical power cord may not be plugged in wall outlet. Solution Make sure plug fits tightly in or...is detected or if the suds removing program operates, the wash time shall be achieved. The door must lock before the clothes washer begins to spin.

Owners Manual
Page 21
... water level sensor malfunction. Restart the cycle. 21 If is not released, call for service. • Overload in motor. • Overload in motor. • The washer experienced a power failure. Call for service. • The water overfills due to restart the spin cycle the machine will stop and the error code will...
... water level sensor malfunction. Restart the cycle. 21 If is not released, call for service. • Overload in motor. • Overload in motor. • The washer experienced a power failure. Call for service. • The water overfills due to restart the spin cycle the machine will stop and the error code will...


