
Owner's Manual
Page 3
... hands to use this may cause some scaled or processed images may cause damage to damage. However, this is characteristic of the fixed-resolution LCD panel. However, this will have no impact or effect on the product. Make sure to move. Make sure the...
... hands to use this may cause some scaled or processed images may cause damage to damage. However, this is characteristic of the fixed-resolution LCD panel. However, this will have no impact or effect on the product. Make sure to move. Make sure the...

Owner's Manual
Page 8
..., adjust the angle as shown below. 1. Tilt Range : -2˚~15˚ -2 15 Do not touch or press the screen when adjusting the angle of the panel in various ways for maximum comfort. ERGONOMIC It is recommended that the power to maintain an ergonomic and comfortable viewing position, the forward tilt angle...
..., adjust the angle as shown below. 1. Tilt Range : -2˚~15˚ -2 15 Do not touch or press the screen when adjusting the angle of the panel in various ways for maximum comfort. ERGONOMIC It is recommended that the power to maintain an ergonomic and comfortable viewing position, the forward tilt angle...
Owner's Manual
Page 10
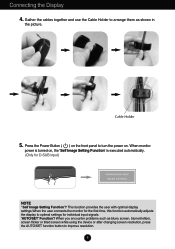
Gather the cables together and use the Cable Holder to improve resolution. 9 Press the Power Button ( ) on the front panel to optimal settings for D-SUB input) NOTE ' Self Image Setting Function'? This function provides the user with optimal display settings.When the user connects the ...
Gather the cables together and use the Cable Holder to improve resolution. 9 Press the Power Button ( ) on the front panel to optimal settings for D-SUB input) NOTE ' Self Image Setting Function'? This function provides the user with optimal display settings.When the user connects the ...

Owner's Manual
Page 11
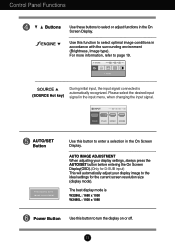
... button to move to EZ ZOOMING, 4:3 IN WIDE and PHOTO EFFECT for D-SUB/DVI-D signal input. The message "OSD LOCKED" should appear. 10 Control Panel Functions Front Panel Controls 123 4 5 67 8 Button Use this button to move to 4:3 IN WIDE, PHOTO EFFECT and VOLUME for HDMI signal input. Button Use this button...
... button to move to EZ ZOOMING, 4:3 IN WIDE and PHOTO EFFECT for D-SUB/DVI-D signal input. The message "OSD LOCKED" should appear. 10 Control Panel Functions Front Panel Controls 123 4 5 67 8 Button Use this button to move to 4:3 IN WIDE, PHOTO EFFECT and VOLUME for HDMI signal input. Button Use this button...
Owner's Manual
Page 12
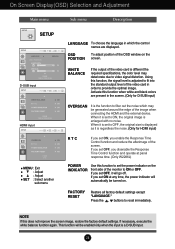
... automatically recognized. For more information, refer to turn the display on or off. 11 The best display mode is W2286L : 1680 x 1050 W2486L : 1920 x 1080 Power Button Use this button to select optimal image conditions in the On Screen Display. Please select the desired input signal ...always press the AUTO/SET button before entering the On Screen Display(OSD).(Only for the current screen resolution size (display mode). Control Panel Functions Buttons Use these buttons to the ideal settings for D-SUB input) This will automatically adjust your display image to select or adjust ...
... automatically recognized. For more information, refer to turn the display on or off. 11 The best display mode is W2286L : 1680 x 1050 W2486L : 1920 x 1080 Power Button Use this button to select optimal image conditions in the On Screen Display. Please select the desired input signal ...always press the AUTO/SET button before entering the On Screen Display(OSD).(Only for the current screen resolution size (display mode). Control Panel Functions Buttons Use these buttons to the ideal settings for D-SUB input) This will automatically adjust your display image to select or adjust ...
Owner's Manual
Page 13
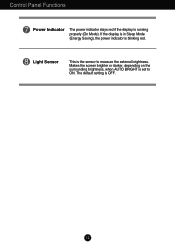
Light Sensor This is OFF. 12 The default setting is the sensor to ON. Makes the screen brighter or darker, depending on the surrounding brightness, when AUTO BRIGHT is blinking red. If the display is in Sleep Mode (Energy Saving), the power indicator is set to measure the external brightness. Control Panel Functions Power Indicator The power indicator stays red if the display is running properly (On Mode).
Light Sensor This is OFF. 12 The default setting is the sensor to ON. Makes the screen brighter or darker, depending on the surrounding brightness, when AUTO BRIGHT is blinking red. If the display is in Sleep Mode (Energy Saving), the power indicator is set to measure the external brightness. Control Panel Functions Power Indicator The power indicator stays red if the display is running properly (On Mode).
Owner's Manual
Page 25
... color level may be enabled only when the input is a D-SUB input. 24 Press the , buttons to ON, the original image is set ON at panel response time. (Only W2286L) POWER INDICATOR Use this function when white and black colors are displayed. When it is enlarged with no noise. If you...
... color level may be enabled only when the input is a D-SUB input. 24 Press the , buttons to ON, the original image is set ON at panel response time. (Only W2286L) POWER INDICATOR Use this function when white and black colors are displayed. When it is enlarged with no noise. If you...
Owner's Manual
Page 27
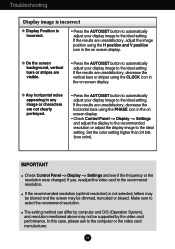
...characters are not clearly portrayed. • Press the AUTO/SET button to automatically adjust your display image to the ideal setting. IMPORTANT Check Control Panel --> Display --> Settings and see if the frequency or the resolution were changed. If the results are unsatisfactory, decrease the vertical bars or .... If the results are unsatisfactory, adjust the image position using the CLOCK icon in the on screen display. • Check Control Panel --> Display --> Settings and adjust the display to the recommended resolution or adjust the display image to the recommend resolution.
...characters are not clearly portrayed. • Press the AUTO/SET button to automatically adjust your display image to the ideal setting. IMPORTANT Check Control Panel --> Display --> Settings and see if the frequency or the resolution were changed. If the results are unsatisfactory, decrease the vertical bars or .... If the results are unsatisfactory, adjust the image position using the CLOCK icon in the on screen display. • Check Control Panel --> Display --> Settings and adjust the display to the recommended resolution or adjust the display image to the recommend resolution.

Owner's Manual
Page 28
.... • Make sure the video card is properly inserted in the slot. • Set the color setting higher than 24 bits (true color) at Control Panel - G Have you see an "Unrecognized monitor, Plug&Play (VESA DDC) monitor found" message? The Audio function is not working G Picture OK & No sound. • Check...
.... • Make sure the video card is properly inserted in the slot. • Set the color setting higher than 24 bits (true color) at Control Panel - G Have you see an "Unrecognized monitor, Plug&Play (VESA DDC) monitor found" message? The Audio function is not working G Picture OK & No sound. • Check...
Owner's Manual
Page 29
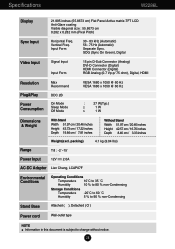
... inches Height 42.57 cm / 16.76 inches Depth 8.46 cm / 3.33 inches Weight(excl. Specifications W2286L Display 21.995 inches (55.8673 cm) Flat Panel Active matrix-TFT LCD Anti-Glare coating Visible diagonal size : 55.8673 cm 0.282 x 0.282 mm (Pixel Pitch) Sync Input Horizontal Freq. Vertical Freq.
... inches Height 42.57 cm / 16.76 inches Depth 8.46 cm / 3.33 inches Weight(excl. Specifications W2286L Display 21.995 inches (55.8673 cm) Flat Panel Active matrix-TFT LCD Anti-Glare coating Visible diagonal size : 55.8673 cm 0.282 x 0.282 mm (Pixel Pitch) Sync Input Horizontal Freq. Vertical Freq.
Owner's Manual
Page 30
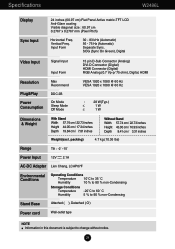
... ( ), Detached ( O ) Power cord Wall-outlet type NOTE Information in this document is subject to change without notice. 29 Vertical Freq. Specifications W2486L Display Sync Input 24 inches (60.97 cm) Flat Panel Active matrix-TFT LCD Anti-Glare coating Visible diagonal size : 60.97 cm 0.2767 x 0.2767 mm (Pixel Pitch) Horizontal Freq.
... ( ), Detached ( O ) Power cord Wall-outlet type NOTE Information in this document is subject to change without notice. 29 Vertical Freq. Specifications W2486L Display Sync Input 24 inches (60.97 cm) Flat Panel Active matrix-TFT LCD Anti-Glare coating Visible diagonal size : 60.97 cm 0.2767 x 0.2767 mm (Pixel Pitch) Horizontal Freq.

