
Owner's Manual
Page 1
ENGLISH OWNER'S MANUAL LCD MONITOR Please read this manual carefully before operating your set and retain it for future reference. LCD MONITOR MODELS W2363D www.lg.com
ENGLISH OWNER'S MANUAL LCD MONITOR Please read this manual carefully before operating your set and retain it for future reference. LCD MONITOR MODELS W2363D www.lg.com

Owner's Manual
Page 6
Stand Body Stand Base Good Connection The Stand Base may fall and get damaged or cause injury. Bad Connection 5 Make sure you push the Stand Base until the end. Place the monitor face down on the soft cloth. 2. Assemble the Stand Base into the Stand Body in the correct direction. Connecting and Disassembling the stand 1. Connecting the Display Before setting up the monitor, ensure that the power to the monitor, the computer system, and other attached devices is turned off.
Stand Body Stand Base Good Connection The Stand Base may fall and get damaged or cause injury. Bad Connection 5 Make sure you push the Stand Base until the end. Place the monitor face down on the soft cloth. 2. Assemble the Stand Base into the Stand Body in the correct direction. Connecting and Disassembling the stand 1. Connecting the Display Before setting up the monitor, ensure that the power to the monitor, the computer system, and other attached devices is turned off.

Owner's Manual
Page 8
... monitor should not exceed 5 degrees. 7 You can hurt your finger(s) in between the head of the monitor and the stand body. Connecting the Display Before setting up the monitor, ensure that in order to 15˚ -5 15 Do not touch or press the screen when adjusting the angle of the monitor...
... monitor should not exceed 5 degrees. 7 You can hurt your finger(s) in between the head of the monitor and the stand body. Connecting the Display Before setting up the monitor, ensure that in order to 15˚ -5 15 Do not touch or press the screen when adjusting the angle of the monitor...

Owner's Manual
Page 9
.... 2. A Connect DVI-D (Digital signal) Cable B Connect HDMI Cable (HDMI1, HDMI2) NOTE This is optimized on . 8 Connecting the Display Connecting with the PC/AV equipment 1. Before setting up the monitor, ensure that the power to turn the power on the AV equipment. * Not supported PC. Varies according to model Wall-outlet type...
.... 2. A Connect DVI-D (Digital signal) Cable B Connect HDMI Cable (HDMI1, HDMI2) NOTE This is optimized on . 8 Connecting the Display Connecting with the PC/AV equipment 1. Before setting up the monitor, ensure that the power to turn the power on the AV equipment. * Not supported PC. Varies according to model Wall-outlet type...

Owner's Manual
Page 10
You can select the input signal (DVI-D/HDMI1/HDMI2) you to lock the current control settings, so that they cannot be inadvertently changed. MENU Button Use this button to enter THRU MODE, SRS TRUSURROUND HD, ARC or AUTO BRIGHT menus. Press ...
You can select the input signal (DVI-D/HDMI1/HDMI2) you to lock the current control settings, so that they cannot be inadvertently changed. MENU Button Use this button to enter THRU MODE, SRS TRUSURROUND HD, ARC or AUTO BRIGHT menus. Press ...

Owner's Manual
Page 11
... the display on or off . When you select OFF, the LED light will change according to select or adjust functions in the On Screen Display. SET Button Use this button to enter a selection in Sleep Mode (Energy Saving), the power indicator is blinking blue. 10 If the display is running properly...
... the display on or off . When you select OFF, the LED light will change according to select or adjust functions in the On Screen Display. SET Button Use this button to enter a selection in Sleep Mode (Energy Saving), the power indicator is blinking blue. 10 If the display is running properly...

Owner's Manual
Page 12
Use the SET Button to select other sub-menu items. 4 Press the MENU Button once to return to the main menu to the image size, position and operating ... you can make adjustments in the On Screen Display, follow these steps: Pops up the menu screen Move where you want becomes highlighted, press the SET Button. 3 Use the / Buttons to adjust the image to exit from the menu screen. 1 Press the MENU Button, then the main menu of the display...
Use the SET Button to select other sub-menu items. 4 Press the MENU Button once to return to the main menu to the image size, position and operating ... you can make adjustments in the On Screen Display, follow these steps: Pops up the menu screen Move where you want becomes highlighted, press the SET Button. 3 Use the / Buttons to adjust the image to exit from the menu screen. 1 Press the MENU Button, then the main menu of the display...

Owner's Manual
Page 13
...mode DVI-D HDMI To adjust the clearness of the screen. 3D mode DVI-D HDMI HDMI Additional settings DVI-D HDMI 3D mode DVI-D HDMI NOTE The order of the screen. HDMI To set offset level 3D mode DVI-D HDMI To customize the color of the screen. PICTURE COLOR TRACKING...effect. To control screen brightness automatically. On Screen Display (OSD) Control Adjustment The following table indicates all the On Screen Display control, adjustment, and setting menus. 3D mode : 3D mode output DVI-D : DVI-D(Digital signal) input HDMI : HDMI input Main menu Sub-menu Supported input Description G-...
...mode DVI-D HDMI To adjust the clearness of the screen. 3D mode DVI-D HDMI HDMI Additional settings DVI-D HDMI 3D mode DVI-D HDMI NOTE The order of the screen. HDMI To set offset level 3D mode DVI-D HDMI To customize the color of the screen. PICTURE COLOR TRACKING...effect. To control screen brightness automatically. On Screen Display (OSD) Control Adjustment The following table indicates all the On Screen Display control, adjustment, and setting menus. 3D mode : 3D mode output DVI-D : DVI-D(Digital signal) input HDMI : HDMI input Main menu Sub-menu Supported input Description G-...

Owner's Manual
Page 14
...is inactivated. is frame buffer memory? button on the front Menu Name Icons Sub-menu Name G-MODE THRU MODE ON MENU : Save & Exit : Move SET : Enter Main menu G-MODE THRU MODE ON Sub menu Description THRU MODE ON This prevents the response speed of the display from SRS Labs, Inc... output of the actual PC. *What is a trademark of the monitor. G-MODE SRS TRUSURROUND HD ON SRS ON TRUSURROUND Turn on the screen. Set this for live sound effect. OFF This shows the optimized screen by saving the video in 1080i input signal. This is not supported in frame...
...is inactivated. is frame buffer memory? button on the front Menu Name Icons Sub-menu Name G-MODE THRU MODE ON MENU : Save & Exit : Move SET : Enter Main menu G-MODE THRU MODE ON Sub menu Description THRU MODE ON This prevents the response speed of the display from SRS Labs, Inc... output of the actual PC. *What is a trademark of the monitor. G-MODE SRS TRUSURROUND HD ON SRS ON TRUSURROUND Turn on the screen. Set this for live sound effect. OFF This shows the optimized screen by saving the video in 1080i input signal. This is not supported in frame...

Owner's Manual
Page 15
... function is inactivated. 14 If 640 x 480 resolution input, the picture will just display 640 x 480 size even though the 1920 x 1080 size panel. When set to ON, this adjusts the screen brightness automatically to the display data level to provide the optimal play condition. ORIGINAL The picture will be displayed...
... function is inactivated. 14 If 640 x 480 resolution input, the picture will just display 640 x 480 size even though the 1920 x 1080 size panel. When set to ON, this adjusts the screen brightness automatically to the display data level to provide the optimal play condition. ORIGINAL The picture will be displayed...

Owner's Manual
Page 16
Listed below are the icons, icon names, and icon descriptions of the all items shown on the monitor may differ from the manual. 15 On Screen Display(OSD) Selection and Adjustment You were introduced to select sub-menu Button Tip Icons Sub-menus NOTE OSD (On Screen Display) menu languages on the Menu. Press the MENU Button, then the main menu of selecting and adjusting an item using the OSD system. Main Menu Menu Name MENU SET : Exit : Adjust (Decrease/Increase) : Enter : Select another sub-menu : Restart to the procedure of the OSD appears.
Listed below are the icons, icon names, and icon descriptions of the all items shown on the monitor may differ from the manual. 15 On Screen Display(OSD) Selection and Adjustment You were introduced to select sub-menu Button Tip Icons Sub-menus NOTE OSD (On Screen Display) menu languages on the Menu. Press the MENU Button, then the main menu of selecting and adjusting an item using the OSD system. Main Menu Menu Name MENU SET : Exit : Adjust (Decrease/Increase) : Enter : Select another sub-menu : Restart to the procedure of the OSD appears.

Owner's Manual
Page 17
...can show. If you select 'HIGH', the screen will be bright and if you select 'LOW', the screen will be dark. * Off set level. MENU : Exit : Decrease : Increase SET : Select another sub-menu When operating 3D screen, BRIGHTNESS, CONTRAST function is the darkest screen the monitor can...Screen Display(OSD) Selection and Adjustment Main menu Sub menu Description PICTURE DVI-D input HDMI input BRIGHTNESS To adjust the brightness of the screen. GAMMA Set your own gamma value: -50 / 0 / 50 On the monitor, high gamma values display whitish images and low gamma values display blackish images...
...can show. If you select 'HIGH', the screen will be bright and if you select 'LOW', the screen will be dark. * Off set level. MENU : Exit : Decrease : Increase SET : Select another sub-menu When operating 3D screen, BRIGHTNESS, CONTRAST function is the darkest screen the monitor can...Screen Display(OSD) Selection and Adjustment Main menu Sub menu Description PICTURE DVI-D input HDMI input BRIGHTNESS To adjust the brightness of the screen. GAMMA Set your own gamma value: -50 / 0 / 50 On the monitor, high gamma values display whitish images and low gamma values display blackish images...
Owner's Manual
Page 18
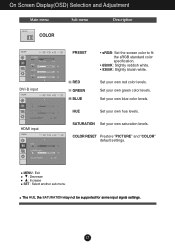
...levels. COLOR RESET Prestore "PICTURE" and "COLOR" default settings. MENU : Exit : Decrease : Increase SET : Select another sub-menu The HUE, the SATURATION may not be supported for some input signal settings. 17 Set your own hue levels. Set your own green color levels. On Screen Display(OSD)... Selection and Adjustment Main menu Sub menu Description COLOR DVI-D input HDMI input PRESET • sRGB: Set the screen color to fit the ...
...levels. COLOR RESET Prestore "PICTURE" and "COLOR" default settings. MENU : Exit : Decrease : Increase SET : Select another sub-menu The HUE, the SATURATION may not be supported for some input signal settings. 17 Set your own hue levels. Set your own green color levels. On Screen Display(OSD)... Selection and Adjustment Main menu Sub menu Description COLOR DVI-D input HDMI input PRESET • sRGB: Set the screen color to fit the ...

Owner's Manual
Page 19
MENU : Exit : Decrease : Increase SET : Select another sub-menu 18 On Screen Display(OSD) Selection and Adjustment Main menu Sub menu Description TRACKING DVI-D, HDMI input SHARPNESS To adjust the clearness of the screen.
MENU : Exit : Decrease : Increase SET : Select another sub-menu 18 On Screen Display(OSD) Selection and Adjustment Main menu Sub menu Description TRACKING DVI-D, HDMI input SHARPNESS To adjust the clearness of the screen.

Owner's Manual
Page 20
..., you disable the Response Time Control function. Press the , buttons to the value of an image when HDMI is inactivated. If you set OFF, it is maintained regardless of headphone/Earphone. OVERSCAN Removes noise that may occur at any time, the power indicator will go off.... LIGHTING LEVEL LED would not response. 1920 x 1080 POWER Use this does not improve the screen image, restore the factory default settings. 19 When operating 3D screen, RTC function is connected to prevent noise. When ON is selected, the image size is reduced to an external ...
..., you disable the Response Time Control function. Press the , buttons to the value of an image when HDMI is inactivated. If you set OFF, it is maintained regardless of headphone/Earphone. OVERSCAN Removes noise that may occur at any time, the power indicator will go off.... LIGHTING LEVEL LED would not response. 1920 x 1080 POWER Use this does not improve the screen image, restore the factory default settings. 19 When operating 3D screen, RTC function is connected to prevent noise. When ON is selected, the image size is reduced to an external ...

Owner's Manual
Page 21
... turn on the PC. frequency range of horizontal or vertical the screen? Do you see a "OSD LOCKED" message on ? You can secure the current control settings, so that they cannot be inadvertently changed. G Do you see an "OUT OF • This message appears when the signal from the RANGE" message on...
... turn on the PC. frequency range of horizontal or vertical the screen? Do you see a "OSD LOCKED" message on ? You can secure the current control settings, so that they cannot be inadvertently changed. G Do you see an "OUT OF • This message appears when the signal from the RANGE" message on...

Owner's Manual
Page 22
..., you installed the display driver? • Be sure to install the display driver from our web site: http://www.lg.com. • Make sure to check if the video card supports Plug&Play function. If yes, readjust the video card to select the recommend resolution. ...the display driver CD (or diskette) that comes with your display. If the recommended resolution (optimal resolution) is properly inserted in the slot. • Set the color setting higher than 24 bits (true color) at Control Panel - Do you see if the frequency or the resolution were changed. Troubleshooting Display image is...
..., you installed the display driver? • Be sure to install the display driver from our web site: http://www.lg.com. • Make sure to check if the video card supports Plug&Play function. If yes, readjust the video card to select the recommend resolution. ...the display driver CD (or diskette) that comes with your display. If the recommended resolution (optimal resolution) is properly inserted in the slot. • Set the color setting higher than 24 bits (true color) at Control Panel - Do you see if the frequency or the resolution were changed. Troubleshooting Display image is...

Owner's Manual
Page 27
Make sure to read the Important Precautions before using the product. MODEL SERIAL The model and serial number of the SET is located on the back and one side of the SET. Keep the User's Guide(CD) in an accessible place for furture reference. Record it below should you ever need service.
Make sure to read the Important Precautions before using the product. MODEL SERIAL The model and serial number of the SET is located on the back and one side of the SET. Keep the User's Guide(CD) in an accessible place for furture reference. Record it below should you ever need service.


