
Owners Manual
Page 7
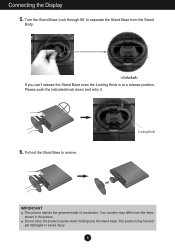
Turn the Stand Base Lock through 90˚ to remove. Pull out the Stand Base to separate the Stand Base from the items shown in the picture. Do not carry the product upside down and retry it. 6. Your monitor may fall and get damaged or cause injury. 6 The product may differ from the Stand Body. If you can't release the Stand Base even the Locking Knob is at a release position, Please push the indicated knob down holding only the stand base. Connecting the Display 5. Locking Knob IMPORTANT This picture depicts the general model of connection.
Turn the Stand Base Lock through 90˚ to remove. Pull out the Stand Base to separate the Stand Base from the items shown in the picture. Do not carry the product upside down and retry it. 6. Your monitor may fall and get damaged or cause injury. 6 The product may differ from the Stand Body. If you can't release the Stand Base even the Locking Knob is at a release position, Please push the indicated knob down holding only the stand base. Connecting the Display 5. Locking Knob IMPORTANT This picture depicts the general model of connection.
Owners Manual
Page 32
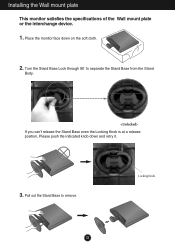
Place the monitor face down and retry it. 3. Locking Knob 31 Pull out the Stand Base to separate the Stand Base from the Stand Body. If you can't release the Stand Base even the Locking Knob is at a release position, Please push the indicated knob down on the soft cloth. 2. Turn the Stand Base Lock through 90˚ to remove. Installing the Wall mount plate This monitor satisfies the specifications of the Wall mount plate or the interchange device. 1.
Place the monitor face down and retry it. 3. Locking Knob 31 Pull out the Stand Base to separate the Stand Base from the Stand Body. If you can't release the Stand Base even the Locking Knob is at a release position, Please push the indicated knob down on the soft cloth. 2. Turn the Stand Base Lock through 90˚ to remove. Installing the Wall mount plate This monitor satisfies the specifications of the Wall mount plate or the interchange device. 1.


