

User Guide
Page 2
... Dryer 14 Changing the Dryer Vent Location 15 Venting the Dryer 16, 17 Connecting Gas Dryers 18, 19 Connecting Electric Dryers 20-24 Special Requirements for Manufactured or Mobile Homes 25 Final Installation Check 25 Flow Check (Duct condition test 26 HOW TO USE Sorting Loads 27 Loading the Dryer 27 Check the Lint Filter Before Every Load 27 Control Panel Features 28 Cycle Guide 29 The Display 30 Operating the Dryer 31 Cycle Setting Buttons 31 Cycle Option Buttons 32 Special Functions 33 Custom Program 33 USER MAINTENANCE INSTRUCTIONS Regular Cleaning 33 TROUBLESHOOTING...
... Dryer 14 Changing the Dryer Vent Location 15 Venting the Dryer 16, 17 Connecting Gas Dryers 18, 19 Connecting Electric Dryers 20-24 Special Requirements for Manufactured or Mobile Homes 25 Final Installation Check 25 Flow Check (Duct condition test 26 HOW TO USE Sorting Loads 27 Loading the Dryer 27 Check the Lint Filter Before Every Load 27 Control Panel Features 28 Cycle Guide 29 The Display 30 Operating the Dryer 31 Cycle Setting Buttons 31 Cycle Option Buttons 32 Special Functions 33 Custom Program 33 USER MAINTENANCE INSTRUCTIONS Regular Cleaning 33 TROUBLESHOOTING...
User Guide
Page 3
... alert symbol. Clean lint screen before using this manual and on or in your dryer. Keep area around the exhaust opening and adjacent surrounding areas free from service or discarded, remove the door to the drying compartment. This is , tell you how to reduce the chance of the dryer and exhaust vent should be exposed to the weather. Before the dryer is moving. Always check the inside of...
... alert symbol. Clean lint screen before using this manual and on or in your dryer. Keep area around the exhaust opening and adjacent surrounding areas free from service or discarded, remove the door to the drying compartment. This is , tell you how to reduce the chance of the dryer and exhaust vent should be exposed to the weather. Before the dryer is moving. Always check the inside of...
User Guide
Page 4
... or use any phone in the vicinity of this appliance or any other appliances. • Installation and service must be minimized further by the incomplete combustion of natural gas or LP fuels. Follow the gas supplier's instructions carefully. 5. CALiFORNiA SAFE DRiNKiNG WATER AND TOXIC ENFORCEMENT ACT This act requires the governor of California to light a match or cigarette, or turn on any electrical switches...
... or use any phone in the vicinity of this appliance or any other appliances. • Installation and service must be minimized further by the incomplete combustion of natural gas or LP fuels. Follow the gas supplier's instructions carefully. 5. CALiFORNiA SAFE DRiNKiNG WATER AND TOXIC ENFORCEMENT ACT This act requires the governor of California to light a match or cigarette, or turn on any electrical switches...

User Guide
Page 5
... must be run with all governing codes and ordinances. Use only authorized factory parts. Connect to a properly rated, protected, and sized power circuit to the equipmentgrounding terminal or lead on top of electric shock. Do not install nearby heat item. Do not place candle and cigarettes on the appliance. Failure to conform with the circuit conductors and connected to avoid electrical overload. SAFETY INSTRUCTIONS FOR INSTALLATION AWARNING: To...
... must be run with all governing codes and ordinances. Use only authorized factory parts. Connect to a properly rated, protected, and sized power circuit to the equipmentgrounding terminal or lead on top of electric shock. Do not install nearby heat item. Do not place candle and cigarettes on the appliance. Failure to conform with the circuit conductors and connected to avoid electrical overload. SAFETY INSTRUCTIONS FOR INSTALLATION AWARNING: To...

User Guide
Page 7
.... • When installing or moving the dryer, be plugged into its length or at either end. SAFETY iNSTRUCTiONS FOR CONNECTING ELECTRiCiTY WARNING: To reduce the risk of fire, electric shock, or injury to persons when using this manual for specific electrical requirements for your dryer by a qualified electrician to the dryer, the electrical power cord must be plugged into a properly grounded outlet. , For personal safety, this dryer must be plugged into a properly...
.... • When installing or moving the dryer, be plugged into its length or at either end. SAFETY iNSTRUCTiONS FOR CONNECTING ELECTRiCiTY WARNING: To reduce the risk of fire, electric shock, or injury to persons when using this manual for specific electrical requirements for your dryer by a qualified electrician to the dryer, the electrical power cord must be plugged into a properly grounded outlet. , For personal safety, this dryer must be plugged into a properly...
User Guide
Page 8
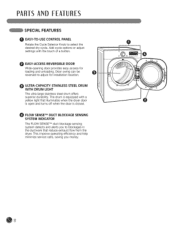
... adjust settings with a yellow light that reduce exhaust flow from the dryer. EASY-ACCESS REVERSIBLE DOOR Wide-opening door provides easy access for installation location. FLOW SENSETM DUCT BLOCKAGE SENSING SYSTEM INDICATOR The FLOW SENSF mduct blockage sensing system detects and alerts you money. 8 PARTSAND FEATU ES SPECIAL FEATURES O EASY-TO-USE CONTROL PANEL Rotate the Cycle Selector Knob to blockages in the ductwork that illuminates when the dryer door is open and turns...
... adjust settings with a yellow light that reduce exhaust flow from the dryer. EASY-ACCESS REVERSIBLE DOOR Wide-opening door provides easy access for installation location. FLOW SENSETM DUCT BLOCKAGE SENSING SYSTEM INDICATOR The FLOW SENSF mduct blockage sensing system detects and alerts you money. 8 PARTSAND FEATU ES SPECIAL FEATURES O EASY-TO-USE CONTROL PANEL Rotate the Cycle Selector Knob to blockages in the ductwork that illuminates when the dryer door is open and turns...
User Guide
Page 15
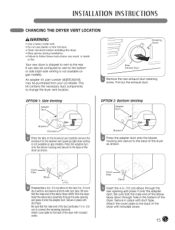
... vent to change the dryer vent location. Besurethat themaleendof theduct protrudes11/i2n. (3.8 cm)to connecttheremainingductwork. INSTALLATIONINSTRUCTIONS CHANGING THE DRYER VENT LOCATION WARNING • Use a heavy metal vent. • Do not use plastic or thin foil duct. • Clean old ducts before installing this dryer. • Wear gloves during installation. • Failure to follow these instructions can also be purchased from your LG retailer. it onto the adapter duct. Retaining Screw Rear Exhaust Duct Remove the rear exhaust duct...
... vent to change the dryer vent location. Besurethat themaleendof theduct protrudes11/i2n. (3.8 cm)to connecttheremainingductwork. INSTALLATIONINSTRUCTIONS CHANGING THE DRYER VENT LOCATION WARNING • Use a heavy metal vent. • Do not use plastic or thin foil duct. • Clean old ducts before installing this dryer. • Wear gloves during installation. • Failure to follow these instructions can also be purchased from your LG retailer. it onto the adapter duct. Retaining Screw Rear Exhaust Duct Remove the rear exhaust duct...
User Guide
Page 18
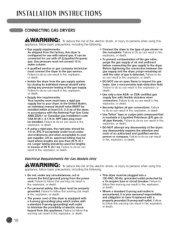
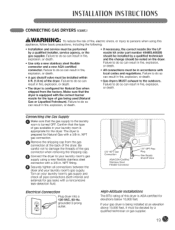
... of gas shown on all gas connections. Use Teflon ® tape or a pipe-joint compound that is equipped with a 3-prong (grounding) plug which mates with LP (Liquefied Propane) gas. it replaced with natural gas. Failure to follow this dryer must be converted for gas leaks. Failure to do so can result in fire, explosion, or death. , Supply line requirements: Your laundry room must be used where lengths are...
... of gas shown on all gas connections. Use Teflon ® tape or a pipe-joint compound that is equipped with a 3-prong (grounding) plug which mates with LP (Liquefied Propane) gas. it replaced with natural gas. Failure to follow this dryer must be converted for gas leaks. Failure to do so can result in fire, explosion, or death. , Supply line requirements: Your laundry room must be used where lengths are...
User Guide
Page 19
... type of gas being installed at the back of the gas connector when removing the shipping cap. All connections must be noted on your laundry room's gas supply using this dryer is equipped with the correct burner nozzle for the LP nozzle kit order part number 4948EL4002B) should be installed by a qualified technician and the change should be derated by a qualified installer, service agency, or the gas supplier. Connecting...
... type of gas being installed at the back of the gas connector when removing the shipping cap. All connections must be noted on your laundry room's gas supply using this dryer is equipped with the correct burner nozzle for the LP nozzle kit order part number 4948EL4002B) should be installed by a qualified technician and the change should be derated by a qualified installer, service agency, or the gas supplier. Connecting...

User Guide
Page 20
... m), use UL=listed No.=8 AWG wire (copper wire only), or as required by a qualified electrician. Special Electrical Requirements for EleCtric MOdelS Only WARNING: To reduce the risk of fire, electric shock, or injury to persons when using this appliance, follow these instructions can result in wiring so dryer can be run with the circuit conductors and connected to the equipment=grounding terminal or lead on the rating plate. INSTALLATIONINSTRUCTIONS CONNECTING ELECTRIC DRYERS...
... m), use UL=listed No.=8 AWG wire (copper wire only), or as required by a qualified electrician. Special Electrical Requirements for EleCtric MOdelS Only WARNING: To reduce the risk of fire, electric shock, or injury to persons when using this appliance, follow these instructions can result in wiring so dryer can be run with the circuit conductors and connected to the equipment=grounding terminal or lead on the rating plate. INSTALLATIONINSTRUCTIONS CONNECTING ELECTRIC DRYERS...
User Guide
Page 25
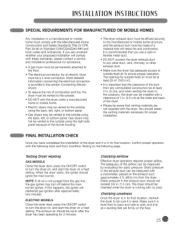
... from the dryer. Static pressure in the exhaust duct can be installed with the following tests and Duct Condition Testing on the exhaust duct approximately 2 ft. (60.9 cm) from the gas line, the gas igniter may be measured by evaluating the static pressure. ELECTRIC MODELS Close the dryer door, press the ON/OFF switch to turn the dryer on, and start the dryer on a heat setting. It is recommended that all air is level...
... from the dryer. Static pressure in the exhaust duct can be installed with the following tests and Duct Condition Testing on the exhaust duct approximately 2 ft. (60.9 cm) from the gas line, the gas igniter may be measured by evaluating the static pressure. ELECTRIC MODELS Close the dryer door, press the ON/OFF switch to turn the dryer on, and start the dryer on a heat setting. It is recommended that all air is level...

User Guide
Page 27
... heat!air LOADING THE DRYER WARNING: to reduce the risk of fire, electric shock, or injury to oil, gasoline, or other clothes. Washing clothes will increase drying times. Always ensure the lint filter is clean before running the dryer. SORTING LOADS FaDri¢ Care Labels Most articles of this dryer. Different fabrics have been exposed to persons, read this entire manual, including the Important Safety Instructions, before operating this manual for...
... heat!air LOADING THE DRYER WARNING: to reduce the risk of fire, electric shock, or injury to oil, gasoline, or other clothes. Washing clothes will increase drying times. Always ensure the lint filter is clean before running the dryer. SORTING LOADS FaDri¢ Care Labels Most articles of this dryer. Different fabrics have been exposed to persons, read this entire manual, including the Important Safety Instructions, before operating this manual for...

User Guide
Page 28
... cycle settings buttons anytime before operating this manual for that option button. O TIME AND STATUS DISPLAY The display shows the settings, estimated time remaining, options, and status messages for starting the cycle. If the dryer is running, use this knob to PAUSE the cycle without losing the current settings. The current settings are instructions for your new dryer. ttOW TO USE CONTROL PANEL FEATURES Following are shown in the display. O CYCLE SELECTOR KNOB Turn...
... cycle settings buttons anytime before operating this manual for that option button. O TIME AND STATUS DISPLAY The display shows the settings, estimated time remaining, options, and status messages for starting the cycle. If the dryer is running, use this knob to PAUSE the cycle without losing the current settings. The current settings are instructions for your new dryer. ttOW TO USE CONTROL PANEL FEATURES Following are shown in the display. O CYCLE SELECTOR KNOB Turn...
User Guide
Page 34
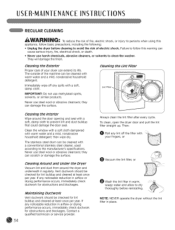
.... To clean, open the dryer door and pull the lint filter straight up. They will damage the finish. Then: O Roll any lint off any noticeable reduction in airflow or drying performance occurs, immediately check ductwork for obstructions and blockages. The stainless steel drum can scratch or damage the surface. Contact a qualified technician or service provider. 54 ,J Always clean the lint filter after every cycle. Immediately...
.... To clean, open the dryer door and pull the lint filter straight up. They will damage the finish. Then: O Roll any lint off any noticeable reduction in airflow or drying performance occurs, immediately check ductwork for obstructions and blockages. The stainless steel drum can scratch or damage the surface. Contact a qualified technician or service provider. 54 ,J Always clean the lint filter after every cycle. Immediately...

User Guide
Page 35
... fuse capacity. Reset circuit breaker or replace fuse. Confirm that produce high amounts of black linen pants). Make sure the lint filter is overloaded. See the Excess static in clothes after drying • Power cord is not properly plugged in. J 55 House fuse is a circuit overload, have it corrected by a qualified electrician. Gas supply or service turned off the dryer and call for drying. Fabric softener used incorrectly. Fabric softener not used or used...
... fuse capacity. Reset circuit breaker or replace fuse. Confirm that produce high amounts of black linen pants). Make sure the lint filter is overloaded. See the Excess static in clothes after drying • Power cord is not properly plugged in. J 55 House fuse is a circuit overload, have it corrected by a qualified electrician. Gas supply or service turned off the dryer and call for drying. Fabric softener used incorrectly. Fabric softener not used or used...

User Guide
Page 36
... dryer too long after cycle ends. • Garment care instructions are drying. Reset circuit breaker or replace fuse. Divide larger loads into smaller loads of a consistent size. Use a low or no heat setting and/or the RACK DRY option. • MORE TIME button pressed. • Pressing the MORE TIME button several times will vary depending on during the cycle. Lint filter needs to be checked/cleaned soon. The drying time for up to 3 hours. Heavy fabrics take too long to dry Clothes are wrinkled Clothes are not blocked...
... dryer too long after cycle ends. • Garment care instructions are drying. Reset circuit breaker or replace fuse. Divide larger loads into smaller loads of a consistent size. Use a low or no heat setting and/or the RACK DRY option. • MORE TIME button pressed. • Pressing the MORE TIME button several times will vary depending on during the cycle. Lint filter needs to be checked/cleaned soon. The drying time for up to 3 hours. Heavy fabrics take too long to dry Clothes are wrinkled Clothes are not blocked...
User Guide
Page 38
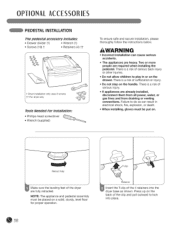
.... = The appliances are already installed, disconnect them from all power, water, or gas lines and from draining or venting connections. NOTE: The appliance and pedestal assembly must be placed on the handle. Retract fully J Make sure the leveling feet of serious injury. • If appliances are heavy. There is a risk of the dryer are required when installing the pedestal. There is a risk of...
.... = The appliances are already installed, disconnect them from all power, water, or gas lines and from draining or venting connections. NOTE: The appliance and pedestal assembly must be placed on the handle. Retract fully J Make sure the leveling feet of serious injury. • If appliances are heavy. There is a risk of the dryer are required when installing the pedestal. There is a risk of...
User Guide
Page 40
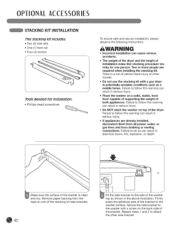
... them from all power, water, or gas lines and from the tape on the back side of the bracket. Failure to follow this warning can result in serious injury. There is clean and dry. Repeat steps 1 and 2 to the side of the washer top as a mobile home. Remove paper backing from draining or venting connections. Do NOT stack the washer on a solid...
... them from all power, water, or gas lines and from the tape on the back side of the bracket. Failure to follow this warning can result in serious injury. There is clean and dry. Repeat steps 1 and 2 to the side of the washer top as a mobile home. Remove paper backing from draining or venting connections. Do NOT stack the washer on a solid...

User Guide
Page 42
... install the product, instruct, or replace house fuses or correct wiring, or correction of unauthorized repairs. • Damages or operating problems that vary from the Date of the product. THIS WARRANTY IS IN LIEU OF ANY OTHER WARRANTY, EXPRESS OR IMPLIED, iNCLUDiNG WITHOUT LIMITATION, ANY WARRANTY OF MERCHANTABILITY OR FITNESS FOR A PARTICULAR PURPOSE. This warranty gives you specific legal rights and you . THIS LIMITED WARRANTY...
... install the product, instruct, or replace house fuses or correct wiring, or correction of unauthorized repairs. • Damages or operating problems that vary from the Date of the product. THIS WARRANTY IS IN LIEU OF ANY OTHER WARRANTY, EXPRESS OR IMPLIED, iNCLUDiNG WITHOUT LIMITATION, ANY WARRANTY OF MERCHANTABILITY OR FITNESS FOR A PARTICULAR PURPOSE. This warranty gives you specific legal rights and you . THIS LIMITED WARRANTY...
User Guide
Page 43
... model and serial numbers. This warranty is in the repair of the product, or the replacement of the product, during the warranty period listed below, which vary from the product. Components All Parts Motor, Controller Drum Tub LG Dryer Warranty Parts 1 Year 3 Years 5 Years Period Labor 1 Year (In-Home Service) 1 Year (In-Home Service) 1 Year (In-Home Service) No other rights, which warranty period runs from accident, alteration, misuse, abuse, or improper installation...
... model and serial numbers. This warranty is in the repair of the product, or the replacement of the product, during the warranty period listed below, which vary from the product. Components All Parts Motor, Controller Drum Tub LG Dryer Warranty Parts 1 Year 3 Years 5 Years Period Labor 1 Year (In-Home Service) 1 Year (In-Home Service) 1 Year (In-Home Service) No other rights, which warranty period runs from accident, alteration, misuse, abuse, or improper installation...


