
User Manual
Page 2
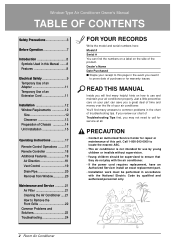
... the side of the product. Call 1-800-243-0000 to locate the nearest ASC. • This air conditioner is not intended for repair or maintenance of this unit. Window-Type Air Conditioner Owner's Manual TABLE OF CONTENTS Safety Precautions 3 Before Operation 7 Introduction 8 Symbols Used in this Manual ... Remote Control Operations ........17 Remote Controller 18 Additional Features 19 Air Direction 19 Vent Control 19 Drain Pipe 20 Removal from Window 20 Maintenance and Service 21 Air Filter 21 Cleaning the Air Conditioner .....21 How to Remove the Front Grille 22 Common Problems ...
... the side of the product. Call 1-800-243-0000 to locate the nearest ASC. • This air conditioner is not intended for repair or maintenance of this unit. Window-Type Air Conditioner Owner's Manual TABLE OF CONTENTS Safety Precautions 3 Before Operation 7 Introduction 8 Symbols Used in this Manual ... Remote Control Operations ........17 Remote Controller 18 Additional Features 19 Air Direction 19 Vent Control 19 Drain Pipe 20 Removal from Window 20 Maintenance and Service 21 Air Filter 21 Cleaning the Air Conditioner .....21 How to Remove the Front Grille 22 Common Problems ...
User Manual
Page 5
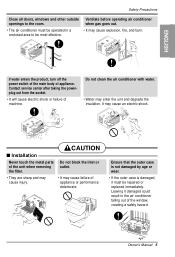
... to the room. • The air conditioner must be operated in the air conditioner falling out of machine. Owner's Manual 5 Contact service center after taking the powerplug out from the socket. • It will cause electric shock or failure of the window, creating a safety hazard. It may... enter the unit and degrade the insulation. CAUTION s Installation Never touch the metal parts of appliance. Ventilate before operating air conditioner when gas goes out. • It may cause ...
... to the room. • The air conditioner must be operated in the air conditioner falling out of machine. Owner's Manual 5 Contact service center after taking the powerplug out from the socket. • It will cause electric shock or failure of the window, creating a safety hazard. It may... enter the unit and degrade the insulation. CAUTION s Installation Never touch the metal parts of appliance. Ventilate before operating air conditioner when gas goes out. • It may cause ...
User Manual
Page 12
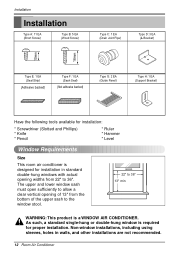
... for installation: * Screwdriver (Slotted and Phillips) * Knife * Pencil * Ruler * Hammer * Level Window Requirements Size This room air conditioner is a WINDOW AIR CONDITIONER. Non-window installations, including using sleeves, holes in standard double-hung windows with actual opening widths from the bottom of the upper sash to the window stool. 22" to 36" 13" min WARNING: This product is designed...
... for installation: * Screwdriver (Slotted and Phillips) * Knife * Pencil * Ruler * Hammer * Level Window Requirements Size This room air conditioner is a WINDOW AIR CONDITIONER. Non-window installations, including using sleeves, holes in standard double-hung windows with actual opening widths from the bottom of the upper sash to the window stool. 22" to 36" 13" min WARNING: This product is designed...

User Manual
Page 14
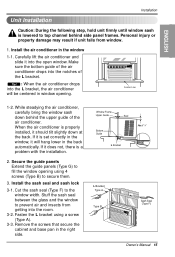
... Be sure to place bracket edge flush against back of the air conditioner. Type A 2. Remove the backing from the seal strip and attach the seal strip to hold unit securely in window Open the window and mark center line on the center of bracket as shown.... The bracket helps to the underside of Chassis 1. Fasten the curtains to the window width. Seal Strip (Type E) 3. Inner Sill Outer Sill Type A Inside Center Line 8" 8" Outside L Bracket 14 Room Air Conditioner Inner Sill Room Side Center Line 4. Attach L bracket 4-1. Use the 2 screws (Type...
... Be sure to place bracket edge flush against back of the air conditioner. Type A 2. Remove the backing from the seal strip and attach the seal strip to hold unit securely in window Open the window and mark center line on the center of bracket as shown.... The bracket helps to the underside of Chassis 1. Fasten the curtains to the window width. Seal Strip (Type E) 3. Inner Sill Outer Sill Type A Inside Center Line 8" 8" Outside L Bracket 14 Room Air Conditioner Inner Sill Room Side Center Line 4. Attach L bracket 4-1. Use the 2 screws (Type...
User Manual
Page 15
...screws that secure the cabinet and base pan in the window 1-1. Window Frame Upper Guide Bottom Guide Seal About 1/4" L Bracket L Bracket Type A Type B Sash Seal (Type F) Owner's Manual 15 While steadying the air conditioner, carefully bring the window sash down at the back. Secure the guide panels Extend...F3 HIGH Fan Dry T imer TE MP C enter Line 1-2. Stuff the sash seal between the glass and the window to the window width. If it into the notches of the air conditioner. Fasten the L bracket using 4 screws (Type B) to top channel behind the upper guide of the L bracket...
...screws that secure the cabinet and base pan in the window 1-1. Window Frame Upper Guide Bottom Guide Seal About 1/4" L Bracket L Bracket Type A Type B Sash Seal (Type F) Owner's Manual 15 While steadying the air conditioner, carefully bring the window sash down at the back. Secure the guide panels Extend...F3 HIGH Fan Dry T imer TE MP C enter Line 1-2. Stuff the sash seal between the glass and the window to the window width. If it into the notches of the air conditioner. Fasten the L bracket using 4 screws (Type B) to top channel behind the upper guide of the L bracket...
User Manual
Page 16
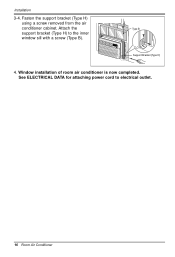
Support Bracket (Type H) 4. Window installation of room air conditioner is now completed. Installation 3-4. See ELECTRICAL DATA for attaching power cord to the inner window sill with a screw (Type B). Fasten the support bracket (Type H) using a screw removed from the air conditioner cabinet. Attach the Type B support bracket (Type H) to electrical outlet. 16 Room Air Conditioner
Support Bracket (Type H) 4. Window installation of room air conditioner is now completed. Installation 3-4. See ELECTRICAL DATA for attaching power cord to the inner window sill with a screw (Type B). Fasten the support bracket (Type H) using a screw removed from the air conditioner cabinet. Attach the Type B support bracket (Type H) to electrical outlet. 16 Room Air Conditioner
User Manual
Page 18
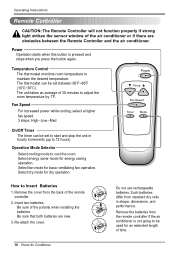
... can be set to start and stop the unit in shape, dimensions, and performance. Remove the cover from the remote controller if the air conditioner is pressed and stops when you press the button again. Re-attach the cover. Select fan mode for energy saving operation. Operating Instructions... Remote Controller CAUTION: The Remote Controller will not function properly if strong light strikes the sensor window of the air conditioner or if there are new. 3. Select dry mode for an extended length of 30 minutes to 12 hours). The unit ...
... can be set to start and stop the unit in shape, dimensions, and performance. Remove the cover from the remote controller if the air conditioner is pressed and stops when you press the button again. Re-attach the cover. Select fan mode for energy saving operation. Operating Instructions... Remote Controller CAUTION: The Remote Controller will not function properly if strong light strikes the sensor window of the air conditioner or if there are new. 3. Select dry mode for an extended length of 30 minutes to 12 hours). The unit ...
User Manual
Page 20
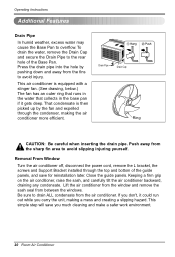
Lift the air conditioner from the window and remove the sash seal from the sharp fin area to avoid...remove the Drain Cap and secure the Drain Pipe to overflow. This air conditioner is then picked up by pushing down and away from the air conditioner. Removal From Window Turn the air conditioner off, disconnect the power cord, remove the L bracket, the ... of the guide panels, and save you much cleaning and make a safer work environment. 20 Room Air Conditioner Close the guide panels. This simple step will save for reinstallation later. Drain Pipe Drain Cap Ring CAUTION...
Lift the air conditioner from the window and remove the sash seal from the sharp fin area to avoid...remove the Drain Cap and secure the Drain Pipe to overflow. This air conditioner is then picked up by pushing down and away from the air conditioner. Removal From Window Turn the air conditioner off, disconnect the power cord, remove the L bracket, the ... of the guide panels, and save you much cleaning and make a safer work environment. 20 Room Air Conditioner Close the guide panels. This simple step will save for reinstallation later. Drain Pipe Drain Cap Ring CAUTION...
User Manual
Page 23
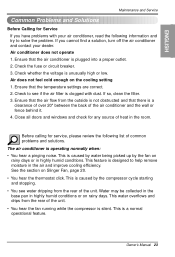
... doors and windows and check for service, please review the following information and try to solve the problem. This is unusually high or low. Owner's Manual 23 Check whether the voltage is caused by the fan on rainy days. Check to help remove moisture in the air and improve ... while the compressor is operating normally when: • You hear a pinging noise. This is a clearance of over 20" between the back of the air conditioner and the wall or fence behind it. 4. This water overflows and drips from the outside is not obstructed and that the temperature settings are correct...
... doors and windows and check for service, please review the following information and try to solve the problem. This is unusually high or low. Owner's Manual 23 Check whether the voltage is caused by the fan on rainy days. Check to help remove moisture in the air and improve ... while the compressor is operating normally when: • You hear a pinging noise. This is a clearance of over 20" between the back of the air conditioner and the wall or fence behind it. 4. This water overflows and drips from the outside is not obstructed and that the temperature settings are correct...


