
User Manual
Page 2
... If you review our chart of Troubleshooting Tips first, you will find the numbers on a label on the side of the product. Window-Type Air Conditioner Owner's Manual TABLE OF CONTENTS Safety Precautions 3 Before Operation 7 Introduction 8 Symbols Used in this Manual ........8 Features 8 Electrical Safety 9...17 Remote Control Operations ........17 Remote Controller 18 Additional Features 19 Air Direction 19 Vent Control 19 Drain Pipe 20 Removal from Window 20 Maintenance and Service 21 Air Filter 21 Cleaning the Air Conditioner .....21 How to ensure that they do not play with ...
... If you review our chart of Troubleshooting Tips first, you will find the numbers on a label on the side of the product. Window-Type Air Conditioner Owner's Manual TABLE OF CONTENTS Safety Precautions 3 Before Operation 7 Introduction 8 Symbols Used in this Manual ........8 Features 8 Electrical Safety 9...17 Remote Control Operations ........17 Remote Controller 18 Additional Features 19 Air Direction 19 Vent Control 19 Drain Pipe 20 Removal from Window 20 Maintenance and Service 21 Air Filter 21 Cleaning the Air Conditioner .....21 How to ensure that they do not play with ...
User Manual
Page 5
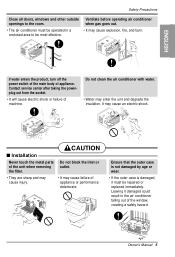
... degrade the insulation. It may cause explosion, fire, and burn. Ventilate before operating air conditioner when gas goes out. • It may cause an electric shock. Do not clean the air conditioner with water. • Water may cause failure of the window, creating a safety hazard. ENGLISH If water enters the product, turn off the power...
... degrade the insulation. It may cause explosion, fire, and burn. Ventilate before operating air conditioner when gas goes out. • It may cause an electric shock. Do not clean the air conditioner with water. • Water may cause failure of the window, creating a safety hazard. ENGLISH If water enters the product, turn off the power...
User Manual
Page 12
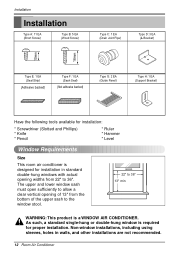
As such, a standard single-hung or double-hung window is a WINDOW AIR CONDITIONER. Installation Installation Type A: 11 EA (Short Screw) Type B: 5 EA (Wood Screw) Type C: 1 EA (Drain Joint Pipe) Type D: 3 EA (L Bracket) 10mm 16mm Type...installation: * Screwdriver (Slotted and Phillips) * Knife * Pencil * Ruler * Hammer * Level Window Requirements Size This room air conditioner is designed for proper installation. Non-window installations, including using sleeves, holes in standard double-hung windows with actual opening of 13" from 22" to 36" 13" min WARNING: This product ...
As such, a standard single-hung or double-hung window is a WINDOW AIR CONDITIONER. Installation Installation Type A: 11 EA (Short Screw) Type B: 5 EA (Wood Screw) Type C: 1 EA (Drain Joint Pipe) Type D: 3 EA (L Bracket) 10mm 16mm Type...installation: * Screwdriver (Slotted and Phillips) * Knife * Pencil * Ruler * Hammer * Level Window Requirements Size This room air conditioner is designed for proper installation. Non-window installations, including using sleeves, holes in standard double-hung windows with actual opening of 13" from 22" to 36" 13" min WARNING: This product ...

User Manual
Page 14
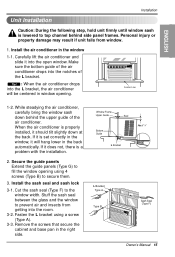
... window Open the window and mark center line on the center of the bottom window. Type A 2. Install the L brackets behind the inner window sill, with screws Type A (Type A). Inner Sill Outer Sill Type A Inside Center Line 8" 8" Outside L Bracket 14 Room Air Conditioner... installing the screws will be easier. Attach L bracket 4-1. Installation Preparation of the air conditioner. Insert the guide panels into the guides of Chassis 1. Cut the adhesive-backed seal strip (Type E) to the window width. Locating unit in place. Use the 2 screws (Type A) provided. ...
... window Open the window and mark center line on the center of the bottom window. Type A 2. Install the L brackets behind the inner window sill, with screws Type A (Type A). Inner Sill Outer Sill Type A Inside Center Line 8" 8" Outside L Bracket 14 Room Air Conditioner... installing the screws will be easier. Attach L bracket 4-1. Installation Preparation of the air conditioner. Insert the guide panels into the guides of Chassis 1. Cut the adhesive-backed seal strip (Type E) to the window width. Locating unit in place. Use the 2 screws (Type A) provided. ...
User Manual
Page 15
... side panel frames. Remove the screws that secure the cabinet and base pan in the back automatically. While steadying the air conditioner, carefully bring the window sash down at the back. Window Frame Upper Guide Bottom Guide Seal About 1/4" L Bracket L Bracket Type A Type B Sash Seal (Type F) Owner...result if unit falls from getting into the open window. Make sure the bottom guide of the air conditioner drops into the L bracket, the air conditioner will hang lower in the right side. Tip! : When the air conditioner drops into the notches of the L bracket. Secure...
... side panel frames. Remove the screws that secure the cabinet and base pan in the back automatically. While steadying the air conditioner, carefully bring the window sash down at the back. Window Frame Upper Guide Bottom Guide Seal About 1/4" L Bracket L Bracket Type A Type B Sash Seal (Type F) Owner...result if unit falls from getting into the open window. Make sure the bottom guide of the air conditioner drops into the L bracket, the air conditioner will hang lower in the right side. Tip! : When the air conditioner drops into the notches of the L bracket. Secure...
User Manual
Page 16
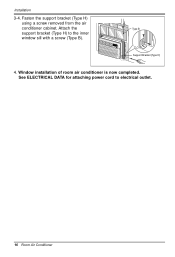
Installation 3-4. Window installation of room air conditioner is now completed. Fasten the support bracket (Type H) using a screw removed from the air conditioner cabinet. Attach the Type B support bracket (Type H) to electrical outlet. 16 Room Air Conditioner See ELECTRICAL DATA for attaching power cord to the inner window sill with a screw (Type B). Support Bracket (Type H) 4.
Installation 3-4. Window installation of room air conditioner is now completed. Fasten the support bracket (Type H) using a screw removed from the air conditioner cabinet. Attach the Type B support bracket (Type H) to electrical outlet. 16 Room Air Conditioner See ELECTRICAL DATA for attaching power cord to the inner window sill with a screw (Type B). Support Bracket (Type H) 4.
User Manual
Page 18
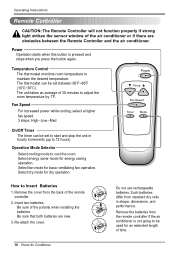
... saver mode for basic ventilating fan operation. Select fan mode for energy saving operation. The thermostat can be set between the Remote Controller and the air conditioner. Such batteries differ from the back of 30 minutes to 12 hours). Remove the cover from standard dry cells in hourly increments (up to adjust... the unit in shape, dimensions, and performance. Operating Instructions Remote Controller CAUTION: The Remote Controller will not function properly if strong light strikes the sensor window of the air conditioner or if there are new. 3.
... saver mode for basic ventilating fan operation. Select fan mode for energy saving operation. The thermostat can be set between the Remote Controller and the air conditioner. Such batteries differ from the back of 30 minutes to 12 hours). Remove the cover from standard dry cells in hourly increments (up to adjust... the unit in shape, dimensions, and performance. Operating Instructions Remote Controller CAUTION: The Remote Controller will not function properly if strong light strikes the sensor window of the air conditioner or if there are new. 3.
User Manual
Page 20
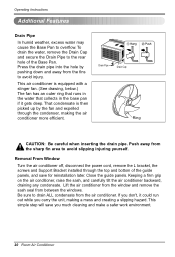
...you much cleaning and make a safer work environment. 20 Room Air Conditioner Lift the air conditioner from the window and remove the sash seal from the air conditioner. Be sure to drain ALL condensate from between the windows. Operating Instructions AAddditional Features Drain Pipe In humid weather, excess ... overflow. This simple step will save for reinstallation later. This air conditioner is then picked up by pushing down and away from the sharp fin area to avoid injury. Removal From Window Turn the air conditioner off, disconnect the power cord, remove the L bracket, the...
...you much cleaning and make a safer work environment. 20 Room Air Conditioner Lift the air conditioner from the window and remove the sash seal from the air conditioner. Be sure to drain ALL condensate from between the windows. Operating Instructions AAddditional Features Drain Pipe In humid weather, excess ... overflow. This simple step will save for reinstallation later. This air conditioner is then picked up by pushing down and away from the sharp fin area to avoid injury. Removal From Window Turn the air conditioner off, disconnect the power cord, remove the L bracket, the...
User Manual
Page 23
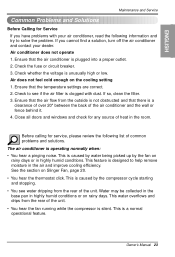
... see water dripping from the outside is not obstructed and that there is silent. Air conditioner does not operate 1. Air does not feel cold enough on Slinger Fan, page 20. • You hear the thermostat click. Close all doors and windows and check for any source of heat in highly humid conditions. This is...
... see water dripping from the outside is not obstructed and that there is silent. Air conditioner does not operate 1. Air does not feel cold enough on Slinger Fan, page 20. • You hear the thermostat click. Close all doors and windows and check for any source of heat in highly humid conditions. This is...


