
Owners Manual
Page 2
... of each unit, _aler's Name Date Pulrct,ased • Slaple your receipl !o this page ir_the event you need it to prove date d put€haste or for warranty issues. ,o READ THIS MANUAL Inside you wi!l find many answers to _mmon problems 'n the cX_arlof troublesh_ling tips If you review our char1 d Troubleshooting Tips first you may not need to _ replaced, replacement work shall...
... of each unit, _aler's Name Date Pulrct,ased • Slaple your receipl !o this page ir_the event you need it to prove date d put€haste or for warranty issues. ,o READ THIS MANUAL Inside you wi!l find many answers to _mmon problems 'n the cX_arlof troublesh_ling tips If you review our char1 d Troubleshooting Tips first you may not need to _ replaced, replacement work shall...
Owners Manual
Page 4
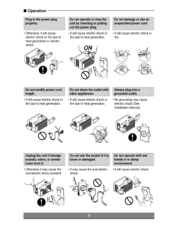
cause electdc shock or fire. • It will cause electdc _ock or fire due to heat generation. , It will _use electdc shock. o It may cau_ fire and electdc shock. • lit will cause electric shock or fire due to heat gestation • No groundir,_ may cau_ fire and electlic shock accident. i Operation , Otherwise, it wil! _use ele_dc s_ck or fire due to heat generation_or electric _ock, • it may cause etectdc shock (See installation Manual). • Othe_ise it wil!lcause eiectric shock or fire due to heat ,get.ration. , I!twill!
cause electdc shock or fire. • It will cause electdc _ock or fire due to heat generation. , It will _use electdc shock. o It may cau_ fire and electdc shock. • lit will cause electric shock or fire due to heat gestation • No groundir,_ may cau_ fire and electlic shock accident. i Operation , Otherwise, it wil! _use ele_dc s_ck or fire due to heat generation_or electric _ock, • it may cause etectdc shock (See installation Manual). • Othe_ise it wil!lcause eiectric shock or fire due to heat ,get.ration. , I!twill!
Owners Manual
Page 5
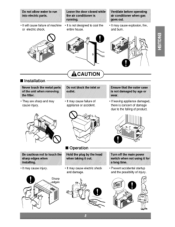
entire house. • It may cause explosion, fire, and burn. [] installation CAUTION jh • They are sharp and may causeinju_ • It may cause failure of applance or a_idenL • ff leaving appliance damaged, there is not designed to the falling of product. i Operation • It may cause injury. • it is concern of damage due to c_] _e or ele_dc s_ck. • It w[li]cau_ failure of machine • it may cause electric shock a_ damage, • Prevent accidental s,ta_up and the possi_lity of injury,,
entire house. • It may cause explosion, fire, and burn. [] installation CAUTION jh • They are sharp and may causeinju_ • It may cause failure of applance or a_idenL • ff leaving appliance damaged, there is not designed to the falling of product. i Operation • It may cause injury. • it is concern of damage due to c_] _e or ele_dc s_ck. • It w[li]cau_ failure of machine • it may cause electric shock a_ damage, • Prevent accidental s,ta_up and the possi_lity of injury,,
Owners Manual
Page 6
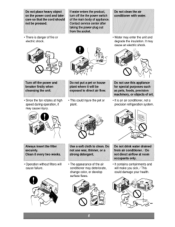
Operation without filters willi _us,e faiiliure,., • The ap_arance of fire, or e_eddc shock. . Water may enter the unit and degrade the insulation, it may _use an electric shock. , Since t_ fan rotates at high _ed during operation, iit may deteriorate, change color, or develop surfa_ flaws. , litco,ntans containments and wilil make you sick./This _uid damage your health. , Thereis danger of t_ .air conditioner may cause injury. • This _uld injure the pet or pla,nt. , It is an air conditioner, not a p_ecisionrefrigeration system. .
Operation without filters willi _us,e faiiliure,., • The ap_arance of fire, or e_eddc shock. . Water may enter the unit and degrade the insulation, it may _use an electric shock. , Since t_ fan rotates at high _ed during operation, iit may deteriorate, change color, or develop surfa_ flaws. , litco,ntans containments and wilil make you sick./This _uid damage your health. , Thereis danger of t_ .air conditioner may cause injury. • This _uld injure the pet or pla,nt. , It is an air conditioner, not a p_ecisionrefrigeration system. .
Owners Manual
Page 7
... inner pa_s of the unit, For repair and maintenance contact your hea_thoDo not expose o_upants, _, or pian_ to direct allow for nomspecified special purposes (e.g preserving precision devices, food,,pets, plants, and a_-ot biects) Usage in _e power plug properly, _Do not share _e same outlet wi_ o_er appliances Do not use water to clean inside the air conditioner Exposure to w_ter...
... inner pa_s of the unit, For repair and maintenance contact your hea_thoDo not expose o_upants, _, or pian_ to direct allow for nomspecified special purposes (e.g preserving precision devices, food,,pets, plants, and a_-ot biects) Usage in _e power plug properly, _Do not share _e same outlet wi_ o_er appliances Do not use water to clean inside the air conditioner Exposure to w_ter...

Owners Manual
Page 9
REMOTE CON_OL SENSOR _,_ Push out the cover on the back of 30 minutes to ooo_the room Select: energy saver mode _Orenergy _ving Select fan mode for basic ventilating fan operation. " Do not use rech_gieable batteries,,M_e sure that both batteries are new, • _nordetroptevend4_ FARSPEESDE,LECTOR For increased power while coo_ing select a higher fan speed. 3 steps: High -.>Low e Med ONiOFF TIMER The timer can be _t to star'I a._ stop t_...
REMOTE CON_OL SENSOR _,_ Push out the cover on the back of 30 minutes to ooo_the room Select: energy saver mode _Orenergy _ving Select fan mode for basic ventilating fan operation. " Do not use rech_gieable batteries,,M_e sure that both batteries are new, • _nordetroptevend4_ FARSPEESDE,LECTOR For increased power while coo_ing select a higher fan speed. 3 steps: High -.>Low e Med ONiOFF TIMER The timer can be _t to star'I a._ stop t_...
Owners Manual
Page 11
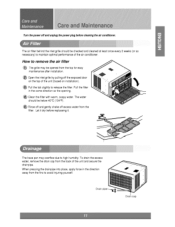
... the unit (based on installation), Pui!the tab siightiy to Ihighhumidity. Turn thepo,_t off and unpl_ th_ powerplug _,to,re cleaning the air condtt_net, The air filter behind the inlet grille should be opened from me top for easy maiintenance after insta_l_ion, ® Open the nlet grille by pulling off excess water from f_e fins to avoid iniuring yourse#, To drain _,e excess water, remove _,e drain...
... the unit (based on installation), Pui!the tab siightiy to Ihighhumidity. Turn thepo,_t off and unpl_ th_ powerplug _,to,re cleaning the air condtt_net, The air filter behind the inlet grille should be opened from me top for easy maiintenance after insta_l_ion, ® Open the nlet grille by pulling off excess water from f_e fins to avoid iniuring yourse#, To drain _,e excess water, remove _,e drain...

Owners Manual
Page 13
CA_ON: his app,liance should be ins_l|ed in _cordance with national wiring r_ulationso he fol|owing information serves a_s as a guide to, help to, explain product features, ® ® @ ® You can choose betw_n _o me_s below ac_rding to lead the power cord out _rough slit "B" Power cord Power cord shape and preference, • Fastenthe stopper using 2 screw hol,e,sa, nd lead out the _wer cord through s_it"A" * Fasten _e stopper using I,e_screw hole,, and rotate properly to your window _oo!
CA_ON: his app,liance should be ins_l|ed in _cordance with national wiring r_ulationso he fol|owing information serves a_s as a guide to, help to, explain product features, ® ® @ ® You can choose betw_n _o me_s below ac_rding to lead the power cord out _rough slit "B" Power cord Power cord shape and preference, • Fastenthe stopper using 2 screw hol,e,sa, nd lead out the _wer cord through s_it"A" * Fasten _e stopper using I,e_screw hole,, and rotate properly to your window _oo!
Owners Manual
Page 14
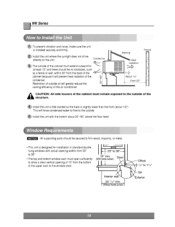
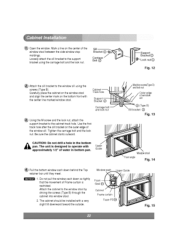
... the air conditioner, CA_ION: AIII sWe louvers of the cabinet must remain expo_d to the outside of the, structure, install the unit a I_le slanted so the back is slightiy iower than the front (about 1/2°'),, This will force condensed water to flow to _e outside, install the unit with the ibo_om a_ut 3,0'"_60°' above the floor ievel ' A!I supporting parts...
... the air conditioner, CA_ION: AIII sWe louvers of the cabinet must remain expo_d to the outside of the, structure, install the unit a I_le slanted so the back is slightiy iower than the front (about 1/2°'),, This will force condensed water to flow to _e outside, install the unit with the ibo_om a_ut 3,0'"_60°' above the floor ievel ' A!I supporting parts...
Owners Manual
Page 15
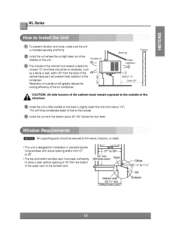
...supporting pa_s should be secured to firm wood,,masons, or metai. • This unit is slightly lower than _e f_ont {a_ut I/2"). louvers: of the caWnetmustremWn ex:posedto the outside ,ofthe cabinet must open sufficiently to allow a c_earve_cal opening of i6 '_from the bosom of the up_r sash to the outsi_, Instali the unit..., _ondensed water to flow to the window stool, 'Exterior WL Series To prevent vibration and noise, make sure the unit is installed securely and fi_ly Install the unit where the suniight does not shine directly on the unit. _e outside of the Instali the unit a ii_e...
...supporting pa_s should be secured to firm wood,,masons, or metai. • This unit is slightly lower than _e f_ont {a_ut I/2"). louvers: of the caWnetmustremWn ex:posedto the outside ,ofthe cabinet must open sufficiently to allow a c_earve_cal opening of i6 '_from the bosom of the up_r sash to the outsi_, Instali the unit..., _ondensed water to flow to the window stool, 'Exterior WL Series To prevent vibration and noise, make sure the unit is installed securely and fi_ly Install the unit where the suniight does not shine directly on the unit. _e outside of the Instali the unit a ii_e...

Owners Manual
Page 16
... the air conditioner, Fence radiation k J 1t2'* Over 20" CAUTION: All side louvers of the cabinet must remain ex_sed t,o the outside , Instail the unit w_h the bottom a_ut 30"_60°'above the floor _evei,, ' A!I supporting!parts should be no olbst'ac_ess0uch as a fence and wall, within 20"' from the back d the cabinet b_caus,eit will force condensed water...
... the air conditioner, Fence radiation k J 1t2'* Over 20" CAUTION: All side louvers of the cabinet must remain ex_sed t,o the outside , Instail the unit w_h the bottom a_ut 30"_60°'above the floor _evei,, ' A!I supporting!parts should be no olbst'ac_ess0uch as a fence and wall, within 20"' from the back d the cabinet b_caus,eit will force condensed water...
Owners Manual
Page 19
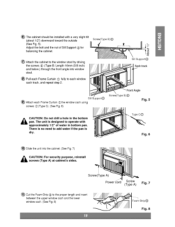
... dry. into the cabinet. ,(SeeFig. 7) CA_ON: For security purpose, reinstall screws (Type A) at cahiin,et"ssides. Pu!! There is no need toi_d water if the pan is design_ to the window sty! _ driving 1hie_rews _) (Ty_ B: Leith 16.mm (5/8 inch), and bellow.} through the front a_le. Fig. 6 Screw(Type A} Power Cut the Foam-St:alp® to each Frame...
... dry. into the cabinet. ,(SeeFig. 7) CA_ON: For security purpose, reinstall screws (Type A) at cahiin,et"ssides. Pu!! There is no need toi_d water if the pan is design_ to the window sty! _ driving 1hie_rews _) (Ty_ B: Leith 16.mm (5/8 inch), and bellow.} through the front a_le. Fig. 6 Screw(Type A} Power Cut the Foam-St:alp® to each Frame...
Owners Manual
Page 20
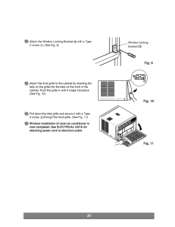
':_ A_ach the Widow L_king Bracket @ w_:h a Ty_ C _re'w Q (be Fig 9) A_ach the, fro_ grille to el,_trical out_et, Win_w Io,ckir_g bracket @ Fig. 9 O Fig. 10 Fig. 11 See ELECTRICAL DATA for a_aching power cord to the cabinet by inseding tile ta_ on the grille into the ta_ on the front of room air conditioner is now completed. Push the grille in until it snaps i_o piace (See Fig i0), Pull down the inllet grille _d secure it witl_ a T_e A screw 6.)thro,ugh the front gdllle, (See Fig, 11) Window in_al_ation ,of the canner.
':_ A_ach the Widow L_king Bracket @ w_:h a Ty_ C _re'w Q (be Fig 9) A_ach the, fro_ grille to el,_trical out_et, Win_w Io,ckir_g bracket @ Fig. 9 O Fig. 10 Fig. 11 See ELECTRICAL DATA for a_aching power cord to the cabinet by inseding tile ta_ on the grille into the ta_ on the front of room air conditioner is now completed. Push the grille in until it snaps i_o piace (See Fig i0), Pull down the inllet grille _d secure it witl_ a T_e A screw 6.)thro,ugh the front gdllle, (See Fig, 11) Window in_al_ation ,of the canner.

Owners Manual
Page 21
... to the pro_r length. WP Series i 2 3 4 5 6 ..... 7 8 9 10 11 12 13 14 15 NAME OF PARTS FRAME CURTAIN suPPoR"rBR.ACK[E S_LL BRACKET LOCK NUT SCREW (TYPF A} SCREW (TYPE B_ _CRE _REW (TYPE D) CARRIAGE BOLT FOAM S"FRiP FOAM SEAL WINDOW LOCKING BRACKET DRNN PiPE FOAM-PE FRAME GUIDE Q'TY 2 2 2 4 14 7 5 2 2 ............1 1 1 1 2 1111¸ I SCREWDRWER(Phiiips and Flatead), RULER, KNIFE,, HAMMER, PENCIL, LEVEL...
... to the pro_r length. WP Series i 2 3 4 5 6 ..... 7 8 9 10 11 12 13 14 15 NAME OF PARTS FRAME CURTAIN suPPoR"rBR.ACK[E S_LL BRACKET LOCK NUT SCREW (TYPF A} SCREW (TYPE B_ _CRE _REW (TYPE D) CARRIAGE BOLT FOAM S"FRiP FOAM SEAL WINDOW LOCKING BRACKET DRNN PiPE FOAM-PE FRAME GUIDE Q'TY 2 2 2 4 14 7 5 2 2 ............1 1 1 1 2 1111¸ I SCREWDRWER(Phiiips and Flatead), RULER, KNIFE,, HAMMER, PENCIL, LEVEL...
Owners Manual
Page 22
...window st_i and a!ign the center mark on the outer _g,e of water in the bottom _n. arka Be onthecenteor f_e windowstoobl eltb_,eetnhesi_ windowstop moldings. Be _ure the cabinet slants outward CAUTION; Do not pull _-_ewin®w sash down so tighfly _at the movement d Frame...The cabinet shouid be installed wi_ a very slight tilt @wnward toward _e outside, Wir_dew sash Cab, ig'let Framecu4ain Use the first track hole after the sill bracket on _e bottom _ont with ap,proximate|y 1/2" of the window sill. Oio not dlril| a holle in bottom pan, Guide si_ (Type B} Silblracket Fig,. ...
...window st_i and a!ign the center mark on the outer _g,e of water in the bottom _n. arka Be onthecenteor f_e windowstoobl eltb_,eetnhesi_ windowstop moldings. Be _ure the cabinet slants outward CAUTION; Do not pull _-_ewin®w sash down so tighfly _at the movement d Frame...The cabinet shouid be installed wi_ a very slight tilt @wnward toward _e outside, Wir_dew sash Cab, ig'let Framecu4ain Use the first track hole after the sill bracket on _e bottom _ont with ap,proximate|y 1/2" of the window sill. Oio not dlril| a holle in bottom pan, Guide si_ (Type B} Silblracket Fig,. ...

Owners Manual
Page 23
... _tween the, upper window sash and the bwier window sash,(S_ Fig, 19) A_ach the Windowlocking bracket with a screw (Type C,) (See Fig, 20} Fig. 17 Power Cord Screw Fig. 18 ...Fig. 19 111 WiRdow locking bta,cket i Fig. 20 PuIe_achFramecu_ainfullytoeachwindowsash tracka, ndpu__le bosomwindowsashdownbehind theTopret_nebr arun#ilt meets, A_acheachFramecu_ainthe_ndowsashbyusing screw(sTypeC,}(SeeFig,17) track Fto_Angle Q Screw(TyB_) Fig. 16 Slide _e unit...
... _tween the, upper window sash and the bwier window sash,(S_ Fig, 19) A_ach the Windowlocking bracket with a screw (Type C,) (See Fig, 20} Fig. 17 Power Cord Screw Fig. 18 ...Fig. 19 111 WiRdow locking bta,cket i Fig. 20 PuIe_achFramecu_ainfullytoeachwindowsash tracka, ndpu__le bosomwindowsashdownbehind theTopret_nebr arun#ilt meets, A_acheachFramecu_ainthe_ndowsashbyusing screw(sTypeC,}(SeeFig,17) track Fto_Angle Q Screw(TyB_) Fig. 16 Slide _e unit...
Owners Manual
Page 24
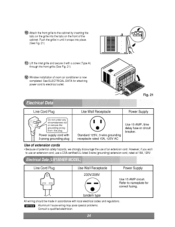
receptacle rated 15A_ 125V AC Use 15 AMP_ time delay fuse or circuit breaker° Use of extension cords ,'B_ause of potential safety h_ards, we _rongly discourage the use of the cabinet Push the 9rille in un_l it with a screw (Type A) through the front gdl:e.(See Fig. 21 ) Window instaHa_onof room air _ndi_oner is now completed See ELECTRICAL DATA for attaching power cord to ,name#ate...
receptacle rated 15A_ 125V AC Use 15 AMP_ time delay fuse or circuit breaker° Use of extension cords ,'B_ause of potential safety h_ards, we _rongly discourage the use of the cabinet Push the 9rille in un_l it with a screw (Type A) through the front gdl:e.(See Fig. 21 ) Window instaHa_onof room air _ndi_oner is now completed See ELECTRICAL DATA for attaching power cord to ,name#ate...

Owners Manual
Page 25
... iyGROUNDED The power cordofthis appliance is propedy grounded. The customer should be replaced by a qualified electrician to minimize the hazard of an extension cord. PREFERRED M_HOD Because d potential safety h_ards, we strongly discourage the use an adapter plug in the receptac!e to assure a proper pola_ty _nnection, CAb%ION:,Attaching the _apter ground terminalf,othe wall rece_le cover screw dioesnot...
... iyGROUNDED The power cordofthis appliance is propedy grounded. The customer should be replaced by a qualified electrician to minimize the hazard of an extension cord. PREFERRED M_HOD Because d potential safety h_ards, we strongly discourage the use an adapter plug in the receptac!e to assure a proper pola_ty _nnection, CAb%ION:,Attaching the _apter ground terminalf,othe wall rece_le cover screw dioesnot...

Owners Manual
Page 26
... Volt units teceplac_e supply cord Ground prong Ensure pro_r ground exists belore use Fig. 24 NOT CUT OR REMOVE THE THIRD (GROUND) PRO_ FROM R"tEPOWER PLUG. Use this appiiance, is not present, one must be instai_ed by a quaiified eieGrician in ac_rdance with a standard three-sl,ot (grounding} wall power outlet (Fig, 24} to serial pilatefor proper _wer supply The customer...
... Volt units teceplac_e supply cord Ground prong Ensure pro_r ground exists belore use Fig. 24 NOT CUT OR REMOVE THE THIRD (GROUND) PRO_ FROM R"tEPOWER PLUG. Use this appiiance, is not present, one must be instai_ed by a quaiified eieGrician in ac_rdance with a standard three-sl,ot (grounding} wall power outlet (Fig, 24} to serial pilatefor proper _wer supply The customer...
Owners Manual
Page 27
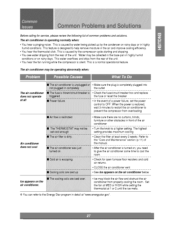
... Energy Star program in detail at all ,,Make sure the p_ugis _mp_ete/y plugged into the outlet • Check the fuse/circuit breaker box and replace the fuse or reset _e breaker ,,_nthe event of Airconndoitti,ocnoeordl oes a_le:a, ' theA_ermaainr ucaoln,tdhieSoner i_-turned on you need to ve _e a r condit oner some t me to coo _e room, .,Check for service, p_ase review me, following list of the unit 'Water...
... Energy Star program in detail at all ,,Make sure the p_ugis _mp_ete/y plugged into the outlet • Check the fuse/circuit breaker box and replace the fuse or reset _e breaker ,,_nthe event of Airconndoitti,ocnoeordl oes a_le:a, ' theA_ermaainr ucaoln,tdhieSoner i_-turned on you need to ve _e a r condit oner some t me to coo _e room, .,Check for service, p_ase review me, following list of the unit 'Water...


