Owners Manual
Page 1
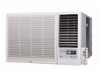
TYPE WINDOW MODEL LW1214ER P/NO MFL68007101 www.lgappliances.com OWNER'S MANUAL AIR CONDITIONER Please read this manual carefully before operating your air conditioner and retain it for future reference.
TYPE WINDOW MODEL LW1214ER P/NO MFL68007101 www.lgappliances.com OWNER'S MANUAL AIR CONDITIONER Please read this manual carefully before operating your air conditioner and retain it for future reference.
Owners Manual
Page 2
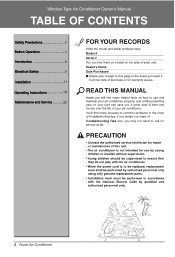
Safety Precautions Before Operation 7 Introduction Electrical Safety Installation Operating Instructions 16 Maintenance and Service 20
Safety Precautions Before Operation 7 Introduction Electrical Safety Installation Operating Instructions 16 Maintenance and Service 20
Owners Manual
Page 3
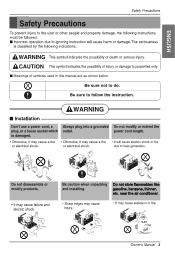
near the air conditioner. Do not store flammables like gasoline benzene thinner etc.
near the air conditioner. Do not store flammables like gasoline benzene thinner etc.
Owners Manual
Page 4
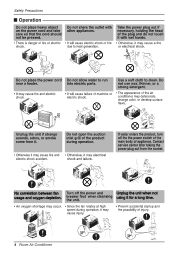
Unplug the unit when not using it for a long time. No correlation between fan usage and oxygen depletion.
Unplug the unit when not using it for a long time. No correlation between fan usage and oxygen depletion.
Owners Manual
Page 5
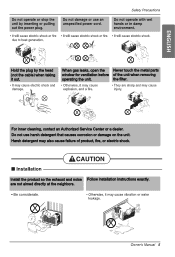
For inner cleaning, contact an Authorized Service Center or a dealer. Install the product so the exhaust and noise Follow installation instructions exactly. Hold the plug by the head čnot the cableĎwhen taking it out. When gas leaks, open the Never touch the metal parts window for ventilation before of product, fire, or electric shock. the filter. Be considerate. Do not use harsh detergent that causes corrosion or damage on the unit. are not aimed directly at the neighbors. Harsh detergent may also cause failure of the unit when removing operating the unit.
For inner cleaning, contact an Authorized Service Center or a dealer. Install the product so the exhaust and noise Follow installation instructions exactly. Hold the plug by the head čnot the cableĎwhen taking it out. When gas leaks, open the Never touch the metal parts window for ventilation before of product, fire, or electric shock. the filter. Be considerate. Do not use harsh detergent that causes corrosion or damage on the unit. are not aimed directly at the neighbors. Harsh detergent may also cause failure of the unit when removing operating the unit.
Owners Manual
Page 6
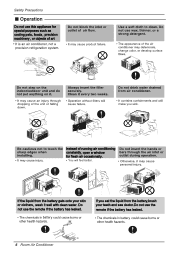
y If you eat the liquid from the battery gets onto your teeth and see doctor.Do not use the remote if the battery has leaked. y Do not use this appliance for special purposes such as cooling petsđfoodsđprecision machineryđor objects of art Instead of running air conditioning constantly̹open a window for fresh air occasionally. Do not use the remote if the battery has leaked. If the liquid from the battery,brush your skin or clothersđwash it well with clean water. You will feel better.
y If you eat the liquid from the battery gets onto your teeth and see doctor.Do not use the remote if the battery has leaked. y Do not use this appliance for special purposes such as cooling petsđfoodsđprecision machineryđor objects of art Instead of running air conditioning constantly̹open a window for fresh air occasionally. Do not use the remote if the battery has leaked. If the liquid from the battery,brush your skin or clothersđwash it well with clean water. You will feel better.
Owners Manual
Page 9
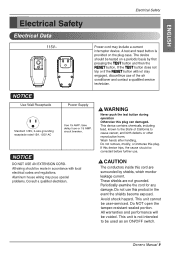
RESET TEST should be used as an ON/OFF switch. 9 Do NOT open the tamper-resistant sealed portion. This unit is not intended to be Avoid shock hazard. All warranties and performance will be user-serviced. This unit cannot be voided.
RESET TEST should be used as an ON/OFF switch. 9 Do NOT open the tamper-resistant sealed portion. This unit is not intended to be Avoid shock hazard. All warranties and performance will be user-serviced. This unit cannot be voided.
Owners Manual
Page 11
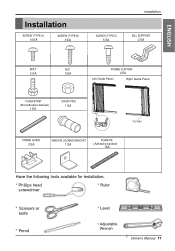
14 EA 3 EA 5 EA 2 EA 2 EA 2 EA Left Guide Panel 2 EA Right Guide Panel (Not adhesive backed) 1 EA 1 EA 2 EA 1 EA Curtain ( Adhesive backed) 1EA Phillips head screwdriver Scissors or knife Adjustable Wrench 11
14 EA 3 EA 5 EA 2 EA 2 EA 2 EA Left Guide Panel 2 EA Right Guide Panel (Not adhesive backed) 1 EA 1 EA 2 EA 1 EA Curtain ( Adhesive backed) 1EA Phillips head screwdriver Scissors or knife Adjustable Wrench 11
Owners Manual
Page 12
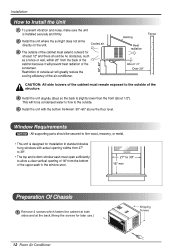
slightly tilted between 27 39 16 Preparation Of Chassis Remove 4 screws which fasten the cabinet at both sides and at the back.(Keep the screws for later use.) 12
slightly tilted between 27 39 16 Preparation Of Chassis Remove 4 screws which fasten the cabinet at both sides and at the back.(Keep the screws for later use.) 12
Owners Manual
Page 13
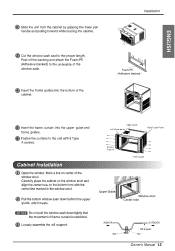
the base pan (Adhesive backed) čAdhesive backedĎ Upper guide Left Guide panel Right Guide Panel 8 Screws (Type A) Frame guide guide hole upper frame curtain sill support. Center hole 13
the base pan (Adhesive backed) čAdhesive backedĎ Upper guide Left Guide panel Right Guide Panel 8 Screws (Type A) Frame guide guide hole upper frame curtain sill support. Center hole 13
Owners Manual
Page 14
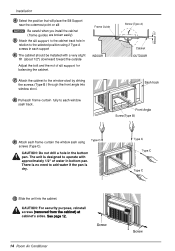
frame guides sill support sill support frame curtain frame curtain (removed from the cabinet) at See page 12. 14
frame guides sill support sill support frame curtain frame curtain (removed from the cabinet) at See page 12. 14
Owners Manual
Page 15
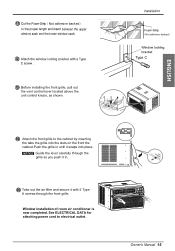
... ELECTRICAL DATA for attaching power cord to the cabinet by inserting the tabs the grille into the slots on the front the cabinet.Push the grille in . 15 Take out the air filter and secure it snaps into place. Window installation of room air conditioner is now completed. čNot adhesive backedĎ Before installing the front grille, pull out the vent control lever located above the unit control...
... ELECTRICAL DATA for attaching power cord to the cabinet by inserting the tabs the grille into the slots on the front the cabinet.Push the grille in . 15 Take out the air filter and secure it snaps into place. Window installation of room air conditioner is now completed. čNot adhesive backedĎ Before installing the front grille, pull out the vent control lever located above the unit control...
Owners Manual
Page 16
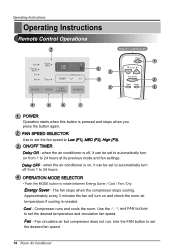
...previous mode and fan settings. Use the and FAN buttons to rotate between Energy Saver / Cool / Fan / Dry. 7 REMOTE CONTROLLER Power Temp Fan Speed Timer Mode POWER Operation starts when this button is needed. OPERATION MODE SELECTOR Push the MODE button to set the desired fan speed. Use the FAN button to Low (F1), MED (F2), High (F3). Energy Saver - Cool - Approximately every 3 minutes the fan will turn on and check the room air temperature if cooling is pressed and stops when you press the button again. FAN SPEED SELECTOR Use to set the fan speed to set...
...previous mode and fan settings. Use the and FAN buttons to rotate between Energy Saver / Cool / Fan / Dry. 7 REMOTE CONTROLLER Power Temp Fan Speed Timer Mode POWER Operation starts when this button is needed. OPERATION MODE SELECTOR Push the MODE button to set the desired fan speed. Use the FAN button to Low (F1), MED (F2), High (F3). Energy Saver - Cool - Approximately every 3 minutes the fan will turn on and check the room air temperature if cooling is pressed and stops when you press the button again. FAN SPEED SELECTOR Use to set the fan speed to set...
Owners Manual
Page 17
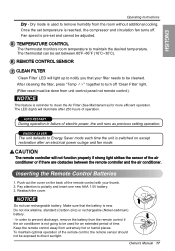
...mode is used for more efficient operation. REMOTE CONTROL SENSOR 7 CLEAN FILTER 'Clean Filter' LED will light up to notify you that the battery is reachedđthe compressor and circulation fan turns off 'Clean Filter' light. (Filter reset must be exposed to be set between the remote controller and the air conditioner. 1. The thermostat can be cleaned. Do not mix alkaline, standard (Carbon-zinc) or rechargeable (Nickel-cadmium) battery. - TEMPERATURE CONTROL The thermostat monitors room temperature to remove humidity from unit control panel not remote control...
...mode is used for more efficient operation. REMOTE CONTROL SENSOR 7 CLEAN FILTER 'Clean Filter' LED will light up to notify you that the battery is reachedđthe compressor and circulation fan turns off 'Clean Filter' light. (Filter reset must be exposed to be set between the remote controller and the air conditioner. 1. The thermostat can be cleaned. Do not mix alkaline, standard (Carbon-zinc) or rechargeable (Nickel-cadmium) battery. - TEMPERATURE CONTROL The thermostat monitors room temperature to remove humidity from unit control panel not remote control...
Owners Manual
Page 18
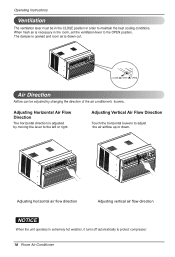
Adjusting horizontal air flow direction Adjusting vertical air flow direction NOTICE When the unit operates in extremely hot weather, it turns off automatically to adjust the air airflow up or down. Touch the horizontal louvers to protect compressor. The horizontal direction is adjusted by moving the lever to the left or right.
Adjusting horizontal air flow direction Adjusting vertical air flow direction NOTICE When the unit operates in extremely hot weather, it turns off automatically to adjust the air airflow up or down. Touch the horizontal louvers to protect compressor. The horizontal direction is adjusted by moving the lever to the left or right.
Owners Manual
Page 20
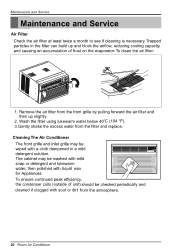
1. Remove the air filter from the filter and replace. Wash the filter using lukewarm water below 40 3.Gently shake the excess water from the front grille by pulling forward the air filter and then up slightly. 2.
1. Remove the air filter from the filter and replace. Wash the filter using lukewarm water below 40 3.Gently shake the excess water from the front grille by pulling forward the air filter and then up slightly. 2.
Owners Manual
Page 21
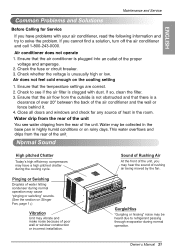
... of the unit, you may vibrate and make noise because of rushing air being moved by the fan. voltage and amperage. Pinging or Swishing Droplets of water hitting condenser during normal operation may cause "pinging or swishing" sounds. (See the section on Slinger Fan, page 1 ) Vibration Unit may hear the sound of poor wall or window construction or incorrect installation. call 1-800...
... of the unit, you may vibrate and make noise because of rushing air being moved by the fan. voltage and amperage. Pinging or Swishing Droplets of water hitting condenser during normal operation may cause "pinging or swishing" sounds. (See the section on Slinger Fan, page 1 ) Vibration Unit may hear the sound of poor wall or window construction or incorrect installation. call 1-800...
Owners Manual
Page 22
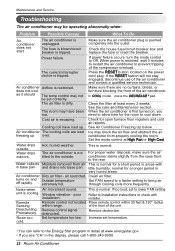
... cool as it should The temp control may have iced up over. Cold air is tripped. See Air Conditioner Freezing Up below. Room too cold. The air conditioner is restored, wait 3 minutes to restart the air conditioner to the outside Water drips indoors Hot, humid weather. Clean air filter. See the care and Maintenance section. Check the house fuse/circuit breaker box and replace the fuse or reset the breaker. If power failure occurs, turn the mode control to the Energy Star...
... cool as it should The temp control may have iced up over. Cold air is tripped. See Air Conditioner Freezing Up below. Room too cold. The air conditioner is restored, wait 3 minutes to restart the air conditioner to the outside Water drips indoors Hot, humid weather. Clean air filter. See the care and Maintenance section. Check the house fuse/circuit breaker box and replace the fuse or reset the breaker. If power failure occurs, turn the mode control to the Energy Star...
Owners Manual
Page 47
.../ broken/ frozen water pipes, restricted drain lines, inadequate or interrupted water supply or inadequate supply of product installation. 3. USA WHAT THIS WARRANTY COVERS: LG Electronics U.S.A., Inc. ("LG") warrants your LG Room Air Conditioner ("product") against defect in the owner's manual. 12. Damage or failure caused by accidents, pests and vermin, lightning, wind, fire, floods or acts of parts not approved or specified by incorrect electrical current, voltage, or plumbing codes. 8. TO...
.../ broken/ frozen water pipes, restricted drain lines, inadequate or interrupted water supply or inadequate supply of product installation. 3. USA WHAT THIS WARRANTY COVERS: LG Electronics U.S.A., Inc. ("LG") warrants your LG Room Air Conditioner ("product") against defect in the owner's manual. 12. Damage or failure caused by accidents, pests and vermin, lightning, wind, fire, floods or acts of parts not approved or specified by incorrect electrical current, voltage, or plumbing codes. 8. TO...
Owners Manual
Page 48
LG ELECTRONICS,INC. 1000 Sylvan Ave.,Englewood Cliffs,NJ 07632 LG Customer Information Center 1-800-243-0000 Register your product OnlineĆ www.lgappliances.com
LG ELECTRONICS,INC. 1000 Sylvan Ave.,Englewood Cliffs,NJ 07632 LG Customer Information Center 1-800-243-0000 Register your product OnlineĆ www.lgappliances.com


