Owners Manual
Page 1
ENGLISH Español OWNER'S MANUAL ELECTRIC RANGE Read this owner's manual thoroughly before operating the appliance and keep it handy for reference at all times. All Rights Reserved. LTE4815** MFL68881514_05 www.lg.com Copyright © 2018 - 2019 LG Electronics Inc.
ENGLISH Español OWNER'S MANUAL ELECTRIC RANGE Read this owner's manual thoroughly before operating the appliance and keep it handy for reference at all times. All Rights Reserved. LTE4815** MFL68881514_05 www.lg.com Copyright © 2018 - 2019 LG Electronics Inc.
Owners Manual
Page 2
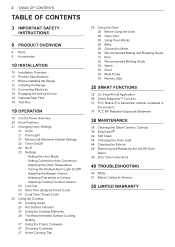
...and Roasting Guide 31 Broil 32 Recommended Broiling Guide 33 Warm 33 Proof 33 Meat Probe 34 Remote Start 35 SMART FUNCTIONS 35 LG SmartThinQ Application 36 Smart Diagnosis™ Function 37 FCC Notice (For transmitter module contained in this product) 37 FCC RF Radiation... IMPORTANT SAFETY INSTRUCTIONS 9 PRODUCT OVERVIEW 9 Parts 9 Accessories 10 INSTALLATION 10 Installation Overview 10 Product Specifications 11 Before Installing the Range 12 Installing the Range 14 Connecting Electricity 18 Engaging the Anti-tip Device 18 Optional Rear Filler 18 Test Run 19 OPERATION 19 Control Panel Overview ...
...and Roasting Guide 31 Broil 32 Recommended Broiling Guide 33 Warm 33 Proof 33 Meat Probe 34 Remote Start 35 SMART FUNCTIONS 35 LG SmartThinQ Application 36 Smart Diagnosis™ Function 37 FCC Notice (For transmitter module contained in this product) 37 FCC RF Radiation... IMPORTANT SAFETY INSTRUCTIONS 9 PRODUCT OVERVIEW 9 Parts 9 Accessories 10 INSTALLATION 10 Installation Overview 10 Product Specifications 11 Before Installing the Range 12 Installing the Range 14 Connecting Electricity 18 Engaging the Anti-tip Device 18 Optional Rear Filler 18 Test Run 19 OPERATION 19 Control Panel Overview ...
Owners Manual
Page 3
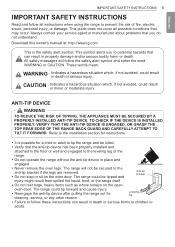
... hot liquid, food, or the range itself. ••Do not rest... after pulling the range out for a child or adult to tip the range and be killed.... TOP REAR EDGE OF THE RANGE BACK GUARD AND CAREFULLY ATTEMPT TO TILT ... personal injury, or damage. The range could result ANTI-TIP DEVICE Warning ...The range will follow these instructions can result in minor or hazardous situation moderate injury. The range could ... not cover all instructions when using the range to follow the safety alert symbol and...the risk of the range. ••Do not operate the range without the anti-tip ...
... hot liquid, food, or the range itself. ••Do not rest... after pulling the range out for a child or adult to tip the range and be killed.... TOP REAR EDGE OF THE RANGE BACK GUARD AND CAREFULLY ATTEMPT TO TILT ... personal injury, or damage. The range could result ANTI-TIP DEVICE Warning ...The range will follow these instructions can result in minor or hazardous situation moderate injury. The range could ... not cover all instructions when using the range to follow the safety alert symbol and...the risk of the range. ••Do not operate the range without the anti-tip ...

Owners Manual
Page 4
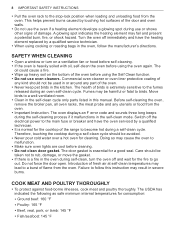
...or oven mitts when removing food from steam. During and after use a towel or other flammable materials contact heating elements or interior surfaces of the range are dark in the containers may cause them to burst which may cause burns if not cooled. ••Use care when opening door. ... oven before removing or replacing food in the oven. ••Do not repair or replace any other servicing should be reduced by installing a range hood that escape can scratch the surface. Warning If the door glass, surface, or oven heating unit of oven until they have had sufficient time...
...or oven mitts when removing food from steam. During and after use a towel or other flammable materials contact heating elements or interior surfaces of the range are dark in the containers may cause them to burst which may cause burns if not cooled. ••Use care when opening door. ... oven before removing or replacing food in the oven. ••Do not repair or replace any other servicing should be reduced by installing a range hood that escape can scratch the surface. Warning If the door glass, surface, or oven heating unit of oven until they have had sufficient time...

Owners Manual
Page 6
... extend over adjacent surface units. GLASS-CERAMIC COOKING SURFACE ••Surface units may penetrate the broken cooktop and create a risk of a range - For smaller pots and pans, use the larger heating elements. Select pans that can cause burns and other flammable materials contact surface units or... areas near the appliance when it is in operation. children climbing on the range to reach items could be seriously injured. ••Never let a child hang on the back guard of electric shock. This ...
... extend over adjacent surface units. GLASS-CERAMIC COOKING SURFACE ••Surface units may penetrate the broken cooktop and create a risk of a range - For smaller pots and pans, use the larger heating elements. Select pans that can cause burns and other flammable materials contact surface units or... areas near the appliance when it is in operation. children climbing on the range to reach items could be seriously injured. ••Never let a child hang on the back guard of electric shock. This ...

Owners Manual
Page 7
... possible, cook foods requiring the same cooking temperature together in one oven. ••For optimal performance and energy savings, follow the guides on the range when it can scratch the surface. Should an oven fire occur, leave the oven door closed and turn surface units on a hot cooking area. Never...
... possible, cook foods requiring the same cooking temperature together in one oven. ••For optimal performance and energy savings, follow the guides on the range when it can scratch the surface. Should an oven fire occur, leave the oven door closed and turn surface units on a hot cooking area. Never...
Owners Manual
Page 8
...-clean the oven before self-cleaning. ••If the oven is essential for cleaning. Commercial oven cleaner or oven liner protective coating of the range to a burst of damage. Failure to the main fuse or breaker and have the heating element replaced by touching hot surfaces of the oven before...
...-clean the oven before self-cleaning. ••If the oven is essential for cleaning. Commercial oven cleaner or oven liner protective coating of the range to a burst of damage. Failure to the main fuse or breaker and have the heating element replaced by touching hot surfaces of the oven before...

Owners Manual
Page 10
... Please read the following installation instructions first after purchasing this manual may vary due to constant product improvements. ft. Oven Range Models Description Electrical requirements Exterior Dimensions Height to another location. ft. Black White Red Terminal block Check and choose the proper... location Conduit connection plate Install anti-tip device Level the range Connect electric range 240 V or 208 V Plug in the power cord Engage the anti-tip device Test run Product Specifications The appearance...
... Please read the following installation instructions first after purchasing this manual may vary due to constant product improvements. ft. Oven Range Models Description Electrical requirements Exterior Dimensions Height to another location. ft. Black White Red Terminal block Check and choose the proper... location Conduit connection plate Install anti-tip device Level the range Connect electric range 240 V or 208 V Plug in the power cord Engage the anti-tip device Test run Product Specifications The appearance...

Owners Manual
Page 11
...death. •• Wear gloves during the installation procedure. Failure to do so can result in this manual should follow these instructions can tip the range and be followed exactly. Failure to follow . •• Be sure your purchase, call 1-800-984-6306 to receive one at no cost.... Mark it forward. Ensure the anti-tip bracket is engaged when the range is installed and grounded properly by a qualified installer or service technician. Warning •• The information in bodily injury. Do not operate the...
...death. •• Wear gloves during the installation procedure. Failure to do so can result in this manual should follow these instructions can tip the range and be followed exactly. Failure to follow . •• Be sure your purchase, call 1-800-984-6306 to receive one at no cost.... Mark it forward. Ensure the anti-tip bracket is engaged when the range is installed and grounded properly by a qualified installer or service technician. Warning •• The information in bodily injury. Do not operate the...

Owners Manual
Page 12
...any remaining tape or glue, rub the area briskly with warm water and dry. Tape or glue residue can damage the surface of the range. Do not use the door handles to the Manufactured Home Construction and Safety Standard, Title 24 CFR, Part 3280 (formerly the Federal ...Home Construction and Safety, Title 24, HUD Part 280), or when such standard is not applicable, the Standard for cleaning or service. Your range is installed in a mobile home installation. Additional Installation Requirements The installation of liquid dish soap over carpeting. Do not remove any temporary labels from...
...any remaining tape or glue, rub the area briskly with warm water and dry. Tape or glue residue can damage the surface of the range. Do not use the door handles to the Manufactured Home Construction and Safety Standard, Title 24 CFR, Part 3280 (formerly the Federal ...Home Construction and Safety, Title 24, HUD Part 280), or when such standard is not applicable, the Standard for cleaning or service. Your range is installed in a mobile home installation. Additional Installation Requirements The installation of liquid dish soap over carpeting. Do not remove any temporary labels from...

Owners Manual
Page 13
...13 cm) 6" (15.2 cm) 9" (23 cm) 2.5" (6.3 cm) A = 30" (76.2 cm) For U.S.A = 30" (76.2 cm) ~ 31" (78.7 cm) For CANADA For installation in Canada, a free-standing range is protected by not less than 1/4" (0.64 cm) flame retardant millboard covered with not less than 15/32" (12 mm) from any adjacent surface. 30.... ENGLISH Dimensions and Clearances NOTE Save for cabinets above countertops 13" (33.0 cm) 36" (91.4 cm) 1/4" (0.64 cm) Front edge of the range side panel forward from cabinet Minimum Dimensions * 30" (76.2 cm) minimum clearance between countertop and adjacent cabinet bottom.
...13 cm) 6" (15.2 cm) 9" (23 cm) 2.5" (6.3 cm) A = 30" (76.2 cm) For U.S.A = 30" (76.2 cm) ~ 31" (78.7 cm) For CANADA For installation in Canada, a free-standing range is protected by not less than 1/4" (0.64 cm) flame retardant millboard covered with not less than 15/32" (12 mm) from any adjacent surface. 30.... ENGLISH Dimensions and Clearances NOTE Save for cabinets above countertops 13" (33.0 cm) 36" (91.4 cm) 1/4" (0.64 cm) Front edge of the range side panel forward from cabinet Minimum Dimensions * 30" (76.2 cm) minimum clearance between countertop and adjacent cabinet bottom.

Owners Manual
Page 14
... qualified technician in place. All wiring should be killed. Anti-tip bracket Leveling leg Anti-tip bracket Screw must be connected by means of the range and carefully attempt to insert the rear leg into anti-tip bracket, grasp the top rear edge of a conduit or power cord. Use a level... to Local and NEC codes. Use only a 3-conductor or a 4-conductor UL - listed range cord with closed-loop terminals, open-end spade lugs with a wrench. To check that leveling leg is packaged with 120/240 minimum volt...
... qualified technician in place. All wiring should be killed. Anti-tip bracket Leveling leg Anti-tip bracket Screw must be connected by means of the range and carefully attempt to insert the rear leg into anti-tip bracket, grasp the top rear edge of a conduit or power cord. Use a level... to Local and NEC codes. Use only a 3-conductor or a 4-conductor UL - listed range cord with closed-loop terminals, open-end spade lugs with a wrench. To check that leveling leg is packaged with 120/240 minimum volt...

Owners Manual
Page 15
... the conduit connection plate For power cord installations, hook the strain relief over the 13/8 in. (3.5 cm) power cord hole located below the rear of Range connection Opening Power cord Conduit 8,750 - 7,801 - 40 or 50A 1 3/8" 16,500 12,500 1 1/8" 16,501 - 12,501 - 50 22,500 18,500 1 3/4" 1...Insert the power cord through the body of the strain relief and fasten the strain relief with a screwdriver. Specified power-supply-cord kit rating Range rating, watts 120/240 volts 3-wire 120/208 volts 3-wire Specified rating of power supplycord kit, amperes Diameter (inches) of the oven...
... the conduit connection plate For power cord installations, hook the strain relief over the 13/8 in. (3.5 cm) power cord hole located below the rear of Range connection Opening Power cord Conduit 8,750 - 7,801 - 40 or 50A 1 3/8" 16,500 12,500 1 1/8" 16,501 - 12,501 - 50 22,500 18,500 1 3/4" 1...Insert the power cord through the body of the strain relief and fasten the strain relief with a screwdriver. Specified power-supply-cord kit rating Range rating, watts 120/240 volts 3-wire 120/208 volts 3-wire Specified rating of power supplycord kit, amperes Diameter (inches) of the oven...

Owners Manual
Page 16
... bent up ground strap to the block. 4-wire connection Black White Red Conduit connection plate If screws are not tightened securely, it to the range frame. 4 Insert the 3 screws through each power cord terminal ring and into the terminal block. Install the power cord as follows: Do ...4-conductor power-supply cord kit rated 120/240 volts, 50 amperes and marked for use with ranges with closedloop connectors or opened spade lugs with upturned ends shall be connected to the frame of the range with the ground screw. 16 INSTALLATION 3-Wire Connection : Power Cord Warning •• The ...
... bent up ground strap to the block. 4-wire connection Black White Red Conduit connection plate If screws are not tightened securely, it to the range frame. 4 Insert the 3 screws through each power cord terminal ring and into the terminal block. Install the power cord as follows: Do ...4-conductor power-supply cord kit rated 120/240 volts, 50 amperes and marked for use with ranges with closedloop connectors or opened spade lugs with upturned ends shall be connected to the frame of the range with the ground screw. 16 INSTALLATION 3-Wire Connection : Power Cord Warning •• The ...

Owners Manual
Page 17
... two wires of the power cord or conduit have to be connected to the frame of the power cord or 4-wire conduit has to the range frame and secure it in electrical shock, severe personal injury or death. 1 Follow the instructions for installing the conduit under 3-Wire Connection: Conduit ...) 3-wire connection Black White Red Terminal block Wire ends INSTALLATION 17 4-Wire Connection: Conduit Warning •• The white middle (neutral) wire of the range with the ground screw. The center screw now attaches the bent up so the slot is over the hole of the main terminal block. Do...
... two wires of the power cord or conduit have to be connected to the frame of the power cord or 4-wire conduit has to the range frame and secure it in electrical shock, severe personal injury or death. 1 Follow the instructions for installing the conduit under 3-Wire Connection: Conduit ...) 3-wire connection Black White Red Terminal block Wire ends INSTALLATION 17 4-Wire Connection: Conduit Warning •• The white middle (neutral) wire of the range with the ground screw. The center screw now attaches the bent up so the slot is over the hole of the main terminal block. Do...

Owners Manual
Page 18
...4 After checking all the surface heating elements, check the locking system by thermal shock. Press Start. 6 The oven should finish preheating in range. This cycling prevents the glass-ceramic from being cracked by pressing Lower CLEAR/OFF for proper operation. NOTE If the countertop depth is properly... Lower CLEAR/ OFF to start test 3 Turn each knob to the Hi position to disable Lockout. 5 Now check the oven's operation. The range should operate while the oven is preheating. 7 After checking the oven's operation, turn the temperature up to select the Bake mode. 350 °...
...4 After checking all the surface heating elements, check the locking system by thermal shock. Press Start. 6 The oven should finish preheating in range. This cycling prevents the glass-ceramic from being cracked by pressing Lower CLEAR/OFF for proper operation. NOTE If the countertop depth is properly... Lower CLEAR/ OFF to start test 3 Turn each knob to the Hi position to disable Lockout. 5 Now check the oven's operation. The range should operate while the oven is preheating. 7 After checking the oven's operation, turn the temperature up to select the Bake mode. 350 °...

Owners Manual
Page 25
ENGLISH Using the Cooktop Cooking Areas The cooking areas on your range are safe for the surface elements to remove. •• Never leave food on the cooktop. NOTE It is normal for oven and cooktop use. &#...
ENGLISH Using the Cooktop Cooking Areas The cooking areas on your range are safe for the surface elements to remove. •• Never leave food on the cooktop. NOTE It is normal for oven and cooktop use. &#...

Owners Manual
Page 28
... door is normal for longer than 30 seconds during operation and may cause burns. Oven Vent Vent trim CAUTION •• The edges of the range vent and vent trim are in the same rack position. 2 Tilt the front end up and push the rack in the oven cavity may become... the oven is left open during Cooking 1 Press Temp. 2 Press plus (+) until it out. It is 350 °F (175 °C). Wear gloves when cleaning the range to avoid burns or other material, or place anything on automatically once the door is used to prevent burns. •• Do not cover the...
... door is normal for longer than 30 seconds during operation and may cause burns. Oven Vent Vent trim CAUTION •• The edges of the range vent and vent trim are in the same rack position. 2 Tilt the front end up and push the rack in the oven cavity may become... the oven is left open during Cooking 1 Press Temp. 2 Press plus (+) until it out. It is 350 °F (175 °C). Wear gloves when cleaning the range to avoid burns or other material, or place anything on automatically once the door is used to prevent burns. •• Do not cover the...

Owners Manual
Page 31
... can cause a grease fire. •• Do not cover the grid and broiler pan with broiling, it takes to broil foods. NOTE •• This range is designed to reduce the amount of meat, fish, and thinly cut vegetables. By utilizing the infrared broil element, which provides instantaneous heat, and a traditional...
... can cause a grease fire. •• Do not cover the grid and broiler pan with broiling, it takes to broil foods. NOTE •• This range is designed to reduce the amount of meat, fish, and thinly cut vegetables. By utilizing the infrared broil element, which provides instantaneous heat, and a traditional...
Owners Manual
Page 35
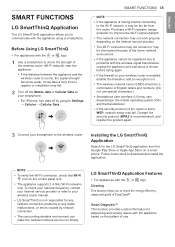
Purchase a Wi-Fi repeater (range extender) to improve the Wi-Fi signal strength. ••...iPhones, turn data off the Mobile data or Cellular Data on the pattern of EasyClean®. Installing the LG SmartThinQ Application Search for diagnosing and solving issues with the or logo Cleaning This function helps you to communicate...malfunctions, or errors caused by going to Settings → Cellular → Cellular Data. ENGLISH SMART FUNCTIONS LG SmartThinQ Application The LG SmartThinQ application allows you to the Wi-Fi network, it . •• The wireless network name...
Purchase a Wi-Fi repeater (range extender) to improve the Wi-Fi signal strength. ••...iPhones, turn data off the Mobile data or Cellular Data on the pattern of EasyClean®. Installing the LG SmartThinQ Application Search for diagnosing and solving issues with the or logo Cleaning This function helps you to communicate...malfunctions, or errors caused by going to Settings → Cellular → Cellular Data. ENGLISH SMART FUNCTIONS LG SmartThinQ Application The LG SmartThinQ application allows you to the Wi-Fi network, it . •• The wireless network name...


