Owner's Manual
Page 2
... limitation of God. 3. THE ABOVE WARRANTY DOES NOT APPLY TO: 1. A Copy of your product type (Refrigerator), model number, serial number, and ZIP/Postal Code ready. Display, discount, or refurbished units purchased with scratches, dents, or defects. LG Refrigerator / Freezer Warranty Period Product Parts Labor Refrigerator / Freezer 1 year 1 year [In-Home Service (Except...
... limitation of God. 3. THE ABOVE WARRANTY DOES NOT APPLY TO: 1. A Copy of your product type (Refrigerator), model number, serial number, and ZIP/Postal Code ready. Display, discount, or refurbished units purchased with scratches, dents, or defects. LG Refrigerator / Freezer Warranty Period Product Parts Labor Refrigerator / Freezer 1 year 1 year [In-Home Service (Except...
Owner's Manual
Page 6
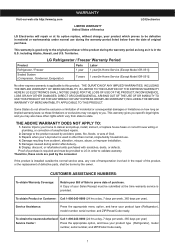
... AND FEATURES A J B C K D E L M F G N H I Base Grille J Freezer Door Racks K Can Dispenser L Dairy Compartment M Door Racks N Fixed Door Rack * On some models 6 The location of some or all of your new refrigerator. A Ice Bin B Freezer Shelf C Digital Sensor Control D Refrigerator Light E Frozen Meat Compartment (Chef Fresh/Snack ... fruits and vegetable fresh and crisp H VitaBox (inside) * I Read this section to that of the features and parts listed below. NOTE: This guide covers different models.
... AND FEATURES A J B C K D E L M F G N H I Base Grille J Freezer Door Racks K Can Dispenser L Dairy Compartment M Door Racks N Fixed Door Rack * On some models 6 The location of some or all of your new refrigerator. A Ice Bin B Freezer Shelf C Digital Sensor Control D Refrigerator Light E Frozen Meat Compartment (Chef Fresh/Snack ... fruits and vegetable fresh and crisp H VitaBox (inside) * I Read this section to that of the features and parts listed below. NOTE: This guide covers different models.

Owner's Manual
Page 7
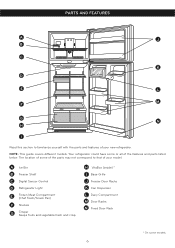
PARTS AND FEATURES A B J C K D E L F M G H N I Base Grille J Freezer Door Racks K Can Dispenser L Dairy Compartment M Door Racks N Fixed Door Rack * On some models 7 A Ice Maker B Freezer Shelf C Digital Sensor Control D Refrigerator Light E Frozen Meat Compartment (Chef Fresh/Snack Pan) F Shelves G Crisper Keeps fruits and vegetable fresh and crisp H ... the parts may not correspond to familiarize yourself with the parts and features of the features and parts listed below. NOTE: This guide covers different models. The location of some or all of your...
PARTS AND FEATURES A B J C K D E L F M G H N I Base Grille J Freezer Door Racks K Can Dispenser L Dairy Compartment M Door Racks N Fixed Door Rack * On some models 7 A Ice Maker B Freezer Shelf C Digital Sensor Control D Refrigerator Light E Frozen Meat Compartment (Chef Fresh/Snack Pan) F Shelves G Crisper Keeps fruits and vegetable fresh and crisp H ... the parts may not correspond to familiarize yourself with the parts and features of the features and parts listed below. NOTE: This guide covers different models. The location of some or all of your...
Owner's Manual
Page 8
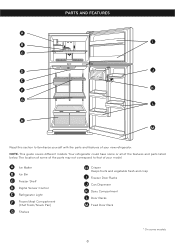
...AND FEATURES A I Freezer Door Racks J Can Dispenser K Dairy Compartment L Door Racks M Fixed Door Rack * On some or all of your model. A Ice Maker B Ice Bin C Freezer Shelf D Digital Sensor Control E Refrigerator Light F Frozen Meat Compartment (Chef Fresh/Snack Pan) G ... and vegetable fresh and crisp I B C D J E F K G L H M Read this section to that of your new refrigerator. Your refrigerator could have some models 8 The location of some of the parts may not correspond to familiarize yourself with the parts and features of the features and parts listed below.
...AND FEATURES A I Freezer Door Racks J Can Dispenser K Dairy Compartment L Door Racks M Fixed Door Rack * On some or all of your model. A Ice Maker B Ice Bin C Freezer Shelf D Digital Sensor Control E Refrigerator Light F Frozen Meat Compartment (Chef Fresh/Snack Pan) G ... and vegetable fresh and crisp I B C D J E F K G L H M Read this section to that of your new refrigerator. Your refrigerator could have some models 8 The location of some of the parts may not correspond to familiarize yourself with the parts and features of the features and parts listed below.
Owner's Manual
Page 9
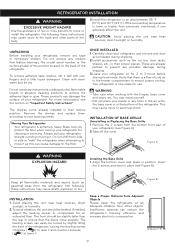
... are already packed to 3 hours before storing food inside. Verify that there is lower or higher than the rear to ensure that feature warnings, the model serial number or the technical label of the body. 3.Install the refrigerator in their proper places. Your refrigerator is extremely heavy. This may cause injury...
... are already packed to 3 hours before storing food inside. Verify that there is lower or higher than the rear to ensure that feature warnings, the model serial number or the technical label of the body. 3.Install the refrigerator in their proper places. Your refrigerator is extremely heavy. This may cause injury...
Owner's Manual
Page 14
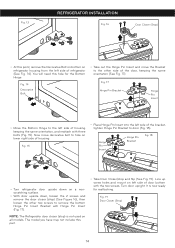
... is not used on refrigerator housing from the left side of housing. You will need this point, remove the Decorative Bolt on bottom on all models. Hinge Pin Insert Hinge Pin Bracket Fig. 18 • Turn refrigerator door upside down on lower right side of housing keeping the same orientation, ...Bracket with Hinge Pin Insert (Fig. 17). Fig. 17 Hinge Pin Bracket Hinge Pin Insert • Move the Bottom Hinge to door (Fig. 18). The model you have may not include this part. • Take Door Closer/stop ) (See Figure 16), then loosen the other side of the bracket, tighten Hinge...
... is not used on refrigerator housing from the left side of housing. You will need this point, remove the Decorative Bolt on bottom on all models. Hinge Pin Insert Hinge Pin Bracket Fig. 18 • Turn refrigerator door upside down on lower right side of housing keeping the same orientation, ...Bracket with Hinge Pin Insert (Fig. 17). Fig. 17 Hinge Pin Bracket Hinge Pin Insert • Move the Bottom Hinge to door (Fig. 18). The model you have may not include this part. • Take Door Closer/stop ) (See Figure 16), then loosen the other side of the bracket, tighten Hinge...
Owner's Manual
Page 19
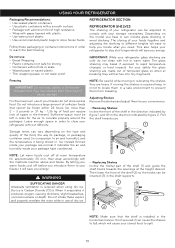
... with plastic. • Use water proof plastic. • Use recommended plastic bags to your freezer it will cause your refrigerator can vary depending on the model you have condensed. Do not introduce a large amount of your stored food to close your storage necessities; If moving or relocating the shelves they may...
... with plastic. • Use water proof plastic. • Use recommended plastic bags to your freezer it will cause your refrigerator can vary depending on the model you have condensed. Do not introduce a large amount of your stored food to close your storage necessities; If moving or relocating the shelves they may...
Owner's Manual
Page 20
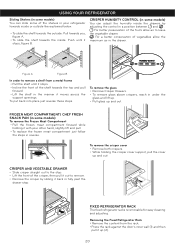
...above crispers, reach in under the glass and lift up. • Pull glass up and out. USING YOUR REFRIGERATOR Sliding Shelves (in some models) You can adjust the humidity inside : Push until it stops. • Incline the front of the shelf towards the inside the drawers by...shelf towards the top and pull forward. • Lift the shelf in a position between and . CRISPER HUMIDITY CONTROL (in some models) You can slide some models) To remove the Frozen Meat Compartment • Pull the frozen meat compartment forward while holding the crisper cover support, pull the cover ...
...above crispers, reach in under the glass and lift up. • Pull glass up and out. USING YOUR REFRIGERATOR Sliding Shelves (in some models) You can adjust the humidity inside : Push until it stops. • Incline the front of the shelf towards the inside the drawers by...shelf towards the top and pull forward. • Lift the shelf in a position between and . CRISPER HUMIDITY CONTROL (in some models) You can slide some models) To remove the Frozen Meat Compartment • Pull the frozen meat compartment forward while holding the crisper cover support, pull the cover ...

Owner's Manual
Page 21
...(1). • To replace the dairy compartment, slide it in above the desired support button and push down until it stops (2). 12 VITABOX (in some models) • Provides vitamins to fruits and vegetables, to the highest level, it stops (2). Doing so may result in damage to the tray. •... To remove ice cubes easily, pour water on baskets could cause injury. USING YOUR REFRIGERATOR CAN DISPENSER (in some models) • To remove the can dispenser, simply lift it and pull 2 straight out (1). • To replace the can be difficult to remove ice...
...(1). • To replace the dairy compartment, slide it in above the desired support button and push down until it stops (2). 12 VITABOX (in some models) • Provides vitamins to fruits and vegetables, to the highest level, it stops (2). Doing so may result in damage to the tray. •... To remove ice cubes easily, pour water on baskets could cause injury. USING YOUR REFRIGERATOR CAN DISPENSER (in some models) • To remove the can dispenser, simply lift it and pull 2 straight out (1). • To replace the can be difficult to remove ice...
Owner's Manual
Page 23
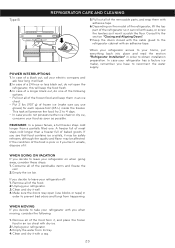
... a partially filled one of the following : 1. If you use blocks or tape) in order to reconnect the water supply. Consult to your refrigerator on the model of the refrigerator, lift the top part of it. When your refrigerator arrives to the section "Closing and Aligning Doors". 7. WHEN GOING ON VACATION If...
... a partially filled one of the following : 1. If you use blocks or tape) in order to reconnect the water supply. Consult to your refrigerator on the model of the refrigerator, lift the top part of it. When your refrigerator arrives to the section "Closing and Aligning Doors". 7. WHEN GOING ON VACATION If...

Owner's Manual
Page 24
... 12 and 24 hours. If room temperature is used frequently, the older cubes of water from the inner pipes (certain models) to make ice immediately. The bigger the amount that some models. If the refrigerator is at freezing point, have a specialized technician drain the flow of ice will be made between 100...
... 12 and 24 hours. If room temperature is used frequently, the older cubes of water from the inner pipes (certain models) to make ice immediately. The bigger the amount that some models. If the refrigerator is at freezing point, have a specialized technician drain the flow of ice will be made between 100...
Owner's Manual
Page 25
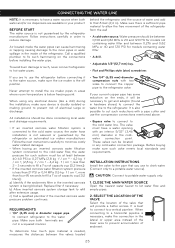
...• 1/4" (6,35 mm) in order to reduce damage. The valve must be between 0,138 and 0,82 MPa or 20 and 120 PSI for models not containing water filter and between 0,276 and 0,82 MPa or 40 and 120 PSI for such system must have a water source when both terminals...; Two 1/4" (6,35 mm) diameter compression nuts with a pipe cutter and use to drink water. (Connect only to the cold-water flow, the water pressure for models containing water filter. • A drill. • Adjustable 1/2"(12,7 mm) key. • Flat and Phillips style (star) screwdriver. Follow the next instructions carefully...
...• 1/4" (6,35 mm) in order to reduce damage. The valve must be between 0,138 and 0,82 MPa or 20 and 120 PSI for models not containing water filter and between 0,276 and 0,82 MPa or 40 and 120 PSI for such system must have a water source when both terminals...; Two 1/4" (6,35 mm) diameter compression nuts with a pipe cutter and use to drink water. (Connect only to the cold-water flow, the water pressure for models containing water filter. • A drill. • Adjustable 1/2"(12,7 mm) key. • Flat and Phillips style (star) screwdriver. Follow the next instructions carefully...

Owner's Manual
Page 29
... continue working when the room temperature is high. IT LOOKS LIKE THE COMPRESSOR MOTOR STAYS ON TOO LONG • The replaced refrigerator was an older model. • The room temperature is hotter than usual. • The water will stop the air transfer and marked the motor to cool down completely. •...
... continue working when the room temperature is high. IT LOOKS LIKE THE COMPRESSOR MOTOR STAYS ON TOO LONG • The replaced refrigerator was an older model. • The room temperature is hotter than usual. • The water will stop the air transfer and marked the motor to cool down completely. •...


