Owner's Manual
Page 2
... the appropriate menu option, and have your product type (Refrigerator), model number, serial number, and ZIP/Postal Code ready. including Alaska, Hawaii, and U.S. LG Refrigerator / Freezer Warranty Period Product Parts Labor Refrigerator / Freezer 1 year 1 year [In-Home Service (Except Model GR-051)] Sealed System (Compressor, Condenser, Evaporator) 7 years 1 year [In-Home Service...
... the appropriate menu option, and have your product type (Refrigerator), model number, serial number, and ZIP/Postal Code ready. including Alaska, Hawaii, and U.S. LG Refrigerator / Freezer Warranty Period Product Parts Labor Refrigerator / Freezer 1 year 1 year [In-Home Service (Except Model GR-051)] Sealed System (Compressor, Condenser, Evaporator) 7 years 1 year [In-Home Service...
Owner's Manual
Page 3
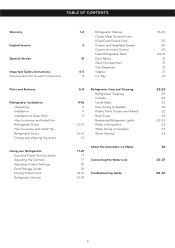
TABLE OF CONTENTS Warranty English Version Spanish Version Important Safety Instructions Requirements for Ground Connection Parts and Features Refrigerator Installation Unpacking Installation Installation of Base Grille How to remove and Install the Refrigerator Doors How to reverse and... 4-5 Vitabox 5 Ice Tray 6-8 9-16 9 9 9 10-11 12-16 16 Refrigerator Care and Cleaning Refrigerator Cleaning Outside Inside Walls Door Lining & Gaskets Plastic Parts (Covers and Panel) Back Cover Replacing Refrigerator Lights Power Interruptions When Going on Vacation When Moving 17-21 17 17 18 18 18-19 19...
TABLE OF CONTENTS Warranty English Version Spanish Version Important Safety Instructions Requirements for Ground Connection Parts and Features Refrigerator Installation Unpacking Installation Installation of Base Grille How to remove and Install the Refrigerator Doors How to reverse and... 4-5 Vitabox 5 Ice Tray 6-8 9-16 9 9 9 10-11 12-16 16 Refrigerator Care and Cleaning Refrigerator Cleaning Outside Inside Walls Door Lining & Gaskets Plastic Parts (Covers and Panel) Back Cover Replacing Refrigerator Lights Power Interruptions When Going on Vacation When Moving 17-21 17 17 18 18 18-19 19...
Owner's Manual
Page 4
... power from the doors or shelves of potential danger, advise you of the refrigerator. All safety messages inform you on the plug. • When moving parts of the ejector mechanism or with this or any repair services be avoided. Consumption of food is questionable, discard it directly from areas in the...
... power from the doors or shelves of potential danger, advise you of the refrigerator. All safety messages inform you on the plug. • When moving parts of the ejector mechanism or with this or any repair services be avoided. Consumption of food is questionable, discard it directly from areas in the...
Owner's Manual
Page 6
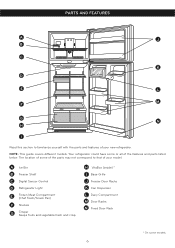
The location of some of the parts may not correspond to familiarize yourself with the parts and features of your model. NOTE: This guide covers different models. Your refrigerator could have some models 6 A Ice Bin B Freezer Shelf C ... Compartment (Chef Fresh/Snack Pan) F Shelves G Crisper Keeps fruits and vegetable fresh and crisp H VitaBox (inside) * I Read this section to that of your new refrigerator. PARTS AND FEATURES A J B C K D E L M F G N H I Base Grille J Freezer Door Racks K Can Dispenser L Dairy Compartment M Door Racks N Fixed Door Rack * On some or ...
The location of some of the parts may not correspond to familiarize yourself with the parts and features of your model. NOTE: This guide covers different models. Your refrigerator could have some models 6 A Ice Bin B Freezer Shelf C ... Compartment (Chef Fresh/Snack Pan) F Shelves G Crisper Keeps fruits and vegetable fresh and crisp H VitaBox (inside) * I Read this section to that of your new refrigerator. PARTS AND FEATURES A J B C K D E L M F G N H I Base Grille J Freezer Door Racks K Can Dispenser L Dairy Compartment M Door Racks N Fixed Door Rack * On some or ...

Owner's Manual
Page 7
...Compartment (Chef Fresh/Snack Pan) F Shelves G Crisper Keeps fruits and vegetable fresh and crisp H VitaBox (inside) * I Read this section to that of your new refrigerator. PARTS AND FEATURES A B J C K D E L F M G H N I Base Grille J Freezer Door Racks K Can Dispenser L Dairy Compartment M Door Racks N ...On some models 7 NOTE: This guide covers different models. Your refrigerator could have some of the parts may not correspond to familiarize yourself with the parts and features of the features and parts listed below. The location of some or all of your model.
...Compartment (Chef Fresh/Snack Pan) F Shelves G Crisper Keeps fruits and vegetable fresh and crisp H VitaBox (inside) * I Read this section to that of your new refrigerator. PARTS AND FEATURES A B J C K D E L F M G H N I Base Grille J Freezer Door Racks K Can Dispenser L Dairy Compartment M Door Racks N ...On some models 7 NOTE: This guide covers different models. Your refrigerator could have some of the parts may not correspond to familiarize yourself with the parts and features of the features and parts listed below. The location of some or all of your model.
Owner's Manual
Page 8
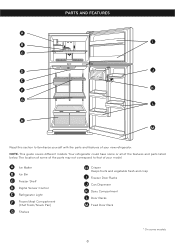
... features of your model. NOTE: This guide covers different models. The location of some or all of the features and parts listed below. PARTS AND FEATURES A I Freezer Door Racks J Can Dispenser K Dairy Compartment L Door Racks M Fixed Door Rack * On some models 8 A Ice Maker B Ice Bin C Freezer Shelf D Digital Sensor ...
... features of your model. NOTE: This guide covers different models. The location of some or all of the features and parts listed below. PARTS AND FEATURES A I Freezer Door Racks J Can Dispenser K Dairy Compartment L Door Racks M Fixed Door Rack * On some models 8 A Ice Maker B Ice Bin C Freezer Shelf D Digital Sensor ...
Owner's Manual
Page 9
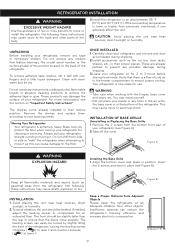
...the back of the refrigerator. UNPACKING Before installing your refrigerator. Do not use . These products can easily be leveled. Do not shift from other parts of the body. 3.Install the refrigerator in an area between 55 °F (13 °C) and 110 °F (43 °C). Verify ... factory position. Carefully clean your hands or any possible damage during shipping. 2.Install accessories such as gasoline) away from the bottom front part of the product located on "Important Safety Instructions". Your refrigerator is a flow of cold air in the bottom of the refrigerator, turning...
...the back of the refrigerator. UNPACKING Before installing your refrigerator. Do not use . These products can easily be leveled. Do not shift from other parts of the body. 3.Install the refrigerator in an area between 55 °F (13 °C) and 110 °F (43 °C). Verify ... factory position. Carefully clean your hands or any possible damage during shipping. 2.Install accessories such as gasoline) away from the bottom front part of the product located on "Important Safety Instructions". Your refrigerator is a flow of cold air in the bottom of the refrigerator, turning...
Owner's Manual
Page 10
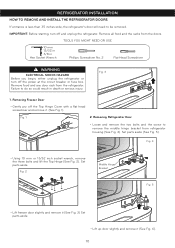
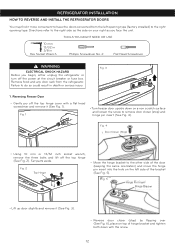
... SHOCK HAZARD Before you begin, either unplug the refrigerator or turn off and unplug the refrigerator. Set parts aside. Fig. 2 Middle Hinge Bracket Fig. 5 • Lift freezer door slightly and remove it (See Fig. 3) Set parts aside. • Lift up door slightly and remove it . (See Fig. 1) Fig. 1 ... pry off the power at the circuit breaker or fuse box. Remove food and any door rack from the doors. Fig. 3 1. Set parts aside (See Fig. 5). Remove all food and the racks from the refrigerator. REFRIGERATOR INSTALLATION HOW TO REMOVE AND INSTALL THE REFRIGERATOR DOORS If ...
... SHOCK HAZARD Before you begin, either unplug the refrigerator or turn off and unplug the refrigerator. Set parts aside. Fig. 2 Middle Hinge Bracket Fig. 5 • Lift freezer door slightly and remove it (See Fig. 3) Set parts aside. • Lift up door slightly and remove it . (See Fig. 1) Fig. 1 ... pry off the power at the circuit breaker or fuse box. Remove food and any door rack from the doors. Fig. 3 1. Set parts aside (See Fig. 5). Remove all food and the racks from the refrigerator. REFRIGERATOR INSTALLATION HOW TO REMOVE AND INSTALL THE REFRIGERATOR DOORS If ...
Owner's Manual
Page 12
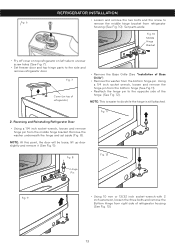
... Closer (Stop) • Using 10 mm or 13/32 inch socket wrench, remove the three bolts and lift off the top hinge (See Fig. 2). Set parts aside. Fig. 2 Top Hinge • Move the hinge bracket to the other side of the bracket (See Fig. 5). Fig. 1 • Turn freezer door upside down...
... Closer (Stop) • Using 10 mm or 13/32 inch socket wrench, remove the three bolts and lift off the top hinge (See Fig. 2). Set parts aside. Fig. 2 Top Hinge • Move the hinge bracket to the other side of the bracket (See Fig. 5). Fig. 1 • Turn freezer door upside down...
Owner's Manual
Page 13
...NOTE: This is still attached. Fig. 7 Cover (on left side to uncover screw holes (See Fig. 7). • Set freezer door and top hinge parts to the opposite side of refrigerator housing (See Fig. 13). 13 Reversing and Reinstalling Refrigerator Door • Using a 1/4 inch socket wrench, loosen and remove ...hinge. (See Fig. 12). NOTE: At this point, the door will be loose, lift up door slightly and remove it (See Fig. 9). Set parts aside. Remove the washer underneath the hinge and set aside (Fig. 8). Fig. 6 REFRIGERATOR INSTALLATION • Loosen and remove the two bolts and the ...
...NOTE: This is still attached. Fig. 7 Cover (on left side to uncover screw holes (See Fig. 7). • Set freezer door and top hinge parts to the opposite side of refrigerator housing (See Fig. 13). 13 Reversing and Reinstalling Refrigerator Door • Using a 1/4 inch socket wrench, loosen and remove ...hinge. (See Fig. 12). NOTE: At this point, the door will be loose, lift up door slightly and remove it (See Fig. 9). Set parts aside. Remove the washer underneath the hinge and set aside (Fig. 8). Fig. 6 REFRIGERATOR INSTALLATION • Loosen and remove the two bolts and the ...
Owner's Manual
Page 14
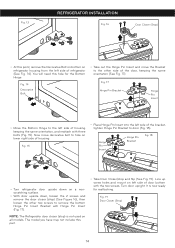
...; With door upside down, loosen the 2 screws and remove the door closer (stop and flip (See Fig. 19). Turn door upright. You will need this part. • Take Door Closer/stop ) (See Figure 16), then loosen the other side of housing keeping the same orientation, and reattach with three bolts (Fig...
...; With door upside down, loosen the 2 screws and remove the door closer (stop and flip (See Fig. 19). Turn door upright. You will need this part. • Take Door Closer/stop ) (See Figure 16), then loosen the other side of housing keeping the same orientation, and reattach with three bolts (Fig...
Owner's Manual
Page 17
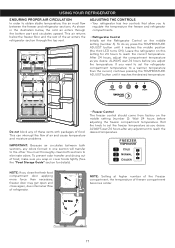
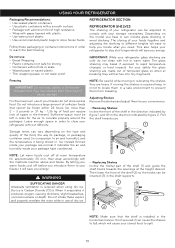
... temperature than necessary, freezer door may get open and close again, due internal air flow of the air enters the refrigerator section through the bottom part and circulates upward. As shown in one section will transfer to the other. Wait 24 hours before you wrap or cover foods tightly (See the...
... temperature than necessary, freezer door may get open and close again, due internal air flow of the air enters the refrigerator section through the bottom part and circulates upward. As shown in one section will transfer to the other. Wait 24 hours before you wrap or cover foods tightly (See the...
Owner's Manual
Page 18
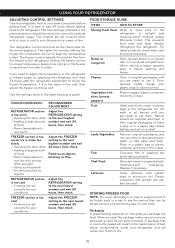
... or in the transmission of food • Room temperature is too cold • Controls not set on a shelf. Chef Fresh Store any dirty or discolored parts. The freezer control adjusts the cold air flow from the freezer to use it colder. If you are ready to the next highest number and...
... or in the transmission of food • Room temperature is too cold • Controls not set on a shelf. Chef Fresh Store any dirty or discolored parts. The freezer control adjusts the cold air flow from the freezer to use it colder. If you are ready to the next highest number and...
Owner's Manual
Page 19
... not introduce a large amount of the shelf in the direction indicated by figure 2. Do not use of dry ice. 2 • Replacing Shelves Incline the frontal part of tempered glass so when at breaking they may break if exposed to circulate properly around the packages. NOTE: Let warm foods cool off before...
... not introduce a large amount of the shelf in the direction indicated by figure 2. Do not use of dry ice. 2 • Replacing Shelves Incline the frontal part of tempered glass so when at breaking they may break if exposed to circulate properly around the packages. NOTE: Let warm foods cool off before...
Owner's Manual
Page 22
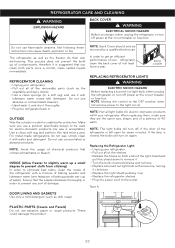
...potency of chemical products that contain phosphates or bleach. NOTE: The light bulbs will turn off power at the circuit breaker or fuse box. PLASTIC PARTS (Covers and Panels) Do not use flammable cleaners. For metal-made refrigerators, do their own de-freezing. NOTE: Avoid the usage of 40 ...the shield down to remove it. • Turn the bulb counterclockwise and remove. • Replace a burned out light bulb with a mixture of the removable parts (such as the vegetable and dairy doors). • Use a clean sponge (or a soft rag) and use it with detergent. NOTE: Moving the control...
...potency of chemical products that contain phosphates or bleach. NOTE: The light bulbs will turn off power at the circuit breaker or fuse box. PLASTIC PARTS (Covers and Panels) Do not use flammable cleaners. For metal-made refrigerators, do their own de-freezing. NOTE: Avoid the usage of 40 ...the shield down to remove it. • Turn the bulb counterclockwise and remove. • Replace a burned out light bulb with a mixture of the removable parts (such as the vegetable and dairy doors). • Use a clean sponge (or a soft rag) and use it with detergent. NOTE: Moving the control...
Owner's Manual
Page 23
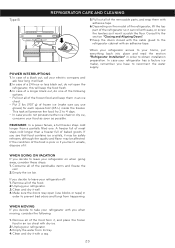
... freezer. If you feel it unsafe, dispose of it. If you decide to leave your refrigerator on the model of the refrigerator, lift the top part of the refrigerator so it can roll with ease, or screw the levelers so it won´t scratch the floor. POWER INTERRUPTIONS 1. In case of... : 1. WHEN GOING ON VACATION If you use blocks or tape) in order to take your food as soon as possible. Remove all of the removable parts, and wrap them in an ice chest. • Put 2 lbs (907 g) of frozen ice (make sure you decide to leave your electric company and ask...
... freezer. If you feel it unsafe, dispose of it. If you decide to leave your refrigerator on the model of the refrigerator, lift the top part of the refrigerator so it can roll with ease, or screw the levelers so it won´t scratch the floor. POWER INTERRUPTIONS 1. In case of... : 1. WHEN GOING ON VACATION If you use blocks or tape) in order to take your food as soon as possible. Remove all of the removable parts, and wrap them in an ice chest. • Put 2 lbs (907 g) of frozen ice (make sure you decide to leave your electric company and ask...

Owner's Manual
Page 24
... the size of the ejector mechanism or with the heater that nothing interferes with the sensor. WARNING PERSONAL INJURY HAZARD Avoid contact with any moving parts of the cubes will still be made between 100 and 130 cubes in a 24 hour period), depending on . NOTE: The ice maker can adjust its...
... the size of the ejector mechanism or with the heater that nothing interferes with the sensor. WARNING PERSONAL INJURY HAZARD Avoid contact with any moving parts of the cubes will still be made between 100 and 130 cubes in a 24 hour period), depending on . NOTE: The ice maker can adjust its...
Owner's Manual
Page 28
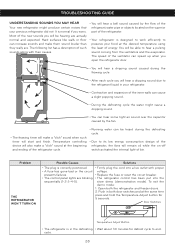
... button for defrost cycle to the refrigerant liquid in both the refrigerator and freezer doors. 2. the fans will remain of, while the on the superior part of the refrigerator. • Your refrigerator is normal if you will be able to its low energy consumption design of the new sounds you worry...
... button for defrost cycle to the refrigerant liquid in both the refrigerator and freezer doors. 2. the fans will remain of, while the on the superior part of the refrigerator. • Your refrigerator is normal if you will be able to its low energy consumption design of the new sounds you worry...


