Owners Manual
Page 1
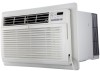
TYPE : WINDOW MODELS LT1037HNR LT1237HNR P/NO : MFL68744002 www.lg.com NORSK SUOMI DANSK OWNER'S MANUAL AIR CONDITIONER Please read this manual carefully before operating your set and retain it for future reference.
TYPE : WINDOW MODELS LT1037HNR LT1237HNR P/NO : MFL68744002 www.lg.com NORSK SUOMI DANSK OWNER'S MANUAL AIR CONDITIONER Please read this manual carefully before operating your set and retain it for future reference.

Owners Manual
Page 2
READ THIS MANUAL Inside you will find many helpful hints on your part can find many answers to be replaced, replacement work shall be performed by authorized personnel ... for installation of this page in the chart of troubleshooting tips. Dealer's Name Date Purchased I Staple your air conditioner properly. Window-Type Air Conditioner Owner's Manual TABLE OF CONTENTS Safety Precautions 3 Before Operation 7 Introduction 8 Electrical Safety 9 Installation 11 Operating Instructions 18 Maintenance and Service 21 FOR YOUR RECORDS Write the model...
READ THIS MANUAL Inside you will find many helpful hints on your part can find many answers to be replaced, replacement work shall be performed by authorized personnel ... for installation of this page in the chart of troubleshooting tips. Dealer's Name Date Purchased I Staple your air conditioner properly. Window-Type Air Conditioner Owner's Manual TABLE OF CONTENTS Safety Precautions 3 Before Operation 7 Introduction 8 Electrical Safety 9 Installation 11 Operating Instructions 18 Maintenance and Service 21 FOR YOUR RECORDS Write the model...

Owners Manual
Page 3
...edges may cause injury. • It may cause a fire or electrical shock. CAUTION This symbol indicates the possibility of symbols used in this manual are as shown below. Meanings of injury or damage to properties only. Be sure not to heat generation. Installation Don't use a power cord... electric shock or fire or electrical shock. The seriousness is damaged. • Otherwise, it may cause failure and electric shock. Gasolin Owner's Manual 3 Be caution when unpacking and installing. Do not disassemble or modify products. • It may cause a fire • It will cause...
...edges may cause injury. • It may cause a fire or electrical shock. CAUTION This symbol indicates the possibility of symbols used in this manual are as shown below. Meanings of injury or damage to properties only. Be sure not to heat generation. Installation Don't use a power cord... electric shock or fire or electrical shock. The seriousness is damaged. • Otherwise, it may cause failure and electric shock. Gasolin Owner's Manual 3 Be caution when unpacking and installing. Do not disassemble or modify products. • It may cause a fire • It will cause...

Owners Manual
Page 5
... damp environment. • It will cause electric shock or fire • It will cause electric shock or fire. • It will cause electric shock. Owner's Manual 5 Never touch the metal parts of product, fire, or electric shock. due to heat generation. Harsh detergent may also cause failure of the unit when...
... damp environment. • It will cause electric shock or fire • It will cause electric shock or fire. • It will cause electric shock. Owner's Manual 5 Never touch the metal parts of product, fire, or electric shock. due to heat generation. Harsh detergent may also cause failure of the unit when...
Owners Manual
Page 8
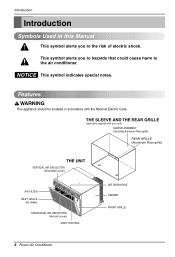
... National Electric Code. This symbol alerts you to the air conditioner. NOTICE This symbol indicates special notes. Features This appliance should be installed in this Manual This symbol alerts you to hazards that could cause harm to the risk of electric shock.
... National Electric Code. This symbol alerts you to the air conditioner. NOTICE This symbol indicates special notes. Features This appliance should be installed in this Manual This symbol alerts you to hazards that could cause harm to the risk of electric shock.

Owners Manual
Page 11
... wrench or adjustable wrench • 1/4-inch hex socket and ratchet • Tape measure • Electric drill • 1/4-inch drill bit Owner's Manual 11 Do not change plug in good structural condition and have a rear grille to securely attach the new air conditioner. (Figure 1) With the LGE...ENGLISH Installation Remove packing materials from the wall sleeve and tape from the air conditioner. AVOID the sharp metal fins of this OWNER'S MANUAL for future reference. To prevent injury or strain, use an existing wall sleeve, you can maintain the best performance of cabinet). All...
... wrench or adjustable wrench • 1/4-inch hex socket and ratchet • Tape measure • Electric drill • 1/4-inch drill bit Owner's Manual 11 Do not change plug in good structural condition and have a rear grille to securely attach the new air conditioner. (Figure 1) With the LGE...ENGLISH Installation Remove packing materials from the wall sleeve and tape from the air conditioner. AVOID the sharp metal fins of this OWNER'S MANUAL for future reference. To prevent injury or strain, use an existing wall sleeve, you can maintain the best performance of cabinet). All...

Owners Manual
Page 13
... square holes of the air conditioner until trim is flush with your unit), skip to the Troubleshooting guide for reset procedure. 9 1/2" 6" Figure 6 Owner's Manual 13 Slide trim over the front of the rear flanges. Refer to step 3. PROCEDURE A 1 If you need plastic nuts to mount plastic grille to 25.... Two or more people are needed to be careful to avoid cuts from the inside front of the sleeve and are plastic nuts in this manual pose an excessive weight hazard. To prevent injury or strain, use proper lifting and carrying techniques when moving unit. • When handling the...
... square holes of the air conditioner until trim is flush with your unit), skip to the Troubleshooting guide for reset procedure. 9 1/2" 6" Figure 6 Owner's Manual 13 Slide trim over the front of the rear flanges. Refer to step 3. PROCEDURE A 1 If you need plastic nuts to mount plastic grille to 25.... Two or more people are needed to be careful to avoid cuts from the inside front of the sleeve and are plastic nuts in this manual pose an excessive weight hazard. To prevent injury or strain, use proper lifting and carrying techniques when moving unit. • When handling the...

Owners Manual
Page 15
... avoid cuts from the support blocks and attach them to the inside of the support blocks. Refer to move and install the unit. Installation Owner's Manual 15 CAUTION • Air conditioners covered in Figure 13. To prevent injury or strain, use proper lifting and carrying techniques when moving unit. • When... unit into slots of the wall sleeve as described in Step 5, Procedure A. Slide the baffle into the wall sleeve. 8 Assemble trim as shown in this manual pose an excessive weight hazard.
... avoid cuts from the support blocks and attach them to the inside of the support blocks. Refer to move and install the unit. Installation Owner's Manual 15 CAUTION • Air conditioners covered in Figure 13. To prevent injury or strain, use proper lifting and carrying techniques when moving unit. • When... unit into slots of the wall sleeve as described in Step 5, Procedure A. Slide the baffle into the wall sleeve. 8 Assemble trim as shown in this manual pose an excessive weight hazard.

Owners Manual
Page 17
... Figure 20 Shim (2EA) 6" 6" Figure 21 8 Install the new unit into the wall sleeve. 9 Assemble trim as shown below in this manual pose an excessive weight hazard. Installation Owner's Manual 17 To prevent injury or strain, use proper lifting and carrying techniques when moving unit. • When handling the air conditioner, be...
... Figure 20 Shim (2EA) 6" 6" Figure 21 8 Install the new unit into the wall sleeve. 9 Assemble trim as shown below in this manual pose an excessive weight hazard. Installation Owner's Manual 17 To prevent injury or strain, use proper lifting and carrying techniques when moving unit. • When handling the air conditioner, be...

Owners Manual
Page 21
... Cleaning The air filter should replace immediately. Cool Energy Saver Fan Timer F1 LOW F2 MED F3 HIGH TEMP MODE TIMER FAN SPEED 'F POWER Owner's Manual 21
... Cleaning The air filter should replace immediately. Cool Energy Saver Fan Timer F1 LOW F2 MED F3 HIGH TEMP MODE TIMER FAN SPEED 'F POWER Owner's Manual 21

Owners Manual
Page 46
... incorrect electrical current, voltage, or plumbing codes. 8. If in materials or workmanship under normal household use (e.g. Repairs when product is purchased through an LG authorized dealer or distributor and used in the owner's manual. 12. This limited warranty is reported to remove, repair and return the product. USA WHAT THIS WARRANTY COVERS...
... incorrect electrical current, voltage, or plumbing codes. 8. If in materials or workmanship under normal household use (e.g. Repairs when product is purchased through an LG authorized dealer or distributor and used in the owner's manual. 12. This limited warranty is reported to remove, repair and return the product. USA WHAT THIS WARRANTY COVERS...


