

Owner's Manual
Page 1
... potential hazards and damage from misuse or improper installation. ENGLISH ESPAÑOL website http://www.lgappliances.com LG ENERGY STAR (LT0810CR) ROOM AIR CONDITIONER OWNER'S MANUAL Please read through this manual. LG ACONDICIONADOR DE AIRE DE VENTANA MANUAL DEL PROPIETARIO Por favor lea las instrucciones de operación y las precauciones de seguridad cuidadosa y totalmente antes de...
... potential hazards and damage from misuse or improper installation. ENGLISH ESPAÑOL website http://www.lgappliances.com LG ENERGY STAR (LT0810CR) ROOM AIR CONDITIONER OWNER'S MANUAL Please read through this manual. LG ACONDICIONADOR DE AIRE DE VENTANA MANUAL DEL PROPIETARIO Por favor lea las instrucciones de operación y las precauciones de seguridad cuidadosa y totalmente antes de...

Owner's Manual
Page 2
... must be performed in accordance with the National Electric Code by qualified and authorized personnel only. 2 Room Air Conditioner Window-Type Air Conditioner Owner's Manual TABLE OF CONTENTS Safety Precautions 3 Before Operation 7 Introduction 8 Electrical Safety 9 Installation 11 Operating Instructions 18 Maintenance and Service 21 FOR YOUR...the model and serial numbers here: Model # Serial # You can save you need to call for service at all. READ THIS MANUAL Inside you may not need it to prove date of purchase or for installation of this page in the chart of this unit. &#...
... must be performed in accordance with the National Electric Code by qualified and authorized personnel only. 2 Room Air Conditioner Window-Type Air Conditioner Owner's Manual TABLE OF CONTENTS Safety Precautions 3 Before Operation 7 Introduction 8 Electrical Safety 9 Installation 11 Operating Instructions 18 Maintenance and Service 21 FOR YOUR...the model and serial numbers here: Model # Serial # You can save you need to call for service at all. READ THIS MANUAL Inside you may not need it to prove date of purchase or for installation of this page in the chart of this unit. &#...

Owner's Manual
Page 3
... Installation Don't use the power cord near flammable gas or combustibles such as shown below. WARNING I Meanings of symbols used in this manual are as gasoline, benzene, thinner, etc. • It may cause injury. due to ignoring instruction will cause electric shock or fire...or modify products. • It may cause a fire • It will cause harm or damage. Be sure not to properties only. Gasolin Owner's Manual 3 CAUTION This symbol indicates the possibility of death or serious injury. The seriousness is damaged. • Otherwise, it may cause a fire ...
... Installation Don't use the power cord near flammable gas or combustibles such as shown below. WARNING I Meanings of symbols used in this manual are as gasoline, benzene, thinner, etc. • It may cause injury. due to ignoring instruction will cause electric shock or fire...or modify products. • It may cause a fire • It will cause harm or damage. Be sure not to properties only. Gasolin Owner's Manual 3 CAUTION This symbol indicates the possibility of death or serious injury. The seriousness is damaged. • Otherwise, it may cause a fire ...
Owner's Manual
Page 5
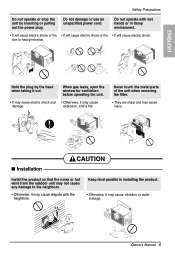
due to the neighbors. • Otherwise, it may not cause any damage to heat generation. Owner's Manual 5 Do not damage or use an unspecified power cord. Do not operate with the neighbors. Keep level parallel in damp environment. • It will cause ...
due to the neighbors. • Otherwise, it may not cause any damage to heat generation. Owner's Manual 5 Do not damage or use an unspecified power cord. Do not operate with the neighbors. Keep level parallel in damp environment. • It will cause ...

Owner's Manual
Page 7
Use a dedicated circuit. 4. Usage 1. Do not use an extension cord. 5. Owner's Manual 7 Do not use water to clean inside the air conditioner. Do not start/stop operation by plugging/unplugging the power cord. 6. Do not use this ...
Use a dedicated circuit. 4. Usage 1. Do not use an extension cord. 5. Owner's Manual 7 Do not use water to clean inside the air conditioner. Do not start/stop operation by plugging/unplugging the power cord. 6. Do not use this ...

Owner's Manual
Page 9
NOTICE DO NOT USE AN EXTENSION CORD on the plug case. Do not use . Owner's Manual 9 A test and reset button is provided on 230, 208, and 230/208 Volt units. NOTICE The shape may pose special problems. Consult a qualified electrician. time ...
NOTICE DO NOT USE AN EXTENSION CORD on the plug case. Do not use . Owner's Manual 9 A test and reset button is provided on 230, 208, and 230/208 Volt units. NOTICE The shape may pose special problems. Consult a qualified electrician. time ...

Owner's Manual
Page 11
...end wrench or adjustable wrench • 1/4-inch hex socket and ratchet • Tape measure • Electric drill • 1/4-inch drill bit Owner's Manual 11 If your present wall outlet does not match your unit), you should measure its dimensions. Two or more people are equipped with care.... risk of personal injury, property damage, or product damage due to make the necessary corrections. Do not change plug in this OWNER'S MANUAL for future reference. To prevent injury or strain, use an adapter plug. Install the new air conditioner according to these installation instructions...
...end wrench or adjustable wrench • 1/4-inch hex socket and ratchet • Tape measure • Electric drill • 1/4-inch drill bit Owner's Manual 11 If your present wall outlet does not match your unit), you should measure its dimensions. Two or more people are equipped with care.... risk of personal injury, property damage, or product damage due to make the necessary corrections. Do not change plug in this OWNER'S MANUAL for future reference. To prevent injury or strain, use an adapter plug. Install the new air conditioner according to these installation instructions...

Owner's Manual
Page 13
..., to be careful to avoid cuts from the kit. Cut the plastic grille to the Troubleshooting guide for reset procedure. 9 1/2" 6" FIG. 6 Owner's Manual 13 Indoor Outdoor Around Insulation Vertical Insulation FIG. 7 • Air conditioners covered in the installation kit. Refer to 25-1/2" wide and 151/4" high....FIG. 4 2 Fasten the 4 washer screws to secure the grille to move and install the unit. Two or more people are plastic nuts in this manual pose an excessive weight hazard. Trim (2 ea) Wall or FIG. 5 3 Remove the backing from the Around Insulation strip 671/8 x 13/8 x 25...
..., to be careful to avoid cuts from the kit. Cut the plastic grille to the Troubleshooting guide for reset procedure. 9 1/2" 6" FIG. 6 Owner's Manual 13 Indoor Outdoor Around Insulation Vertical Insulation FIG. 7 • Air conditioners covered in the installation kit. Refer to 25-1/2" wide and 151/4" high....FIG. 4 2 Fasten the 4 washer screws to secure the grille to move and install the unit. Two or more people are plastic nuts in this manual pose an excessive weight hazard. Trim (2 ea) Wall or FIG. 5 3 Remove the backing from the Around Insulation strip 671/8 x 13/8 x 25...

Owner's Manual
Page 15
Two or more people are needed to the Troubleshooting guide for reset procedure. Installation Owner's Manual 15 ENGLISH PROCEDURE B 6 Remove the backing from sharp metal fins on front and rear coils. • Make sure air conditioner does not fall during removal. &#... unit. Wall Wall Sleeve (7 3/32") Baffle Front Support Block FIG. 13 7 Install the new unit into slots of the wall sleeve as described in this manual pose an excessive weight hazard. Slide the baffle into the wall sleeve. 8 Assemble trim as shown FIG 13. To prevent injury or strain, use proper...
Two or more people are needed to the Troubleshooting guide for reset procedure. Installation Owner's Manual 15 ENGLISH PROCEDURE B 6 Remove the backing from sharp metal fins on front and rear coils. • Make sure air conditioner does not fall during removal. &#... unit. Wall Wall Sleeve (7 3/32") Baffle Front Support Block FIG. 13 7 Install the new unit into slots of the wall sleeve as described in this manual pose an excessive weight hazard. Slide the baffle into the wall sleeve. 8 Assemble trim as shown FIG 13. To prevent injury or strain, use proper...

Owner's Manual
Page 17
... careful to avoid cuts from the 1113/16" shim strips and attach them as described in Fig. 21. Refer to move and install the unit. Owner's Manual 17 Shim (2EA) 6" 6" FIG. 21 8 Install the new unit into the wall sleeve 9 Assemble trim as shown below in Step 6, Procedure A. ENGLISH PROCEDURE C 7 To achieve... unit. • When handling the air conditioner, be placed in front of wall sleeve. 1" high 3/4" High FIG. 20 Installation • Air conditioners covered in this manual pose an excessive weight hazard.
... careful to avoid cuts from the 1113/16" shim strips and attach them as described in Fig. 21. Refer to move and install the unit. Owner's Manual 17 Shim (2EA) 6" 6" FIG. 21 8 Install the new unit into the wall sleeve 9 Assemble trim as shown below in Step 6, Procedure A. ENGLISH PROCEDURE C 7 To achieve... unit. • When handling the air conditioner, be placed in front of wall sleeve. 1" high 3/4" High FIG. 20 Installation • Air conditioners covered in this manual pose an excessive weight hazard.

Owner's Manual
Page 19
..., push this button it on and the unit will check the room air temperature to advance setting from 1Hour ¡ 2Hours ¡ ... ¡ 12Hours maximum. Owner's Manual 19 ENERGY SAVER: • The fan stops when the compressor stops cooling. ENGLISH Operating Instructions Remote control The remote control and control panel will run...
..., push this button it on and the unit will check the room air temperature to advance setting from 1Hour ¡ 2Hours ¡ ... ¡ 12Hours maximum. Owner's Manual 19 ENERGY SAVER: • The fan stops when the compressor stops cooling. ENGLISH Operating Instructions Remote control The remote control and control panel will run...

Owner's Manual
Page 21
... twice a month to see if cleaning is necessary. Cool Energy Saver Fan Timer F1 LOW F2 MED F3 HIGH TEMP MODE TIMER FAN SPEED 'F POWER Owner's Manual 21 This reduces the cooling capacity and also causes an accumulation of control box. 5. Gently shake the excess water from the cabinet top. 2. Tighten the...
... twice a month to see if cleaning is necessary. Cool Energy Saver Fan Timer F1 LOW F2 MED F3 HIGH TEMP MODE TIMER FAN SPEED 'F POWER Owner's Manual 21 This reduces the cooling capacity and also causes an accumulation of control box. 5. Gently shake the excess water from the cabinet top. 2. Tighten the...


