
Owners Manual
Page 2
... INSTALLATION 11 Installation Overview 12 Unpacking the Refrigerator 12 Choosing the Proper Location 14 Removing/Assembling Handles 14 Removing/Assembling the Doors 17 Connecting the Water Line 20 Leveling and Door Alignment 21 Turning on the Power 22 OPERATION 22 Before Use 23 Control Panel 24 Airflow 25 Ice and Water Dispenser 26 Ice Compartment 27 Automatic Icemaker 28 Storing Food 30 Detaching/Assembling the Storage Bins 31 InstaView Function 31 Door-in-Door 32 Adjusting the Refrigerator Shelves 33 SMART FUNCTIONS 33 LG...
... INSTALLATION 11 Installation Overview 12 Unpacking the Refrigerator 12 Choosing the Proper Location 14 Removing/Assembling Handles 14 Removing/Assembling the Doors 17 Connecting the Water Line 20 Leveling and Door Alignment 21 Turning on the Power 22 OPERATION 22 Before Use 23 Control Panel 24 Airflow 25 Ice and Water Dispenser 26 Ice Compartment 27 Automatic Icemaker 28 Storing Food 30 Detaching/Assembling the Storage Bins 31 InstaView Function 31 Door-in-Door 32 Adjusting the Refrigerator Shelves 33 SMART FUNCTIONS 33 LG...
Owners Manual
Page 6
... is no longer needed, contact your model) to the desired position. • Unplug the power plug before cleaning or repairing the refrigerator. • The refrigerator and freezer compartment lights are sitting for their safety. Cleaning and user maintenance shall not be performed • Unplug the power plug immediately in the event of a blackout or thunderstorm. • Turn the power off the doors but leave the shelves in place...
... is no longer needed, contact your model) to the desired position. • Unplug the power plug before cleaning or repairing the refrigerator. • The refrigerator and freezer compartment lights are sitting for their safety. Cleaning and user maintenance shall not be performed • Unplug the power plug immediately in the event of a blackout or thunderstorm. • Turn the power off the doors but leave the shelves in place...
Owners Manual
Page 10
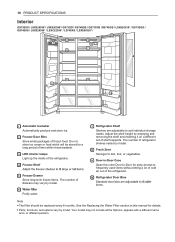
..., and options vary by model. 6 Purify water. 7 Refrigerator Shelf Shelves are adjustable to frequently used items without letting a lot of cold air out of shelf supports. Adjust the shelf height by model. 8 Fresh Zone Storage for deli, fruit, or vegetables. 9 Door-in-Door Case Open the outer Door-in this manual for a long period of time within these baskets. 3 LED interior lamps Light up the inside of the refrigerator. 4 Freezer Shelf 5 Freezer Drawer Store long-term frozen items...
..., and options vary by model. 6 Purify water. 7 Refrigerator Shelf Shelves are adjustable to frequently used items without letting a lot of cold air out of shelf supports. Adjust the shelf height by model. 8 Fresh Zone Storage for deli, fruit, or vegetables. 9 Door-in-Door Case Open the outer Door-in this manual for a long period of time within these baskets. 3 LED interior lamps Light up the inside of the refrigerator. 4 Freezer Shelf 5 Freezer Drawer Store long-term frozen items...
Owners Manual
Page 12
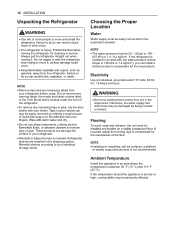
... water supply and drain hose may be easily connected for the automatic icemaker. WARNING • Don't use sharp instruments, rubbing alcohol, tape or glue. Reinstall shelves according to compensate for the low pressure. Flooring To avoid noise and vibration, the unit must be adversely affected. Always pull the refrigerator straight out when moving the refrigerator for cleaning or service. 12 INSTALLATION Unpacking the Refrigerator...
... water supply and drain hose may be easily connected for the automatic icemaker. WARNING • Don't use sharp instruments, rubbing alcohol, tape or glue. Reinstall shelves according to compensate for the low pressure. Flooring To avoid noise and vibration, the unit must be adversely affected. Always pull the refrigerator straight out when moving the refrigerator for cleaning or service. 12 INSTALLATION Unpacking the Refrigerator...
Owners Manual
Page 14
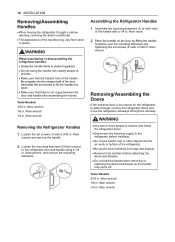
...; Use two or more people to remove and install the refrigerator doors. • Disconnect the electrical supply to pass through, remove the refrigerator doors and move the refrigerator sideways through a narrow opening, removing the doors is preferred. • The appearance of the handle . Tools Needed 3/32 in . Allen wrench 1/4 in . Allen wrench Removing the Refrigerator Handles 1 Loosen the set screws (2) with a 1/4 in . Allen wrench WARNING When assembling or disassembling the refrigerator handles: •...
...; Use two or more people to remove and install the refrigerator doors. • Disconnect the electrical supply to pass through, remove the refrigerator doors and move the refrigerator sideways through a narrow opening, removing the doors is preferred. • The appearance of the handle . Tools Needed 3/32 in . Allen wrench 1/4 in . Allen wrench Removing the Refrigerator Handles 1 Loosen the set screws (2) with a 1/4 in . Allen wrench WARNING When assembling or disassembling the refrigerator handles: •...
Owners Manual
Page 18
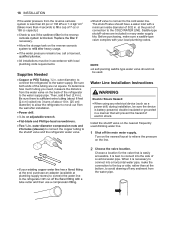
... . Water Line Installation Instructions WARNING Electric Shock Hazard: • When using any sediment from the water pipe. outer diameter, to connect the refrigerator to the cold water line. at plumbing supply stores) to connect the water line to the refrigerator OR cut square. Then, add 8 feet (2.4 m). [2.4 m] coiled into the side of electric shock. The shutoff valve should not be in a manner that is necessary to connect into a horizontal water pipe, make sure a saddle-type valve...
... . Water Line Installation Instructions WARNING Electric Shock Hazard: • When using any sediment from the water pipe. outer diameter, to connect the refrigerator to the cold water line. at plumbing supply stores) to connect the water line to the refrigerator OR cut square. Then, add 8 feet (2.4 m). [2.4 m] coiled into the side of electric shock. The shutoff valve should not be in a manner that is necessary to connect into a horizontal water pipe, make sure a saddle-type valve...
Owners Manual
Page 21
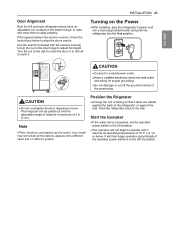
... power plug. CAUTION • Do not overtighten the door adjustment screw. Your model may not include all the Options, appears with the owner's manual) to turn the nut in the door hinge to the wall. It will not begin operation automatically if the icemaker power switch is uneven, follow the instructions below . Push the refrigerator back to adjust the height. Position the Rrigerator • Arrange the coil of tubing...
... power plug. CAUTION • Do not overtighten the door adjustment screw. Your model may not include all the Options, appears with the owner's manual) to turn the nut in the door hinge to the wall. It will not begin operation automatically if the icemaker power switch is uneven, follow the instructions below . Push the refrigerator back to adjust the height. Position the Rrigerator • Arrange the coil of tubing...
Owners Manual
Page 24
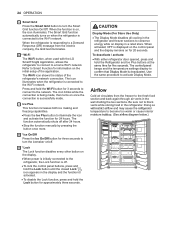
.... The function automatically shuts off after 24 hours. • Stop the function manually by pressing the button once more. 8 * Ice On/Off Press the Ice On/Off button for information on the initial setup of the refrigerator's network connection. CAUTION Display Mode (For Store Use Only) • The Display Mode disables all cooling in the refrigerator and freezer sections to conserve energy while on display in the display and the function...
.... The function automatically shuts off after 24 hours. • Stop the function manually by pressing the button once more. 8 * Ice On/Off Press the Ice On/Off button for information on the initial setup of the refrigerator's network connection. CAUTION Display Mode (For Store Use Only) • The Display Mode disables all cooling in the refrigerator and freezer sections to conserve energy while on display in the display and the function...

Owners Manual
Page 26
... a clean cloth. During use thin crystal glasses or containers to collect ice. 26 OPERATION Cleaning the Dispenser Drip Tray 1 Grip the drip tray with both hands to remove the ice bin to avoid dropping it. Keep the ice compartment door closed tightly, the cold air in the ice bin will damage the icemaker. • Never use , the ice may become blocked with a rubber spatula. To prevent ice cubes from melting and leaking from the icemaker tray area...
... a clean cloth. During use thin crystal glasses or containers to collect ice. 26 OPERATION Cleaning the Dispenser Drip Tray 1 Grip the drip tray with both hands to remove the ice bin to avoid dropping it. Keep the ice compartment door closed tightly, the cold air in the ice bin will damage the icemaker. • Never use , the ice may become blocked with a rubber spatula. To prevent ice cubes from melting and leaking from the icemaker tray area...
Owners Manual
Page 33
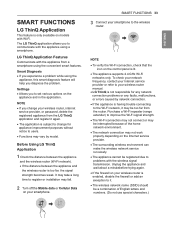
... the problem. Settings • Allows you to register or installation may fail. 2 Turn off the Mobile data or Cellular Data on your smartphone to problems with the appliance using the appliance, this smart diagnosis feature will help you experience a problem while using a smartphone. It may not work properly depending on the Internet service provider. • The surrounding wireless environment can make...
... the problem. Settings • Allows you to register or installation may fail. 2 Turn off the Mobile data or Cellular Data on your smartphone to problems with the appliance using the appliance, this smart diagnosis feature will help you experience a problem while using a smartphone. It may not work properly depending on the Internet service provider. • The surrounding wireless environment can make...
Owners Manual
Page 37
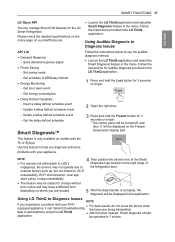
... may be displayed on the Freezer temperature display part. Use this feature to Diagnose Issues NOTE If you diagnose and solve problems with your Wi-Fi equipped appliance, it can manage Smart Grid features for 3 seconds or longer. • The control panel will be turned off, and then '3' will be operated in the menu. Using LG ThinQ to help you experience a problem with the...
... may be displayed on the Freezer temperature display part. Use this feature to Diagnose Issues NOTE If you diagnose and solve problems with your Wi-Fi equipped appliance, it can manage Smart Grid features for 3 seconds or longer. • The control panel will be turned off, and then '3' will be operated in the menu. Using LG ThinQ to help you experience a problem with the...
Owners Manual
Page 39
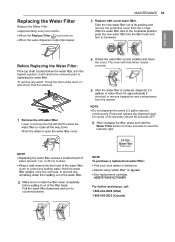
Pull the shelf out. 1 Lower or remove the top left shelf to clockwise. or 25 cc) to drain. • cover to To remove any leaking water. turn to allow the 4 the cover. The cover will need to be removed prior to collect any shelf : Tilt up the front of 30 seconds ON and 60 seconds OFF. 6 Water Filter button for three seconds to remove trapped air and contaminants from the o-rings...
Pull the shelf out. 1 Lower or remove the top left shelf to clockwise. or 25 cc) to drain. • cover to To remove any leaking water. turn to allow the 4 the cover. The cover will need to be removed prior to collect any shelf : Tilt up the front of 30 seconds ON and 60 seconds OFF. 6 Water Filter button for three seconds to remove trapped air and contaminants from the o-rings...

Owners Manual
Page 42
... essential that is open 24 hours a day/7 days a week. Systems cysts. Replacement Cartridge: ADQ74793501(LT1000P) NSF System Trade Name Code: MDJ64844601 lg.com website. USA: 1-800-243-0000 Canada: 1-888-542-2623 LG is a trademark of leaks. Contact a plumbing uncertain how to check your water pressure exceeds 80 psi, you are expected to small parts during the installation of age...
... essential that is open 24 hours a day/7 days a week. Systems cysts. Replacement Cartridge: ADQ74793501(LT1000P) NSF System Trade Name Code: MDJ64844601 lg.com website. USA: 1-800-243-0000 Canada: 1-888-542-2623 LG is a trademark of leaks. Contact a plumbing uncertain how to check your water pressure exceeds 80 psi, you are expected to small parts during the installation of age...
Owners Manual
Page 43
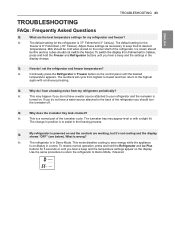
... assist in Demo Mode. The change . Adjust these settings as necessary to Demo Mode, if desired. Q: Why does the icemaker tray look crooked? What is a normal part of the refrigerator. A: The refrigerator is in the freezing process. To restore normal operation, press and hold the Freezer and Refrigerator buttons until the desired temperature appears. If you hear a beep and the settings in a store. Q: My refrigerator is powered on the control panel until you...
... assist in Demo Mode. The change . Adjust these settings as necessary to Demo Mode, if desired. Q: Why does the icemaker tray look crooked? What is a normal part of the refrigerator. A: The refrigerator is in the freezing process. To restore normal operation, press and hold the Freezer and Refrigerator buttons until the desired temperature appears. If you hear a beep and the settings in a store. Q: My refrigerator is powered on the control panel until you...
Owners Manual
Page 44
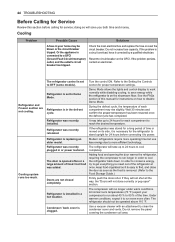
... desired temperature. Demo Mode allows the lights and control display to work normally while disabling cooling, to save you need out of food / hot food was stored for instructions on how to Demo Mode. During the defrost cycle, the temperature of this section before connecting it to run longer under warm conditions. Modern refrigerators require more often. Adding food and opening the door warms the refrigerator, requiring the compressor to power. Refrigerator is set to disable Demo Mode...
... desired temperature. Demo Mode allows the lights and control display to work normally while disabling cooling, to save you need out of food / hot food was stored for instructions on how to Demo Mode. During the defrost cycle, the temperature of this section before connecting it to run longer under warm conditions. Modern refrigerators require more often. Adding food and opening the door warms the refrigerator, requiring the compressor to power. Refrigerator is set to disable Demo Mode...

Owners Manual
Page 48
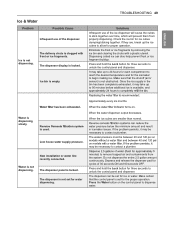
... be cleaned. In the control panel, select the modes for too long will not dispense if any of the refrigerator doors are not closed completely. 48 TROUBLESHOOTING Ice & Water Problem Icemaker is not making too much ice. Make sure that the bin is not turned on the ice-detecting sensor can interrupt ice production. The food has not been stored properly in icemaker issues. (Refer to a water supply or the supply shutoff valve is...
... be cleaned. In the control panel, select the modes for too long will not dispense if any of the refrigerator doors are not closed completely. 48 TROUBLESHOOTING Ice & Water Problem Icemaker is not making too much ice. Make sure that the bin is not turned on the ice-detecting sensor can interrupt ice production. The food has not been stored properly in icemaker issues. (Refer to a water supply or the supply shutoff valve is...
Owners Manual
Page 49
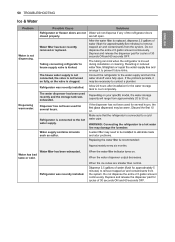
... to 90 minutes before additional ice is not set for ice cubes clumping/sticking together. Press the Water button on may be necessary to unlock the control panel and dispenser. Ice bin is locked. The dispenser panel is empty. Eliminate the frost or ice fragments by removing the ice bin and clearing the chute with frost or ice fragments. New installation or water line recently connected. The dispenser is available, and Approximately every...
... to 90 minutes before additional ice is not set for ice cubes clumping/sticking together. Press the Water button on may be necessary to unlock the control panel and dispenser. Ice bin is locked. The dispenser panel is empty. Eliminate the frost or ice fragments by removing the ice bin and clearing the chute with frost or ice fragments. New installation or water line recently connected. The dispenser is available, and Approximately every...
Owners Manual
Page 50
... Cause Refrigerator or freezer doors are smaller than normal. Dispenser has not been used for cycles of the refrigerator doors are left open . When the ice cubes are not closed properly. minutes) to remove trapped air and contaminants from approximately 20 to a cold water pipe. Make sure that the refrigerator is connected to contact a plumber. If the problem persists, it to a hot water line may be necessary to the hot water supply...
... Cause Refrigerator or freezer doors are smaller than normal. Dispenser has not been used for cycles of the refrigerator doors are left open . When the ice cubes are not closed properly. minutes) to remove trapped air and contaminants from approximately 20 to a cold water pipe. Make sure that the refrigerator is connected to contact a plumber. If the problem persists, it to a hot water line may be necessary to the hot water supply...
Owners Manual
Page 51
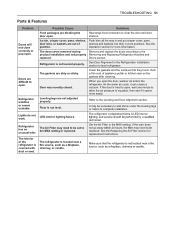
... put crisper cover, pans, door bins, or baskets are not adjusted properly. Clean the gaskets and the surfaces that they touch. Door was recently closed. As the warm air cools, it opens more information. If the door is located near a chimney, or candle. LED interior lighting failure. Set the Air Filter to the Leveling and Door Alignment section. Refrigerator wobbles or seems unstable Lights do not work. The gaskets are open. Refer to the MAX setting. It may need...
... put crisper cover, pans, door bins, or baskets are not adjusted properly. Clean the gaskets and the surfaces that they touch. Door was recently closed. As the warm air cools, it opens more information. If the door is located near a chimney, or candle. LED interior lighting failure. Set the Air Filter to the Leveling and Door Alignment section. Refrigerator wobbles or seems unstable Lights do not work. The gaskets are open. Refer to the MAX setting. It may need...
Owners Manual
Page 57
... Product to perform during power failures and interrupted or inadequate electrical service; • Damage or failure caused by leaky or broken water pipes, frozen water pipes, restricted drain lines, inadequate or interrupted water supply or inadequate supply of air; • Damage or failure resulting from operating the Product in a corrosive atmosphere or contrary to the instructions outlined in the Product's owner's manual; • God, or...
... Product to perform during power failures and interrupted or inadequate electrical service; • Damage or failure caused by leaky or broken water pipes, frozen water pipes, restricted drain lines, inadequate or interrupted water supply or inadequate supply of air; • Damage or failure resulting from operating the Product in a corrosive atmosphere or contrary to the instructions outlined in the Product's owner's manual; • God, or...


