Owners Manual
Page 2
... WARRANTY Power Failure 26 Ice and Water Dispenser 27 Storing Food 27 - Storing Frozen Food 30 Detaching and Assembling the Storage Bins 32 Door-In-Door 33 Adjusting the Refrigerator Shelves 34 MAINTENANCE 34 Cleaning 35 Replacing the Water Filter 39 SMART DIAGNOSISTM 39 Using Smart DiagnosisTM 40 TROUBLESHOOTING 40 Common Product Questions 41 Noises You Might Hear 42 Before Calling for Vacation 24 - Measuring the Clearances 12 Removing/Assembling the Refrigerator Door Handles...
... WARRANTY Power Failure 26 Ice and Water Dispenser 27 Storing Food 27 - Storing Frozen Food 30 Detaching and Assembling the Storage Bins 32 Door-In-Door 33 Adjusting the Refrigerator Shelves 34 MAINTENANCE 34 Cleaning 35 Replacing the Water Filter 39 SMART DIAGNOSISTM 39 Using Smart DiagnosisTM 40 TROUBLESHOOTING 40 Common Product Questions 41 Noises You Might Hear 42 Before Calling for Vacation 24 - Measuring the Clearances 12 Removing/Assembling the Refrigerator Door Handles...

Owners Manual
Page 5
... for use time delay fuses. Call a service agent. Do not disassemble or modify the refrigerator. Do not put glass containers, glass bottles or soda in . When dispensing ice from the appliance. Turn the power off with a switch. Do not place fingers or hands on ships, etc. Unplug the power plug before cleaning or repairing the refrigerator. When you replace the light bulb...
... for use time delay fuses. Call a service agent. Do not disassemble or modify the refrigerator. Do not put glass containers, glass bottles or soda in . When dispensing ice from the appliance. Turn the power off with a switch. Do not place fingers or hands on ships, etc. Unplug the power plug before cleaning or repairing the refrigerator. When you replace the light bulb...
Owners Manual
Page 10
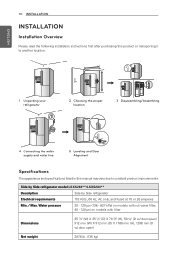
... Side refrigerator Electrical requirements 115 Volts, 60 Hz, AC only, and fused at 15 or 20 amperes Min. / Max. ENGLISH 10 INSTALLATION INSTALLATION Installation Overview Please read the following installation instructions first after purchasing this product or transporting it to another location. 1 Unpacking your refrigerator 2 Choosing the proper location 3 Disassembling/Assembling 4 Connecting the water supply and water line 5 Leveling and Door Alignment Specifications The appearance and specifications listed in this manual may...
... Side refrigerator Electrical requirements 115 Volts, 60 Hz, AC only, and fused at 15 or 20 amperes Min. / Max. ENGLISH 10 INSTALLATION INSTALLATION Installation Overview Please read the following installation instructions first after purchasing this product or transporting it to another location. 1 Unpacking your refrigerator 2 Choosing the proper location 3 Disassembling/Assembling 4 Connecting the water supply and water line 5 Leveling and Door Alignment Specifications The appearance and specifications listed in this manual may...

Owners Manual
Page 11
... refrigerator should be slightly higher than the rear to your fingers. To remove any temporary labels from overheated wires. If required, adjust the leveling legs to protect the floor. Wipe with your individual storage needs. Select a place where a water supply can be plugged into its own individual properly grounded electrical outlet rated for the automatic icemaker. Please reinstall shelves according to aid in door...
... refrigerator should be slightly higher than the rear to your fingers. To remove any temporary labels from overheated wires. If required, adjust the leveling legs to protect the floor. Wipe with your individual storage needs. Select a place where a water supply can be plugged into its own individual properly grounded electrical outlet rated for the automatic icemaker. Please reinstall shelves according to aid in door...
Owners Manual
Page 13
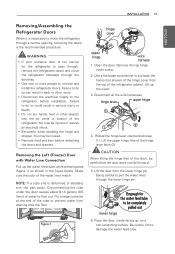
.... Open the door. Use a flat blade screwdriver to pry back the hooks (not shown) of the refrigerator cabinet. Lift the door from the top of the hinge cover from the lower hinge pin, being careful to pull the water lines through the lower hinge pin. You may be injured. Remove food and bins before installation. Make sure the color of the hinge lever latch (2). Disconnecting the tube under...
.... Open the door. Use a flat blade screwdriver to pry back the hooks (not shown) of the refrigerator cabinet. Lift the door from the top of the hinge cover from the lower hinge pin, being careful to pull the water lines through the lower hinge pin. You may be injured. Remove food and bins before installation. Make sure the color of the hinge lever latch (2). Disconnecting the tube under...
Owners Manual
Page 15
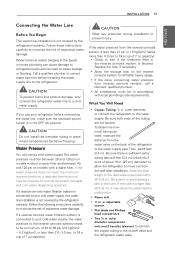
... Tubing, ¼ in . Call a qualified plumber to correct water hammer before connecting the water line, make sure the icemaker power switch is connected to your refrigerator before installing the water supply line to malfunction. Power drill. ½ in the reverse osmosis system is not covered by the refrigerator warranty. If you need a cold water supply. Water hammer (water banging in the pipes) in house plumbing can cause damage to refrigerator parts and can lead to avoid getting...
... Tubing, ¼ in . Call a qualified plumber to correct water hammer before connecting the water line, make sure the icemaker power switch is connected to your refrigerator before installing the water supply line to malfunction. Power drill. ½ in the reverse osmosis system is not covered by the refrigerator warranty. If you need a cold water supply. Water hammer (water banging in the pipes) in house plumbing can cause damage to refrigerator parts and can lead to avoid getting...
Owners Manual
Page 19
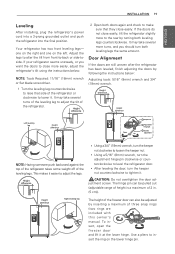
... counterclockwise to level the refrigerator door. After leveling the door, turn both leveling legs counterclockwise. Use a pliers to tighten it at the lower hinge. This makes it . It may take several more turns, and you want the doors to close more to -back or side-toside. Height difference Height difference Left leveling leg Height difference C CHANGE FILTER F C PRESS & HOLD F 1 keeper nut 2 Adjustment hinge pin 3 Tool for Down Up adjustment C CHANGE FILTER F C PRESS & HOLD...
... counterclockwise to level the refrigerator door. After leveling the door, turn both leveling legs counterclockwise. Use a pliers to tighten it at the lower hinge. This makes it . It may take several more turns, and you want the doors to close more to -back or side-toside. Height difference Height difference Left leveling leg Height difference C CHANGE FILTER F C PRESS & HOLD F 1 keeper nut 2 Adjustment hinge pin 3 Tool for Down Up adjustment C CHANGE FILTER F C PRESS & HOLD...
Owners Manual
Page 23
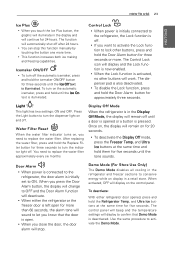
... refrigerator or the freezer door is illuminated. After replacing the water filter, press and hold until a door is pressed. Demo Mode (For Store Use Only) The Demo Mode disables all cooling in the refrigerator and freezer sections to lock other buttons will remain off . The control panel will beep and the temperature settings will display to turn the dispenser light on and off until the Ice On text is left open . When you close the door, the door alarm...
... refrigerator or the freezer door is illuminated. After replacing the water filter, press and hold until a door is pressed. Demo Mode (For Store Use Only) The Demo Mode disables all cooling in the refrigerator and freezer sections to lock other buttons will remain off . The control panel will beep and the temperature settings will display to turn the dispenser light on and off until the Ice On text is left open . When you close the door, the door alarm...

Owners Manual
Page 24
... freezer compartment temperature, room temperature, number of door openings and other operating conditions. It takes about 12 to 24 hours for use by ruptured water lines or connections. 24 HOW TO USE ENGLISH Automatic Icemaker Ice is made in the pipes as the icemaker refills. lcemaker * This button for a newly installed refrigerator to occur. Ice making ice. Dry the storage bin and reinstall it. Wait 72 hours for Vacation Set the icemaker...
... freezer compartment temperature, room temperature, number of door openings and other operating conditions. It takes about 12 to 24 hours for use by ruptured water lines or connections. 24 HOW TO USE ENGLISH Automatic Icemaker Ice is made in the pipes as the icemaker refills. lcemaker * This button for a newly installed refrigerator to occur. Ice making ice. Dry the storage bin and reinstall it. Wait 72 hours for Vacation Set the icemaker...

Owners Manual
Page 26
... a small opening, place it out. Water Dispenser structure Ice Water Switch Ice Switch Using the dispenser To dispense cold water, push on the water switch with a glass. To dispense ice, push on the model, some of ice (about 24 cubes). Hold your cup beneath the dispenser for a long time. Cleaning the dispenser stand The dispenser drip tray has no self-draining function. NOTE If discolored ice is also necessary if the refrigerator has not been used for...
... a small opening, place it out. Water Dispenser structure Ice Water Switch Ice Switch Using the dispenser To dispense cold water, push on the water switch with a glass. To dispense ice, push on the model, some of ice (about 24 cubes). Hold your cup beneath the dispenser for a long time. Cleaning the dispenser stand The dispenser drip tray has no self-draining function. NOTE If discolored ice is also necessary if the refrigerator has not been used for...
Owners Manual
Page 35
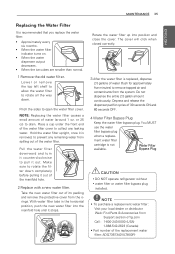
... water filter cover to remove trapped air and contaminants from the orings. ment water filter cartridge is recommended that you replace the water filter: • Approximately every six months. • When the water filter indicator turns on. • When the water dispenser output decreases. • When the ice cubes are smaller than normal. 1 Remove the old water filter. Lower or remove the top left shelf to allow the water filter...
... water filter cover to remove trapped air and contaminants from the orings. ment water filter cartridge is recommended that you replace the water filter: • Approximately every six months. • When the water filter indicator turns on. • When the water dispenser output decreases. • When the ice cubes are smaller than normal. 1 Remove the old water filter. Lower or remove the top left shelf to allow the water filter...

Owners Manual
Page 37
...; The disposable filter cartridge MUST be used on hot water supply lines. Contact a plumbing professional if you are uncertain how to water leakage: Read and follow Use Instructions before or after the system. Manufactured for this filter system is essential that is a trademark of this product. The maximum operating water temperature of unknown quality without adequate disinfection before installation and use MUST comply with...
...; The disposable filter cartridge MUST be used on hot water supply lines. Contact a plumbing professional if you are uncertain how to water leakage: Read and follow Use Instructions before or after the system. Manufactured for this filter system is essential that is a trademark of this product. The maximum operating water temperature of unknown quality without adequate disinfection before installation and use MUST comply with...
Owners Manual
Page 42
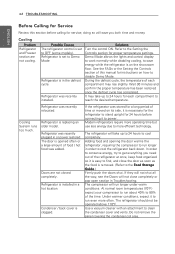
..., expect it to clean the condenser cover and vents. Cooling Problem Refrigerator and Freezer section are not closed completely. Refrigerator was recently relocated. Demo Mode allows the lights and control display to work normally while disabling cooling, to more operating time but use less energy due to save you need out of this section before connecting it to reach the desired temperature. Cooling System runs too much. Refrigerator was added. Refrigerator is clogged. Modern...
..., expect it to clean the condenser cover and vents. Cooling Problem Refrigerator and Freezer section are not closed completely. Refrigerator was recently relocated. Demo Mode allows the lights and control display to work normally while disabling cooling, to more operating time but use less energy due to save you need out of this section before connecting it to reach the desired temperature. Cooling System runs too much. Refrigerator was added. Refrigerator is clogged. Modern...

Owners Manual
Page 43
TROUBLESHOOTING 43 ENGLISH Cooling Problem Refrigerator or Freezer section is too cold, adjust the control Freezer section settings. Possible Causes Refrigerator was added to either the cooling system to the Airflow diagram in the Using Your Refrigerator section.) When the doors are opened often or for each completed. Locate air vents by using your hand to stabilize. Refrigerator or Incorrect temperature control If the temperature is too warm. and Condiment slightly warmer than the bins are blocked...
TROUBLESHOOTING 43 ENGLISH Cooling Problem Refrigerator or Freezer section is too cold, adjust the control Freezer section settings. Possible Causes Refrigerator was added to either the cooling system to the Airflow diagram in the Using Your Refrigerator section.) When the doors are opened often or for each completed. Locate air vents by using your hand to stabilize. Refrigerator or Incorrect temperature control If the temperature is too warm. and Condiment slightly warmer than the bins are blocked...
Owners Manual
Page 45
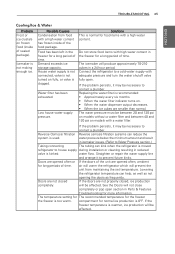
... in Parts & Features Troubleshooting for a long period of time. Solutions This is 0°F. Straighten or repair the water supply line and arrange it may be necessary to house supply during installation or cleaning resulting in icemaker issues. (Refer to Water Pressure section.) Tubing connecting The tubing can kink when the refrigerator is used. House water supply is not connected, valve is not turned on fully, or valve is not making enough ice. Lowering the refrigerator temperature...
... in Parts & Features Troubleshooting for a long period of time. Solutions This is 0°F. Straighten or repair the water supply line and arrange it may be necessary to house supply during installation or cleaning resulting in icemaker issues. (Refer to Water Pressure section.) Tubing connecting The tubing can kink when the refrigerator is used. House water supply is not connected, valve is not turned on fully, or valve is not making enough ice. Lowering the refrigerator temperature...
Owners Manual
Page 47
...) is recommended: • Approximately every six months. • When the water filter indicator turns on models with frost or ice fragments. Replacing the water filter is not obstructed. the ice bin and clearing the chute with a plastic utensil. Water filter has been exhausted. Low house water supply pressure. Ice bin is clogged Eliminate the frost or ice fragments by removing with a water filter. Refrigerator was recently installed. Possible Causes Solutions Doors are left open. to begin making ice.
...) is recommended: • Approximately every six months. • When the water filter indicator turns on models with frost or ice fragments. Replacing the water filter is not obstructed. the ice bin and clearing the chute with a plastic utensil. Water filter has been exhausted. Low house water supply pressure. Ice bin is clogged Eliminate the frost or ice fragments by removing with a water filter. Refrigerator was recently installed. Possible Causes Solutions Doors are left open. to begin making ice.

Owners Manual
Page 48
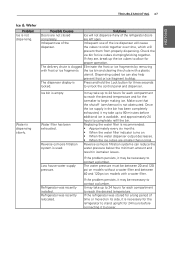
... turned on the control panel to unlock the control panel and dispenser. Water filter has been recently After the water filter is kinked. Refrigerator was water storage capacity will not dispense if any of water (flush for recently connected. approximately 20 to a cold water pipe. Allow 24 hours after installation for ice or water. several hours. Refrigerator or freezer doors are left open . The dispenser is not set for water The dispenser can kink when the refrigerator house supply valve is replaced, dispense removed or replaced...
... turned on the control panel to unlock the control panel and dispenser. Water filter has been recently After the water filter is kinked. Refrigerator was water storage capacity will not dispense if any of water (flush for recently connected. approximately 20 to a cold water pipe. Allow 24 hours after installation for ice or water. several hours. Refrigerator or freezer doors are left open . The dispenser is not set for water The dispenser can kink when the refrigerator house supply valve is replaced, dispense removed or replaced...
Owners Manual
Page 49
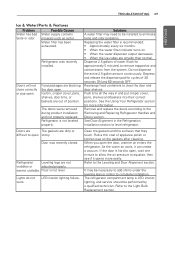
... doors were removed during product installation and not properly replaced. Ice bin, crisper cover, pans, shelves, door bins, or baskets are not wobbles or adjusted properly. When you open . Depress and release the dispenser pad for more easily. Doors will not close correctly or pop open . sticky. Lights do not work. See the Using Your Refrigerator section for cycles of position. TROUBLESHOOTING 49 ENGLISH Ice & Water/Parts & Features Problem Water has bad taste or odor. Possible Causes Water supply...
... doors were removed during product installation and not properly replaced. Ice bin, crisper cover, pans, shelves, door bins, or baskets are not wobbles or adjusted properly. When you open . Depress and release the dispenser pad for more easily. Doors will not close correctly or pop open . sticky. Lights do not work. See the Using Your Refrigerator section for cycles of position. TROUBLESHOOTING 49 ENGLISH Ice & Water/Parts & Features Problem Water has bad taste or odor. Possible Causes Water supply...

Owners Manual
Page 52
... properly installed. 8. Damage caused by leaky or broken water pipes, frozen water pipes, restricted drain lines, inadequate or interrupted water supply or inadequate supply of parts not approved or specified by LG. 7. Replacement of the product if it is used for other parts besidesÄthose that were originally included with original serial numbers that are required for repairs. 16. The removal and reinstallation of light bulbs, filters, or any display, open...
... properly installed. 8. Damage caused by leaky or broken water pipes, frozen water pipes, restricted drain lines, inadequate or interrupted water supply or inadequate supply of parts not approved or specified by LG. 7. Replacement of the product if it is used for other parts besidesÄthose that were originally included with original serial numbers that are required for repairs. 16. The removal and reinstallation of light bulbs, filters, or any display, open...

Owners Manual
Page 54
... owner's manual. 15. Shelves, door bins, drawers, handles, and accessories to improper installation. 8. All costs associated with original serial numbers that have been removed, altered, or cannot be borne by unauthorized modification or alteration, or use of light bulbs, filters, or any water leakage due to the Product. Damage to the instructions outlined in utility costs and additional utility expenses. 13. repair or replacement of fuses or correction of wiring...
... owner's manual. 15. Shelves, door bins, drawers, handles, and accessories to improper installation. 8. All costs associated with original serial numbers that have been removed, altered, or cannot be borne by unauthorized modification or alteration, or use of light bulbs, filters, or any water leakage due to the Product. Damage to the instructions outlined in utility costs and additional utility expenses. 13. repair or replacement of fuses or correction of wiring...


