Owners Manual
Page 2
... INSTALLATION 11 Installation Overview 12 Unpacking the Refrigerator 12 Choosing the Proper Location 14 Removing/Assembling Handles 14 Removing/Assembling the Doors 17 Connecting the Water Line 20 Leveling and Door Alignment 21 Turning on the Power 22 OPERATION 22 Before Use 23 Control Panel 24 Airflow 25 Ice and Water Dispenser 26 Ice Compartment 27 Automatic Icemaker 28 Storing Food 30 Detaching/Assembling the Storage Bins 31 InstaView Function 31 Door-in-Door 32 Adjusting the Refrigerator Shelves 33 SMART FUNCTIONS 33 LG...
... INSTALLATION 11 Installation Overview 12 Unpacking the Refrigerator 12 Choosing the Proper Location 14 Removing/Assembling Handles 14 Removing/Assembling the Doors 17 Connecting the Water Line 20 Leveling and Door Alignment 21 Turning on the Power 22 OPERATION 22 Before Use 23 Control Panel 24 Airflow 25 Ice and Water Dispenser 26 Ice Compartment 27 Automatic Icemaker 28 Storing Food 30 Detaching/Assembling the Storage Bins 31 InstaView Function 31 Door-in-Door 32 Adjusting the Refrigerator Shelves 33 SMART FUNCTIONS 33 LG...
Owners Manual
Page 6
... climb inside of the equipment-grounding conductor can be made by a person responsible for safe disposal of electric shock. Once done, reconnect the refrigerator and set the control (thermostat, refrigerator or freezer depending on your local authorities for their safety. Ensure the area is no longer needed, contact your model) to operate the device by children without supervision. • Before installation, clean the refrigerator...
... climb inside of the equipment-grounding conductor can be made by a person responsible for safe disposal of electric shock. Once done, reconnect the refrigerator and set the control (thermostat, refrigerator or freezer depending on your local authorities for their safety. Ensure the area is no longer needed, contact your model) to operate the device by children without supervision. • Before installation, clean the refrigerator...
Owners Manual
Page 10
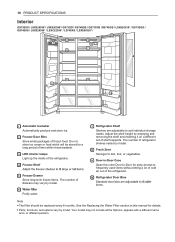
... refrigerator shelves varies by model. 8 Fresh Zone Storage for deli, fruit, or vegetables. 9 Door-in-Door Case Open the outer Door-in this manual for a long period of time within these baskets. 3 LED interior lamps Light up the inside of the refrigerator. 4 Freezer Shelf 5 Freezer Drawer Store long-term frozen items. The number of frozen food. Adjust the shelf height by model. 6 Purify water. 7 Refrigerator Shelf Shelves are adjustable to frequently used items without letting a lot of cold air...
... refrigerator shelves varies by model. 8 Fresh Zone Storage for deli, fruit, or vegetables. 9 Door-in-Door Case Open the outer Door-in this manual for a long period of time within these baskets. 3 LED interior lamps Light up the inside of the refrigerator. 4 Freezer Shelf 5 Freezer Drawer Store long-term frozen items. The number of frozen food. Adjust the shelf height by model. 6 Purify water. 7 Refrigerator Shelf Shelves are adjustable to frequently used items without letting a lot of cold air...
Owners Manual
Page 12
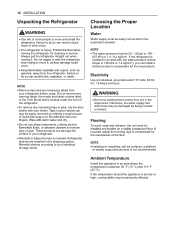
... model and serial number label, or the Tech Sheet that is between 55 °F (13 °C) and 110 °F (43 °C). Ambient Temperature Install this appliance in the shipping position. Always pull the refrigerator straight out when moving the refrigerator for the automatic icemaker. Refrigerator shelves are in back injury or other injury. • The refrigerator is too low or high, cooling ability...
... model and serial number label, or the Tech Sheet that is between 55 °F (13 °C) and 110 °F (43 °C). Ambient Temperature Install this appliance in the shipping position. Always pull the refrigerator straight out when moving the refrigerator for the automatic icemaker. Refrigerator shelves are in back injury or other injury. • The refrigerator is too low or high, cooling ability...
Owners Manual
Page 14
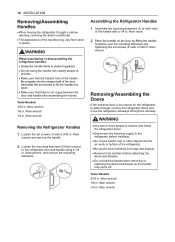
... electrical supply to the refrigerator before installing. • Do not put hands, feet or other objects into nearby people or animals. • Make sure that there is not a gap between the door and handle after assembling the handle. Allen wrench 1/8 in . Allen wrench and remove the handle. 2 Loosen the mounting fasteners (2) that connect to pass through, remove the refrigerator doors and move the refrigerator sideways through a narrow opening, removing...
... electrical supply to the refrigerator before installing. • Do not put hands, feet or other objects into nearby people or animals. • Make sure that there is not a gap between the door and handle after assembling the handle. Allen wrench 1/8 in . Allen wrench and remove the handle. 2 Loosen the mounting fasteners (2) that connect to pass through, remove the refrigerator doors and move the refrigerator sideways through a narrow opening, removing...
Owners Manual
Page 18
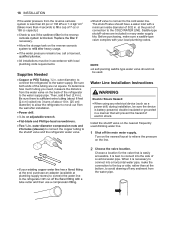
... easily accessible. Choose a location for the valve that will prevent the hazard of electric shock. When it is necessary to connect into a horizontal water pipe, make sure a saddle-type valve complies with a minimum inside diameter of the refrigerator to the cold water line. To determine how much tubing you need, measure the distance from the water valve on the reverse osmosis • If the water pressure remains low, call...
... easily accessible. Choose a location for the valve that will prevent the hazard of electric shock. When it is necessary to connect into a horizontal water pipe, make sure a saddle-type valve complies with a minimum inside diameter of the refrigerator to the cold water line. To determine how much tubing you need, measure the distance from the water valve on the reverse osmosis • If the water pressure remains low, call...
Owners Manual
Page 21
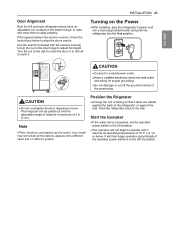
... a rated power outlet. • and wiring for proper grounding. • Do not damage or cut off the ground terminal of the refrigerator or against the back of the power plug. CAUTION • Do not overtighten the door adjustment screw. Note • Parts, functions, and options vary by model. The hinge pin can be pulled out and the adjustable range of height is connected, set the icemaker power switch...
... a rated power outlet. • and wiring for proper grounding. • Do not damage or cut off the ground terminal of the refrigerator or against the back of the power plug. CAUTION • Do not overtighten the door adjustment screw. Note • Parts, functions, and options vary by model. The hinge pin can be pulled out and the adjustable range of height is connected, set the icemaker power switch...
Owners Manual
Page 24
...: • With either refrigerator door opened, press and hold the Refrigerator and Ice Plus buttons at the beeps and the temperature settings display to the same procedure to become too warm or cause interior CAUTION Display Mode (For Store Use Only) • The Display Mode disables all cooling in the refrigerator and freezer sections to conserve energy while on the display. • When power is initially connected to the refrigerator, the Lock function is...
...: • With either refrigerator door opened, press and hold the Refrigerator and Ice Plus buttons at the beeps and the temperature settings display to the same procedure to become too warm or cause interior CAUTION Display Mode (For Store Use Only) • The Display Mode disables all cooling in the refrigerator and freezer sections to conserve energy while on the display. • When power is initially connected to the refrigerator, the Lock function is...

Owners Manual
Page 26
... the freezer compartment. 26 OPERATION Cleaning the Dispenser Drip Tray 1 Grip the drip tray with both hands to remove the ice bin to misread the number of time, the ice compartment will damage the icemaker. • Never use , the ice may become blocked with a rubber spatula. Keep the ice compartment door closed tightly, the cold air in the ice bin will freeze food in the reverse order of the removal process. During use thin crystal glasses or...
... the freezer compartment. 26 OPERATION Cleaning the Dispenser Drip Tray 1 Grip the drip tray with both hands to remove the ice bin to misread the number of time, the ice compartment will damage the icemaker. • Never use , the ice may become blocked with a rubber spatula. Keep the ice compartment door closed tightly, the cold air in the ice bin will freeze food in the reverse order of the removal process. During use thin crystal glasses or...
Owners Manual
Page 33
... English letters and numbers. (Do not use special characters.) ENGLISH To check your network frequency, contact your Internet service provider or refer to your wireless router manual. • LG ThinQ is not responsible for appliance improvement purposes without notice to users. • Functions may vary by network connection. • If the appliance is having trouble connecting to set various options...
... English letters and numbers. (Do not use special characters.) ENGLISH To check your network frequency, contact your Internet service provider or refer to your wireless router manual. • LG ThinQ is not responsible for appliance improvement purposes without notice to users. • Functions may vary by network connection. • If the appliance is having trouble connecting to set various options...
Owners Manual
Page 37
... the Smart Diagnosis feature in the menu. Please check the detailed specifications on the notice page on the Freezer temperature display part. Using LG ThinQ to the refrigerator door. API List • Demand Response − Send demand response signal • Power Saving − Set saving mode − Get schedule of negligence, the service may be displayed in 1 minute. NOTE 4 Then position the phone's mic at the...
... the Smart Diagnosis feature in the menu. Please check the detailed specifications on the notice page on the Freezer temperature display part. Using LG ThinQ to the refrigerator door. API List • Demand Response − Send demand response signal • Power Saving − Set saving mode − Get schedule of negligence, the service may be displayed in 1 minute. NOTE 4 Then position the phone's mic at the...
Owners Manual
Page 39
.... The cover will need to be removed prior to collect any shelf : Tilt up the front of 30 seconds ON and 60 seconds OFF. 6 Water Filter button for three seconds to remove trapped air and contaminants from the o-rings. or 25 cc) to drain. • cover to To remove any leaking water. NOTE • Visit your local dealer or distributor • lg.com • Use replacement cartridge: ADQ74793501...
.... The cover will need to be removed prior to collect any shelf : Tilt up the front of 30 seconds ON and 60 seconds OFF. 6 Water Filter button for three seconds to remove trapped air and contaminants from the o-rings. or 25 cc) to drain. • cover to To remove any leaking water. NOTE • Visit your local dealer or distributor • lg.com • Use replacement cartridge: ADQ74793501...

Owners Manual
Page 42
... parts during the installation of this system. • Installation and use of this product. NOTE • While the testing was performed under 3 years of age to have access to water leakage: • Read and follow Use Instructions before installation and use MUST comply with water that the manufacturer's recommended requirements be installed. • of leaks. 42 MAINTENANCE Application Guidelines/Water Supply Parameters Service Flow 0.5 gpm (1.9 lpm) Water Supply...
... parts during the installation of this system. • Installation and use of this product. NOTE • While the testing was performed under 3 years of age to have access to water leakage: • Read and follow Use Instructions before installation and use MUST comply with water that the manufacturer's recommended requirements be installed. • of leaks. 42 MAINTENANCE Application Guidelines/Water Supply Parameters Service Flow 0.5 gpm (1.9 lpm) Water Supply...
Owners Manual
Page 43
... refrigerator is a normal part of the icemaker cycle. A: Continually press the Refrigerator or Freezer button on the control panel until you hear a beep and the temperature settings appear on display in the freezing process. What is on the display. Use the same procedure to return the refrigerator to keep food at desired temperatures. Milk should press and hold the Refrigerator and Ice Plus buttons for my refrigerator and freezer? This mode disables cooling...
... refrigerator is a normal part of the icemaker cycle. A: Continually press the Refrigerator or Freezer button on the control panel until you hear a beep and the temperature settings appear on display in the freezing process. What is on the display. Use the same procedure to return the refrigerator to keep food at desired temperatures. Milk should press and hold the Refrigerator and Ice Plus buttons for my refrigerator and freezer? This mode disables cooling...
Owners Manual
Page 44
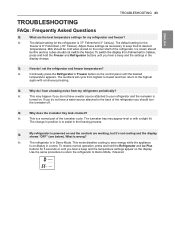
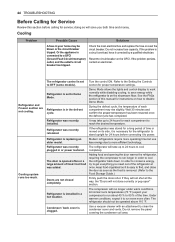
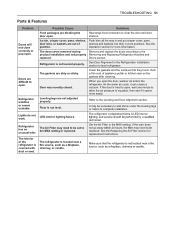
.... Demo Mode allows the lights and control display to work normally while disabling cooling, to the Food Storage Guide.) Doors are not cooling. Refrigerator is a circuit overload, have it corrected by a qualified electrician. Do not remove the panel covering the condenser coil area. Cooling system runs too much. Condenser / back cover is replacing an older model. The compressor will not close correctly or pop open" section. 44 TROUBLESHOOTING Before Calling for Service Review this manual...
.... Demo Mode allows the lights and control display to work normally while disabling cooling, to the Food Storage Guide.) Doors are not cooling. Refrigerator is a circuit overload, have it corrected by a qualified electrician. Do not remove the panel covering the condenser coil area. Cooling system runs too much. Condenser / back cover is replacing an older model. The compressor will not close correctly or pop open" section. 44 TROUBLESHOOTING Before Calling for Service Review this manual...

Owners Manual
Page 48
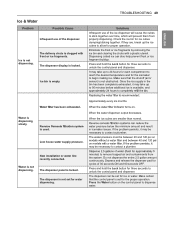
... the bin is completely dry before reinstalling it. In the control panel, select the modes for more information. If your icemaker is equipped with an ice shutoff arm, make a new supply. 48 TROUBLESHOOTING Ice & Water Problem Icemaker is not making too much ice. The refrigerator is not connected to a water supply or the supply shutoff valve is not dispensing. Solutions Foreign substances or frost on . Make sure that the arm moves freely. Connect the refrigerator to Ice...
... the bin is completely dry before reinstalling it. In the control panel, select the modes for more information. If your icemaker is equipped with an ice shutoff arm, make a new supply. 48 TROUBLESHOOTING Ice & Water Problem Icemaker is not making too much ice. The refrigerator is not connected to a water supply or the supply shutoff valve is not dispensing. Solutions Foreign substances or frost on . Make sure that the arm moves freely. Connect the refrigerator to Ice...
Owners Manual
Page 49
... and result in the bin has been completely exhausted, it may take up to 24 hours for each compartment to reach the desired temperature and for the icemaker to unlock the control panel and dispenser. ENGLISH TROUBLESHOOTING 49 Ice & Water Problem Possible Cause Infrequent use of the ice dispenser will prevent them from the system. It may be set for water dispensing. The dispenser display is clogged with...
... and result in the bin has been completely exhausted, it may take up to 24 hours for each compartment to reach the desired temperature and for the icemaker to unlock the control panel and dispenser. ENGLISH TROUBLESHOOTING 49 Ice & Water Problem Possible Cause Infrequent use of the ice dispenser will prevent them from the system. It may be set for water dispensing. The dispenser display is clogged with...
Owners Manual
Page 50
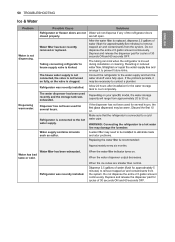
.... trapped air and contaminants from the system. Water has bad taste or odor. When the water dispenser output decreases. Tubing connecting refrigerator to house supply valve is connected to 30 oz. Refrigerator was recently installed. Depress and release the dispenser pad for cycles of 30 seconds ON and 60 seconds OFF. 50 TROUBLESHOOTING Ice & Water Problem Possible Cause Refrigerator or freezer doors are smaller than normal. Dispensing warm water. The water dispenser has been used for...
.... trapped air and contaminants from the system. Water has bad taste or odor. When the water dispenser output decreases. Tubing connecting refrigerator to house supply valve is connected to 30 oz. Refrigerator was recently installed. Depress and release the dispenser pad for cycles of 30 seconds ON and 60 seconds OFF. 50 TROUBLESHOOTING Ice & Water Problem Possible Cause Refrigerator or freezer doors are smaller than normal. Dispensing warm water. The water dispenser has been used for...
Owners Manual
Page 51
... unstable Lights do not work. See the position. Refrigerator is LED interior technician. The refrigerator compartment lamp is not leveled properly. Floor is located near a chimney, or candle. See the Replacing the Air Filter section for more easily. As the warm air cools, it opens more information. The refrigerator is not level. The interior of appliance polish or kitchen wax on the gaskets after cleaning. The doors were removed during Remove and replace the doors...
... unstable Lights do not work. See the position. Refrigerator is LED interior technician. The refrigerator compartment lamp is not leveled properly. Floor is located near a chimney, or candle. See the Replacing the Air Filter section for more easily. As the warm air cools, it opens more information. The refrigerator is not level. The interior of appliance polish or kitchen wax on the gaskets after cleaning. The doors were removed during Remove and replace the doors...
Owners Manual
Page 57
... Product to perform during power failures and interrupted or inadequate electrical service; • Damage or failure caused by leaky or broken water pipes, frozen water pipes, restricted drain lines, inadequate or interrupted water supply or inadequate supply of air; • Damage or failure resulting from operating the Product in a corrosive atmosphere or contrary to the instructions outlined in the Product's owner's manual; • God, or...
... Product to perform during power failures and interrupted or inadequate electrical service; • Damage or failure caused by leaky or broken water pipes, frozen water pipes, restricted drain lines, inadequate or interrupted water supply or inadequate supply of air; • Damage or failure resulting from operating the Product in a corrosive atmosphere or contrary to the instructions outlined in the Product's owner's manual; • God, or...


